
The LivePerson SDK provides brands with a secure way to foster connections with their customers and increase app engagement and retention.
Use this Quick Start guide to get you up and running with a project powered by LivePerson. When done, you'll be able to send messages between an Android device and Conversational Cloud.
Prerequisites
- Followed the Getting Started Guide to create a Conversational Cloud account, retrieve your domain, authorize API calls, and authenticate with Conversational Cloud.
- Latest version of Android Studio.
- Latest version of Gradle.
The Mobile SDK currently supports only Native Android (Java/Kotlin) implementations. If you use other core frameworks, languages, or development setups, please check with LivePerson Support (use the chat on this page, or message Support) for advice before attempting these steps.
Step 1: Install the Messaging SDK into your project
You can install the Mobile App Messaging SDK using a couple of different methods:
Option 1: Automatically add the SDK files using Gradle
You can use Gradle, an automation tool, to scale your projects effortlessly.
- Add
mavenCentral()to the project level gradle file:repositories { mavenCentral() } -
In your project, locate and double-click Gradle Scripts → build.gradle (Module: app).
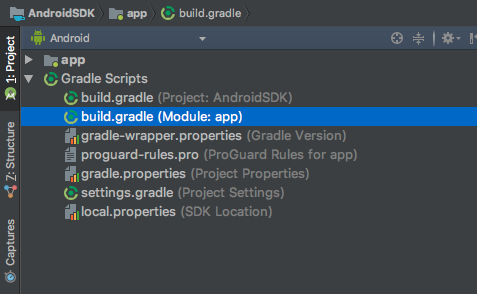
- In the dependencies section, add:
dependencies {
    implementation  "com.liveperson.android:lp_messaging_sdk:5.27.1"
}
Example: Build.gradle (Module: app) file
apply plugin: "com.android.application"

android {
    compileSdk 36
    defaultConfig {
        applicationId "com.mybrand.app"
        minSdkVersion 21
        targetSdkVersion 36
        versionCode 1
        versionName "1.0"
    }
    buildTypes {
        release {
            minifyEnabled false
            proguardFiles getDefaultProguardFile("proguard-android.txt"), "proguard-rules.pro"
        }
    }
}

dependencies {
    implementation fileTree(dir: "libs", include: ["*.jar"])
    ...
    ...
    ...
    // LivePerson SDK
    implementation  "com.liveperson.android:lp_messaging_sdk:5.27.1"
}
Option 2: Manually copying the SDK files to your project
- Download the latest SDK libraries here.
- You can get a sample app that demonstrates how to use the SDK here.
- In your Android Studio project, go to File->New->New Module->Import .JAR/>AAR Package and select .aars to add.
- Navigate to the folder where you extracted the SDK libraries, and add all libraries one by one.
- In the defaultConfig section, make sure the minSDKVersion is set 21:
defaultConfig { applicationId "com.mybrand.app" minSdkVersion 21 targetSdkVersion 36 versionCode 1 versionName "1.0" } - In the dependencies section, add:
 implementation project(path: ":lp_messaging_sdk")
 implementation project(path: ":messaging_ui")
 implementation project(path: ":infra")
 implementation project(path: ":messaging")
 implementation project(path: ":ui")
 implementation project(path: ":monitoring")
Build.gradle file example:
apply plugin: "com.android.application" android { compileSdk 36 defaultConfig { applicationId "com.mybrand.app" minSdkVersion 21 targetSdkVersion 36 versionCode 1 versionName "1.0" testInstrumentationRunner "android.support.test.runner.AndroidJUnitRunner" multiDexEnabled true } buildTypes { release { minifyEnabled false proguardFiles getDefaultProguardFile("proguard-android.txt"), "proguard-rules.pro" } } } dependencies { implementation fileTree(dir: "libs", include: ["*.jar"]) ... ... ... // LivePerson SDK implementation project(path: ":lp_messaging_sdk") implementation project(path: ":messaging_ui") implementation project(path: ":infra") implementation project(path: ":messaging") implementation project(path: ":ui") implementation project(path: ":monitoring") } apply plugin: "com.google.gms.google-services" - In your settings.gradle of your app, add:
include ":lp_messaging_sdk"
Step 2: Integrate code for basic deployment
-
Add permissions to your app’s AndroidManifest.xml file:
<uses-permission android:name="android.permission.INTERNET" /> <uses-permission android:name="android.permission.ACCESS_NETWORK_STATE" /> -
Add imports to your class imports section:
import com.liveperson.api.LivePersonCallback;
import com.liveperson.infra.InitLivePersonProperties;
import com.liveperson.infra.callbacks.InitLivePersonCallBack;
import com.liveperson.messaging.TaskType;
import com.liveperson.messaging.model.AgentData;
import com.liveperson.messaging.sdk.api.LivePerson;
Step 3: Initialize the Messaging SDK
Before you can show a conversation, you must initialize the Messaging SDK.
If you want to use the Monitoring API, you must initialize the Messaging SDK with Monitoring Params.
-
Set your app ID and view controller. Provide your
APP_IDas a string your application's class.private static final String APP_ID = "com.mybrand.app"; @Override protected void onCreate(Bundle savedInstanceState) { super.onCreate(savedInstanceState); setContentView(R.layout.activity_main); } -
Select your choice of authentication for initializing the SDK instance.
For more details on Code Flow and Implicit Flow for the Mobile SDK, see How It Works.
-
Code Flow (authenticated)
The LivePerson back-end verifies the authentication token sent by the SDK with your system servers. If the key cannot be verified on your company’s backend servers, this call fails.
LPAuthenticationParams().setAuthKey("yourAuthCode").Tip: Alternatively, when using this method, you can also set a special redirect URL when authenticating by calling:
lpAuthenticationParams.setHostAppRedirectUri("yourRedirectUrl") -
Implicit Flow (authenticated)
LPAuthenticationParams().setHostAppJWT("yourJwt")Once the Authentication key expires, you get notified with a callback / local intent
void onTokenExpired().To re-connect with a new Authentication key, use
LivePerson.reconnect() API)Errors while trying to connect uses callback:
void onError(TaskType type, String message); -
String brandID = "53949244"; String appInstallID = "46bcf782-feee-490d-861d-2b5feb4437c8";
-
-
Show the conversation view. If your system implementation involves an authentication step, you must call the
showConversationmethod provided by the LPMessagingSDK instance. It pushes a new navigation stack containing the conversation view.Choose an authentication method:
-
Activity mode - Implements the toolbar that displays the agent name to the consumer. The 'Is Typing' indicator displays when the agent is typing.
Start a new conversation activity to open the conversation window in a separate activity:
LivePerson.showConversation(getActivity(), LPAuthenticationParams lpAuthenticationParams, ConversationViewParams params);The SDK implements the controls on the action bar.
-
Fragment mode - Attaches the returned fragment to a container in your activity. The caller, placed inside a container, receives the conversation fragment from the SDK. Also, the caller is responsible for initializing the SDK and, if needed, implementing a toolbar or other indicators according to the provided SDK callbacks.
Make sure that the init process, from the
onInitSucceedcallback, finished successfully.Open conversation window in a fragment to return a conversation fragment and place it in a container in your activity:
LivePerson.getConversationFragment(LPAuthenticationParams lpAuthenticationParams, ConversationViewParams params);Tip. When using fragment mode, you could use the provided SDK callbacks in your app to implement functionalities such as menu items, action bar indications, agent name, and typing indicator.
-
Fragment mode — Handle CSAT (feedback) — Implements notifications of the CSAT screen state (visible/invisible). For example, you can show a different title on the toolbar or show a close CSAT button.
The container Activity (the activity that hosts the fragment) needs to implement ConversationFragmentCallbacks interface:
public interface ConversationFragmentCallbacks { void setFeedBackMode(boolean on, IFeedbackActions actions); // boolean on-Notify whether feedback (csat) screen is visible or dismisses. // IFeedbackActions actions - provides set of actions for the feedback screen. void onSurveySubmitted(IFeedbackActions actions); void setSecureFormMode(boolean on, String formTitle) {} } // IFeedbackActions actions-provides a set of actions for the feedback screen. public interface IFeedbackActions { void closeFeedBackScreen(); //close the screen, for example-after submitting the CSAT. When showing the "thank you" screen. void skipFeedBackScreen(); //skip and close the whole feedback process. }Once the CSAT screen is visible, setFeedBackMode will be called with true value, when the CSAT is not visible anymore (skip/submitted) - setFeedBackMode will be called with false value.
Example — how to use ConversationFragmentCallbacks (code from the container Activity)
class ContainerActivity extends FragmentActivity implements ConversationFragmentCallbacks { @Override public void setFeedBackMode(boolean on, final IFeedbackActions actions) { toolbar.setTitle("Csat mode: " + ( on ? "on!" : "off!" )); toolbar.setNavigationOnClickListener(new View.OnClickListener() { @Override public void onClick(View v) { if (actions != null){ actions.closeFeedBackScreen(); } } }); } @Override public void onSurveySubmitted(IFeedbackActions actions) { toolbar.setTitle("survey submitted"); } }
-
-
Initialize your application. We have provided examples to use to help you get started. The demo account has basic features available for demonstrating the Conversational Commerce experience in the Conversational Cloud console.
-
Code Flow
public void startCodeFlow(View v) { String brandID = "62219232"; final String authCode = "k16336"; LivePerson.initialize(this, new InitLivePersonProperties(brandID, APP_ID, new InitLivePersonCallBack() { @Override public void onInitSucceed() { LPAuthenticationParams lpAuthenticationParams = new LPAuthenticationParams(LPAuthenticationType.AUTH); lpAuthenticationParams.setAuthKey(authCode); LivePerson.showConversation(MainActivity.this, lpAuthenticationParams, new ConversationViewParams()); } @Override public void onInitFailed(Exception e) { } })); } -
Implicit Flow
public void startImplicitFlow(View v) { String brandID = "42391995"; final String jwt = "eyJhbGciOiJSUzI1NiJ9.eyAgInN1YiI6ICJoZWxsbyIsICAiaXNzIjogImh0dHBzOi8vTFAtQXV0aC5jb20iLCAgImV4cCI6MTU1Mzc5NDAyMSwgICJpYXQiOjE1NTM3OTM0MjF9.GP0iCe1k3aQbWHp-FYKhpfK-MZqktQ8pByTTF5lAHTelCyDAxhgHyMIq5J9mJnSoIdTlUbmscRHpy2MCop-AlYx5Sz66y1aX38AD8Rat1k_SnbPNbvbEysomb_SjxZ3uleN_OCzrSqGJrLXP6yIN2UiuuvKM62i-e-aQVIWzIXWMxjgmH9n_ZUOkgq_0jY3Me8r78dKsitc-jvzGzbasv81u40fR-7Y-ViOZliFOLjVBl2VWCbgcrGerLUyWVJQW69Hn3TlvvVpSVZk-IUU8hpYorcItIb-XNV2mOVkuZmzlGo7a1nIhJCCWzP5qaQvCCecSHTTHbcROwwE7dk6vKg"; LivePerson.initialize(this, new InitLivePersonProperties(brandID, APP_ID, new InitLivePersonCallBack() { @Override public void onInitSucceed() { LPAuthenticationParams lpAuthenticationParams = new LPAuthenticationParams(LPAuthenticationType.AUTH); lpAuthenticationParams.setHostAppJWT(jwt); LivePerson.showConversation(MainActivity.this, lpAuthenticationParams, new ConversationViewParams()); } @Override public void onInitFailed(Exception e) { } })); } -
Unauth Flow
public void startUnauthFlow(View v) { String brandID = "53949244"; String appInstallID = "46bcf782-feee-490d-861d-2b5feb4437c8"; final MonitoringInitParams monitoringInitParams = new MonitoringInitParams(appInstallID); LivePerson.initialize(this, new InitLivePersonProperties(brandID, APP_ID, monitoringInitParams, new InitLivePersonCallBack() { @Override public void onInitSucceed() { LPAuthenticationParams lpAuthenticationParams = new LPAuthenticationParams(LPAuthenticationType.UN_AUTH); LivePerson.showConversation(MainActivity.this, lpAuthenticationParams, new ConversationViewParams()); } @Override public void onInitFailed(Exception e) { } })); }
Element Description brandID Your LivePerson account ID. If you don’t have one, please contact your LivePerson representative (other contact options: chat with us on this page, or message Support). APP_ID Your application ID ( com.mybrand.app), which is used in the registerLPPusher method.onInitSuccess Callback that indicates the init process has finished successfully. onInitFailed Callback that indicates the init process has failed. Example implementation:
private static final String APP_ID = "com.mybrand.app"; @Override protected void onCreate(Bundle savedInstanceState) { super.onCreate(savedInstanceState); setContentView(R.layout.activity_main); } public void startCodeFlow(View v) { String brandID = "62219232"; final String authCode = "k16336"; LivePerson.initialize(this, new InitLivePersonProperties(brandID, APP_ID, new InitLivePersonCallBack() { @Override public void onInitSucceed() { LPAuthenticationParams lpAuthenticationParams = new LPAuthenticationParams(LPAuthenticationType.AUTH); lpAuthenticationParams.setAuthKey(authCode); LivePerson.showConversation(MainActivity.this, lpAuthenticationParams, new ConversationViewParams()); } @Override public void onInitFailed(Exception e) { } })); }Make sure that the init process, from the
onInitSucceedcallback, finished successfully. -
Code Flow
Step 4: Screen orientation
Activity mode
Override in your application's AndroidManifest.xml with the ConversationActivity definition:
<activity
  android:name="com.liveperson.infra.messaging_ui.ConversationActivity"
  android:screenOrientation="your screen orientation"/>
Fragment mode
Set the desired orientation in your container Activity definition in AndroidManifest.xml. For a list of Activity elements to add to your manifest, see android:screenOrientation.
Next Steps
Congratulations! You're all set.
You can now do any of the following:
-
Configure the SDK. You can register for LivePerson events related to the conversation, determine the layout of messaging with the app, or define the backup rules for auto backup and restore. You can also customize the look and feel of the conversation screen with your branding.xml file. Additionally, you can configure the style of the message EditText in your styles.xml file.
-
Configure the Proguard. Add required proguard rules to achieve a consistent working release build.
-
Enable features in your AndroidManifest.xml file. If you have vibrate on new message, photo sharing, or audio messaging enabled, you must add these features to your app's AndroidManifest.xml file.
-
Configure push notifications. Push and local notifications are a key factor that makes the experience better for consumers. They never have to stay in your app or keep the window open as they get a proactive notification as soon as a reply or notice is available.
-
Configure Photo sharing and File sharing. Agents within Conversational Cloud to share photos and files with consumers. Once sent, the consumer gets a notification only if push notifications are enabled. Otherwise, when the consumer returns to the conversation, the download icon appears in the unread message area of the conversation. The consumer can tap the thumbnail to view it or share it through the default app on the device.
-
Configure quick replies. When a consumer starts a new conversation, or a new customer visits the site, brands can send the first message with a list of quick replies of common intents.