
This article discusses a legacy approach for integrating with a KMS or CMS. There's a better, more powerful, and more flexible way: Use LivePerson's Integration Hub, which embeds Workato.
High-level workflow
-
(Optional) If you intend to use Natural Language Understanding to match consumer queries to articles via intents, then in Intent Manager, create the domain and the intents therein.
As an alternative to step 1, you can use KnowledgeAI™'s AI Search. It works very well out-of-the-box, with no setup required. Learn about search methods.
- In KnowledgeAI:
-
Add the external knowledge base.
During this step, you associate the domain that you created in step 1, if you chose to go the route of intent matching to retrieve articles.
- If applicable, in the external knowledge base that you added, associate each article with an intent in the domain.
- Train the articles to match consumer utterances.
-
- Expose the articles to agents by integrating KnowledgeAI into your Conversation Assist solution, or expose them to consumers by integrating KnowledgeAI into a LivePerson Conversation Builder bot.
After making any changes to the content in the CMS, sync with the CMS. This updates the knowledge base accordingly.
Choose an approach - one or two connectors
This type of knowledge base makes use of two connectors that you create when you add the knowledge base:
| Connector name | Required? | Purpose |
|---|---|---|
| Get Content Metadata | Yes | Retrieves article metadata from the CMS and stores it in KnowledgeAI in read-only form. If the Get Content connector doesn't exist, retrieves on demand the article's content from KnowledgeAI, not from the CMS. |
| Get Content | No | Retrieves on demand the article's content from the CMS. |
When should you add the Get Content connector? Add it if you always want to rely on and use the content in your CMS when serving answers at runtime.
If you don't add the Get Content connector:
- Make sure to map the
summaryand/ordetailfields when you add the Get Content Metadata connector. If you don't, searches of the knowledge base won't return any results. - Make sure to manually sync with CMS on a regular basis and after significant updates. This ensures the content stored in KnowledgeAI is up-to-date.
Can you add both connectors? Yes, you can. We recommend this, as it's a "best of both" approach.
There's one more important reason to map the summary and/or detail fields in the Get Content Metadata connector: It significantly enhances the performance of AI Search when retrieving article matches.
If you don't map one or both fields, and if the articles aren’t tied to intents, the only substantive data that we store within KnowledgeAI is the article’s title. This means that only the title can be used by AI Search to find relevant answers via a semantic search. By its nature, a semantic search attempts to understand the meaning behind the consumer’s query; it doesn’t just match keywords or phrases. Equipped with only the article’s title, the effectiveness of the semantic search is limited.
Add an external KB with LivePerson AI
- Click Add Knowledge Base in the upper-right corner.
- On the AI Enabled tab of the window that appears, select External Knowledge Base.
-
Specify the following:
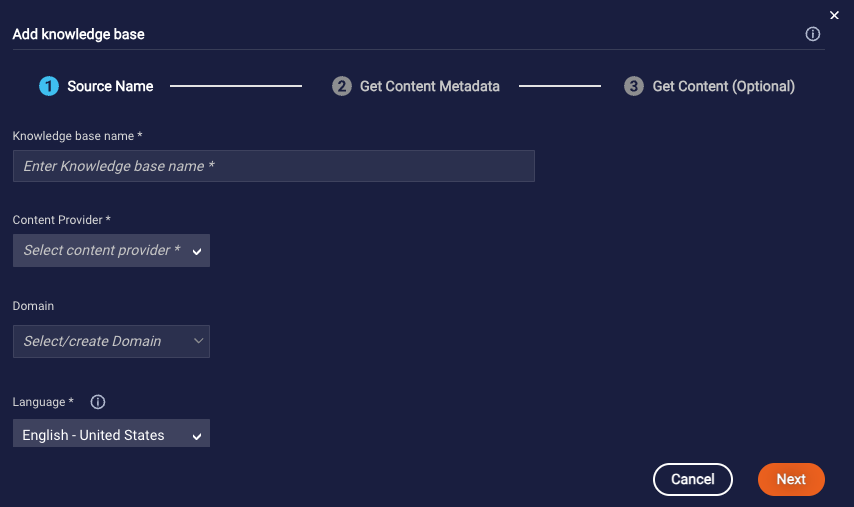
- Knowledge Base Name: Enter a descriptive name, e.g., “Technical Support FAQs.”
- Content Provider: Select the name of the content provider. If the provider isn't listed, select "Other," and enter the name.
- Domain: Optional. If you intend to associate intents with the articles, select the name of the domain that contains the intents.
- Language: Select the language of the content.
- Click Next.
-
Define the request to fetch your content's metadata.

The request should return a list of articles, and each article must contain a title and unique identifier. You can optionally retrieve the summary, detail, tags, and a category as well. An article can have multiple tags but exactly one category.
- Method: Select the type of HTTP request method.
- URL: Enter the request target, the URL.
- Credential: Select the credential to use for authorization if applicable.
- + Add Request Headers: Add any request headers to include in the request.
- + Add Request Parameters: Add any request parameters to pass in the URL’s query string.
- + Add Post Body: Enter the payload to send if applicable.
-
Transformation Spec: If you were able to select your Content Provider in Step 3 above, a default spec is provided here. You can use it if you haven't customized the CMS' data model. If you weren't able to select your content provider, a default spec isn't provided.
Here, provide a Jolt transformation spec that can be used to "transform" the response into the LivePerson KnowledgeAI article schema. In other words, given the request, map the returned articles' metadata data model (schema) to the LivePerson KnowledgeAI data model.
Configure the connector payload to target only the content that you want to use as a part of this knowledge base. If you add the knowledge base with clear domain scoping—limiting the content as needed—the knowledge base will perform better and be easier to tune.
-
Click Next.
In the next step, you can optionally add the Get Content connector. Unsure of whether you should? Review our discussion on choosing an approach - one or two connectors.
-
Optionally define the request for the on-demand retrieval of a single article.
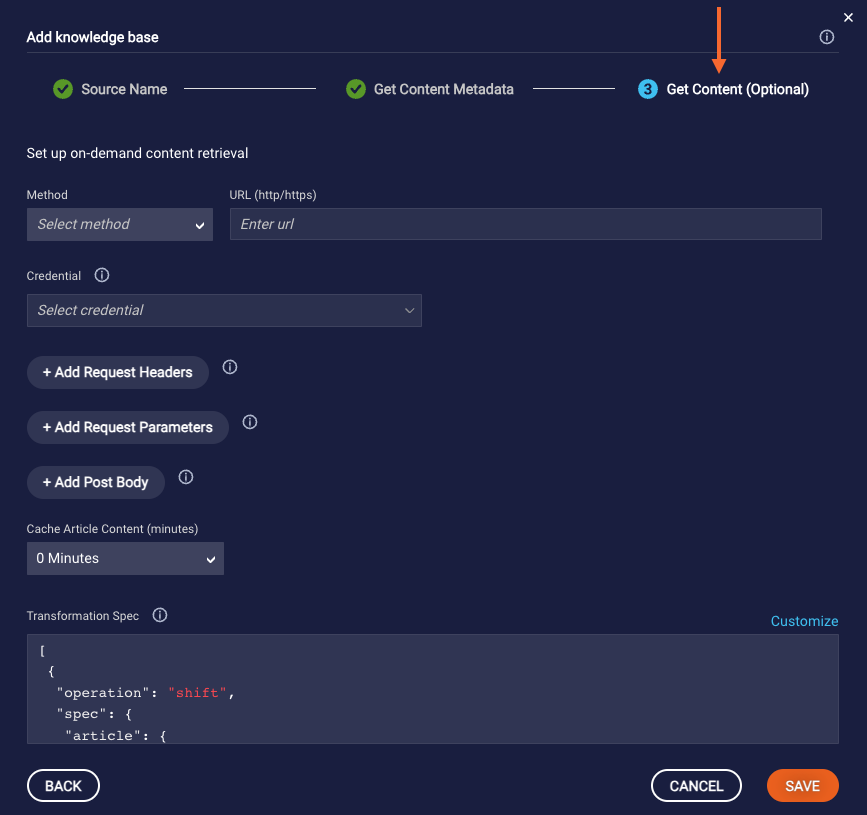
To pass the unique identifier of the article to retrieve, you must use the
{externalArticleId}placeholder that's provided as per your CMS' API contract: in the URL, in the request parameters, or in the post body.The request should return a single article that must contain a title, a unique identifier, and at least one of these content attributes: summary, detail, contentURL, imageURL, videoURL, or audioURL.
- Method: Select the type of HTTP request method.
- URL: Enter the request target, the URL.
- Credential: Select the credential to use for authorization if applicable.
- Add Request Headers: Add any request headers to include in the request.
- Add Request Parameters: Add any request parameters to pass in the URL’s query string.
- Add Post Body: Enter the payload to send if applicable.
- Cache Article Content: If you want to temporarily cache the article content that’s returned at run time for improved performance, select the duration in minutes.
-
Transformation Spec: Here again, if you were able to select your Content Provider in Step 3 above, a default spec is provided. You can use it if you haven't customized the CMS' data model. If you weren't able to select your content provider, a default spec isn't provided.
Here, provide a Jolt transformation spec that can be used to "transform" the response into the LivePerson KnowledgeAI article schema. In other words, given the request, map the single article’s content data model (schema) to the LivePerson KnowledgeAI data model.
- Click Save.
Map content metadata
When adding an external knowledge base with LivePerson AI, one step involves configuring the request to fetch the articles' metadata. This includes defining the transformation spec for the data that's returned. The following LivePerson attributes are supported:
| LivePerson Attribute | Description | Mandatory? |
|---|---|---|
| externalId | A String; a unique ID assigned to the article | yes |
| title | The article title. This should be a complete sentence or question that the user might ask. | yes |
| tags | A list of relevant keywords. These highlight the key noun(s) or word(s) in the training phrases. For example, for an article about health insurance, the tags should be "health", “insurance”, “benefits”. These should be words, not sentences. | no |
| category | Assigning a category lets you filter and find articles based on categories in the KnowledgeAI application. | no |
| summary | A short response or message to be sent to the user. You can include web links, although depending on the channel they might not display correctly. For SMS/Messaging, you might need to show the URL by itself, not wrapped in HTML, since the HTML will be sent as plain text over these channels. | no |
| detail | A longer message to the user. For messaging, it's recommended that you keep the responses as brief as possible. | no |
When adding an external knowledge base with LivePerson AI, a second but optional step involves configuring the request for the on-demand retrieval of a single article by its unique identifier. This includes defining the transformation spec for the data that's returned. The following LivePerson attributes are supported:
| LivePerson Attribute | Description | Mandatory? |
|---|---|---|
| externalId | A String; a unique ID assigned to the article | yes |
| title | The article title. This should be a complete sentence or question that the user might ask. | yes |
| tags | A list of relevant keywords. These highlight the key noun(s) or word(s) in the training phrases. For example, for an article about health insurance, the tags should be "health", “insurance”, “benefits”. These should be words, not sentences. | no |
| category | Assigning a category lets you filter and find articles based on categories in the KnowledgeAI application. | no |
| summary | A short response or message to be sent to the user. You can include web links, although depending on the channel they might not display correctly. For SMS/Messaging, you might need to show the URL by itself, not wrapped in HTML, since the HTML will be sent as plain text over these channels. | no, but see note below |
| detail | A longer message to the user. For messaging, it's recommended that you keep the responses as brief as possible. | no, but see note below |
| contentURL | The URL of a hyperlink. | no, but see note below |
| imageURL | The URL of an image. | no, but see note below |
| audioURL | The URL of an audio file. | no, but see note below |
| videoURL | The URL of a video file. | no, but see note below |
One of summary, detail, contentURL, imageURL, audioURL, or videoURL is mandatory.
For information on how to send article content to consumers, see this topic.
Learn more about how to map content metadata.
Write a transformation spec
Learn about writing a transformation spec. Examples are below.
Examples — Map articles' metadata
Example 1
Input JSON
{
    "results": [
        {
            "id": 360048529551,
            "url": "https://livepersonkb.zendesk.com/api/v2/help_center/en-us/articles/360048529551-Account-Information.json",
            "title": "Account Information",
            "label_names": [
                "Info",
                "Account Information",
                "Information"
            ],
            "body": "<p>For account information, go to Settings → Account → Basic Information.</p>"
        },
        {
            "id": 360048237271,
            "url": "https://livepersonkb.zendesk.com/api/v2/help_center/en-us/articles/360048237271-How-to-Reset-password.json",
            "title": "How to Reset password",
            "label_names": [
                "Account"
            ],
            "body": "<p>Go to login page, and click on \"forgot password\" button below password field, and follow the instructions to receive the password reset email. </p>"
        }
    ]
}
Transformation specification
[
  {
    "operation": "shift",
    "spec": {
      "results": {
        "*": {
          "id": "[&1].externalId",
          "title": "[&1].title",
          "body": "[&1].summary",
          "label_names": "[&1].tags"
        }
      }
    }
  }
]
Using the “&” wildcard: Use the wildcard “&” if you want to use the key on the LHS as a key on the RHS. This wildcard has a canonical syntax “&(n,m)” for complex mappings:
- The first parameter tells the level to go up on the LHS from current node.
- The second parameter tells which part of the key (applicable when using “ * ” on LHS object keys) to use on the RHS.
The syntaxes below are equal, i.e., parameters/brackets can be ignored for simple mappings:
& = &0 = &(0) = &(0,0)
&1 = &(1) = &(1,0)
    {
        "foo" : {
            "bar": {
                "baz":  // on RHS &0 = baz, &1 = bar, &2 = foo
            }
        }
     }
In the transformation spec farther above, we use the index of the "results" array (&1 = one level up from “title” means index of the "results" array) as the object's index on the RHS. “[ ]“ around “&1” is required as the output is an array.
On the LHS, the values “0” and “1” are resolved by “&1”, as we have two objects in the "results" array that are mapped to “[0]”, “[1]” on the RHS in the same order as the LHS.
Transformed output
[ {
  "externalId" : 360048529551,
  "title" : "Account Information",
  "tags" : [ "Info", "Account Information", "Information" ]
}, {
  "externalId" : 360048237271,
  "title" : "How to Reset password",
  "summary" : "<p>Go to login page, and click on \"forgot password\" button below password field, and follow the instructions to receive the password reset email. </p>",
  "tags" : [ "Account" ]
} ]
Example 2
Input JSON
{
  "results": [
    {
      "categoryGroups": [
        {
          "groupLabel": "All",
          "groupName": "All",
          "selectedCategories": [
            {
              "categoryLabel": "Account",
              "categoryName": "Account",
              "url": "/services/data/v42.0/support/dataCategoryGroups/All/dataCategories/Account?sObjectName=KnowledgeArticleVersion"
            }
          ]
        }
      ],
      "id": "kA0050000004F1HCAU",
      "summary": "Go to login page mentioned in the developer documentation, and enter your credentials.",
      "title": "How to Login",
      "url": "/services/data/v42.0/support/knowledgeArticles/kA0050000004F1HCAU"
    },
    {
      "categoryGroups": [
        {
          "groupLabel": "All",
          "groupName": "All",
          "selectedCategories": [
            {
              "categoryLabel": "Profile",
              "categoryName": "Profile",
              "url": "/services/data/v42.0/support/dataCategoryGroups/All/dataCategories/Account?sObjectName=KnowledgeArticleVersion"
            }
          ]
        }
      ],
      "id": "kA0050000004EA3CAM",
      "summary": "To reset password, click on the link provided below password field on the logon page.",
      "title": "How to reset password",
      "url": "/services/data/v42.0/support/knowledgeArticles/kA0050000004EA3CAM"
    }
  ]
}
Transformation specification
[
  {
    "operation": "shift",
    "spec": {
      "results": {
        "*": {
          "id": "[&1].externalId",
          "title": "[&1].title",
          "summary": "[&1].summary",
          "categoryGroups": {
            "*": {
              "selectedCategories": {
                "*": {
                  "categoryLabel": "[&5].tags[]"
                }
              }
            }
          }
        }
      }
    }
  }
]
[&5].tags[ ] is used on the RHS because the “results” array index is five levels up from categoryLabel, i.e., categoryLabel → selectedCategories index → selectedCategories key → categoryGroups index → categoryGroups key → results index.
Transformed output
[ {
  "externalId" : "kA0050000004F1HCAU",
  "title" : "How to Login",
  "summary": "Go to login page mentioned in the developer documentation, and enter your credentials.",
  "tags" : [ "Account" ]
}, {
  "externalId" : "kA0050000004EA3CAM",
  "title" : "How to reset password",
  "summary" : "To reset password, click on the link provided below password field on the login page.",
  "tags" : [ "Profile" ]
} ]
Examples — Map a single article's content
Example 1
Input JSON
{
   "result": {
       "id": 360048237271,
       "url": "https://livepersonkb.zendesk.com/api/v2/help_center/en-us/articles/360048237271-How-to-Reset-password.json",
       "title": "How to Reset password",
       "label_names": [
           "Account"
       ],
       "body": "<p>Go to login page, and click on \"forgot password\" button below password field, and follow the instructions to receive the password reset email. </p>"
   }
}
Transformation specification
[
  {
    "operation": "shift",
    "spec": {
      "result": {
        "id": "externalId",
        "title": "title",
        "body": "summary",
        "url": "contentURL",
        "label_names": "tags"
      }
    }
}]
Transformed output
{
  "externalId" : 360048237271,
  "title" : "How to Reset password",
  "summary" : "<p>Go to login page, and click on \"forgot password\" button below password field, and follow the instructions to receive the password reset email. </p>",
  "contentURL" : "https://livepersonkb.zendesk.com/api/v2/help_center/en-us/articles/360048237271-How-to-Reset-password.json",
  "tags" : [ "Account" ]
}
Example 2
Input JSON
{
  "articleNumber": "000001000",
  "categoryGroups": [
    {
      "groupLabel": "All",
      "groupName": "All",
      "selectedCategories": [
        {
          "categoryLabel": "Account",
          "categoryName": "Account",
          "url": "/services/data/v38.0/support/dataCategoryGroups/All/dataCategories/Account?sObjectName=KnowledgeArticleVersion"
        }
      ]
    },
    {
      "groupLabel": "User",
      "groupName": "User",
      "selectedCategories": [
        {
          "categoryLabel": "Profile",
          "categoryName": "Profile",
          "url": "/services/data/v38.0/support/dataCategoryGroups/All/dataCategories/Account?sObjectName=KnowledgeArticleVersion"
        }
      ]
    }
  ],
  "createdDate": "2020-08-12T21:20:31Z",
  "id": "kA0050000004EA3CAM",
  "summary": "To reset password, click on the link provided below password field on the logon page.",
  "title": "How to reset password",
  "url": "/services/data/v38.0/support/knowledgeArticles/kA0050000004EA3CAM"
}
Transformation specification
[
  {
    "operation": "shift",
    "spec": {
      "id": "externalId",
      "title": "title",
      "summary": "summary",
      "url": "contentURL",
      "categoryGroups": {
        "*": {
          "selectedCategories": {
            "*": {
              "categoryLabel": "tags[]"
            }
          }
        }
      }
    }
  }
]
In the above specification, in the output JSON’s tags attribute, “[ ]” is used to explicitly mention it as an array data type. If we don’t do this, if there is only one selected category, then "tags" is created as a string data type on the RHS due to categoryLabel being a string type. If the selected categories are more than one across all category groups, then mentioning "tags" as an array isn’t required, as the Shift transform automatically does the type casting to hold a list of strings.
Using the * wildcard: In the transform operation, " * " considers all fields/keys matching “ * ” pattern at the current level on the LHS.
In the example above, we use “ * “ to consider all objects under the “categoryGroups” array.
“ * “ can be used to match all fields/keys/indexes like in the example above. It can also be used to match part of the key on the LHS. For example, “ categor* ” could match keys like “categoryGroups”, “categories”.
Transformed output
{
  "externalId" : "kA0050000004EA3CAM",
  "title" : "How to reset password",
  "summary" : "To reset password, click on the link provided below password field on the logon page.",
  "contentURL" : "/services/data/v38.0/support/knowledgeArticles/kA0050000004EA3CAM",
  "tags" : [ "Account", "Profile" ]
Example 3
Input JSON
{
  "result": [
    {
      "id": 360048237271,
      "url": "https://livepersonkb.zendesk.com/api/v2/help_center/en-us/articles/360048237271-How-to-Reset-password.json",
      "title": "How to Reset password",
      "label_names": [
        "Account"
      ],
      "body": "<p>Go to login page, and click on \"forgot password\" button below password field, and follow the instructions to receive the password reset email. </p>"
    }
  ]
}
Transformation specification
[
  {
    "operation": "shift",
    "spec": {
      "result": {
        "0": {
          "id": "externalId",
          "title": "title",
          "body": "summary",
          "url": "contentURL",
          "label_names": "tags"
        }
      }
    }
}]
When fetching a single article, some CMS systems might return an array as per their contract. However, when mapping a single article’s content, the target schema should be an object. For this reason, in the example above, “0” index is used under the “result” array to consider only a single object on the RHS.
Transformed output
{
  "externalId" : 360048237271,
  "title" : "How to Reset password",
  "summary" : "<p>Go to login page, and click on \"forgot password\" button below password field, and follow the instructions to receive the password reset email. </p>",
  "contentURL" : "https://livepersonkb.zendesk.com/api/v2/help_center/en-us/articles/360048237271-How-to-Reset-password.json",
  "tags" : [ "Account" ]
}
Associate an article with an intent
If you associate articles with intents (this is optional), then during a knowledge base search at runtime, the knowledge base uses the NLU engine to evaluate the consumer's utterance against the articles' intents to determine if there's a match. The highest scoring articles that are found are retrieved from the CMS.
An intent can't be used more than once, i.e., in more than one article.
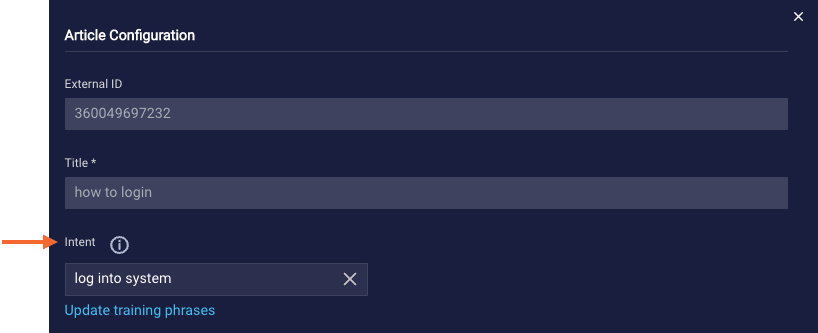
To associate an article with an intent
- Open the knowledge base.
- Use the Articles page to find the article, and select it.
-
Use the Intent dropdown to select the name of the intent to associate with the article. From this dropdown, you can also create the intent on-the-fly if needed.
Sync with the CMS
Manually syncing with the CMS does the following:
- Updates the existing articles
- Adds new articles if there are any
- Deletes all articles that aren't returned by the CMS but were stored during the previous sync
Sync with the CMS after making any changes to the content in the CMS so that the knowledge base is updated accordingly. This is particularly important after significant updates.
Once you sync, you can add or update the intents associated with articles as needed, if applicable.
Notes
- A sync operation times out in 20 seconds. This is an all-or-nothing scenario: If all of the content can't be synced within that time, the entire operation fails. No updates are made.
- For details on sync operations, check the knowledge base’s Change History page.
To sync with the CMS
- Open the knowledge base.
- Click Settings in the upper-left corner.
- Scroll down and expand More Options.
- Scroll down to Sync Articles, and click
 .
.
Restore an earlier version of an article
Best practices
- When you create the knowledge base, consider configuring it so that fetched content is cached at run time, for improved performance.
- Remember to manually sync with the CMS after you make changes in the CMS.
Learn more about best practices.
FAQs
Is AI Search available for this type of external knowledge bases?
Yes, it is.
Can I use intents with this type of external knowledge base?
Yes, you can.
How does the Intent Match search assign scores for this type of knowledge base?
When it's an external knowledge base that uses LivePerson AI, the scoring breakdown for the NLU engine used by the associated domain is used.