
Please see our Community Center for more updated information on our Salesforce integration and how to use it.
This integration will allow you to see and create your Salesforce Contact, Lead, Account and Opportunity record data right from within Conversational Cloud. It will also allow you to view your Conversational Cloud transcripts from within Salesforce. Brands that use Conversational Cloud for sales and support can offer a more personalized, informed experience with access to Salesforce by giving agents a full overview of the account, including previous or existing cases, opportunities and even potential leads.
Brands that use Conversational Cloud for sales and support can offer a more personalized, informed experience with access to Salesforce, by giving agents a full overview of the account, including previous or existing cases, opportunities and even potential leads. Through the Conversational Cloud Salesforce integration, agents can utilize the workspace to conduct all conversations with customers, and get instant access to pertinent information without having to open a separate browser window to manually check the Salesforce record. Agents can also search through records using the field from pre-chat surveys and/or through the widget.
Furthermore, agents have the ability to easily create records in Salesforce as part of the conversation (leads, opportunities, accounts, cases) and store the conversation transcript and additional info in the CRM after the engagement.
The Conversational Cloud Salesforce Widget will allow SFDC information to be viewed inside the platform, as well as enabling records to be created and chat/messaging transcripts to be attached to them. In addition, the app will include back-end setup that will allow the SFDC admin to customize the default settings for their organization. This guide sets out the steps to install, configure, and start working with the Conversational Cloud app for Salesforce.
Please note: The information in this guide refers to both chat and messaging, unless otherwise indicated.
Step #1: Installing the Conversational Cloud app for Salesforce
- Log into Salesforce.
- Go to the following URL: https://login.salesforce.com/packaging/installPackage.apexp?p0=04t1C000000lIZ4
- Select "Install for All Users,” click "Install." (When you complete the installation, make sure to limit the app and tabs only to the relevant authorized profiles, so the agents will not be able to modify the app configuration and setup (Admin, Management).
- “Approve Third-Party Access” - The App will ask you to install “Remote Site Settings”, mark the checkbox “Yes, grant access to these third-party web sites” and click continue, to allow communication to LivePerson Servers (this is mandatory for the app to work).
Step #2: Configuring the Conversational Cloud app in Salesforce
This step will guide you through the activation and configuration of the app in Salesforce.
Navigating to the Conversational Cloud application in Salesforce
- Now that you have installed the Conversational Cloud app in your Salesforce org, you will want to set it up.
- Login to Salesforce — click on the application menu in the top right of your screen.
- Make sure you have the Conversational Cloud application selected.
Verifying Clickjack setting is disabled for required Visualforce Pages
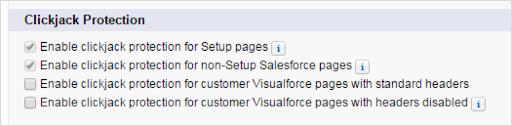
Our widget includes our own Clickjacking Protection feature, that makes sure that the Visualforce pages of our app can only be opened by websites hosted on official LivePerson domains and servers, so your information is always safe. You should therefore configure the following settings:
- Go to the Salesforce Setup Screen.
- Choose “Security Controls” on the right-side menu, and then “Session Settings.”
- Make sure the settings are as follows (this is also Salesforce default state).
The first three check-boxes can have any value (true/false), however, the 4th “Enable clickjack protection for customer Visualforce pages with headers disabled” has to be disabled.
Configure your account settings
- Click on the “Account Settings” tab.
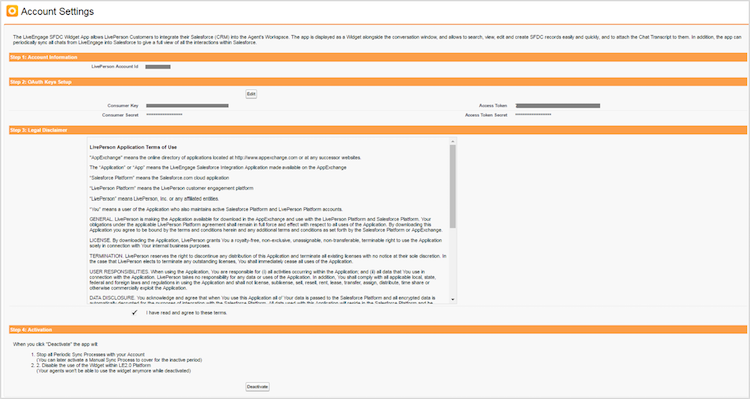
- “Step 1: Account Information” — Enter the relevant Account ID.
- “Step 2: OAuth Key Setup” — For this part you will need your App Keys from your LivePerson Conversational Cloud account.
- Go to the Campaign Builder and search for the link “Data Sources.”
- Go to “API” Tab and click “Manage” and then “New.”
- Fill in the App Name: “SFDC Integration,” Developer:“LivePerson” and then make sure to select the following APIs on the list: “Data” → “Engagement History” and “Administrations” → “Skills” and click “Save.”
- Back to Salesforce: Enter the 4 strings you got into the matching fields on our activation page: Consumer Key, Consumer Secret, Access Token, and Access Token Secret.
- “Step 3: Legal Disclaimer” — Read the terms of use and check the “I have read and agree to these terms.”
- “Step 4: Activation” — Click “Activate.”
Note: When you click on “Deactivate,” you will disable the use of the widget within the platform and stop all periodic sync processes with your account.
Configuring the app
Click on the “Customization Settings” tab.
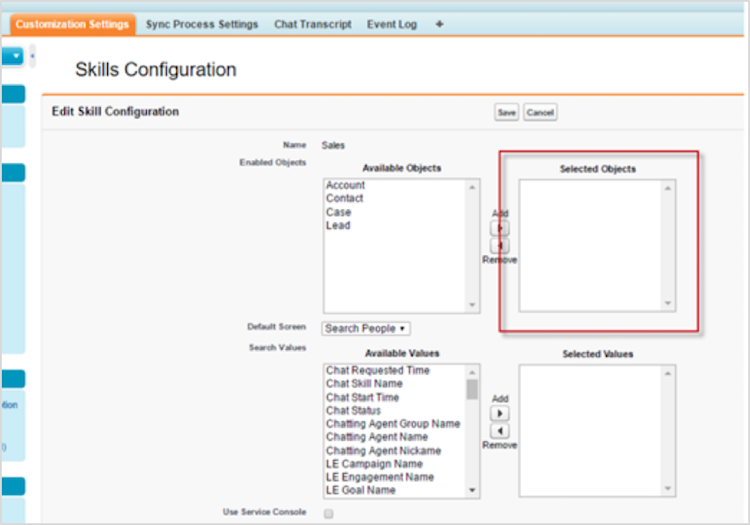
Object settings
This section sets out the Salesforce objects for which we would like the widget to search, according to data related to the visitor who initiated the chat/messaging conversation.
- From the list of available objects, select those you would like to see in the widget. Select the relevant “Available Objects” and click “Add” to move them to the “Selected Objects” side or “Remove” to remove them.
- To enable the automatic search as the widget loads, verify that “Disable On Load Auto Search” checkbox is unchecked.
- To pre-populate the search parameters, verify that “Disable Modify Onload Search Params” checkbox is unchecked.
Skills settings
- The Skills are used within the Salesforce Widget. In this section, you will define which Salesforce Objects will be available to each Skill in the Salesforce Widget.
Note: You must have skills in your LivePerson Conversational Cloud account for this package to work. If you don’t have any skills configured, please create a default one before continuing forward.
- From the “Customization Settings” tab, scroll down to the “Skills” section.
- Select from a list of Available Skills by selecting on relevant “Available Skills”, click the “Add” button to move to the “Selected Skills” side or “Remove” to remove them.
- In order to configure the skills further and define which objects each skill can view (along with other Skill-specific definitions), click on the “Configure Skills” link under “Advanced Settings.”
- The full list of the ‘Selected skills’ will be shown (The skills you selected from the previous screen).
- In order to customize the SFDC widget based on Skills, Click “Edit” next to one of the ‘selected skills’:
- Select which objects the relevant Skill can work with in the SFDC widget.
- Select the default widget screen: either a Search Type or New Record page. The default and recommended option is “People Search” — the “People Search” shows the agent all the Accounts, Contacts and Leads that answer the search criteria, structured in a convenient tree format.
- If you select a search option as the default page, you can select the relevant search values that should be retrieved. For example, if the default screen selected is “Search Contact” and the selected Search Value is “Pre-Chat Survey Visitor Email”, then once the widget is loading, it will search for any SFDC Contact record which holds an email address matching to the email address filled by the visitor as part of the pre-chat survey. The available values for search represent the list of available LivePerson SDK search values.
As a best practice, we recommend to use the search option, since that allows the agent to verify if the record he’s about to create already exists before creating it.
If you are using the Salesforce Service Console, select “Use Service Console." By selecting this, when you click on the “SF Full View” option within the widget, the Service Console will open with the record’s tab. Otherwise, the standard SF Classic view will open in a new browser tab for each record.
Chat transcript settings
The SFDC package supplied by LivePerson includes an object named “Chat Transcript”. This object purpose is to capture conversations of both types: chat or messaging.
- From the “Customization Settings” tab, scroll down to the Chat Transcript Settings section of your page
- Select from one of the following values in the “Chat Transcript Save Mode” picklist:
- Field – will insert the full transcript of the chat/messaging conversation into the ‘Transcript’ field on the chat transcript record.
- Attachment – will insert the full transcript of the chat/messaging conversation as a related File Attachment on the chat transcript record.
- Field and Attachment – this will save the transcript by both the above methods to the chat transcript record.
- Click on “Configure field mapping” under ‘Advanced Settings’ to determine the values saved into the chat transcript record. Note the following instructions:
- Custom fields need to be added to the Chat Transcript object for them to show up in this list. Please map only to those new custom fields you created, choosing any other previously existing field will not work and might cause errors in both the widget and sync process.
- Custom fields created on the Chat Transcript object for mapping purposes, have to be of type “Text” and with maximum length of 255. Other text-type fields (Long Text, Rich Text, etc) should work as well, however different field types might cause errors.
Enabled object settings
Enabling custom objects
In order to add a Custom Object to the list of “Available Objects,” you will first need to create a Lookup field for your Custom Object on the “Chat Transcript” object. Only once you create this Lookup field will your Custom Object appear under the “Available Objects” section of this page (The “Chat Transcript” object can be found under the Setup menu, “Create” → “Objects” among all custom objects in your Salesforce org).
- After you enabled a standard or custom object in the Customization Settings, the following should be defined (not all are mandatory, define according to your needs: Field Mapping, Related Lists, and Search Filters).
- Exposing the chat/messaging conversation transcript for an object in Salesforce — For each object you want to use, and choose to enable for the widget, if you would like to see the related Chat Transcript on that object’s records in Salesforce, you need to add the chat/messaging conversation transcript related list using Salesforce layout editor for all the Salesforce layouts you want to include it on.
- Each enabled object will have a link titled “Configure Field Mapping, Related Lists, and Search Filters” — clicking this link will direct you to a page where you can define these settings.
Field mapping
These settings allow you to choose which fields of each object will be available. These fields will be available to the agent whenever he views, create or edit records. You may also map Conversational Cloud values to those fields, so they can pre-populate when creating a new record in the widget.
- Click “Add Field Mapping” to get started.
- Fill out the following fields to complete your field mapping:
- Choose a SF Field Name
- Choose ‘Editability’ mode. Note: Editability mode may sometimes be enforced according to your SF settings and permissions.
- LivePerson Field Name — Choose a LP value only if you want this field to be prepopulated with one. Choose “Other" to manually configure a specific LP Value not included in the list (pre-chat survey, post-chat survey, extra SDEs, etc.) — See Appendix #1 for advanced instructions on how to set this.
- Include in Overview — within the Choose this is you want the field to appear in the bubble widget (The bubble appears when clicking ‘i’ next to the Account/Contact from the main Search screen of the widget). Note: Only the first 5 fields will be shown in the bubble.
- Required — Setting the field as mandatory when creating or editing the record.
- Default Value — Set up a fixed default text value for a field (will be editable by the agent).
- Click “Save.” Note: You can edit or delete any existing field mapping by clicking on the respective link next to each.
Related list config
- Select one of the values in the “Related List Object Name” picklist.
- Select from a list of fields you would like to include in your related list — do this by selecting any “Available Fields”, click the “Add” button so that they are moved to the “Selected Fields” side. Note: Only the first 4 fields will be shown on the related list.
- Select one of the values in the “Field to Sort” picklist
- Select one of the values in the “Number of Records” picklist.
- Select one of the values in the “Sort Direction” picklist.
- Click “Save.”
Search filters
In this section you can define the search filters for the Widget Search Screen. These filters will limit agents to see only records you want them to (this is only on top of existing restrictions on their profiles).
For example: you can use this to limit the Accounts your agents see to Account Type = “Customer” only.
- Click “Add Search Filter” to get started.
- Fill out the following fields to create your new search filter:
- “Field Name” — The field that you want to filter by (for example: Account Type, Case Origin, etc.)
- Operation — The operator you want to use for filtering (Make sure it fits the field type)
- “Value” — The values you want to use. Note: When filtering by a lookup field (or record type) — you need to put the SF ID of the relevant value. For example, for a record type “012000000000jdT.”
- Click “Save.”
Account settings
- Scroll down to the “Account Settings” section of your page.
- Click on the “Allow Account Creation” checkbox if you permit your Conversational Cloud users to create a new Account from the Conversational Cloud SFDC widget (this is only on top of existing restrictions on their profiles).
- Click on ‘Configure Field Mapping, Related Lists, and Search Filters’ to configure all of settings for the Account object (see the above “Enabled Object Settings” section for further explanation on this screen).
Contact settings
- Scroll down to the “Contact Settings” section of your page.
- Click on the “Allow Contact Creation” checkbox if you permit your Conversational Cloud users to create new Contacts from the Conversational Cloud SFDC widget.
- Click on ‘Configure Field Mapping, Related Lists, and Search Filters’ to configure all of settings for the Contact object (see the above “Enabled Object Settings” section for further explanation on this screen).
Lead settings
- Scroll down to the “Lead Settings” section of your page.
- Ensure that the “Use Lead Assignment Rules” checkbox is checked/unchecked according to your need. Note: If you have configured Lead assignment rules in your org, then checking this checkbox will uphold those rules when a Lead record is created from within the platform.
- Ensure that the “User Edit Use Lead Assignment Rules” checkbox is checked/unchecked according to your need. Note: Check this checkbox if you want to enable Lead Assignment Rules but want to give your Conversational Cloud users the ability to decide whether or not they should be upheld when creating a new record in the Conversational Cloud. This is on a case by case basis. Checking this checkbox will add a checkbox to the Conversational Cloud SFDC Widget interface, indicating whether or not they would like the new record to be assigned using existing sharing rules.
- Click on ‘Configure Field Mapping, Related Lists, and Search Filters’ to configure all of settings for the Lead object (see the above “Enabled Object Settings” section for further explanation on this screen).
Case settings
- Scroll down to the “Case Settings” section of your page.
- Ensure that the “Case Account is Mandatory” checkbox is checked/unchecked according to your need. Note: Checking this checkbox will require an Account name to be populated when creating a Case record from within the widget).
- Ensure that the “Case Contact is Mandatory” checkbox is checked/unchecked according to your need. Note: Checking this checkbox will require a Contact name to be populated when creating a Case record from within the widget)
- Ensure that the “Use Case Assignment Rules” checkbox is checked/unchecked according to your need. Note: If you have configured Case assignment rules in your org, then checking this checkbox will uphold those rules when a Case record is created from the widget)
- Ensure that the “User Edit Use Case Assignment Rules” checkbox is checked/unchecked according to your need. Note: Check this checkbox if you want to enable Case Assignment Rules but want to give your Conversational Cloud users the ability to decide whether or not they should be upheld when creating a new record in the platform. This is on a case by case basis. Checking this checkbox will add a checkbox to the Conversational Cloud SFDC Widget interface, indicating whether or not they would like the new record to be assigned using existing sharing rules).
-
Click on ‘Configure Field Mapping, Related Lists, and Search Filters’ to configure all of settings for the Case object
(see the above “Enabled Object Settings” section for further explanation on this screen). Note: The Account and Contact lookup fields have to be included in the Field Mapping list if you want the Cases you create using the widget to be attached to them.
Opportunity settings
- Scroll down to the “Opportunity Settings” section of your page.
- Ensure that the “Opportunity Account is Mandatory” checkbox is checked/unchecked according to your need. Note: Checking this checkbox will require an Account name to be populated when creating an Opportunity record from within the widget.
- Click on ‘Configure Field Mapping, Related Lists, and Search Filters’ to configure all of settings for the Opportunity object (see the above “Enabled Object Settings” section for further explanation on this screen). Note: The Account lookup field has to be included in the Field Mapping list if you want the Opportunity you create using the widget to be attached to it.
Custom object settings
- Scroll down to the “Custom Object” Settings section of your page.
- Ensure that the “Account is Mandatory” checkbox is checked/unchecked according to your need. Note: Checking this checkbox will require an Account name to be populated when creating a Custom Object record from within the widget.
- Ensure that the “Contact is Mandatory” checkbox is checked/unchecked according to your need. Note: Checking this checkbox will require a Contact name to be populated when creating a Custom Object record from within the widget.
- Select from one of the following values in the “Account Field” picklist:
- Account
- Any other existing Account Lookup Field(s)
- Select from one of the following values in the “Contact Field” picklist:
- Contact
- Any other existing Contact Lookup Field(s)
-
Click on ‘Configure Field Mapping, Related Lists, and Search Filters’ to configure all of settings for the Custom object (see the above “Enabled Object Settings” section for further explanation on this screen).
Note: The Account Field and Contact field lists will allow you to choose any of the Account or Contact Lookup fields on your custom object, in case there are any.
Step #3: Configuring the app’s sync process settings
Overview
In addition to the widget integration which creates chat transcript records when the chat/messaging conversation starts, an extra offline sync process was built into this package to sync between Salesforce and Conversational Cloud Servers.
This process is used to preserve data integrity and to make sure the chat/messaging conversation transcript information saved in Salesforce is full, accurate and up-to-date.
The sync process includes 4 sync options:
- Periodic sync: Captures and update information of the last 6 hours, every 3 hours (8 times a day in total).
- Daily sync: Captures information from the last 48 hours (In order to keep with LivePerson’s Data SLA of up to 24 hours for full data).
- Manual sync: Allows the admin to choose a past period of time to manually sync into Salesforce (Due to various reasons: server issues, agent wasn’t logged in, errors etc…).
-
“Sync Chat” button on the chat transcript record: allows on-demand sync with LivePerson servers for a specific chat transcript record.
Note: These sync processes are one sided, from the Conversational Cloud to Salesforce only, no information is transferred from Salesforce to the Conversational Cloud.
Schedule a periodic sync job
This will sync chat/messaging conversations in a batch every 3 hours.
- Scroll down to “Periodic Sync Job”.
- Click “Schedule Periodic Job” to activate.
Schedule a daily sync job
Daily Sync Jobs will sync any chat/messaging conversations that may have encountered errors during the time the periodic sync jobs ran. Daily Sync Jobs allow you to select the hour that your job will run
- Scroll down to “Daily Sync Job.”
- “Select Hour” that the job will run.
- Click “Schedule Daily Job” to activate.
Run a manual job
In case the periodic or daily sync did not capture a chat/messaging conversation for any reason (errors etc.), you can run a manual job.
- Scroll down to the “Manual Sync Job” section.
- Select “Start Time.”
- Select “End Time.”
- Click “Schedule Manual Job.”
Note: The limitation for the ‘Manual job’ is 30 Days.
“Sync Chat” button on chat transcript record
After the chat transcript record has been created in Salesforce, and only when the chat/messaging conversation already ended, you may update it by clicking on “Sync Chat” button at the top of the record page.
“Event Log” tab
The “Event Log” includes information about any sync errors that may have occurred. Click on the drop down list, select the “Callout Errors” list view and view any errors that occurred during the sync.
Step #4: Setting up the widget
Configuring the widget
Now that you’ve configured your app in Salesforce, it’s time to go back to the Conversational Cloud and configure the widget within the platform.
- Click on the 'Night Vision' icon at the top of the page.
- Click on 'Agent Workspace Configuration'.
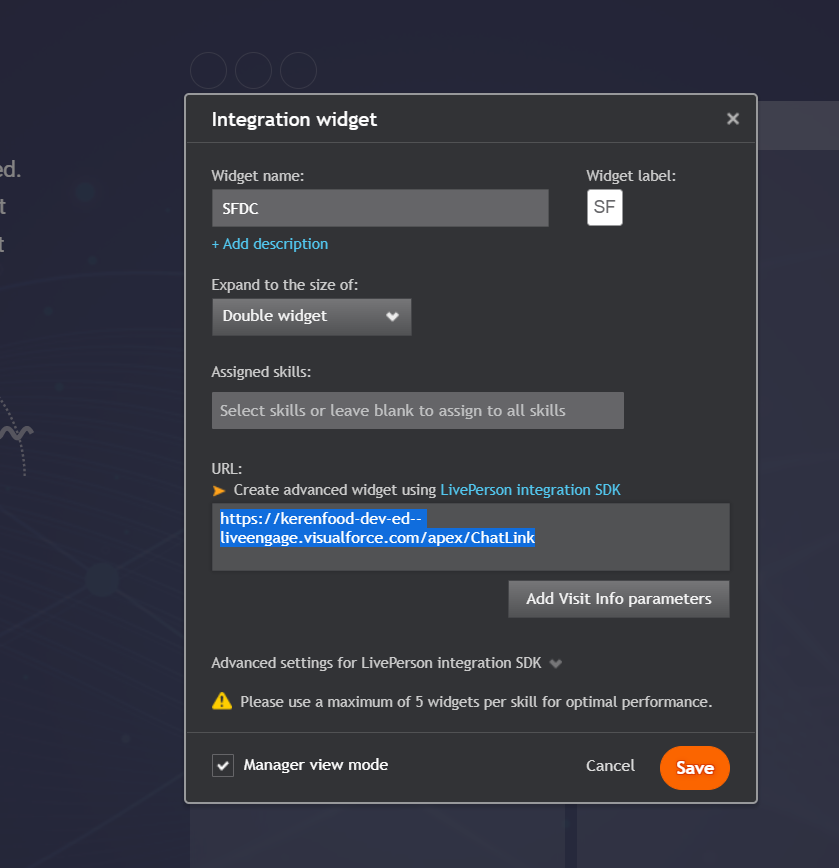
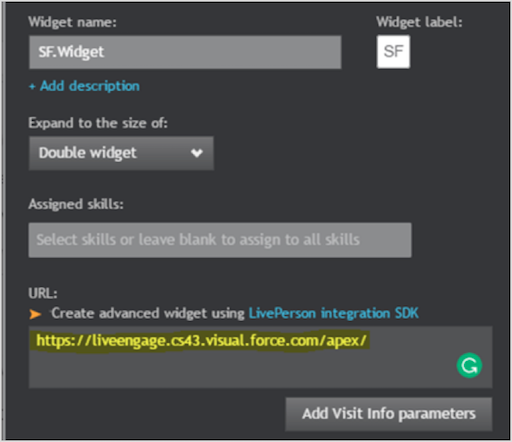
- Click on the "+" next to the existing widget labels. (Note: The limit is five widgets.)
- Choose a name for the Widget (you can use "SF.Widget" to have "SF" as the Widget’s label).
- Choose 'Double Widget' size.
- Enter the Salesforce console and switch it to classic mode.
- Select the Customization Settings tab in your Salesforce settings, copy the first part of the URL, and add the "ChatLink" suffix to ensure you're using the correct link.
- Switch back to your Conversational Cloud settings, select the Salesforce widget, click Edit, and paste the URL in the 'URL' box.
Now you are ready to go, just open the widget on an active chat/messaging conversation.
User guide
Below is an overview of the widget capabilities, in this section, we will cover the following topics:
- Introducing the Salesforce widget
- Creating an account
- Creating a contact from
- Creating a lead
- Creating an opportunity
- Creating a case
- Creating a Custom Object record
Introducing the Conversational Cloud SFDC widget
- Following the above configuration, you may start working with the new widget.
- Accept a chat/messaging conversation, click on the SF widget and you will be able to view and create any SF record directly from the Conversational Cloud.
Creating an account from the Conversational Cloud
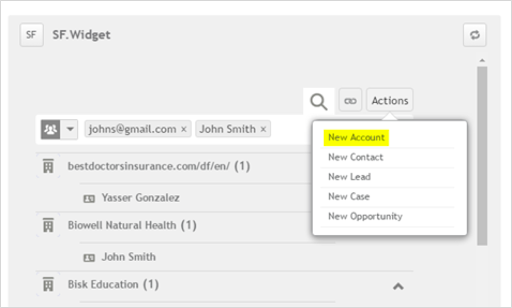
- In case you want to create a new Account record, click the “Actions” button on the Default Search Page.
- Select “New Account”
- Fill in all of the relevant fields in the form
- Click “Save & Link”.
This will save the account record in SF and link the existing chat/messaging conversation to this account:
Creating a contact
- In case you want to create a new contact record, click the “Actions” button on the Default Search Page (you can also do it when viewing an Account record).
- Select “New Contact.”
- Fill in all of the relevant fields in the form
- Click “Save & Link.”
This will save the contact record in SF and link the existing chat/messaging conversation to this Contact and Account.
Creating a lead
- In case you want to create a new Lead record, click the “Actions” button on the Default Search Page.
- Select “New Lead.”
- Fill in all of the relevant fields
- Click “Save & Link.”
This will save the Lead record in SF and link the existing chat/messaging conversation to this Lead.
Creating an opportunity
- In case you want to create a new Opportunity record, click the “Actions” button on the Default Search Page (you can also do it when viewing an Account record).
- Select “New Opportunity”
- Fill in all of the relevant fields
- Click “Save & Link”
This will save the Opportunity record in SF and link the existing chat/messaging conversation to this Opportunity and Account.
Creating a case
- In case you want to create a new Case record, click the “Actions” button on the Default Search Page (you can also do it when viewing an Account or a Contact record).
- Select “New Case”
- Fill in all of the relevant fields
- Click “Save & Link”
This will save the Case record in SF and link the existing chat/messaging conversation to this Case, Account and Contact.
Creating a custom object record
- In case you want to create a new ‘Custom Object’ record, click the “Actions” button.
- Select the “New [Custom Object Name]”
- Fill in all of the relevant fields
- Click “Save & Link”
This will save the ‘Custom Object’ record in SF and link the existing chat/messaging conversation to this ‘Custom Object.’
Note: If the ‘Custom Object’ has lookup fields for Account and/or Contact in Salesforce, and the Admin also defined this in the apps admin settings, the chat/messaging conversation will be linked to the Account/Contact as well.
Another option to create a new record from the widget
- Once the widget loads you may manually or auto search for the relevant records (based on what you defined in the admin settings.
- Navigate to the relevant Account/Contact for this chat/messaging conversation and hover with the cursor next to the name to choose the required action: Create a Case/Opportunity
- The relevant form will open, fill in the relevant information and click “Save & Link”
Linking a chat/messaging conversation to an existing Salesforce record
- In case the chat/messaging conversation is related to an existing Case/Opportunity (or any other object depending on the business process), you can link the chat/messaging conversation to that relevant record in Salesforce.
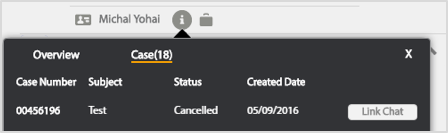
- Click on the info icon next to the relevant Contact, the “Info Bubble” will open and present the data from Salesforce.
- Look for the relevant Case/Opportunity in the bubble, click ‘Link Chat’
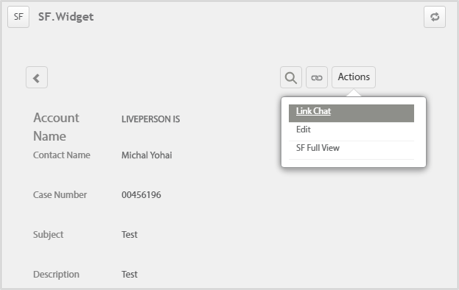
- Another option is to view the record in the widget, Click “Actions”, “Link Chat.”
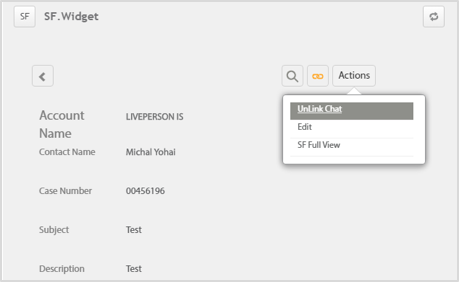
- Once the chat/messaging conversation is linked to the record, the ‘Quick Links’ icon will become Orange. By clicking on it you will be able to view the relevant records the chat/messaging conversation is linked to.
- In case you mistakenly linked the chat/messaging conversation to the wrong record, you may always ‘Unlink’, Click on ‘Actions’ menu from the record page and choose ‘Unlink Chat.’
Viewing the data in Salesforce
Objective
Now that we created records from the Conversational Cloud, you may view all our Chat Transcripts from Salesforce as well, as well as create reports for them.
Looking at your chat transcripts
- Login to Salesforce — click on the application menu in the top right of your screen.
- Make sure you have the "Conversational Cloud" application selected (or any other app in which you’ve included the tab).
- Click on the “Chat Transcripts” tab.
- Select one of the recently synced chat transcripts by clicking on the “Chat Transcript Name” under the Recent Chat Transcript list.
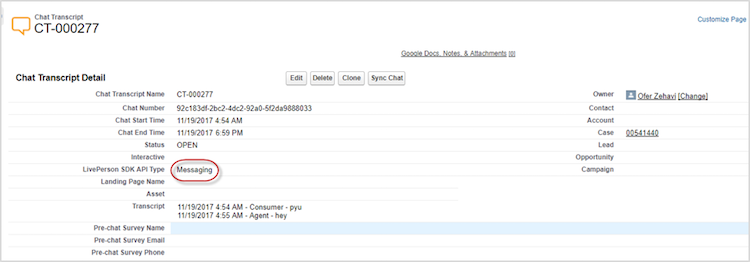
- There you have it — depending on your chat transcript settings, you will see a number of fields populated.
In case you are using both chat and messaging within the Conversational Cloud, the field ‘LivePerson SDK API Type’ identifies the specific type of the record (e.g. chat or messaging).
Reporting on your chat/messaging transcripts
- Login to Salesforce
- Choose the Reports Tab and add a new report
- Choose the Chat Transcript report type (if you don’t see it, use Salesforce Admin Settings to create one)
- Customize your report to fit your needs
- If you are missing fields or want to include more fields from the related objects within your report, you can create your own Report Type in Salesforce and include all the fields you want/need.
Appendix #1: How to map your own Conversational Cloud fields
Objective
Note: This section is very technical, please assist your AM/CVM/TAM or our Technical Support in case of a problem or if you’re not sure about any step.
Using each object’s Field Mapping, you can choose to map the Conversational Cloud fields/parameters to Salesforce Fields, both for Pre-Population of new record forms, or for saving information to the chat transcript record itself.
When adding a Field Mapping, you can choose to use one of the Conversational Cloud predefined parameters, or you can choose “Other” for when you want to map custom parameters of yours like the pre-chat survey custom questions, post-chat survey questions, agent survey or different engagement attributes.
To use “Other,” you need to manually populate two fields: one is the address of your parameter in our LivePerson SDK Field (The API used on the widget/client side of our package) and one is our LivePerson API Field (The API used on the back-end sync process of our package).
The equivalent fields needed for messaging are ‘LivePerson Msg SDK Field’ and ‘LivePerson Msg API Field’.
The complete structure of the data in the “Agent Widget SDK,” “Engagement History API,” and “Messaging Interactions API” is described in their own documents which update all the time and you can find through the Connection Panel on your LivePerson Conversational Cloud account, or in our Developer Center:
Agent Widget SDK Public Data Model: https://developers.liveperson.com/agent-workspace-widget-sdk-public-model-structure.html
Engagement History API — Engagement Attributes: https://developers.liveperson.com/engagement-history-api-engagement-attributes.html
Messaging Interactions API — Engagement Attributes: https://developers.liveperson.com/messaging-interactions-api-engagement-attributes.html
Survey questions (pre-chat, post-chat, agent)
To get one of the standard out-of-the-box pre-chat survey questions the access is easy using the list of predefined values, but you need “Other” for any custom questions you have on that type of survey or others, the address you’ll build will use the Display Name of the question. Below are a few examples.
Note: If you ever change the text in the Display Name of a survey question in the Conversational Cloud — you have to update this mapping too, otherwise the mapping will stop working.
- For a custom pre-chat survey question with the text “What is your Account Number?” use the following:
-
LivePerson SDK Field:
surveyQuestions.preChat.customizedQuestions[displayName=What is your Account Number?].value -
LivePerson API Field:
surveys.preChat[displayName=What is your Account Number?].value
- For a custom post-chat survey question with the text “How would you rate us?” use the following:
-
LivePerson SDK Field:
surveyQuestions.postChat[displayName=How would you rateus?].value -
LivePerson API Field:
surveys.postChat[displayName=How would you rate us?].value
- For a custom agent survey question with the text “Was the customer satisfied?” use the following:
-
LivePerson SDK Field:
surveyQuestions.agentSurvey[displayName=Was the customer satisfied?].value -
LivePerson API Field:
surveys.operator[displayName=Was the customer satisfied?].value
Engagement attributes (Customer Details, Personal Info, Marketing Source, etc.) and more
The Conversational Cloud has a wide (and constantly growing) list of parameters for different uses, which our customers can use for to transfer information about the visitor and his journey on their website, and into the Conversational Cloud.
Those fields are arranged in a hierarchical structure described on both Agent Widget SDK and Engagement History API documents (there are slight differences in those structures but most of the content is similar).
Each parameter/sub-section is like a property of the upper section, to which you can refer by a dot (“.”). For example, if you want to get your account ID from the main info section, you can use “info.accountId” on the Engagement History API or “chatInfo.accountId” on the Agent Widget SDK. Some of those are actually arrays of objects, which you can either turn to by a locator “[1]” search in by their properties.
These are just a few examples meant to demonstrate how to write these “addresses”, but rest assured, all of these, along with more than 55 (!) other Conversational Cloud parameters are available to you on the predefined list.
- For a Chat Start Time value:
-
LivePerson SDK Field:
chatInfo.chatStartTime -
LivePerson API Field:
info.startTime
- For a Customer Type value:
-
LivePerson SDK Field:
SDE.customerDetails.type -
LivePerson API Field:
sdes.events[sdeType=CUSTOMER_INFO].customerInfo.customerInfo.customerType
- For the Visitor’s Name value:
-
LivePerson SDK Field:
SDE.personalInfo.name -
LivePerson API Field:
sdes.events[sdeType=PERSONAL_INFO\].personalInfo.personalInfo.name
- For the Goal Name value:
-
LivePerson SDK Field:
campaignInfo.goalName -
LivePerson API Field:
campaign.goalName
- For the Visitor Browser value:
-
LivePerson SDK Field:
visitorInfo.browser -
LivePerson API Field:
visitorInfo.browser
- For the Marketing Affiliate value:
-
LivePerson SDK Field:
SDE.marketingSource.affiliate -
LivePerson API Field:
sdes.events[sdeType=MARKETING_CAMPAIGN_INFO\].marketingCampaignInfo.marketingCampaignInfo.affiliate
Appendix #2: Troubleshooting
Basic troubleshooting Q&A
Q: Why does the Salesforce Widget not load and the agent only gets a blank screen?
A: The agent has to be logged in to Salesforce in order for the widget to load. Make sure the agent logs into Salesforce on the same browser session as the Conversational Cloud (the same browser and not in incognito mode).
Q: Why are the Configuration Settings grayed out?
A: Make sure you activate the integration package using the Account Settings tab before you try to use the configuration or the widget itself.
Q: Why is the Search box not pre-populated with values (Names, Email, etc')?
A: Please verify the following:
- On the Customization Settings tab, you chose Selected Skills, and that under Advanced Settings → Configure Skills, you selected the parameters you want to prepopulate the search for each of them.
- The parameters you selected to pre-populate with indeed exist for your chat/messaging conversation (use Visitor Info widget to check).
- Check that “Disable On Load Auto Search” is unchecked in the on the top part of the Customization Settings.
Q: Why are the creation options missing on the Actions menu for some of my objects?
A: While on the widget Search window, the Actions Menu will show creation options for all the allowed objects. This relies on the configuration set on the Configuration Settings Tab in Salesforce (“Allow Account Creation”) and on a user’s profiles permissions. If an agent is not allowed to create an object according to his Salesforce Profile, he won’t be shown the option for that object.
Q: Why aren’t I able to use the widget and get an error: “The Skill is missing. Contact your system administrator”
A: Please verify the following:
- Your LivePerson Conversational Cloud account has at least one Skill and the campaign you’re using directs to a Skill.
- Your chat/messaging conversation is assigned to a Skill (easily check using the “Visitor Info” widget to verify that).
- Your chat/messaging conversation Skill is one of “Enabled Skills” for the widget (check the “Customization Settings” tab in Salesforce)
Q: I don’t see any Skills in my “Available Skills” list. Why?
A: Verify you created Skills on your LivePerson Conversational Cloud account. If you’re sure you have Skills available but don’t see them, turn to your LivePerson Support or Account Manager to make sure your account is on AC Users.
Q: Why don’t I see any of my Salesforce Custom Objects on the “Available Objects” list?
A: For a Custom Object to appear in the list, you need to first create a lookup field connecting it to the Chat Transcript object (see Object Settings section).
Q: Why can’t I find the field I’m looking for when creating a new field mapping for an object?
A: Some field names might appear differently on this list than on Salesforce (for example, Account Name or Contact Name on the Case object, might appear as Account ID or Contact ID, respectively, as well as other lookup fields). There are special fields on Salesforce that Salesforce does not expose outside their standard pages due to complex functionality on them. For example: Campaign field on the Lead object will not be available.
Q: I used the widget’s search, chose an Account / Contact and clicked on the Case / Opportunity icon next to it, but after saving the Opportunity / Case I created isn’t linked to them in Salesforce. Why?
A: Please verify that the Case / Opportunity settings has the Account and Contact lookup fields included in the field mapping. If you have more than one lookup field to Account / Contact on the object, make sure you include the standard one from Salesforce (they are called “Account ID” and “Contact ID” on the field mapping list).
Q: Why does the sync process doesn’t happen on the exact hour I chose for it, but slightly after?
A: The daily sync process will happen in an offset of minutes, but within the hour, of the time you chose for it, which might change between different orgs. The periodic sync will happen every 3 hours, but at an offset as well.
Known issues
-
Issue: SF widget will not load.
Possible causes/solutions:
- User was not logged-in to Salesforce with the same browser.
- Wrong widget URL in LE: missing “ChatLink” wording.
- Wrong widget URL in LE: installed in SandBox but URL refers to production.
- Missing SF configuration: skill is not associated with an object.
-
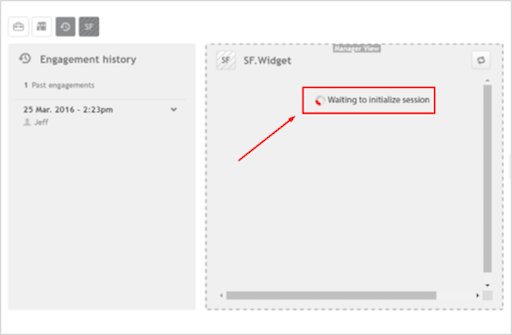
Issue: “Waiting to initialize session” appears in the Salesforce widget, and the widget doesn’t load.
Steps for resolving the issue:
- Make sure that there is a skill already defined in the LivePerson account. If there is no skill, create one. There should be at least one skill configured.
- Assign the skill to the engagement via one of the following methods:
- Via the engagement studio: Campaign engagement studio
- Create a pre-chat survey question with a routing based question. (Only valid for the chat engagements)
- For messaging engagements, it is possible to pass the SDEs (engagement attributes) parameters in order to successfully load the widget
-
Issue: Salesforce widget does not load followed by an error message.
Steps for resolving the problem (guide the customer to do the following):
- Login using a SF admin user. If this works, that means a permission is missing for the SF user profile.
- Within SF you must grant access to the relevant objects:
- Create a new ‘modify all’ permission set to the relevant SF object (in this example Opportunities) and assign it to the user who encountered the problem.
4. Issue: Salesforce widget does not load followed by an error message.
**Observation:** missing Salesforce configuration; skill is not associated with an object.
-
Issue: Chat Transcripts are not synced to SF
Possible causes:
- Scheduled sync jobs need to be defined
- Job is defined, but the SF user is inactive
Known limitations
- The IE11 browser is not supported.
- The SF feature ‘Person accounts’ is not supported: Person accounts is a SF feature which stores information about individual consumers (Account = Contact).
- The transcript for converted leads is not accessible.
- The widget is not defined as SF Lightning ready.