
What's a domain?
A domain is a list of intents and entities; these can be matched to consumer training phrases (utterances) with an intent-recognition model.
Add a prebuilt domain
Domains added from prebuilt domains use the LivePerson NLU engine.
To add a prebuilt domain
- Access Intent Manager.
- Locate the domain list in the Intent Manager dashboard, and click Add a domain in the upper-right corner.
- In the Add Domain window, select the Prebuilt domains tab.
-
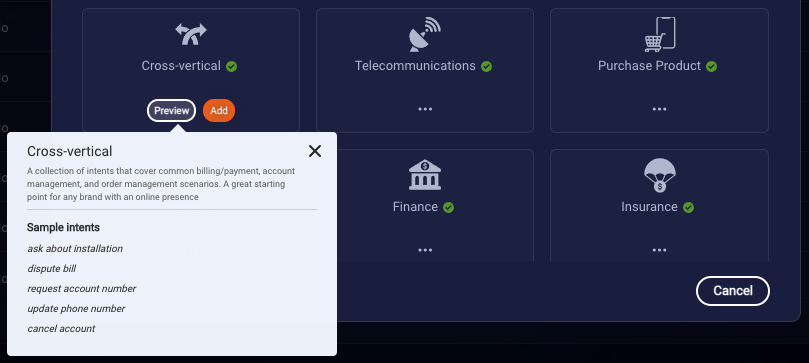
Move your mouse over the desired domain. Then click Preview to see a description of the domain and some example intents. This helps you to verify that the domain is one you want.
- If you've unlocked the Discover/Analyze features of Intent Manager, you can specify the following for the domain:
- Intent Tracking: Select "Enabled" to enable “intent listening” (intent tracking) for the domain, which provides you with enhanced intent-related reporting on your consumers’ utterances.
- Primary Domain: Select "Enabled" to set the domain as the primary domain.
- For Language, select the language of the domain you want to add.
-
Click the Add button that's displayed when you move your mouse over the desired domain.
After you add the domain, there's no need to train or activate it for the first time. This has been done automatically. However, from this point forward, things work as if you had created the domain manually: You can customize the domain as you see fit. If you subsequently make any changes, you must re-train the domain to create a new model version that reflects the changes. And when ready, you’ll need to activate the new model version.
Overwrite from a prebuilt domain
If you've added a prebuilt domain and customized it, but you no longer want to use your customizations, you can overwrite your domain to reflect the prebuilt domain offered by LivePerson. This operation removes all the model versions in your domain, and it creates a single model version–trained and activated–that is based on the prebuilt domain.
You can overwrite your domain with a prebuilt domain if you have not customized your domain's name. Once you do this, you break the relationship with the source prebuilt domain.
Overwriting a domain should only be done during the development phase because it disrupts all the associated resources (bots and knowledge bases) that use the domain.
To overwrite your domain with a prebuilt domain
- Access Intent Manager.
- Locate the domain list in the Intent Manager dashboard, and click Add a domain in the upper-right corner.
- In the Add Domain window, select the Prebuilt domains tab.
- If you've unlocked the Discover/Analyze features of Intent Manager, you can specify the following for the domain:
- Intent Tracking: If the domain had intent tracking enabled, take care to also enable it now, if desired.
- Primary Domain: If the domain had this enabled (to specify it as the primary domain), take care to also enable it now, if desired.
- For Language, select the same language of the domain you want to overwrite.
- Move your mouse over the desired domain, and click the Add button that's displayed.
-
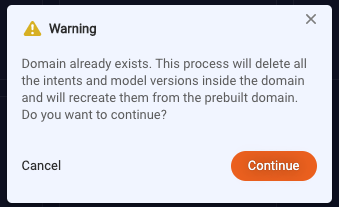
In the Warning dialog that appears, click Continue.
Add a domain manually or using an import file
If you're adding a domain that will use your own Rasa-based engine as the NLU provider, there's additional info that you need to provide when you do this.
To add a domain manually or using an import file
- Create the import file.
- Access Intent Manager.
- Locate the domain list in the Intent Manager dashboard, and click Add a domain in the upper-right corner.
- In the Add Domain window, on the New domain tab, specify the following:
- Domain Name: Enter a name. Use a standard naming convention to make sorting and finding domains easier.
- NLU Provider: Select the provider of the NLU engine to use. Don't see the NLU provider that you're looking for? Check the settings in your account details in Bot Accounts.
- Language: Select the language of the domain.
- Create content: If you're going to add intents and entities manually, select "Manually." If you're going to import them from a file, select "Import."
-
Import Intents & Entities from: If you selected "Import" as the import method, now select the type of import file involved: CSV or Google Sheet. Then use the controls that appear to upload the files. You can import intents but not entities if desired; in this case, don't specify an entities file/sheet. Note: An import file should only be named with and contain alphanumeric characters.
Google sheets: A Google sheet must be public, i.e., with no file restrictions in place. Moreover, it must contain 100 or fewer columns (intents and entities combined); otherwise, the import fails. If your domain is larger and you have more columns than this, use a CSV file instead.
If you import a Google sheet, be aware that this establishes a link between the domain and the sheet. If you later sync the domain with the sheet, the domain is updated with the current contents in the sheet.
- Intent Tracking: This setting is displayed if you've unlocked the Discover/Analyze features of Intent Manager. Select "Enabled" to enable “intent listening” (intent tracking) for the domain, which provides you with enhanced intent-related reporting on your consumers’ utterances.
- Primary Domain: This setting is displayed if you've unlocked the Discover/Analyze features of Intent Manager. Select "Enabled" to set the domain as the primary domain.
-
Click Add.
If you didn't import the intents and entities, you can now add them to the domain.
Create an import file
If you want to import a set of intents and/or entities into a domain when you add the domain (or later), you'll need to create the import file.
The easiest way to ensure that the import file is well-formatted is to export a test domain. This provides you with an export file in the proper format. You can then use the export file to create an import file.
The following illustrates a well-formatted intents file:
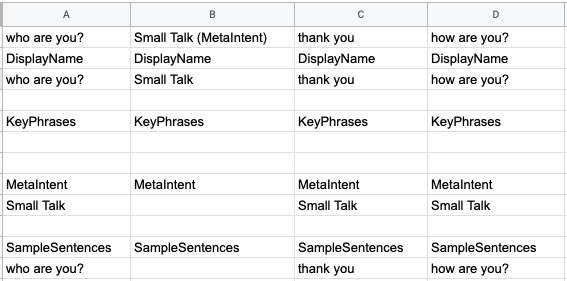
Key phrases are only applicable to the LivePerson (Legacy) engine. You can leave this section blank if you're using another NLU engine. For information on key phrase matching, see Configure domain settings, which follows below.
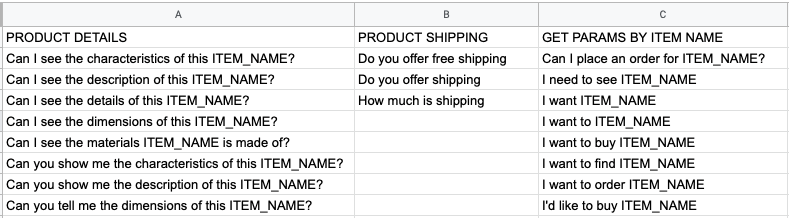
Additionally, having said the above, the following, simplified format also works. It should suit most use cases.
The following illustrates a well-formatted entities file:
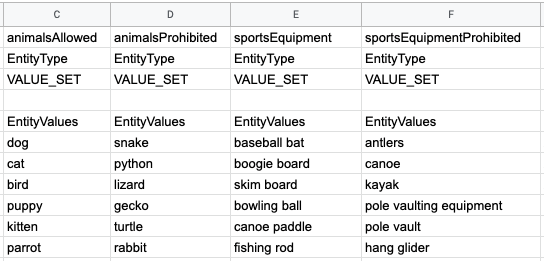
If you're creating a Google sheet, add the intents to the first tab in the sheet, and name the tab "Intents." Then add the entities to a second tab named "Entities." The Google sheet must be public, i.e., with no file restrictions in place.
Configure domain settings
- Access Intent Manager.
- Locate the domain list in the Intent Manager dashboard.
- Move your mouse over the name of the relevant domain, and select Domain Settings from the menu that appears.
- Specify the following basic settings:
- Domain Name: Enter a name. Use a standard naming convention to make sorting and finding domains easier.
- NLU Provider: Read-only. The provider of the NLU engine can’t be changed after you create the domain.
- Language: The language of the domain.
- Specify the following import/export settings:
-
Create content: Manually or Import. You can select to add the intents and entities manually or import them via a CSV file or Google sheet. If you import them via a CSV file, the operation is additive, i.e., the intents and entities are appended to the existing ones. You can import intents but not entities if desired; in this case, don't specify an entities file/sheet. Note: An import file should only be named with and contain alphanumeric characters.
Google sheets: A Google sheet must be public, i.e., with no file restrictions in place. Moreover, it must contain 100 or fewer columns (intents and entities combined); otherwise, the import fails. If your domain is larger and you have more columns than this, use a CSV file instead.
If you import a Google sheet, be aware that this establishes a link between the domain and the sheet. If you later sync the domain with the sheet, the domain is updated with the current contents in the sheet.
-
- Specify the following intent analysis settings:
- Intent Tracking: Select "Enabled" to enable “intent listening” (intent tracking) for the domain, which provides you with enhanced intent-related reporting on your consumers’ utterances.
- Primary Domain: Select "Enabled" to set the domain as the primary domain.
- Specify the following advanced settings:
- Enable Key Phrase Match: Available only if the NLU engine used by the domain is LivePerson (Legacy). Select this to enable Key Phrase Matching. Once enabled, select the threshold to use. For more on Key Phrase Matching, see farther below.
- Click Update domain.
Key Phrase Matching: LivePerson (Legacy) only
Enable Key Phrase Match is a domain setting that’s only available in domains that use the LivePerson (Legacy) NLU engine. It’s designed to improve the NLU matching by adding another “layer” of matching during intent prediction.
A key phrase is a critical noun or verb. If you enable Key Phrase Matching for the domain, you can specify a collection of key phrases for each intent. During intent prediction, the key phrases are evaluated after the training phrases. If the key phrases are found in the user’s utterance, the NLU score for the intent is boosted to GOOD even if the utterance doesn’t match any of the intent’s training phrases.
Key Phrase Matching uses a threshold that you must specify when you enable the domain setting. As an example, if you set the threshold to 2, then if 2 of the intent’s key phrases are found in the consumer’s utterance, the intent is considered a match.

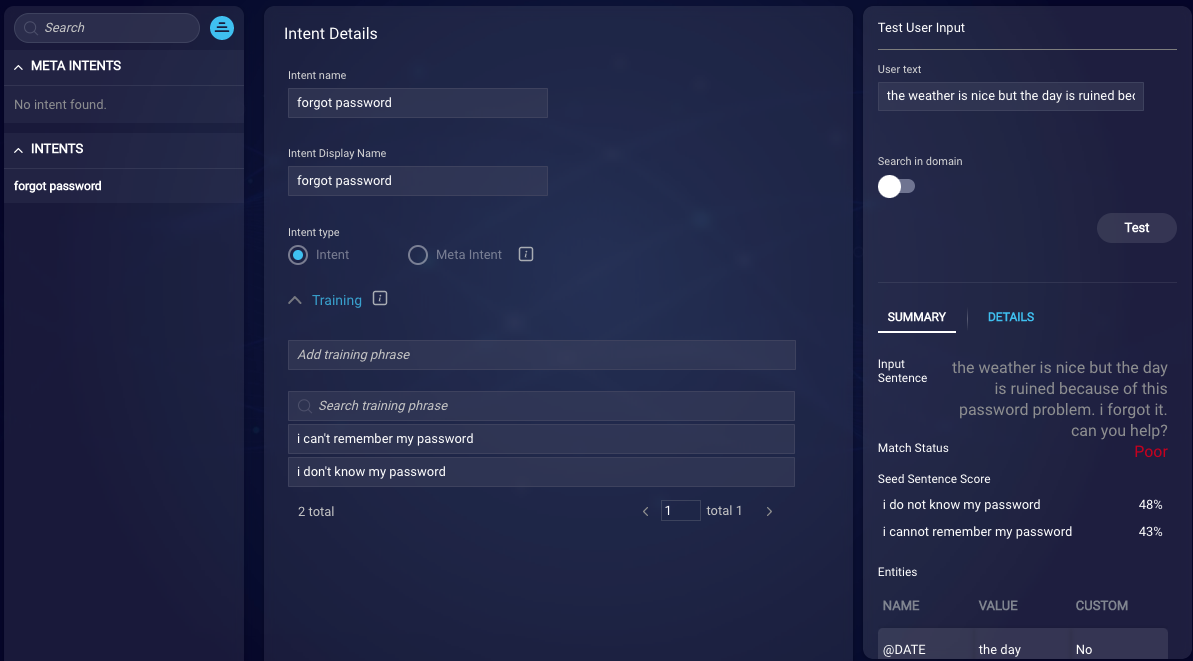
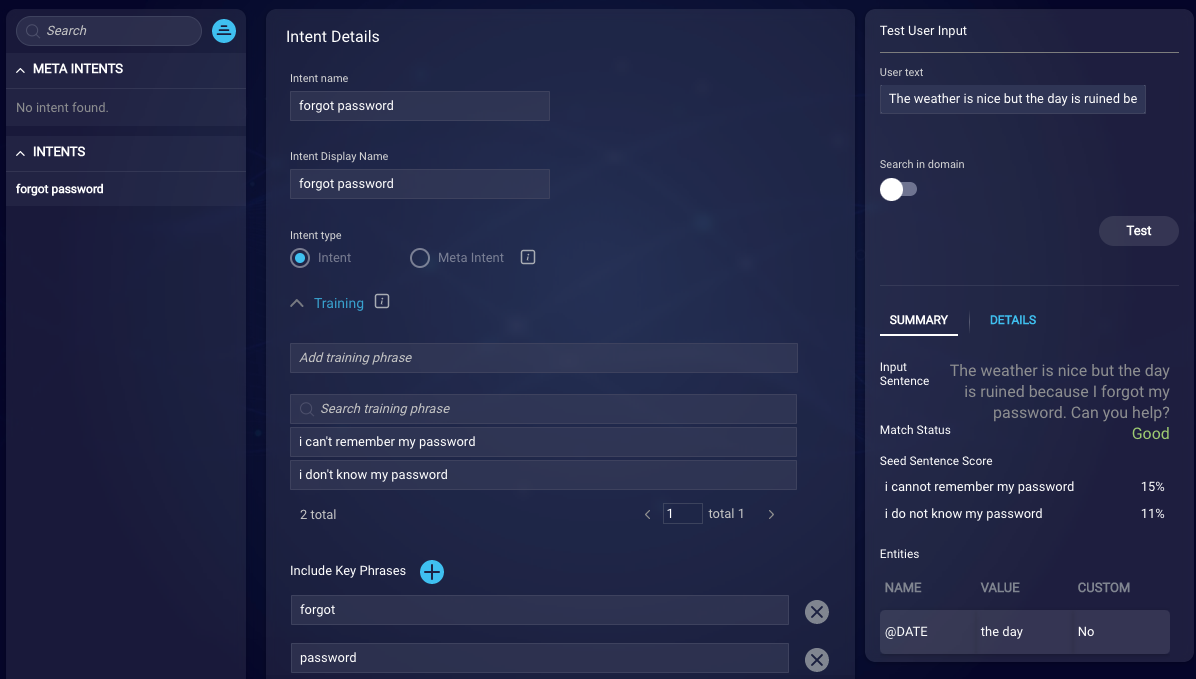
Key Phrase Matching can be helpful when you know there are specific words that directly correlate with an intent because it boosts the score when appropriate. For example, with the LivePerson (Legacy) engine, the NLU score is penalized when the consumer’s utterance is too long when compared to the training phrases. Let’s say the consumer says, “The weather is nice, but I forgot my password, and now my whole day is ruined as a result of my forgetfulness. Please help. I don't know what to do.” In your domain, you have a “Forgot password” intent, but it doesn’t yield a match because of the length of the consumer's utterance. Without key phrase matching, there isn’t a match. However, if you know that any time the consumer says something that contains the words “forgot” and “password” that it’s related to the “Forgot password” intent, you can add those words as key phrases and boost the score to GOOD when they are found in the utterance. (Since the intent is matched, this also means it can be in contention for disambiguation if disambiguation used.)
Here's a test example without Key Phrase Matching enabled:
And here's a test example with Key Phrase Matching enabled:
Sync with a Google sheet
After you've made changes to the Google sheet that's linked to the domain, sync the domain to update it with the content.
This action overwrites the content in the domain with the content in the Google sheet, so use caution when performing this.
To sync a domain with a Google sheet
- Access Intent Manager.
- Locate the domain list in the Intent Manager dashboard.
- Move your mouse over the name of the relevant domain, and select Domain Settings from the menu that appears.
- Scroll down to the advanced settings, and beside Sync Google Sheet, click
 (Refresh icon).
 - Train the domain so that the changes are reflected in a new model version.
Train a domain
Training a domain is something that you do if the domain uses the LivePerson engine or a 3rd-party NLU engine, not the LivePerson (Legacy) engine.
Training a domain creates a new model version; for more, see the relevant section for the NLU engine that you're using:
Download a domain
You might need to download a domain for a few reasons:
- You want to create a copy of the domain by downloading it and then adding a new domain using the CSV as the import file.
- You want to move or copy the domain to another environment.
- You want an extra measure of back-up, so you plan to archive the CSV file for safekeeping.
Download of a domain creates a ZIP file that contains 2 CSV files, one for the intents and the other the entities.
To download a domain
- Access Intent Manager.
- Locate the domain list in the Intent Manager dashboard.
- Select the name of the relevant domain, and then select Domain Settings from the menu that appears.
- Scroll down to the import/export settings, and beneath Download Domain Data, click Export All Data.
- Follow the browser prompts to access and save the ZIP file to a location of your choice.
Delete a domain
Deleting a domain is a non-recoverable action, so be certain about doing so before taking this action.
Before you delete a domain, ensure that it isn't being used by any bots or knowledge bases. Also, consider downloading the domain for backup purposes.
To delete a domain
- Access Intent Manager.
- Locate the domain list in the Intent Manager dashboard.
- Select the name of the relevant domain, and then select Domain Settings from the menu that appears.
- Scroll down to the advanced settings, and beside Delete Domain, click
 (Delete domain).
 - In the confirmation dialog, click Yes.