
This is a tutorial series that's cumulative in nature. What's more, this series builds on the beginner's series. To complete this tutorial, start from the beginning.
"Many Bots" design approach
Historically, all of our bot capabilities would be included in a single, monolithic bot design. This bot would house all of our intent-driven dialogs, knowledge bases, the fallback dialog, and escalations.
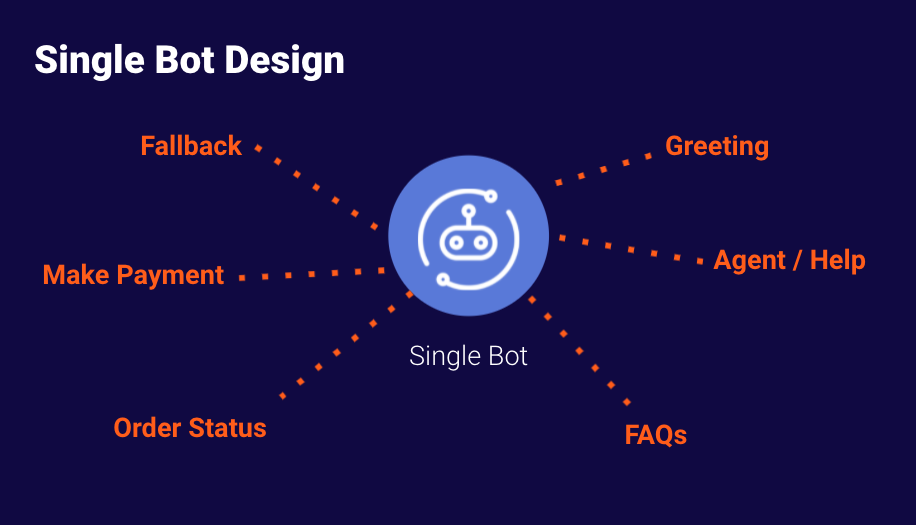
While this approach is certainly appropriate for small-scale use cases, it results in difficulty in navigating and developing future iterations of your bot. As the dialogs stack up and become more complex for development teams to approach, scaling bots becomes a real concern and can be difficult to manage. With this in mind, LivePerson has implemented functionality for a multiple bot approach, with each bot being responsible for its own functionality.
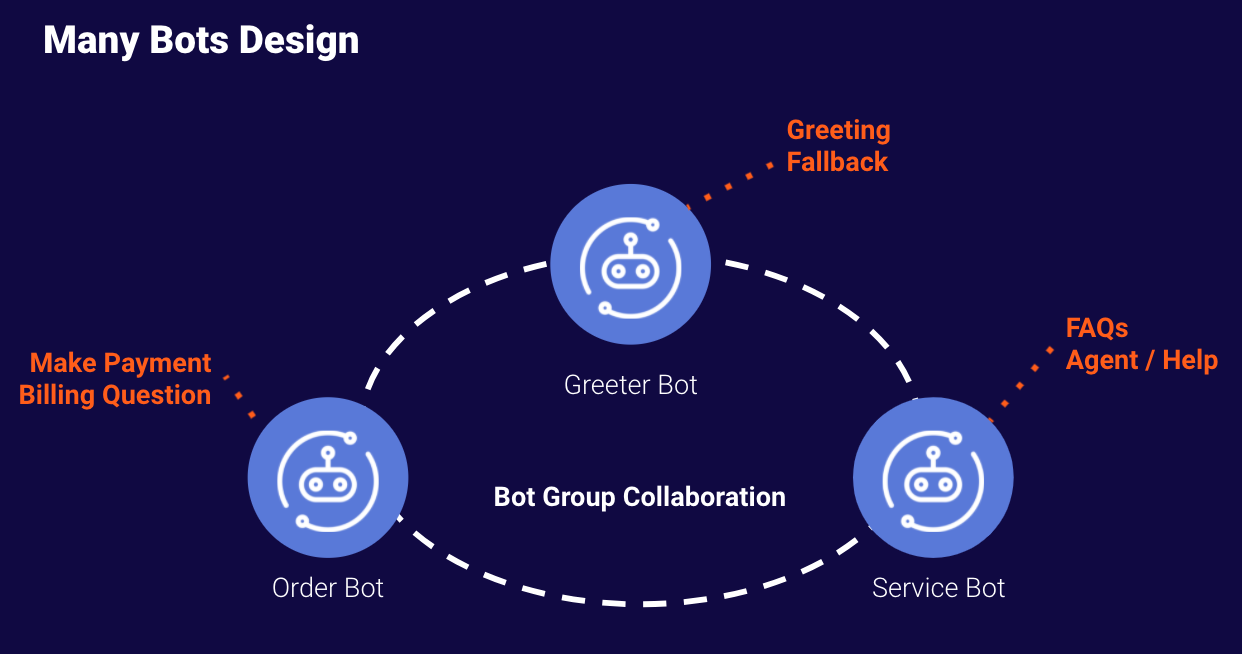
With the addition of bot groups and bot group collaboration, we’re able to create multiple bots that work together seamlessly to assist users. Collaboration allows conversations to be passed around to each bot as needed, ensuring that each user has access to the bot they need to satisfy their intent. An added benefit of the "many bot" approach is apparent during development. Multiple developers are able to work on the same account, each focusing on a separate bot without the concern of conflicts.
Breaking up the monolith
After completing the Getting Started tutorial, you have a single bot that handles welcoming the user, processing several intents, and escalating to a human agent. As new functionality is introduced, the size and scope of this single bot can become difficult to manage. Breaking a single bot into multiple bots is no small task, so it is best to do so as early in your development process as possible.
We’ll use three separate bots as part of our "many bot" solution:
- A Greeter bot that will serve to provide our existing Welcome, Goodbye, and Fallback dialogs.
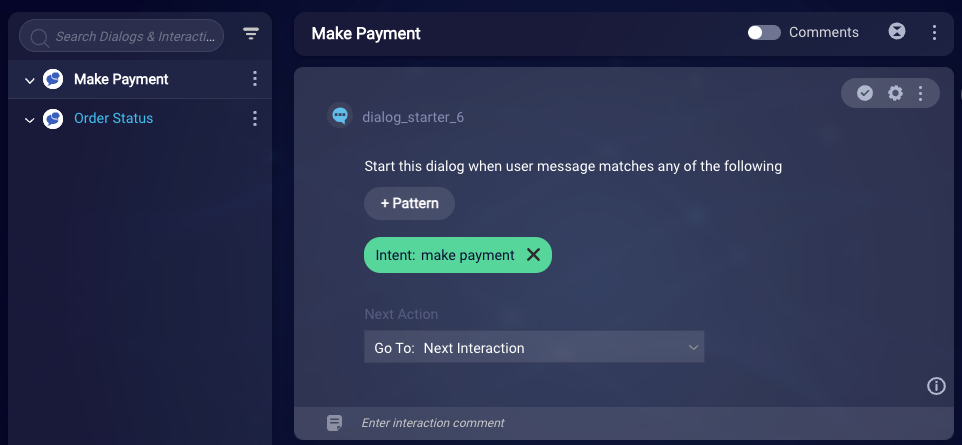
- An Order bot that will contain our Make Payment and Order Status dialogs.
- A Service bot that will contain our Agent Escalation and frequently asked questions that we'll develop later in this tutorial.
Step 1: Create the Greeter bot
Instead of creating these new bots from scratch, we will copy our Getting Started bot into three new bots and strip away the unnecessary functionality from each copy.
- Open the menu on the left side of the page, and select Automate > Conversation Builder to open Conversation Builder.
- Open the Getting Started Bot that you created in the first tutorial series.
- Click the three-dot icon
 in the menu bar, and select Bot Settings.
 - Expand the More Settings menu, and scroll towards the bottom until you see the Export Bot option. Click the download icon
 to generate a JSON-formatted copy of the Getting Started bot. Save it to your local computer.
 - Back out of the Getting Started bot to the dashboard of bots. (Click Cancel, then Back).
- Click Import Bot in the upper-right corner.
- Select and open the downloaded JSON as your import file, which will create a new copy of your bot, bringing you into its dialog editor.
- Navigate to this bot’s Bot Settings, and update the name to "Greeter Bot."
- Prior to saving, click the Bot Group dropdown and select the Create Group option and provide the following values in the Create Bot Group form:
- Bot group name: Enter "Many bots"
- Collaboration: Turn this on
- Transfer message: Enter "BLANK_MESSAGE"
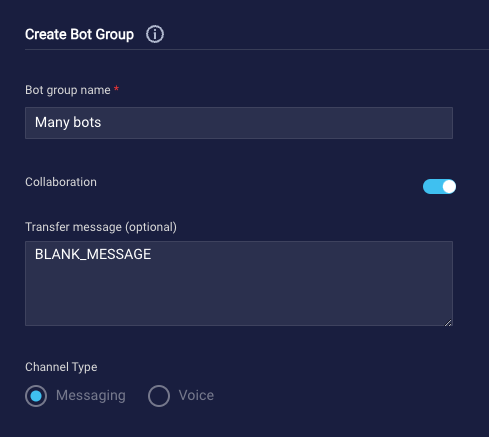
Click Create to exit the Create Bot Group form.
- Back in Bot Settings, select the newly created "Many bots" bot group for Bot Group, and click Save.
-
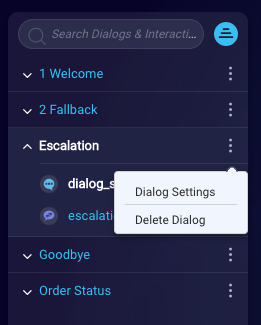
Lastly, delete the dialogs that Greeter Bot isn't responsible for: From the Dialogs menu, click the three-dot icon next to the Make Payment dialog, and select Delete Dialog. Confirm Yes. Repeat this process to also delete the Escalation and Order Status dialogs.
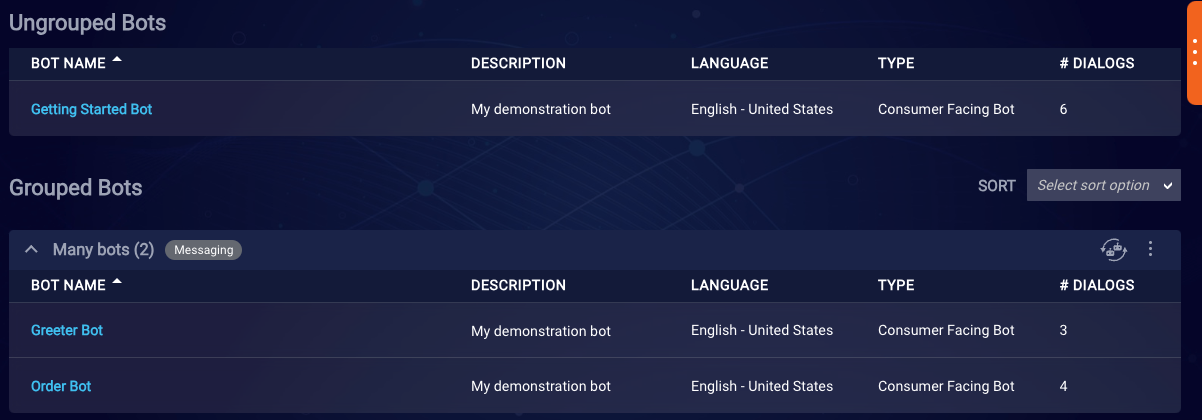
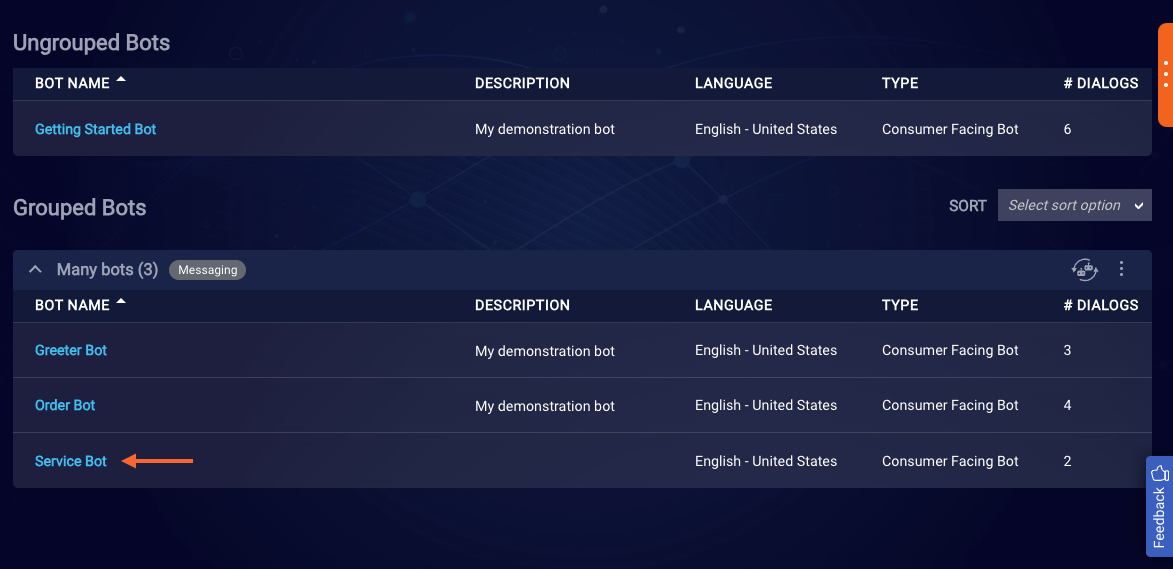
Once you’ve deleted the unnecessary dialogs, back out of the Greeter Bot and return to the Conversation Builder dashboard of bots. Two bots should now be visible: your original Getting Started Bot and the new Greeter Bot. Note that the Greeter Bot is nested under the "Many bots" group.

Step 2: Create the Order bot
For the Order bot, follow the same process that you used to create the Greeter bot:
- From the Conversation Builder dashboard of bots, click Import Bot in the upper-right corner.
- Select and open the downloaded Getting Started JSON as your import file, which will create a new copy of the bot, bringing you into its dialog editor.
- Navigate to this bot's Bot Settings, and update the name to "Order Bot."
- Prior to saving, click the Bot Group dropdown, and select the "Many bots" group. Click Save.
- Delete the dialogs that Order Bot isn't responsible for, i.e., the Welcome, Goodbye, Fallback, and Escalation dialogs.
-
Verify that the Make Payment and Order Status dialogs are still set to be triggered using their associated intents.
As long as you are still in the same account, these links remain active. If you have created a new account for your "Many bots" group, you will need to export and import the previously created domain into the new account.
Back in the Conversation Builder dashboard of bots, ensure that your Order Bot is nested underneath your "Many bots" group, along with the Greeter Bot.
Step 3: Create the Service Bot
As much of the functionality of the Service Bot has yet to be constructed, you will create this bot from scratch and associate it with the "Many bots" group.
- From the Conversation Builder dashboard of bots, click New Bot in the upper-right corner.
- Select to create a custom bot, and in the resulting Custom Bot form, fill in the following:
- Name: Service Bot
- Bot Language: English - United States
- Bot Group: Many bots
Click Create Bot.
- Click Add Dialog in the lower-left corner and give the new dialog a name of "Escalation." Click Save.
-
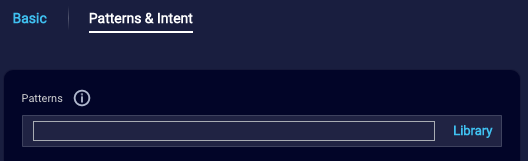
Complete the Dialog Starter interaction using the process that you used in the Getting Started tutorial, i.e., add the patterns
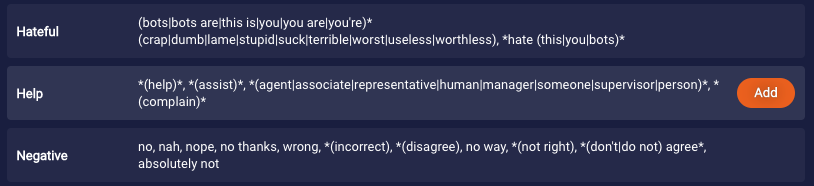
agent,representative, andhumanto trigger the dialog.Tip: A quick and easy way to add these patterns is to click the Library link, and select the "Help" set of patterns.
-
Create a new Agent Transfer interaction, modifying the text to read “Transferring to a human agent…” In the Interaction Settings for this interaction, make sure to enter the corresponding Human skill ID for your user profile. Please refer to the Getting Started tutorial series for details on this process.
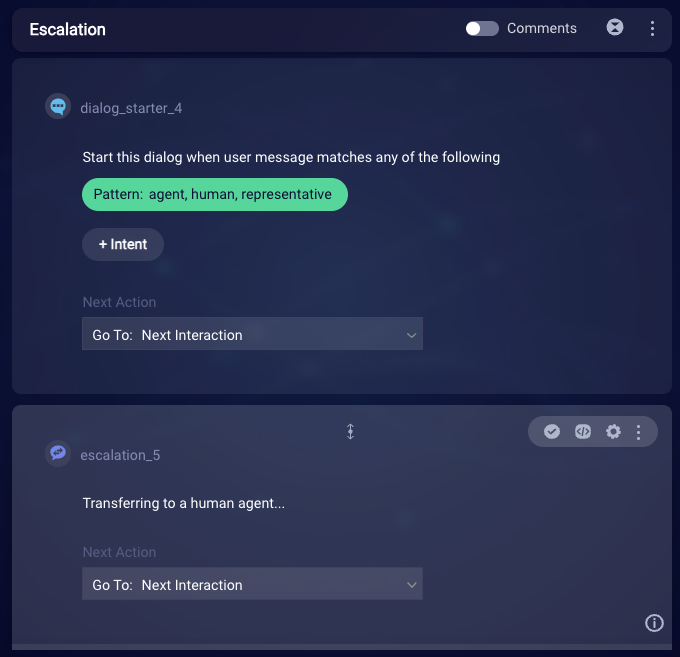
-
At this time, this bot will only serve to provide Escalation functionality, so delete both the Welcome and Fallback dialogs that were provided on bot creation.
-
Back out of the Service bot to the dashboard of bots. You should see the newly created bot nested under the "Many bots" group, along with the Greeter and Order bots.
Step 4: Deploying the "Many Bots" group
Due to the nature of the Many Bots solution, each bot in our bot group will need to be deployed with an agent connector in order to see the collaboration in action. To do so, new bot agents will need to be created and assigned to each bot in our group.
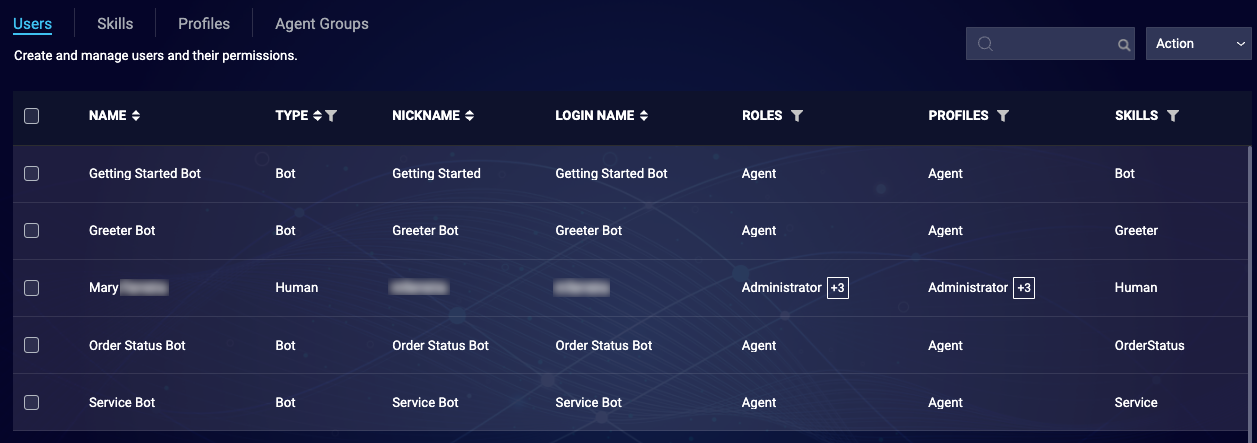
- Use the left navigation menu to navigate to Manage > Users & Skills.
- In the lower-left corner, click + Add user.
- Fill out the User details form with the following information:
- User type: Bot
- Login name: Greeter Bot
- Email: Your email address
- Nickname: Greeter Bot
- Name: Greeter Bot
In the Add login method section, complete the following:- Choose login method: API key
- Api key: Generate API Key
In the Assignment section:- Assign profile: Agent
- Skills: Greeter
Unless you have previously created your Greeter skill, you will need to type it into the Skills field to create it. Then click the dynamic "Create skill" link that appears.
Click Save.
-
Repeat the previous steps for both our Order Status and Service bot agents. All fields will remain the same except where you’ll need to replace “Greeter” with either "Order Status" or "Service."
-
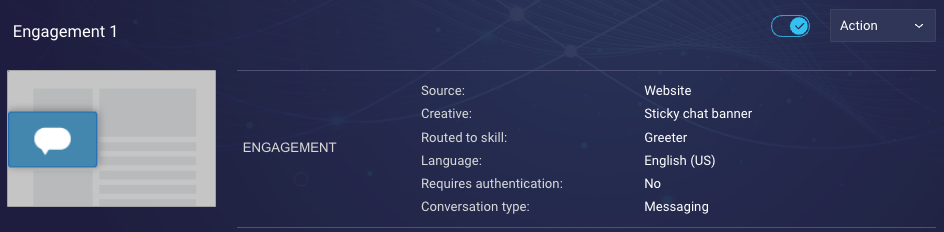
Once you’ve created all of your bot user agents, navigate to Campaign Builder (click Engage > Campaign Builder on the left menu), and select the Getting Started campaign. We want to ensure that the Greeter Bot is the one that picks up all new conversations, so edit the existing engagement to point to the Greeter Skill.
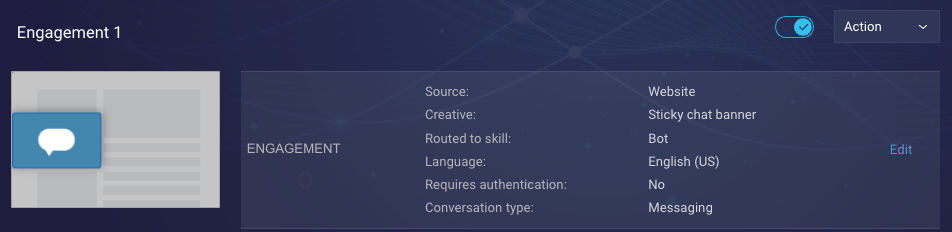
Click Edit in the Engagement section. In the Routing section of the Engagement Settings, set the specific skill to "Greeter." Then click Publish in the lower-right corner.
- Navigate back to Conversation Builder. The bot agents that have been created now need to be connected to their associated bots. Within each of the 3 bots, click Agent Connectors on the menu, click Add Agent Connector, and complete the Add Agent Connector form as follows:
- Agent User ID: Select the bot agent that corresponds to this bot
- Role: Agent
- Conversation Type: Messaging
- Deploy to: Demo
Click the Start button for each.

-
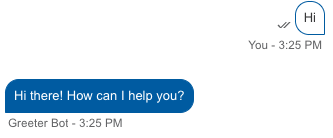
Once all agent connectors have been added, navigate to the bot demo deployment site and test as you did with the previous Getting Started bot. Saying “Hello” results in your Greeter bot responding.
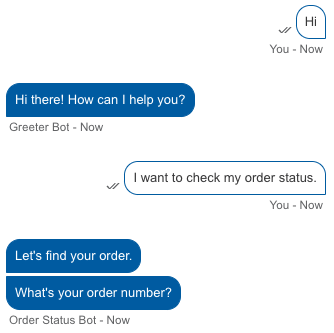
Next, type “I want to check my order status”. This results in the Order Bot taking over and directing to the appropriate intent.
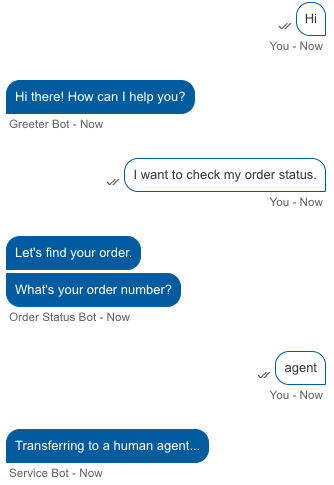
Follow this by typing “agent” to see the Service bot handle the escalation to a human agent.
Seamlessly, the different bots that have been created will enter and exit the conversation to meet the needs of your users. When the Greeter bot is unable to handle the “Order Status” intent, it looks to its collaborator bots to see whether they are able to assist. Note that the bot name displayed changes based on which bot is currently working with our users.
Learn more about bot groups and bot collaboration.
If your testing isn't working, try ending the current conversation in the messaging window. Then start anew in the web page by clicking the Messaging call to action.
With our bots now properly split up and working in tandem to handle a user's needs, there are additional improvements and best practices that we can implement to ensure proper handling and understanding of our users' intents.
What's next?
Continue on to the next tutorial in the series.