
This is a tutorial series that's cumulative in nature. What's more, this series builds on the beginner's series. To complete this tutorial, start from the beginning.
Brands often have static content, such as frequently asked questions, that can be addressed through bots and delivered with Conversation Builder. As opposed to creating individual interactions to handle these use cases, the Conversational Cloud provides knowledge base support to provide a seamless experience in delivering this content. To best work within the Collaborative Bot Group structure, we will create an FAQ meta intent to capture all FAQ questions and present them to our user within the Service Bot.
Step 8: Create the FAQ meta intent
A meta intent is a wrapper for a group of related intents.
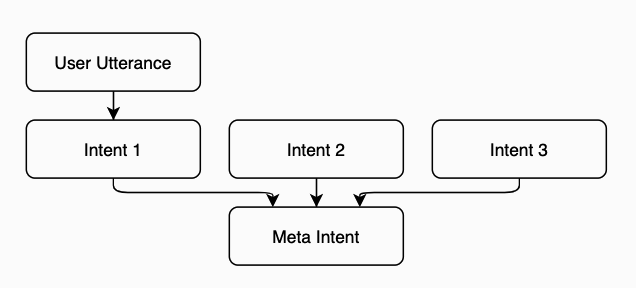
Using meta intents, you can funnel a variety of intents into a single dialog for processing. A meta intent can have many standard intents, and standard intents can belong to one meta intent. Another way to think about this relationship is as a parent-children model, with the meta intent being the parent and all its standard intents as its children.
- Open the menu on the left side of the page, and select Automate > Intent Manager to open Intent Manager.
- From the domain list on the Intent Manager dashboard, select the "LP_Cross-vertical" domain, and then select Build from the menu that appears.
-
Create a meta intent: Click Add Intent in the lower-left corner, and specify the following:
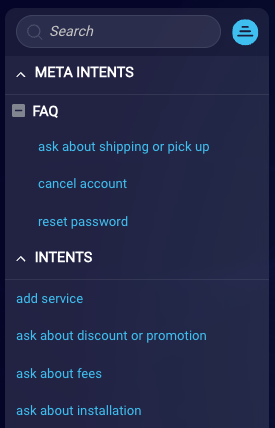
- Intent Name: FAQ
- Intent Display Name: FAQ
- Intent Type: Meta Intent
-
Intents > Select intent to add:
- ask about shipping or pick up
- reset password
- cancel account
When finished, click Save.
If created correctly, you should see your standard intents displayed underneath the FAQ meta intent.
-
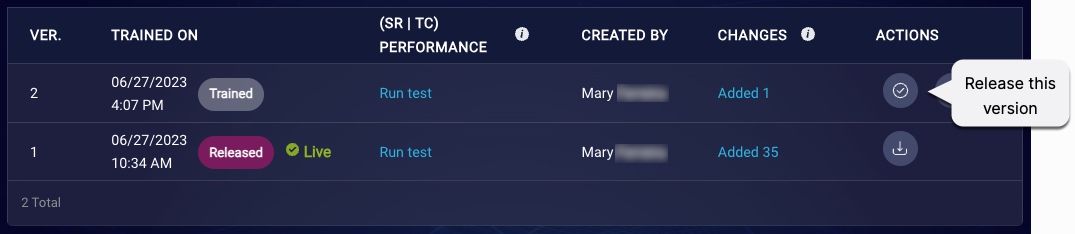
Once saved, you will need to re-train your domain for your changes to take effect. Click Train & Create Version in the upper-right corner. And confirm the action in the pop-up window that appears.
Training might take a few minutes to complete.
-
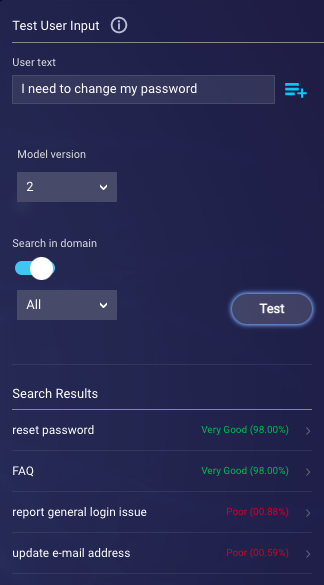
Test to make sure both intents and meta intents are being triggered by your training phrases: Click Intents on the menu bar. In the Test User Input panel on the right, select your newly trained model from the Model version dropdown. Test out a few phrases that you would expect to match the newly created intents. If set up correctly, you should see both the standard intent and its parent meta intent triggered with the same confidence score.
-
With a newly created meta intent in hand, "release" the new model version, so the changes are reflected in your bot: Click Versions on the menu bar. Select the "release" action, and click Release.
In the final two steps, you'll create a knowledge base and integrate it into a bot…in order to automate answers to consumers. But first, you need to activate our Generative AI features, so you can enrich those answers using a Large Language Model before sending them. Enriched answers are smarter, warmer, and better.
Step 9: Activate Generative AI features
You need administrator access on the account to activate our Generative AI features. Contact your admin if you need assistance.
-
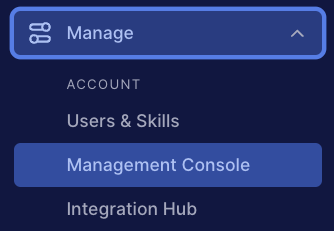
In the menu on the left side of the page, select Manage > Management Console.
-
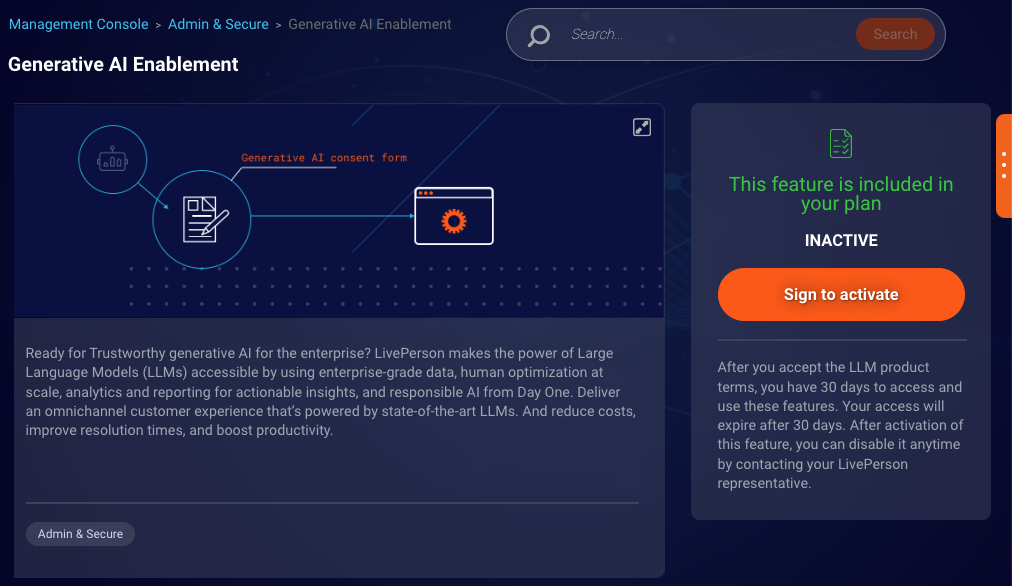
In the Management Console, search for “Generative AI” to display the Generative AI Management page.
-
Click Sign to activate.
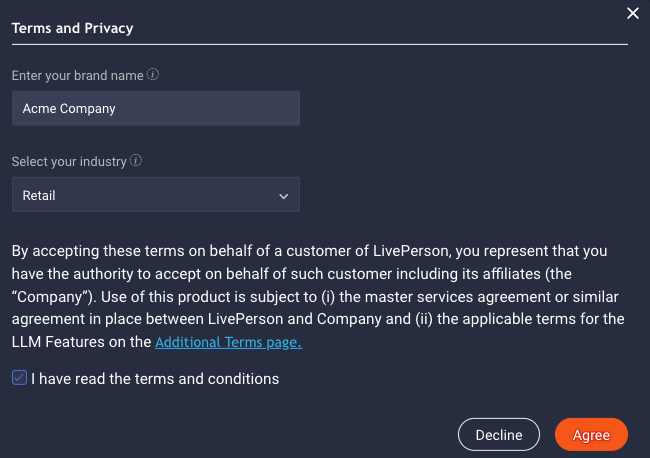
- In the pop-up window, specify the following:
- Brand name: Acme Company
- Industry: Retail
During queries to the Large Language Model (LLM) service, your brand name and industry are included in the prompt that gets sent to the service. It helps the responses to stay in bounds, i.e., specific to your brand, with fewer hallucinations.
-
Review the terms and conditions, and check the box to indicate that you’ve done so. Click Agree.
- Review the info in the confirmation window: You’ll need to log out and back in. And it might take 15 minutes or so before the features are active. Click Ok, got it.
- Wait 15 minutes or so before proceeding to the next step.
- Log out of Conversational Cloud and then log back in.
The next step will be to create a new knowledge base.
Step 10: Create the FAQ knowledge base
In this step, you’ll create a new FAQ knowledge base and add FAQ articles to it.
-
Open the menu on the left side of the page, and select Automate > KnowledgeAI to open KnowledgeAI.
-
Click Add Knowledge Base in the upper-right corner. (If you don't have any existing knowledge bases, you'll need to click Let's go instead in this step.)
-
On the AI Enabled tab of the window that appears, specify the following:
- Knowledge base name: Getting Started KB
- Domain: LP_Cross-vertical
- Language: English
- Content source: Leave this field blank, as you'll create articles from scratch.
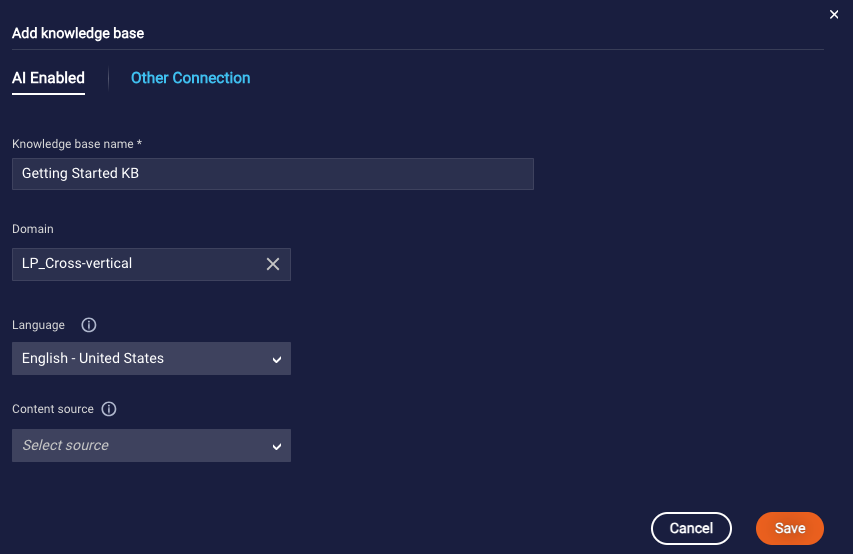
Click Save.
The next step is to add the FAQ articles that will be triggered by intents from our LP_Cross-vertical domain.
-
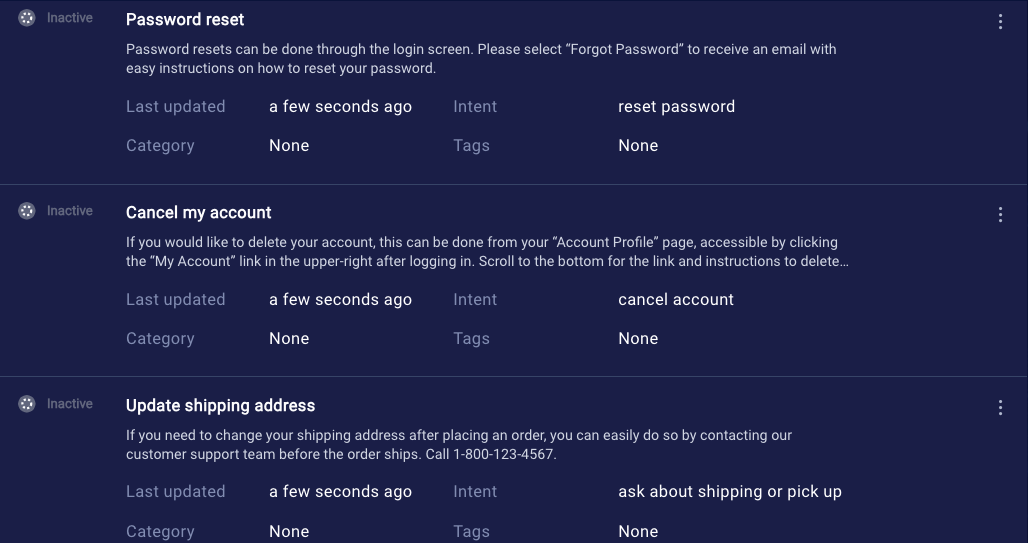
Click Add article in the upper-right corner to create your first article. Complete the Add Article form with the following information:
- Title: Password reset
-
Intent: reset password
The intent dropdown contains all of the intents within your associated domain. Use the search field or scroll down the list of intents to select the intent you want to surface this article.
- Summary: Password resets can be done through the login screen. Please select “Forgot Password” to receive an email with easy instructions on how to reset your password.
After completing these fields, click Save to create your article.

-
Back in our Getting Started KB page, repeat this process to add additional articles with the following information:
- Title: Cancel my account
- Intent: cancel account
-
Summary: If you would like to delete your account, this can be done from your “Account Profile” page, accessible by clicking the “My Account” link in the upper-right after logging in. Scroll to the bottom for the link and instructions to delete your account from our server.
- Title: Update shipping address
- Intent: ask about shipping or pickup
- Summary: If you need to change your shipping address after placing an order, you can easily do so by contacting our customer support team before the order ships. Call 1-800-123-4567.
-
Back in the Getting Started KB menu, confirm that the newly created articles are present in your list of articles. Note the Inactive designation, as all newly created articles need to be enabled prior to being accessible.
-
For each article, click the article title, scroll down to the Enable Article setting, and turn it on. Click Save.
In this section, you learned how to tie articles to intents, but this isn't a necessary step for a Production solution. Our AI Search method works well out-of-the-box; no intents are required.
The knowledge base has now been created. Navigating back to Conversation Builder, next you will use the Knowledge AI interaction to access and display this content.
Step 11: Create the FAQs dialog
In our Service Bot, we will now create a FAQs dialog which will be triggered by our FAQ meta intent.
-
Open the menu on the left side of the page, and select Automate > Conversation Builder to open Conversation Builder.
-
Open the Service Bot, which at this point only includes the Escalation dialog.
-
Add a new standard dialog (dialog type = Dialog): Click Add Dialog in the lower-left corner, and give the dialog a name of "FAQs". Click Save.
-
Using the Assist tool, associate the dialog starter with the LP_Cross-vertical domain and the FAQ meta intent.
As you do so, note the asterisk next to the FAQ intent, which serves to signify that it is a meta intent.
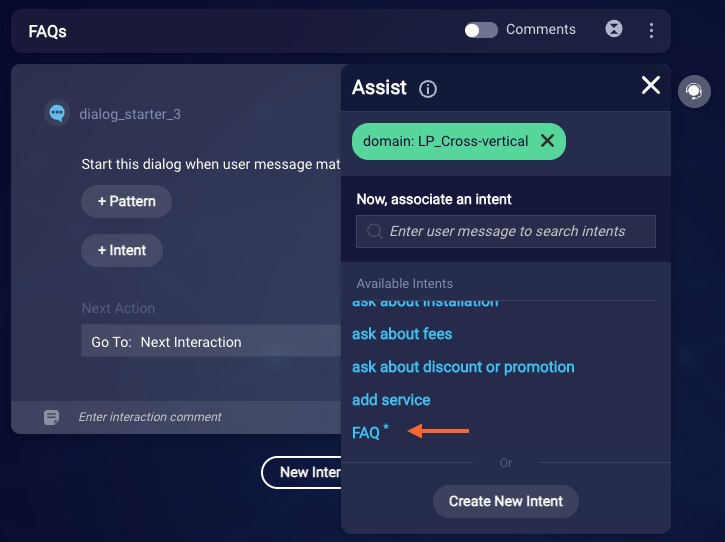
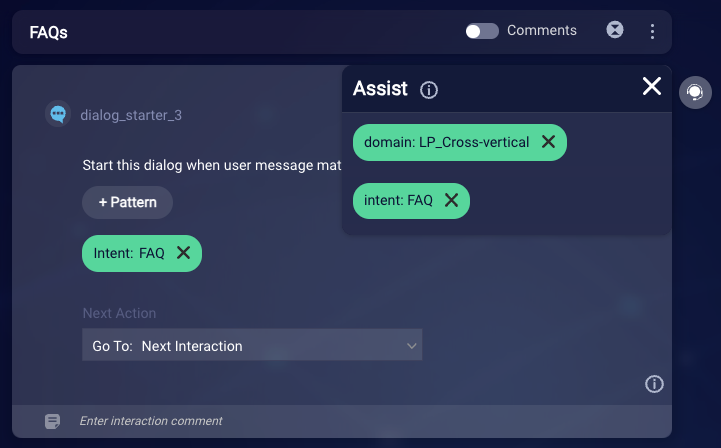
This ensures that any of the intents within the FAQ meta intent will trigger this dialog.
-
From the New Interaction menu, select the Knowledge AI interaction to add it to the dialog.

-
In the Knowledge AI interaction, use the Select knowledge base dropdown to select the Getting Started KB. And turn on the Enriched answers via Generative AI toggle.

You can ignore the warning in the UI about the default value for the Enrichment prompt. For the purpose of this tutorial, the default prompt will work just fine. In a real world scenario, you should select and use one of your own prompts as soon as possible. (You can copy one of LivePerson's if you choose.)
The Enrichment prompt is the prompt to send to the LLM service when the consumer’s query is matched to articles in the knowledge base. It instructs the LLM service on how to use the matched articles to generate an enriched answer.
-
Still in the Knowledge AI interaction, select the Settings (gear) icon and navigate to the Advanced menu.
The Knowledge AI offers several options in how to display the article contents.
-
For this example, select "1" for Max Number of Answers, and select "Auto render, plain" for Answer layout.
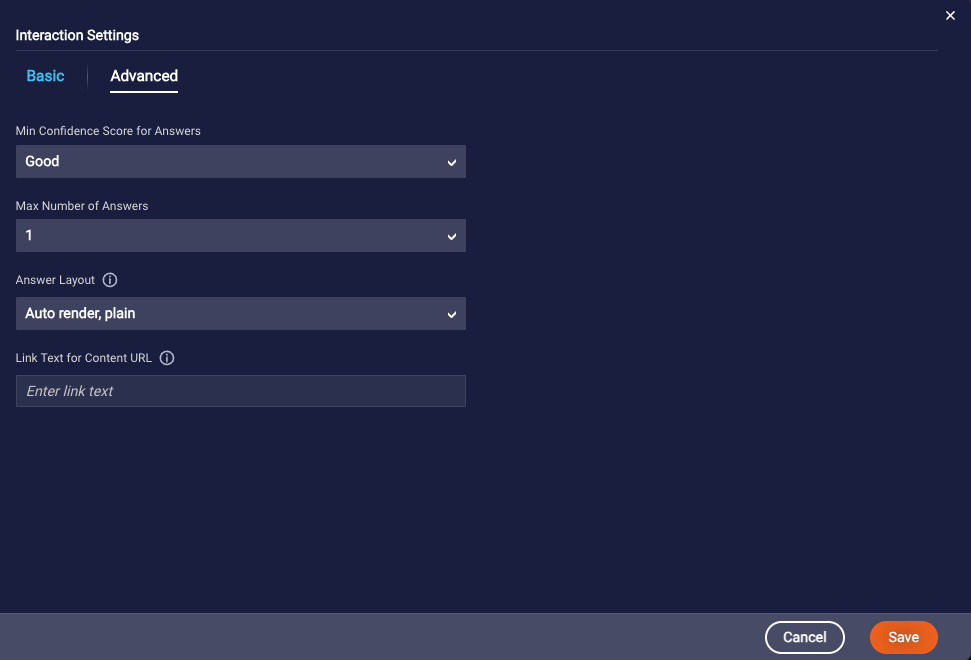
This will ensure that the results are displayed in the same conversational fashion as our other interactions.
-
Click Save.
-
Test by opening the Preview tool, resetting your session, and typing in a variety of phrases to trigger the intents contained in your FAQ meta intent. If successful, you will receive different responses for each intent despite the fact that you have a single meta intent that triggers this dialog.
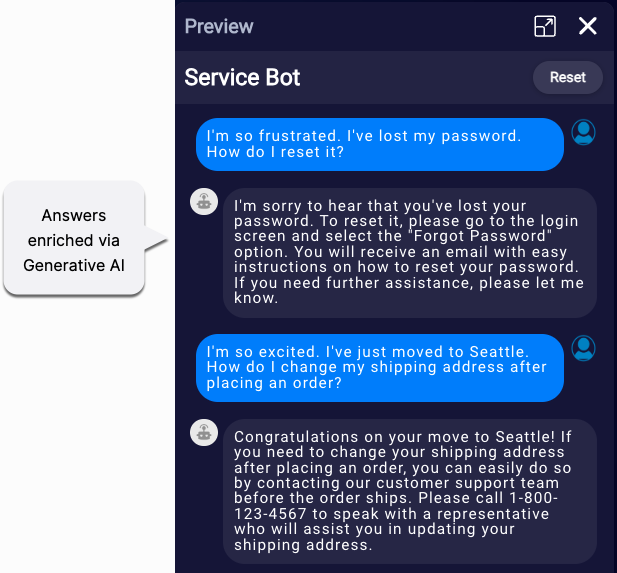
This is successful because, while the meta intent triggers the process, we are sending the user’s message to our knowledge base. Each of the articles within the knowledge base are triggered by individual standard intents. Adding additional FAQ responses simply requires nesting new intents under the FAQ meta intent and creating a corresponding Getting Started KB article. No additional dialogs will be required.
Note how the answers are grounded in knowledge base content, warm, and reflective of the conversation's context. Learn more about answers enriched via Generative AI.
Congratulations on completing this tutorial series!