
What’s File Upload?
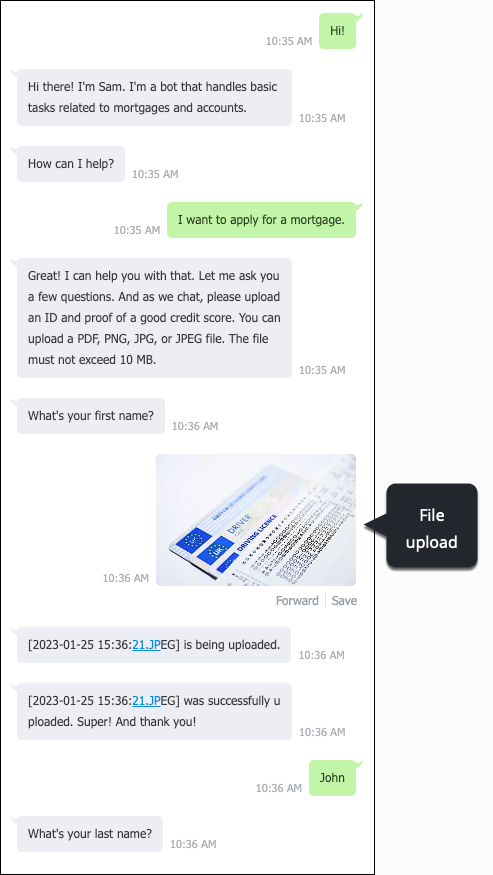
Sometimes during an automated conversation with a bot, the consumer needs to upload files to your organization. For example, a bot that handles mortgage applications might need the consumer to upload an ID and proof of a good credit score.
File Upload is the feature that makes it possible for consumers to upload files to your organization.
Important notes
- File Upload requires an integration of type "File." When you set up that integration, you can use any REST endpoint that can accept an upload.
- LivePerson isn’t responsible for the quality of the content that the consumer uploads to your brand’s file share, and no checks of this nature are performed by us.
Prerequisites
Before getting started, contact your LivePerson representative to enable file uploads. This requires that we do some backend configuration of your account.
Choosing an implementation approach
The way in which you implement File Upload within a bot depends primarily on your answers to these questions:
- What is the target channel?
- Do you need to support uploads to one or multiple locations?
- Can the uploads happen at any point in the bot flow, or do you want the uploads to happen at specific points?
We recommend you use the File Upload dialog whenever possible. It’s a best practice because the configuration is simpler, and the behavior is more flexible.
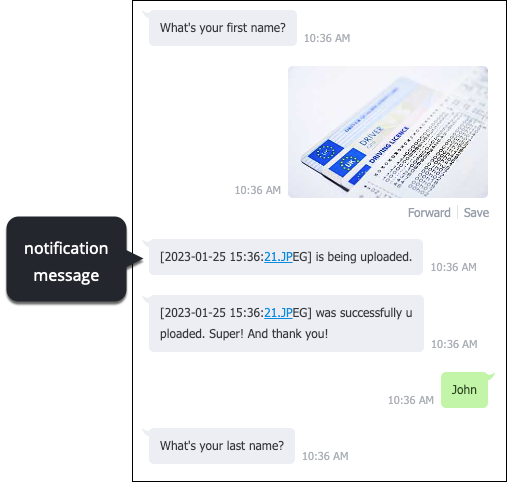
Regardless of your implementation approach, file upload is an asynchronous process: While the upload is in progress, the bot's conversation with the consumer continues. The consumer is advised of the upload status along the way via notification messages.
Limitations
Target channel
- The File Upload dialog is supported only on WhatsApp. For other channels, use the File Upload interaction.
File attributes
- The consumer can upload a maximum of 20 files at one time.
- The file to upload can’t be over 10 MB.
- Password-protected files can’t be uploaded.
- Channel-specific limitations might exist; check the channel in use.
We recommend that you advise the consumer of the file size limit during the conversation.
Parking lot bots
A parking lot bot is a solution that LivePerson’s professional services team has implemented for many brands. What does it do? When human agents are away, offline, or in off hours, or when the agent is waiting for the consumer to respond, the associated conversation is assigned to the parking lot bot temporarily. When the bot receives a consumer message (or a LivePerson Functions call or Web View call), it transfers the conversation back to the previously assigned agent, or it assigns the conversation to a new agent based on the rules for agent capacity and availability.
If you ask LivePerson to turn on the File Upload feature for your account (see Prerequisites), there exists a scenario where the parking lot bot doesn’t work as intended. The issue can happen regardless of whether you have added support for file uploads to any of your other bots. In other words, if you have us turn on the switch behind the scenes, an issue with your parking lot bot can occur.
Here is the issue that arises: When the consumer sends multiple messages quickly, or when they upload multiple files quickly, what should happen is that the parking lot bot uses the first message to trigger a proper transfer of the conversation to an agent (previous or new). All subsequent messages should be ignored. However, in practice, this isn’t happening. Subsequent messages are also processed, which leads to incorrect and failed transfers.
LivePerson supports the use of a parking lot bot in conjunction with other bots that perform file uploads, but note that this issue can occur, albeit as a rare scenario.
Bot groups
Overall, File Upload is only supported at the bot level, not the bot group level.
- When using the File Upload dialog: This approach only supports file uploads within the context of the bot that includes the File Upload dialog. For example, assume you have bots A, B, and C in a bot group. Both Bot A and Bot B have File Upload dialogs. Bot C has no such configuration. If the consumer is conversing with Bot C and tries to upload a file, this won’t be recognized as such, nor will the conversation or upload be transferred to Bot A or Bot B for handling. Bot C will treat the file upload like a consumer message, and the bot flow will continue accordingly. In most cases, the upload attempt will trigger a fallback flow.
- When using the File Upload interaction: This implementation approach is different from that for the File Upload dialog. This is a highly specific flow within a regular “business” dialog; it indicates exactly when to upload a file. Since this is the case, the same limitation applies: File uploads are only supported at the bot level, not the bot group level.
Upload to a single location (File Upload dialog)
Use the File Upload dialog whenever the bot must upload files to a single location.
We recommend you use this approach whenever possible. It’s a best practice because the configuration is simpler, and the behavior is more flexible. The approach should suit most use cases.
Watch the video
Key characteristics
- This solution is highly flexible and agnostic of your bot flow. The consumer can upload files at any point in the bot flow.
- The consumer can upload any number of files. And that number can be dynamic.
- The bot can upload files to only a single location.
Components
In the bot, you need:
- An integration of type File
- A dialog of type File Upload
Setup and configuration
In the bot:
- Add an integration of type "File." It specifies how and where to upload files, i.e., the location of your brand’s external file share.
-
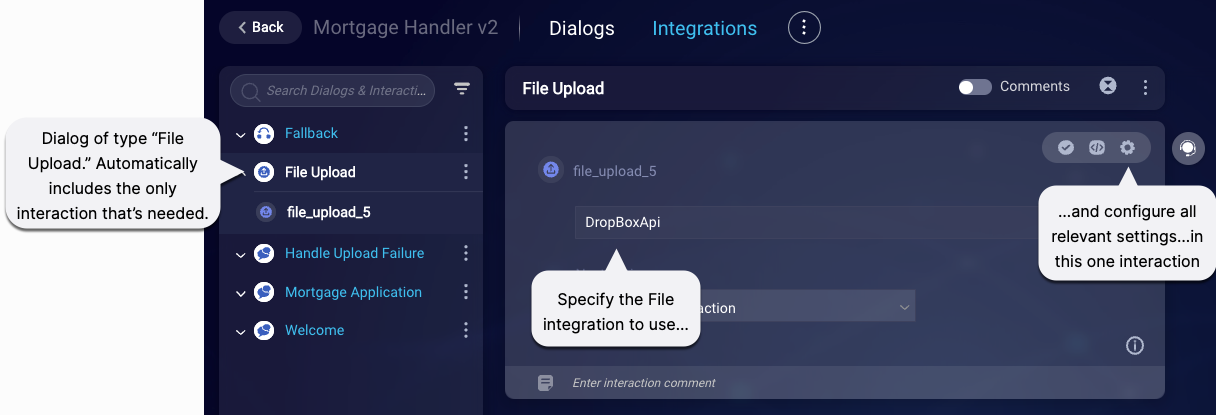
Add a dialog of type "File Upload."
The dialog automatically includes the one interaction that you need to configure. The bot can have only one of these dialogs, and the dialog can and must have only one of these interactions and no other interactions. Therefore, when you’re working in this dialog, the interaction tool palette is hidden from view.
The interaction handles the upload of all files to your brand’s external file share.
In the next step, you configure several notification messages in the interaction. There are a few things to note:
- Messages are sent per file that’s uploaded.
- You can include botContext and environment variables in the messages.
- The name of the file uploaded by the consumer is automatically prepended to each message. Note that, in cases where there is no file name (which can happen depending on how the file is uploaded), a date/timestamp is used as the default file name, for example: [2023-01-25 13:59:04.JPEG].
- If you don’t want to send a particular message, enter “BLANK_MESSAGE” as the value.
-
In the interaction, click
 (Settings icon), select the Advanced tab, and configure the available settings:
- Accepted file types: Select the types of files that you will accept for upload (PDF, JPEG, PNG, etc.). If the consumer attempts to upload a file of any other type, the upload will fail, and the “Unaccepted file type” message will be sent to the consumer.
- “Successful upload” message: Enter the message to send to the consumer if the file upload to your external file share is successful. If you leave this field blank, the following value is used: “Successfully processed the file.”
- “Failed upload” message: Enter the message to send to the consumer if the file upload to your external file share is unsuccessful due to an error. If you leave this field blank, the following value is used: “Failed to process the file. Please try again.”
- “Unaccepted file type” message: Enter the message to send to the consumer if the upload fails because the consumer has attempted to upload a file of an invalid type. If you leave this field blank, the following value is used: “The file type is invalid. Upload one of these types: {a}, {b}, {c}.” A, B, and C are drawn from the configuration of accepted file types, so this info is dynamic.
- “Upload in progress” message: Enter the message to send to the consumer when the upload begins. If you leave this field blank, the following value is used: “Processing the file…”
With this configuration, the consumer is free to upload files at any point in the bot flow.
Typically, there’s no need to define any custom rules for the interaction, especially since file upload is an asynchronous process. (See also Handling success and failure, which is farther below.)
Prompting the consumer to upload files
Depending on your use case, you might want to prompt the consumer to upload files. That is, you might want to make them aware that they must do this and let them know what types of files are accepted and the file size limit (to ensure a smooth process).
To accomplish this, in the regular dialog (the one responsible for the bot flow), use a Text statement to send an appropriate message. To ensure the consumer has time to read the message, you can add an interaction delay to the interaction that follows it.
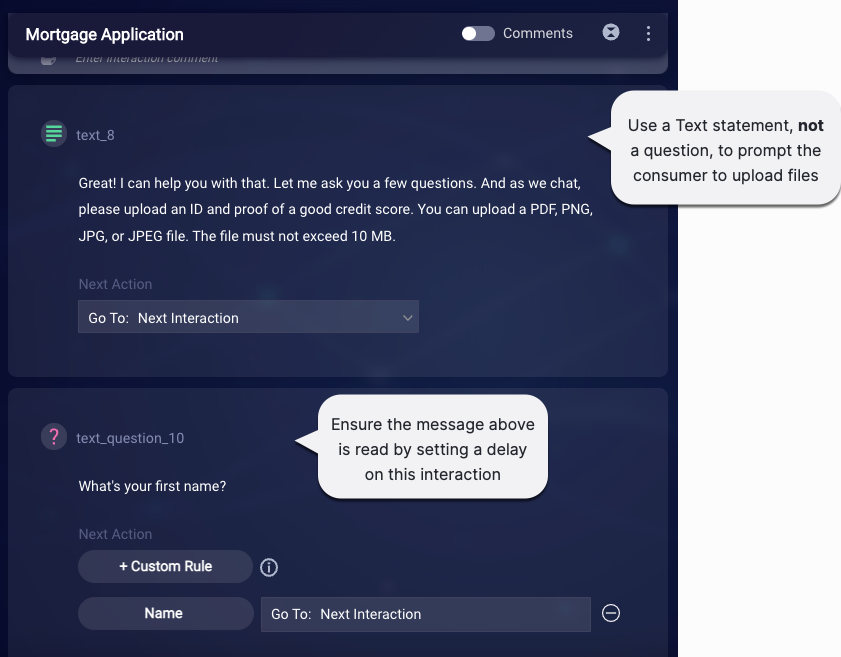
Don’t use a question interaction to prompt the user to upload files. This won’t trigger the upload. Instead, the conversation will stop there and wait for a recognized response (a message) from the consumer, which will not come.
For their part, the consumer can upload files however the channel allows.
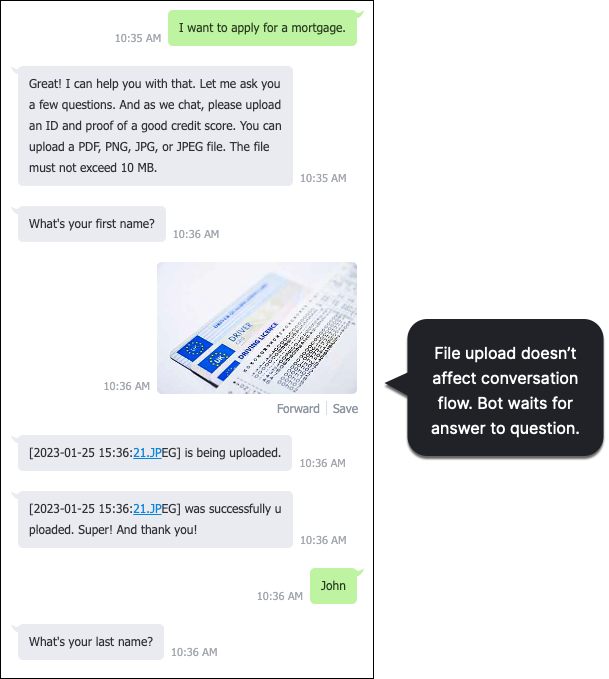
An unaffected conversational flow
While the bot does send notification messages to the consumer about the status of files being uploaded, these are just inserted midstream into the ongoing conversation. The conversation itself remains unaffected (unless you’re explicitly handling failure or success). So, if the bot is waiting for an answer to a question, the bot will continue to wait for that answer.
Upload to multiple locations (File Upload interaction)
Use the File Upload interaction that’s available on the interaction palette whenever the bot must upload files to multiple locations, or when you want the uploads to happen at specific points in the conversation.
Key characteristics
- This is a highly specific implementation: You must place the interactions involved at the exact point in the dialog flow where a file needs to be uploaded. Only at such a point is an upload handled by the bot.
- The consumer can upload a specific number of files – one or more. But that number can’t be dynamic. It’s based on the configuration in the bot flow.
- The bot can upload files to multiple locations. This requires multiple File integrations. And it also requires that you repeat the configuration multiple times in the bot.
Components
In the bot, you need:
- An integration of type File (reusable)
- An interaction of type File Upload (one per file to upload)
- An interaction of type Integration (one per file to upload)
Setup and configuration
In the bot:
- Add an integration of type “File.” It specifies how and where to upload files, i.e., the location of your brand’s external file share.
-
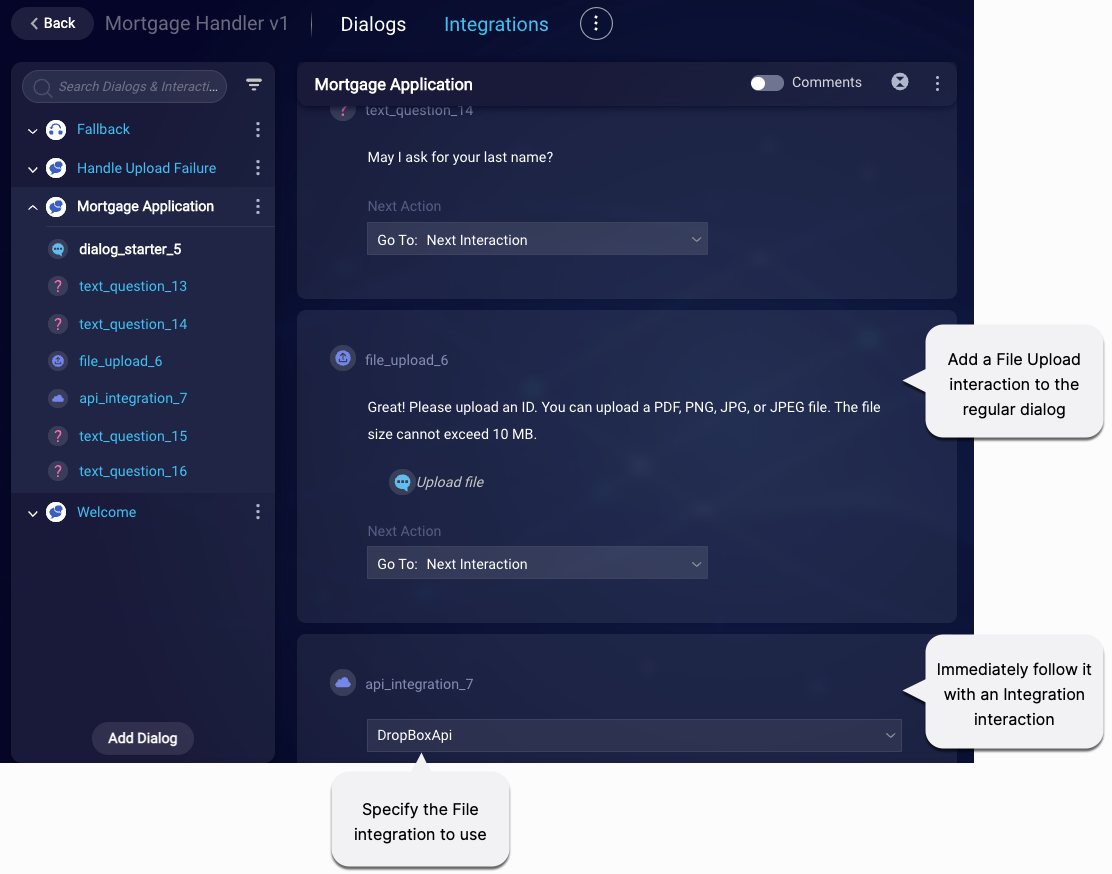
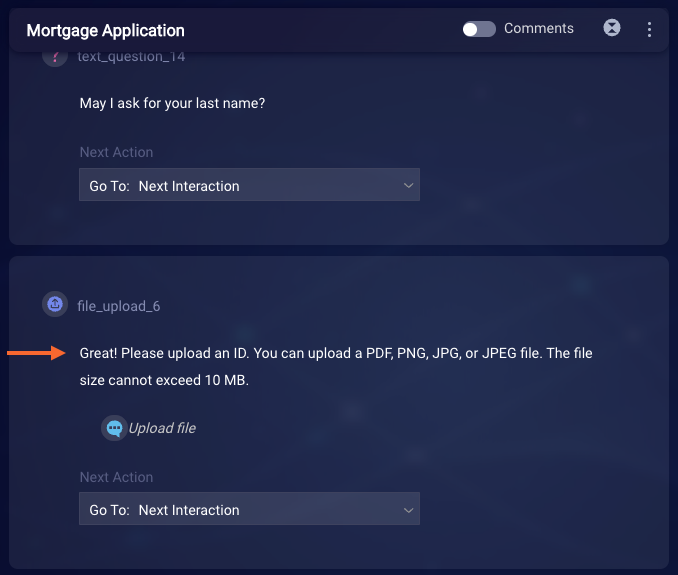
Identify the exact point in the bot flow (in the regular “business” dialog) where the consumer must upload a file, and add the File Upload interaction there. Directly on the interaction’s face, enter the message to send to the consumer. We recommend that this message prompt them to upload a file of an acceptable type and advise them of file size limits.
In the next step, you configure several notification messages in the interaction. There are a few things to note:
- Messages are sent per file that’s uploaded.
- You can include botContext and environment variables in the messages.
- Unlike when using a File Upload dialog, the name of the file uploaded by the consumer is not automatically prepended to each message.
- If you don’t want to send a particular message, enter “BLANK_MESSAGE” as the value.
-
In the File Upload interaction, click
(Settings icon), select the Advanced tab, and configure the available settings:- Accepted file types: Select the types of files that you will accept for upload (PDF, JPEG, PNG, etc.). If the consumer attempts to upload a file of any other type, the upload will fail, and the “Unaccepted file type” message will be sent to the consumer.
- “Successful upload” message: Enter the message to send to the consumer if the file upload to your external file share is successful. If you leave this field blank, the following value is used: “Successfully processed the file.”
- “Failed upload” message: Enter the message to send to the consumer if the file upload to your external file share is unsuccessful due to an error. If you leave this field blank, the following value is used: “Failed to process the file. Please try again.”
- “Unaccepted file type” message: Enter the message to send to the consumer if the upload fails because the consumer has attempted to upload a file of an invalid type. If you leave this field blank, the following value is used: “The file type is invalid. Upload one of these types: {a}, {b}, {c}.” A, B, and C are drawn from the configuration of accepted file types, so this info is dynamic. To help to avoid validation failures, consider mentioning the acceptable file types in the File Upload message, as we've done in the image above.
- “Upload in progress” message: Enter the message to send to the consumer when the upload begins. If you leave this field blank, the following value is used: “Processing the file…”
-
Immediately after the File Upload interaction, add an Integration interaction. Directly on the interaction’s face, select the File integration that you created earlier.
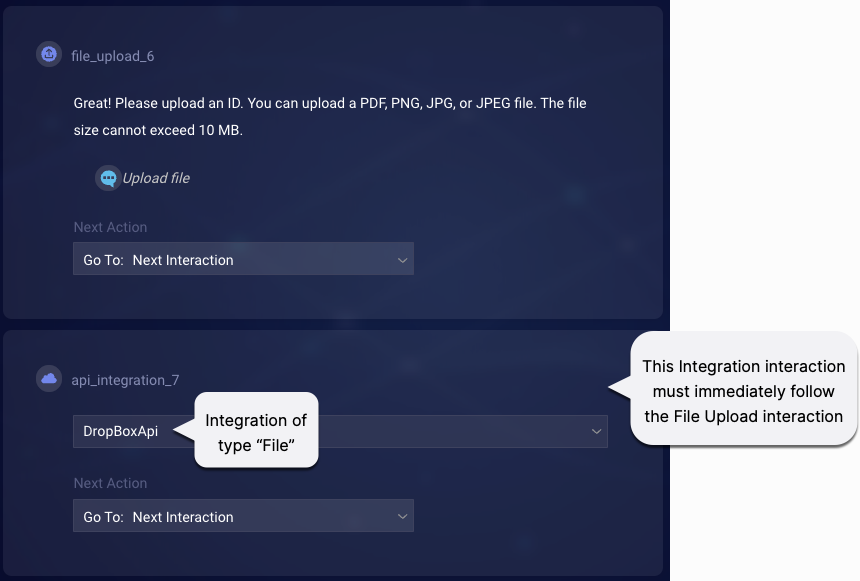
The File integration handles upload of the file from Conversational Cloud to your brand’s external file share.
-
Repeat the above setup wherever the consumer must upload a file. You can repeat the setup as many times as you need. The File integration that you use can be the same or different. There is one constraint:
If the consumer must upload multiple files, use different dialogs to accomplish this so that there is only one File Upload interaction in a single dialog.
Handling success or failure
If desired, you can route the conversation to a different dialog flow based on whether the file upload succeeded or failed. For example, you might want to do this to prompt the consumer to try again.
To route the conversation if an upload fails, create a dialog that begins with a dialog starter that matches the following pattern:
file_upload_failed:{your failure message}
Spaces in the message are permitted, for example:
file_upload_failed:failed to upload
Similarly, if desired, you can route the conversation if the upload succeeds by matching the following pattern:
file_upload_success:{your success message}
Two other points here:
-
Implementation - If you’re using the File Upload interaction (not the File Upload dialog), and the consumer must upload multiple files, you might have several different failure and success messages in use. If you want to handle all failures and successes in the same way, use the * wildcard character to match all of the messages that might be sent, i.e.,
file_upload_failed:*file_upload_success:* -
Behavior - If your bot is using context switching, once the failure/success dialog flow is finished, the consumer is returned to the flow that was in progress just before the failure/success.
Testing
You can’t test File Upload using the Preview window. Deploy the bot to test.
Additionally, be aware that LivePerson’s Web messaging emulator doesn’t support the upload of multiple files at once. Trying to upload multiple files only results in the upload of a single file. So use a different channel (for example, WhatsApp) to test.
Best practices
- Use the File Upload dialog whenever possible. The configuration is simpler, and its behavior is more flexible.
- Currently, File integrations don’t support the use of credentials as an authorization mechanism for using the integration. Ensure you have a way of authenticating and authorizing before invoking your brand’s API for uploading files. Save the authentication token in the botContext in any manner you prefer. If you’re using the File Upload dialog, ensure you do so before the consumer can upload files (for example, you might want to save the token when the conversation is initialized). If you’re using the File Upload interaction, you can do so in the interaction that precedes the File Upload interaction.
Troubleshooting
If you encounter errors, verify the File integration that’s being used is configured properly. This is a common cause of errors.
FAQs
When multiple files are uploaded, are they uploaded as one binary file?
No, the files are streamed one by one. The consumer may upload multiple files at once, but the bot always streams them to the endpoint one at a time.
What Content-Type should I use in the File integration?
If the media type can vary (PDF, PNG, etc.) or if the endpoint uses a streaming API, use octet-stream as the Content-Type. octet-stream is a generic media type. Alternatively, if the media type is always one type, you can be more specific: application/pdf for PDF, image/png for PNG file, etc.
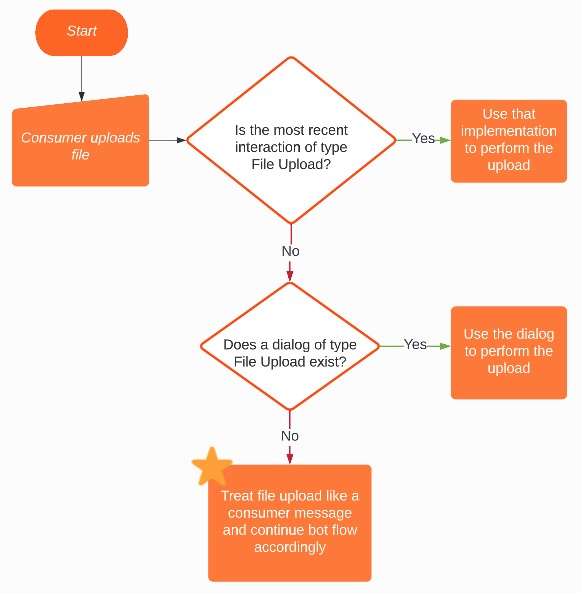
What happens if the consumer tries to upload a file but support for this hasn’t been added to the bot?
The file upload is treated like a consumer message and the bot flows continue accordingly. In most cases, a fallback flow is triggered.
When the file upload is treated like a consumer message, the bot gets the file name as the message. In cases where there is no file name (which can happen in some cases depending on how the file is uploaded), the bot gets this message: __EMPTYTEXT__
I’m already using the File Upload interaction in my bot. Does it still work?
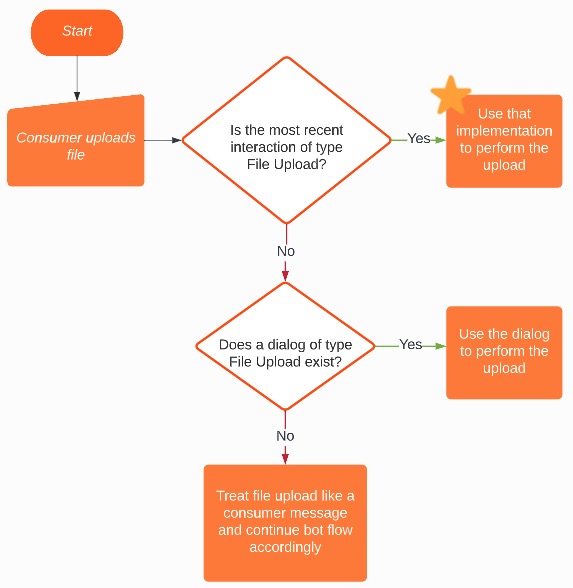
Yes, it does. You don’t have to make any changes to an existing bot that uses the File Upload interaction.
When a consumer uploads a file, the bot performs a check to see if the most recent interaction is of type File Upload. If it is, that implementation (as configured in the current dialog) begins. The flow for the File Upload dialog is never reached.
In a bot, can I use both approaches (File Upload dialog and File Upload interaction)?
Yes, you can.
Is validation done based on the file’s size?
No, this isn’t done. In the bot flow, advise the consumer of applicable size limitations.
If a file upload fails, is the process retried?
No, it isn’t. Considering handling failure as described above.
If the consumer is conversing with Bot A and tries to upload a file, but the consumer is then transferred to Bot B or a human agent, does the consumer receive any of the notification messages about the status/outcomes of the uploads?
No, they won’t receive the messages in this case. Situations like this should be infrequent.
If the consumer uploads the same file more than once, what happens?
The file will be uploaded more than once. So, for example, if the consumer uploads their driver’s license two times, then two files will be uploaded to the destination. And the consumer receives two success messages.
Is there a way to know why the upload of a file has failed?
With either approach (dialog or interaction), there’s a customizable validation message that is sent when the file isn’t of an accepted type. This message is sent to the consumer when appropriate. Apart from this, it’s not currently possible to know why the upload of a file has failed.
Is there a way to know the final name or ID that was given to the file that was uploaded successfully? Or the location to which it was uploaded?
No, currently this isn’t possible.
When using the File Upload dialog, is there a maximum number of files that can be uploaded?
The consumer can upload any number of files, but only 20 files at one time. There is no maximum number overall.
I’m using “BLANK_MESSAGE” as the value for one of the notification messages. I see this value when testing with the Preview tool. Does the consumer ever see this value?
No, the consumer doesn’t see this in the channel. The consumer experience is that no message is sent at all. “BLANK_MESSAGE” is only visible in the Preview tool.
Info for Accessibility users
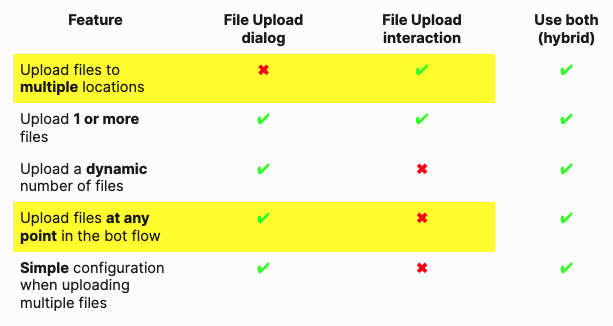
For users with Accessiblity needs, here below is a text-based version of the table presented in "Choosing an implementation approach" farther above.
| Feature | File Upload dialog | File Upload interaction | Use both (hybrid) |
|---|---|---|---|
| Upload files to multiple locations | No | Yes | Yes |
| Upload 1 or more files | Yes | Yes | Yes |
| Upload a dynamic number of files | Yes | No | Yes |
| Upload files at any point in the bot flow | Yes | No | Yes |
| Simple configuration when uploading multiple files | Yes | No | Yes |