
Introduction
When creating a bot, there might be instances where you need to externalize certain values or constants. Environment variables let you create a set of values that you can subsequently tie to a particular bot instance.
For example, if you have a bot that has both a Sandbox and Production version, 99% of the functionality will be the same, but certain values (like skill IDs for instance) might be different. Defining and storing these values outside of the bot makes them easier to manage.
Use bot environments to store static configuration data that's common across automations, for example:
- API domains
- Skill IDs
- Email addresses and phone numbers (e.g., an email address or phone number for contacting your brand's Support team)
- Working hours
- URLs
Benefits of bot environments
- Management of configuration data is less error-prone.
- Duplication of code is prevented.
- The deployment process is streamlined, as there’s no need to change data in the bot just before you deploy.
Best practices
- Always leverage bot environments when appropriate.
- Don’t leverage bot environments to store API credentials. If you use credentials (API key, API token, etc.) to make an API call, it’s better to request this from LivePerson Functions and use LivePerson Functions Secret Storage to store the credentials.
- For security reasons, don’t use authorization tokens in environment variables.
System environment variables
LivePerson Conversation Builder includes a number of environment variables that you can use to take advantage of associated bot behaviors:
Variable for overriding the interaction limit
system_maxIterationLimit
Use the system_maxIterationLimit to override the limit of 10 when chaining together consecutive Statement and/or Integration interactions. You can specify a value between 11 and 50 inclusive. Nothing lower than 11 makes sense because the default limit is 10. If you specify a value that's higher than 50, the system will use a value of 10.
Use caution when using this environment variable, and test thorougly to ensure the bot doesn’t get stuck in a loop.
Variables for customizing disambiguation
You can use these environment variables to customize how disambiguation works:
system_groupConsecutiveIntentRanksInDisambiguationsystem_useIntentsOnlyWithDialogStartersInDisambiguation
Variables for preventing consumer interruptions
These environment variables work together to prevent consumer interruptions while the bot is responding to the consumer:
system_handleIntermediateUserMessagesystem_intermediateBotMessagesystem_intermediateBotResponseTimeout
Add environment variables
If you are using multiple bot instances (e.g., a Sandbox version and a Production version), you would create a Sandbox environment and a Production environment and then associate the specific environment with the specific bot.
To add environment variables
- From the dashboard that lists your bots, click Bot Environments in the upper-left corner.
- Click Add Environment in the lower-left corner.
-
Specify the following:
- Environment Name: Enter a descriptive name. For example, you might have Sandbox and Production instances (e.g., "Router Bot Sandbox").
- Environment Values: Enter the key/value pairs for each variable. Variables cannot have spaces or special characters in their names, only letters and numbers. There is no character limit for the value in the key/value pair.
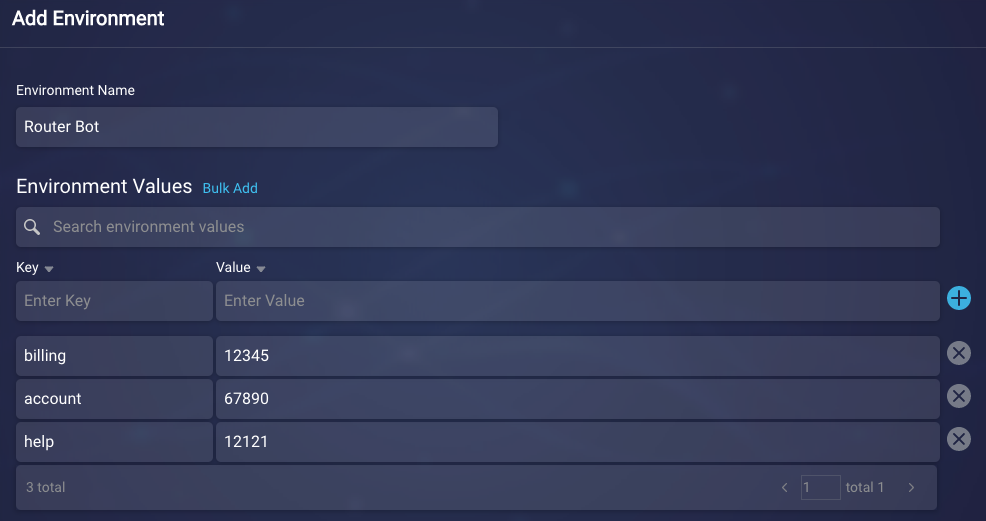
You can add the key/value pairs one by one using the fields provided. Alternatively, click the Bulk Add link and enter them in key=value format in the text box provided. The text box also lets you copy the values from another source and paste them in.
- Click Save.
Link environment variables to a bot
Once you’ve created an environment, you need to connect it to your bot.
To link environment variables to a bot
- Open the bot, and click
 (3-dot icon) in the upper-left corner, just to the right of the menu bar.
 - Click Bot Settings from the menu that appears.
- Scroll down, and click More Settings.
- For Bot Environment, select the name of the environment.
- Click Save.
Use environment variables
There are two ways you can call environment variables.
For JavaScript, use the following notation: botContext.getEnvVariable(variableName);
For example:
switch(intent) {
  case "billing":
    transferMessage = "Hold on while I transfer you to someone who can help with your billing";
    skillId = botContext.getEnvVariable('billing');
    skillName = intent;
    break;
  case "account":
    transferMessage = "Hold on while I transfer you to someone who can help with your account";
    skillId = botContext.getEnvVariable('account');
    skillName = intent;
    break;
  case "help":
    transferMessage = "Hold on while I transfer you to someone who can help with your issue";
    skillId = botContext.getEnvVariable('help');
    skillName = intent;
    break;
}
To display an environment variable directly in text, use the following notation: {$env.variableName}
For example:
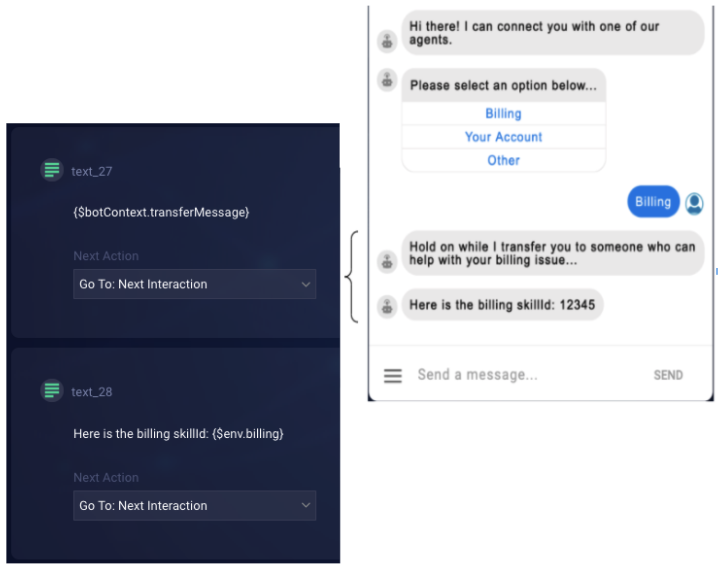
Export environment variables to a CSV file
Exporting a set of environment variables is useful when you need to "move" the values from one environment to another, e.g., from Development to Staging, or from Staging to Production. You can export the variables and then use the Bulk Add feature (and copy/paste) to add them to the new environment.
To export environment variables to a CSV file
- From the dashboard that lists your bots, click Bot Environments in the upper-left corner.
- In the left panel, select the environment.
- In the right panel, under More Options, click
 (Download icon) beside Export Environment Variables.
 - Follow the browser prompts to access and save the CSV file to a location of your choice.