
Questions present information to the user (a question that expects a reply of some kind, a list of things to pick from, etc.), and they expect and wait for a user response before executing the next action.
With a question, you can take the user’s response, evaluate it against a condition (i.e., does it match a pattern, an intent, a regular expression, or an exact value?), and then act accordingly. For example, if you ask the user for a 7-digit account number, you’ll likely want to perform a check that the user entered exactly 7 numbers. If the user did, you can then safely pass that value into an API call or perform some other action with it. For some practice at this, try the Intents tutorial. (You’ll need to complete the Dialogs and Patterns tutorial first, as they build on one another.)
User responses to question interactions can be saved in variables, making them available for future use.
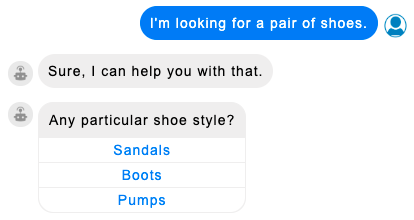
Multiple choice
Multiple choice questions let the consumer select an answer from a list of choices.
Multiple choice questions aren't supported on Viber.
One powerful feature of multiple choice questions is that the bot can be configured to respond to answers not appearing in the list through the use of entities.
Question text
Enter the question to send. The maximum character length is 255.
For proper performance, always take care to enter the question.
Choices
Enter the answer choices. The number of choices depends on the channel, so check the limitations for the channels in use. (For example, Facebook restricts this to three options.) For each choice, 20 characters or less is recommended.
The user can either enter or select the answers.
Interaction settings
Configure the following settings in the interaction's settings:
- Display Choices as: Select whether you want to display the choices as buttons (shown above) or quick reply “chips” (shown below).

-
Choices per Row: This setting is available when you select to display the choices as quick reply "chips" (in Display Choices as). Select the number of answer choices to present in a single row. Example: You have 8 answer choices, and you select "3" here. So, 3 choices will be presented in the first row, 3 in the second row, and the remaining 2 in the last row. Note that a maximum of 3 rows are used; the third row includes all the answer choices not included in the first 2 rows.
-
Text Only Fallback → List Style: When you deploy your bot to a channel that doesn't support rich content formatting (i.e., SMS, Apple Messages for Business or WhatsApp), a multiple choice question is automatically sent as plain text. Use this setting to select the list style (1. 2. 3. 4. or a. b. c. d.) to use for channels that support only plain text.
-
Enable Indentation: Affects the display of options in text-only channels. Enable this to indent (with one tab space) the multiple choice options under the question. Disable this to align them under the question without an indent.
Notes on Multiple Choice questions
- For the number of buttons that you can add, check the limitations for the channels in use. (For example, while Conversational Cloud doesn't have a limitation here, Facebook's limit is 3 buttons.)
Text
Text questions expect and wait for a text-based response from the consumer.
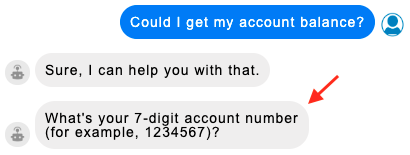
With text questions, it’s recommended that you include an example of an expected response, like is done in our example above. This helps to increase the likelihood of a valid response.
Question text
Enter the question to send. The maximum character length is 255.
Structured
Most conversations involve plain text like what you are reading now. However, a structured question lets you send content (images, buttons, maps, quick replies, etc.) to a consumer in a richer, interactive, and structured format.
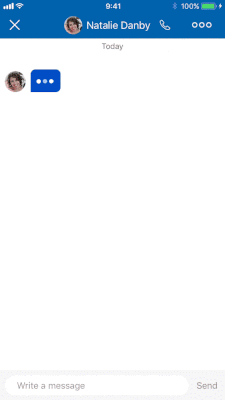
Like with any question, a structured question expects and waits for the user response before executing the next action.
Structured questions aren't supported on all channels. Be sure to verify the channel's support before designing your bot. For example, Facebook supports structured questions, but Apple Messages for Business doesn't. Apple Messages for Business offers its list picker instead.
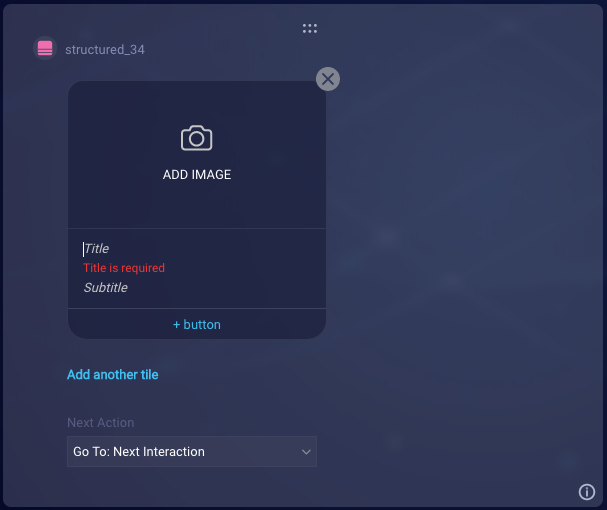
Tile settings
| Setting | Description | Required or Optional | Example |
|---|---|---|---|
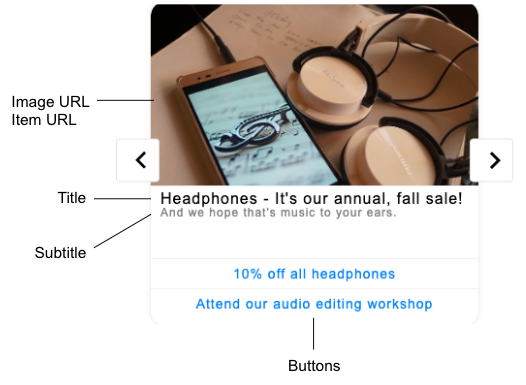
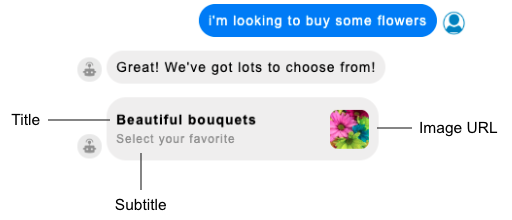
| ADD IMAGE → Image URL | The URL of the image to display. The domain in the URL must be whitelisted. | Optional | https://www.mysite.com/images/headphones.jpg |
| ADD IMAGE → Item URL | The URL of the resource to load when the image is clicked. | Optional | https://www.mysite.com |
| Title | The title of the message. Enter a maximum of 255 characters, but be aware that the actual maximum length depends on the channel and could be shorter. Check the limitations for the channels in use. Variables are permitted. | Required | Headphones — It’s our annual fall sale! |
| Subtitle | The subtitle of the message. Enter a maximum of 255 characters, but be aware that the actual maximum length depends on the channel and could be shorter. Check the limitations for the channels in use. Variables are permitted. | Optional | And we hope that’s music to your ears. |
Button settings
| Setting | Description | Required or Optional | Example |
|---|---|---|---|
| Button Label | The button text to be displayed. Conversational Cloud allows for up to 128 characters, but channel-specific restrictions do exist, so the actual maximum could be shorter. (For example, Facebook only allows for up to 20 characters.) Variables are permitted. | Required | 10% off all headphones |
| Action Type | If you want the button to be a link that takes the consumer to a URL, select Web URL. Then enter the URL in the Callback field. If you want to use the button to send back to the bot a value as the consumer's message, select Postback here. Then enter the message to send back as the payload in the Callback field. Postback for Bookmark, Phone number, and Share are legacy features that are no longer supported. |
Required | Web URL |
| Webview | This is a legacy feature that's no longer supported. | Not applicable | Not applicable |
| Target | Applies when the Action Type equals “Web URL." Select whether to open the URL in a new window, the current window, or a slideout window. The slideout window "slides out" from the side of the conversation window, which can be an attractive and tightly integrated experience. Note: The Slideout option is supported for Web messaging. Additionally, the target URL must be iFrame compatible. Many companies' websites (Google for instance) employ code to prevent their inclusion in an iFrame, so this must be tested. | Required | New Window |
| Callback | Enter the data to send back to the bot. If you select "Web URL" for the Action Type, this value should be a URL. If you select "Postback" for the Action Type, this value should be whatever you want to send back to the bot as the consumer's message. You can enter the value for the button label or a different value (e.g., the number "5" instead of the word "Excellent"). Entering a different value works depending on the channel in use (e.g., there's support in Facebook but not in SMS). Make sure to test and verify on the device or in the application. Entering the same value for both the button label and the callback value will always work. If required for your use case, you can use the enableButtonTextOnPostback custom configuration field in the bot’s agent connector. If you set the field to true, the selected button’s label, not the button’s callback value, is displayed to the consumer as their selected choice. Otherwise, the button’s callback value is displayed instead. See our discussion on enableButtonTextOnPostback for limitations regarding variable usage. |
Required | https://www.mysite.com/coupons/headphonesCoupon.html |
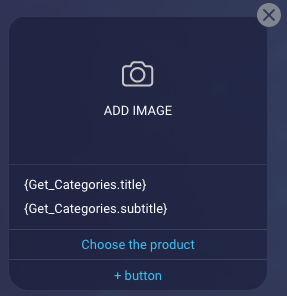
Populating a Structured question dynamically
You can populate the tiles with static information, or they can be dynamically populated during run time, for example, using data received from an API integration.
Button clicks: Sending metadata back to the bot
In a Structured question, you can set metadata in a button’s configuration. During a conversation, when the consumer clicks the button, that metadata is sent back to the bot in the conversation’s metadata. You can retrieve the metadata using the getMetadata scripting function in the Process User Response code of the question.
There are many use cases where this capability can be useful. Here are a few:
- Scenario 1: You have a bot that includes a Structured question that gets populated with products the consumer is interested in. For each product, there’s a “Details on this” button that links to the product’s details page on your website. You add metadata to this button so that, when the consumer clicks the button, the product’s ID is sent back to the bot in the conversation metadata. The bot then retrieves and uses the product ID to determine the next action in the flow. You also track the event for analytics purposes (by logging a custom event that can later be viewed in Bot Analytics, or by posting the data to your external system via an API integration).
- Scenario 2: You have a bot in Facebook that includes a Button question with a button to start direct messaging with an agent. You add metadata to this button so that, when the consumer clicks the button, info on that social messaging event is sent back to the bot in the conversation metadata. The bot then retrieves the event info and uses it to determine the next action in the flow, for example, closure of the bot conversation. Note that Button questions are discussed in-depth elsewhere on this page.
To send metadata back to the bot when the consumer clicks a button
-
Add and configure the button’s settings as required. For help with this, see the relevant section that’s farther above on this page.
-
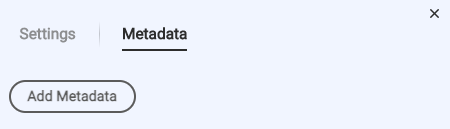
Switch to the Metadata tab, and click Add Metadata.
-
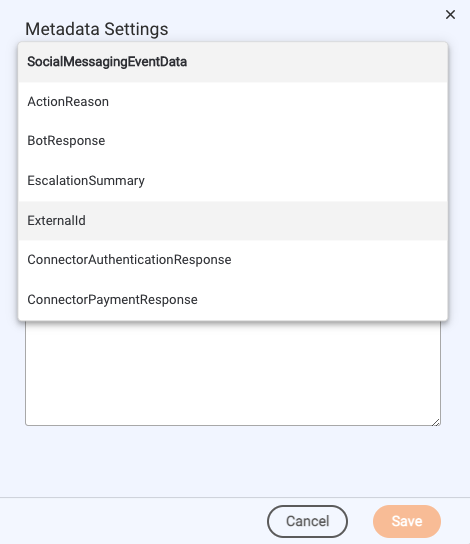
Select the type of metadata to add; you can add any of the types described in this section. In the LivePerson Conversation Builder UI, the available choices are named by metadata type.
-
Enter the JSON. As a help, some default JSON is provided to illustrate the proper format to use.
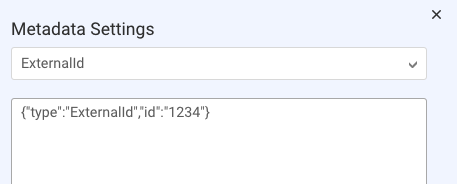
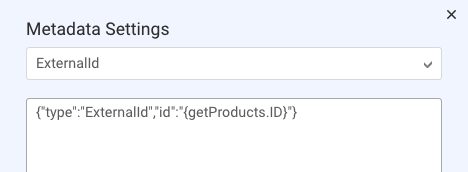
When writing the JSON, ensure it’s well-formed and conforms to the proper format. You can reference botContext variables as well as the custom data fields in API integrations. In our example below, we’re referencing the latter.
-
Click Save.
-
Add more metadata objects if desired. You can add as many as you need. Typically, each is of a unique type, and there are just a few.
Example
As an example, let’s break down one of the aforementioned use cases with some more detail.
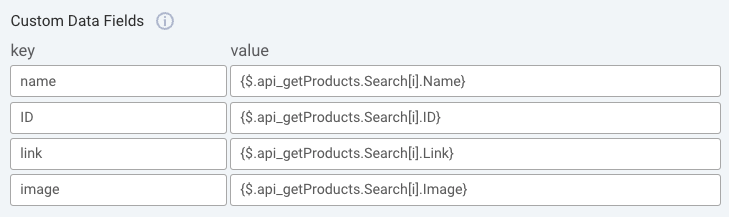
Assume you have a bot that includes a Structured question that gets populated with products the consumer is interested in. This is accomplished with an API call to your system for the data. In your API integration, you capture the response data in a number of custom data fields:
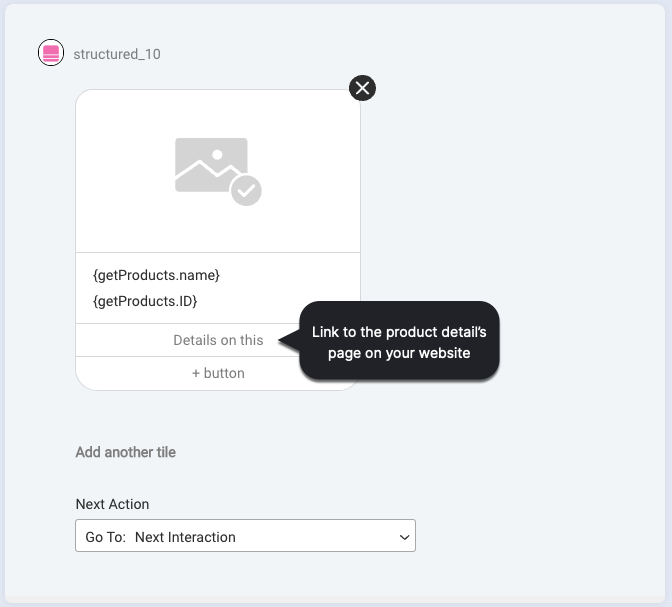
Back in the dialog, the Structured question looks like this below. For each product, there’s a “Details on this” button that links to the product’s details page on your website.
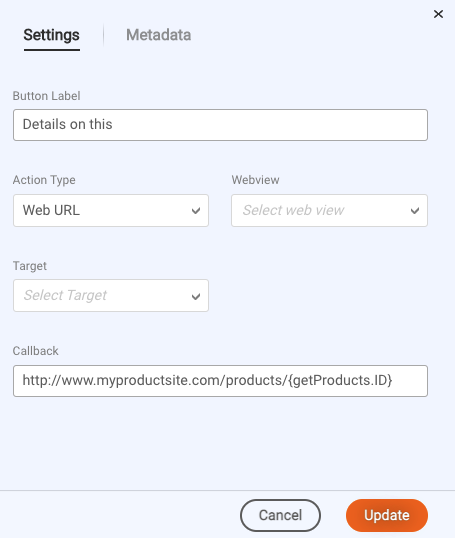
On the Settings tab, the button is configured to use the “Web URL” action type, so the callback is set to the URL to which to take the consumer.
On the Metadata tab, there’s one metadata object added: “ExternalId.” This is used to track the consumer’s selection of the “Details on this” button.
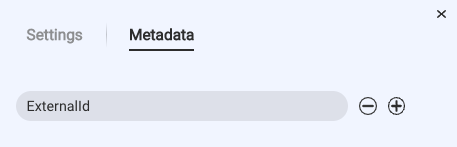
The metadata object is configured so that, when the consumer clicks the button, the product’s ID is sent back to the bot in the conversation metadata.
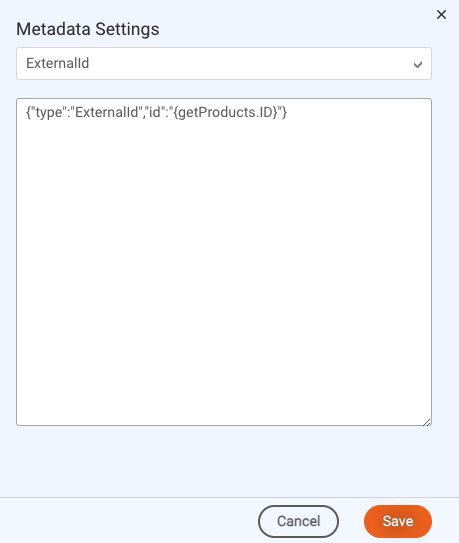
Finally, in the Process User Response code of the interaction, the bot retrieves and uses the product ID to log a custom event to track the click event, and to determine the next action in the flow. The code looks like this:
var metadata = botContext.getMetadata(“ExternalId”);

if (metadata && metadata.id) {
    botContext.logCustomEvent(metadata.id, 'Selected Product');
    botContext.setTriggerNextMessage('Offer Related Items');
}
Need help understanding custom data fields in API integrations? See this section. Wondering when the Process User Response code gets invoked in the interaction? See this section.
Notes on Structured questions
- You can include a maximum of 10 tiles.
- For the number of buttons that you can add, check the limitations for the channels in use. (For example, while Conversational Cloud doesn't have a limitation here, Facebook's limit is 3 buttons.)
- When multiple items are present in the interaction, they can be displayed vertically–which is the default–or horizontally. To add support for horizontal display, add the "tileDisplay" custom configuration field with a value of "horizontal" when you deploy your bot. Setting tileDisplay to horizontal can be useful for resolving formatting issues that can occur on specific channels.
- Formatting of text (bold, italics, etc.) isn't supported.
Button
A button question lets you ask a question that expects a simple, short reply and present the consumer with button choices.
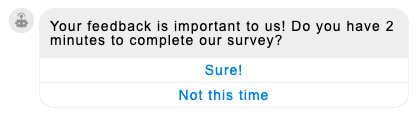
Clicking a button can perform an action defined by you as the bot developer. For example, if the consumer were to click “Sure!” above, they could be taken to the URL for your feedback form.
Question text
Enter the question to send.
Button settings
| Setting | Description | Required or Optional | Example |
|---|---|---|---|
| Button Label | The button text to be displayed. Conversational Cloud allows for up to 128 characters, but channel-specific restrictions do exist, so the actual maximum could be shorter. (For example, Facebook only allows for up to 20 characters.) Variables are permitted. | Required | Sure! |
| Action Type | If you want the button to be a link that takes the consumer to a URL, select Web URL. Then enter the URL in the Callback field. If you want to use the button to send back to the bot a value as the consumer's message, select Postback here. Then enter the message to send back as the payload in the Callback field. Postback for Bookmark, Phone number, and Share are legacy features that are no longer supported. |
Required | Web URL |
| Webview | This is a legacy feature that's no longer supported. | Not applicable | Not applicable |
| Target | Applies when the Action Type equals “Web URL." Select whether to open the URL in a new window, the current window, or a slideout window. The slideout window "slides out" from the side of the conversation window, which can be an attractive and tightly integrated experience. Note: The Slideout option is supported for Web messaging. Additionally, the target URL must be iFrame compatible. Many companies' websites (Google for instance) employ code to prevent their inclusion in an iFrame, so this must be tested. | Required | New Window |
| Callback | Enter the data to send back to the bot. If you select "Web URL" for the Action Type, this value should be a URL. If you select "Postback" for the Action Type, this value should be whatever you want to send back to the bot as the consumer's message. You can enter the value for the button label or a different value (e.g., the number "5" instead of the word "Excellent"). Entering a different value works depending on the channel in use (e.g., there's support in Facebook but not in SMS). Make sure to test and verify on the device or in the application. Entering the same value for both the button label and the callback value will always work. If required for your use case, you can use the enableButtonTextOnPostback custom configuration field in the bot’s agent connector. If you set the field to true, the selected button’s label, not the button’s callback value, is displayed to the consumer as their selected choice. Otherwise, the button’s callback value is displayed instead. See our discussion on enableButtonTextOnPostback for limitations regarding variable usage. |
Required | https://www.surveymonkey.com/mysurvey.html |
Button clicks: Sending metadata back to the bot
In a Button question, you can set metadata in a button’s configuration. During a conversation, when the consumer clicks the button, that metadata is sent back to the bot in the conversation’s metadata. You can retrieve the metadata using the getMetadata scripting function in the Process User Response code of the question. For more on this, see the discussion in the corresponding section on Structured questions on this page. The info is the same, and the same guidelines and rules apply.
Quick Reply
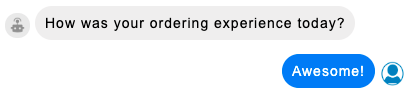
A quick reply question lets you ask a question that expects a simple, short reply and present the consumer with choices from which to select. The response choices appear as “chips” beneath the question.
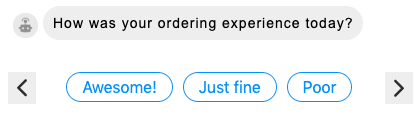
And the chips disappear once the consumer selects one:
Details vary by channel. For example, Apple Messages for Business does not support Quick Reply, but other channels do, and each behaves slightly differently. As one example, in Facebook Messenger, a Quick Reply question can have a maximum of 13 options. Consult these guidelines and best practices.
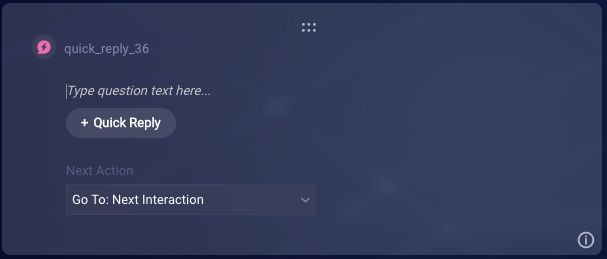
Question text
Enter the question to send.
Interaction settings
Configure the following setting in the interaction's settings:
- Choices per Row: Select the number of answer choices to present in a single row. Example: You have 8 answer choices, and you select "3" here. So, 3 choices will be presented in the first row, 3 in the second row, and the remaining 2 in the last row. Note that a maximum of 3 rows are used; the third row includes all the answer choices not included in the first 2 rows.
Quick Reply settings
| Setting | Description | Required or Optional | Example |
|---|---|---|---|
| Title | The label to be displayed. | Required | Awesome! |
| Type | Always select "Text." The "Location" value currently isn't supported. |
Required | Text |
| Payload | Enter the data to send back to the bot. If you specify a postback value here, it is sent back to the bot instead of the button label. However, be aware that this depends on the channel in use. Make sure to test and verify on the device or in the application, as use of this field works in some channels (like Facebook) but not in others (like SMS). Entering the same value for both the button label and the postback value will always work. |
Optional | Awesome |
| Image URL | Use this field to specify a small image to be displayed to the left of the Quick Reply title. Typically, this setting isn't used unless the image is an emoji or something of a similar nature. | Optional | https://www.mysite.com/images/emoji_smile.jpg |
Quick Reply clicks: Sending metadata back to the bot
In a Quick Reply question, you can set metadata in the configuration of a quick reply. During a conversation, when the consumer clicks the quick reply, that metadata is sent back to the bot in the conversation’s metadata. You can retrieve the metadata using the getMetadata scripting function in the Process User Response code of the question. For more on this, see the discussion in the corresponding section on Structured questions on this page. The info is the same, and the same guidelines and rules apply.
Apple List Picker
For Apple Messages for Business only.
If your business uses Apple’s Messages for Business service to chat with consumers via the Messages app, you can use the List Picker question interaction to display a list of items (along with information about those items), so the consumer can reply by selecting one or more. Like with any question interaction, a list picker expects and waits for the user response before executing the next action.
You might want to include a list picker so consumers can select from a list of:
- Products in your catalog
- Food items on your menu
- Navigational menu items
- And more
You can create a list picker that displays a static (fixed) list of items that you specify when you create the picker. Or, you can configure the picker so that it gets populated with items dynamically at runtime, passing in values from an earlier API integration call to an external system.
The interaction has been developed per Apple's List Picker specifications. Keep in mind Apple's guidelines.
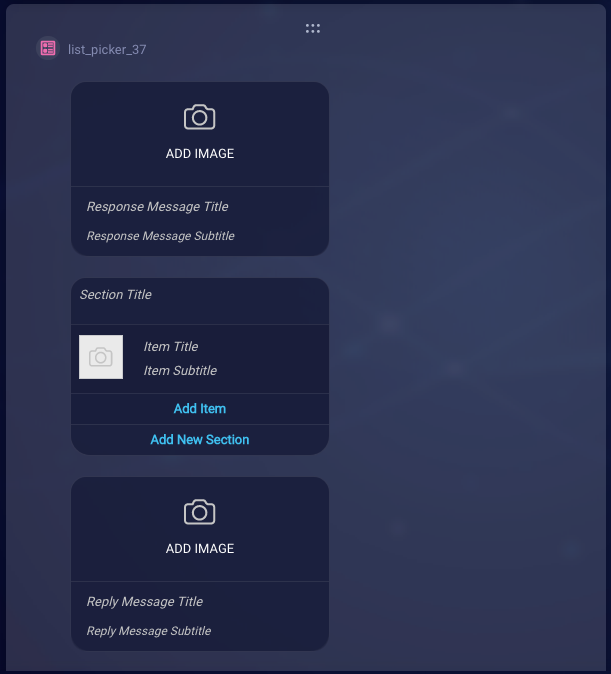
Response Message settings
The Response Message settings define how to initially display the list picker to the consumer:
Response Message settings also provide the text in the header of the actual list picker.
| Setting | Description | Required or Optional | Example |
|---|---|---|---|
| ADD IMAGE → Image URL | The URL of the image to display. The domain in the URL must be whitelisted. | Optional | https://www.mysite.com/images/flowers.jpg |
| ADD IMAGE → Image Style | The size of the image, either Icon (smallest), Small, or Large. | Optional | Icon |
| Response Message Title | The title of the message. The maximum length is 85 characters; Apple recommends 30 characters. | Required | Beautiful bouquets |
| Response Message Subtitle | The subtitle of the message. The maximum length is 400 characters; Apple recommends 85 characters. | Optional | Select your favorite |
Item settings
Section and item settings define how to display the sections and individual items in the list picker.
| Setting | Description | Required or Optional | Example |
|---|---|---|---|
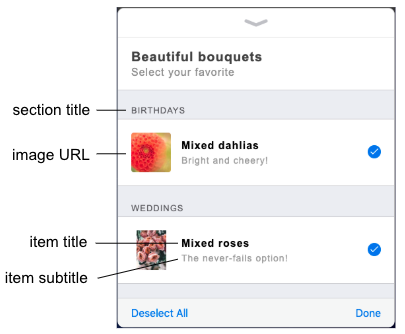
| Section Title | The title of the section. | Required | Birthdays |
| ADD IMAGE → Image URL | The URL of the image to display. The domain in the URL must be whitelisted. | Optional | https://www.mysite.com/images/dahlias.jpg |
| ADD IMAGE → Image Style | Select "Default." Only this value is supported. | Optional | Default |
| ADD IMAGE → Identifier | A unique identifier for the item; this is system-generated. | Not applicable | 32957836-2f95-1e8d-ce4e-aa95e8f844a2 |
| Item Title | The item’s title. | Required | Mixed dahlias |
| Item Subtitle | The item’s subtitle. | Optional | Bright and cheery! |
Reply Message settings
The Reply Message settings define how to display the consumer’s reply after the consumer picks one or more items from the list.
| Setting | Description | Required or Optional | Example |
|---|---|---|---|
| ADD IMAGE → Image URL | The URL of the image to display. The domain in the URL must be whitelisted. | Optional | https://www.mysite.com/images/flowers.jpg |
| ADD IMAGE → Image Style | The size of the image, either Icon (smallest), Small, or Large. | Optional | Large |
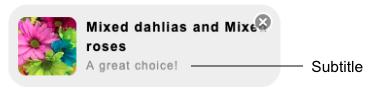
| Reply Message Title | The title of the message. The maximum length is 85 characters; Apple recommends 30 characters. | Required. Although required, this field is replaced at run time with the title of the user's selection. | Your selection |
| Reply Message Subtitle | The subtitle of the message. The maximum length is 400 characters; Apple recommends 85 characters. | Optional | A great choice! |
Interaction Details — Settings
| Setting | Description | Required or Optional | Example |
|---|---|---|---|
| Enable Multiple Selection | Enable this setting to let the consumer select multiple items in the list picker. This field is disabled by default. | Optional | [On] |
Populating a list picker dynamically
Values for many of the settings above can be static, but they can also be populated dynamically at runtime. For example, if the list picker is for selecting items from a product catalog, you’ll likely want to retrieve and use the item information from the catalog.
Scrolling and sorting
List pickers scroll vertically, and this can’t be changed.
If you’re hard-coding the sections and items, their display order is as you configure it. Alternatively, if they are populated dynamically at runtime, sorting could be done at the API level.
The user response to a list picker
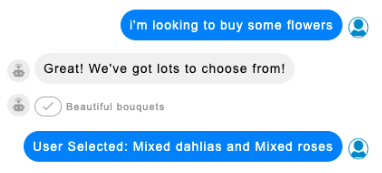
Once a user makes their selection in the list picker, the reply is sent back to the bot as "User Selected: " plus the item title. If the user has selected multiple items, they are concatenated with "and."
Apple Time Picker
For Apple Messages for Business only.
If your business uses Apple’s Messages for Business service to chat with consumers via the Messages app, you can use the Time Picker question interaction to display an interactive time picker, so the consumer can schedule a meeting or an appointment.
The interaction has been developed per Apple's Time Picker specifications. Keep in mind Apple's guidelines.
You can create a time picker that displays a static (fixed) list of time slots that you specify when you create the picker. Or, you can configure the picker so that it gets populated with time slots dynamically at runtime, passing in values from an earlier API integration call to an external system.
Response Message settings
The Response Message settings define how to display the time picker that’s initially presented to the consumer.
Response Message settings also provide the text in the header of the actual time picker.
| Setting | Description | Required or Optional | Example |
|---|---|---|---|
| ADD IMAGE → Image URL | The HTTPS URL of the image file to display. The domain in the URL must be whitelisted. The file format must be JPG or PNG. The image size is limited to 0.5 MB. | Optional | https://www.mysite/images/clock.jpg |
| ADD IMAGE → Image Style | The size of the image to display, either Icon (smallest), Small, or Large. The default value is Icon. | Optional | Icon |
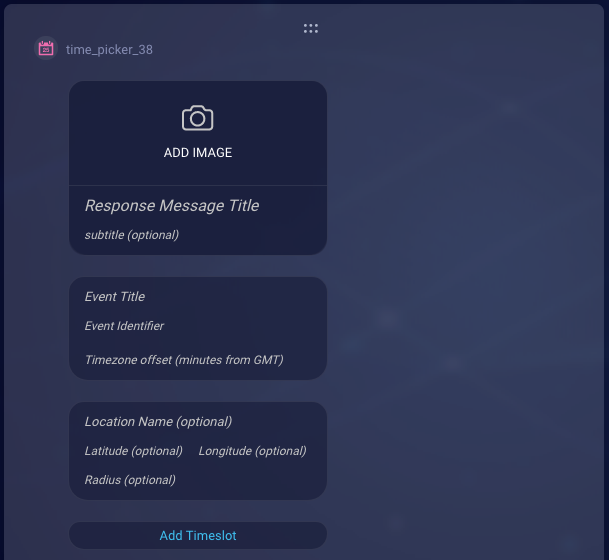
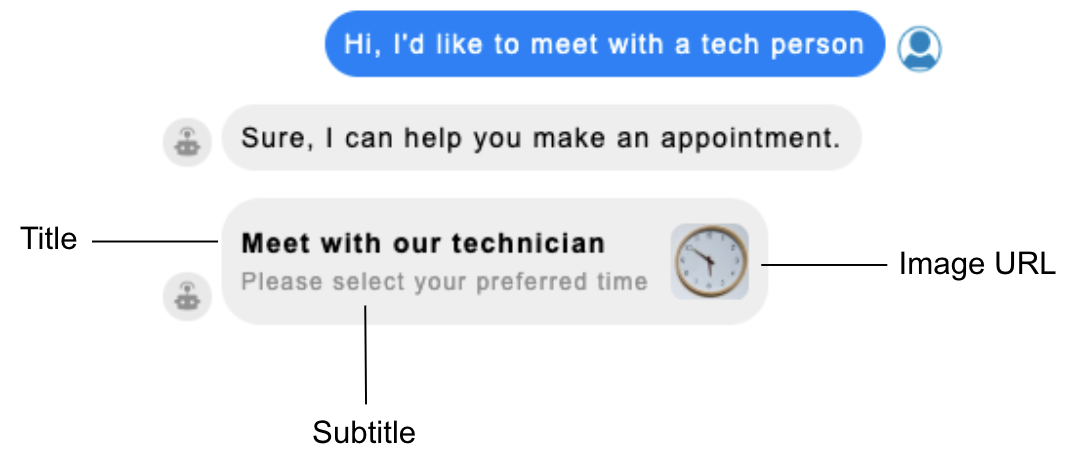
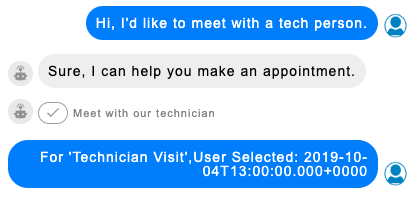
| Response Message Title | The title of the message. The maximum length is 85 characters; Apple recommends 30 characters. | Required | Meet with our technician |
| Response Message Subtitle | The subtitle of the message. The maximum length is 400 characters; Apple recommends 85 characters. | Optional | Please select your preferred time |
Event settings
| Setting | Description | Required or Optional | Example |
|---|---|---|---|
| Event Title | The title of the calendar meeting. | Optional | Technician Visit |
| Event Identifier | An ID for the event. If you don’t set this, it’s set by the system since it's required by Apple. LivePerson recommends that you set this. If you're populating the time picker with data received from an API call, you can set this with an ID provided in that API result. | Required | event123 |
| Timezone offset (minutes from GMT) | The number of minutes from GMT, specifying the timezone of the event’s location. If not set, times are shown according to the customer’s current time zone. If set, the times are shown according to the event’s time zone, regardless of the customer’s location. The offset must be expressed in positive numbers. If the offset is positive, use the formula: (offset in hours 60). If the offset is negative, use the formula: ((24 — offset in hours) 60). |
Optional | In Central European Summer Time, Mannheim, Germany is GMT+2, which is a positive offset, so 2 60 = 120. In Eastern Daylight Time, New York, New York is GMT-4, which is a negative offset, so ((24 – 4) 60) = 1200. |
Location settings
Location settings support features that play a role after the consumer has selected a time slot and sent the reply. The consumer can tap the reply message bubble to view location information, if available. The consumer can also tap Add to Calendar or Get Directions. The location name supports the former (Add to Calendar); the latitude, the longitude, and the radius support the latter (Get Directions).
| Setting | Description | Required or Optional | Example |
|---|---|---|---|
| Location Name | The location’s name; this is shown in the consumer’s calendar after the appointment is added. | Optional | Building One |
| Latitude | The location’s latitude (a numeric double value). | Optional | 49.4872955 |
| Longitude | The location’s longitude (a numeric double value). | Optional | 8.4682869 |
| Radius | The location’s radius in meters (a numeric double value). This setting is ignored if Latitude and Longitude are missing or empty. | Optional | 10 |
Time slot settings
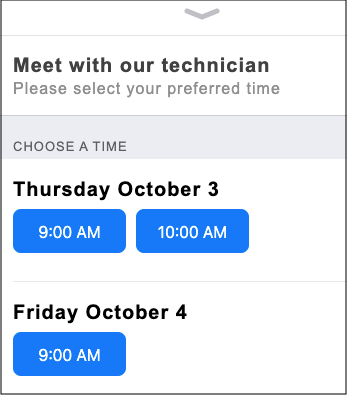
Use the fields below to specify a static start date and start time:
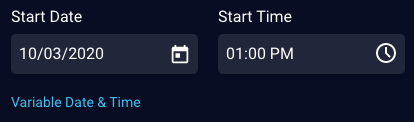
Or, use the field below to specify a variable start date and start time:
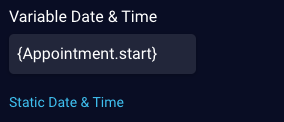
You can switch between the two options using the blue link (shown above) beneath the fields. See below for more details.
| Setting | Description | Required or Optional | Example |
|---|---|---|---|
| Start Date | The date in GMT on which the event starts. Used when specifying a static date. | Required | 10/03/2020 |
| Start Time | The time in GMT on which the event starts. Used when specifying a static time. As discussed earlier, the Timezone offset determines whether the start time is shown to the customer in a specific time zone or in the customer's time zone. |
Required | 1:00 PM |
| Variable Date & Time | The date and time in GMT on which the event starts. Used when specifying a variable date and time. For more on this (e.g., the format required), see Populating a time picker dynamically below. As discussed earlier, the Timezone offset determines whether the start time is shown to the customer in a specific time zone or in the customer's time zone. |
Required | {Appointment.start} |
| Duration | The duration in minutes of the event. | Required | 30 |
| Timeslot ID | An ID for the time slot. If you don’t set this, it’s set by the system since it's required by Apple. LivePerson recommends that you set this. If you're populating the time picker with data received from an API call, you can set this with an ID provided in that API result. | Required | time123 |

Populating a time picker dynamically
As mentioned earlier, a time picker can be populated dynamically during run time using variable data received from an API integration. As an example, in the image below, we're retrieving a list of appointment dates and times that are returned from an API integration named "Appointment." In the integration, the returned data is stored in a custom data field named "start."

We can then reference this custom data field in the Variable Date & Time field in the time picker, using the following notation (i.e., with {apiName.variableName}):
During run time, the time picker iterates over the list and populates the list of start times.
Since the API response defines the date and time together in the received payload, you don't need to specify them separately in two fields in the time picker. However, the data must be in the following format:
2020-04-30T13:30+0000
Additionally, all start dates and times must be defined in GMT, so depending on the data received from the API call, you might need to do some preprocessing to convert the data.
The Duration field can't be populated dynamically; you must manually specify this value.
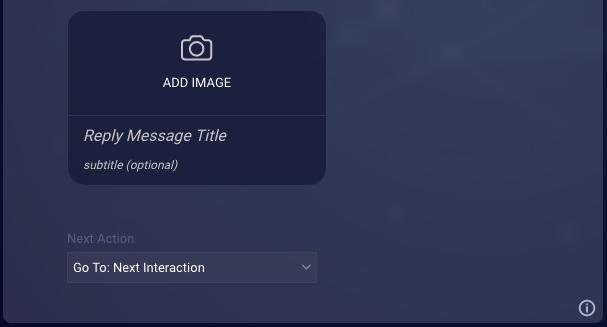
Reply Message settings
The Reply Message settings define how to display the consumer’s reply after the consumer picks a time slot.
| Setting | Description | Required or Optional | Example |
|---|---|---|---|
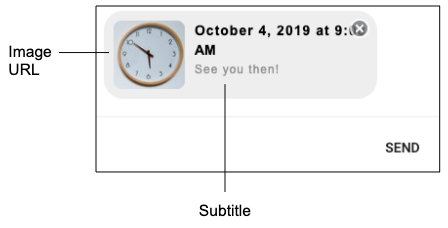
| ADD IMAGE → Image URL | The HTTPS URL of the image file to display. The domain in the URL must be whitelisted. The file format must be JPG or PNG. The image size is limited to 0.5 MB. | Optional | https://www.mysite/images/clock.jpg |
| ADD IMAGE → Image Style | The size of the image to display, either Icon (smallest), Small, or Large. The default value is Icon. | Optional | Icon |
| Reply Message Title | Not used; this is replaced with the selected time. | Not applicable | Not applicable |
| Reply Message Subtitle | The subtitle of the message. The maximum length is 400 characters; Apple recommends 85 characters. | Optional | See you then! |
The user response to a time picker
Once a user makes their selection in the time picker, the reply is sent back to the bot as "For" plus the event title, followed by "User Selected: " plus the date and time expressed in GMT.
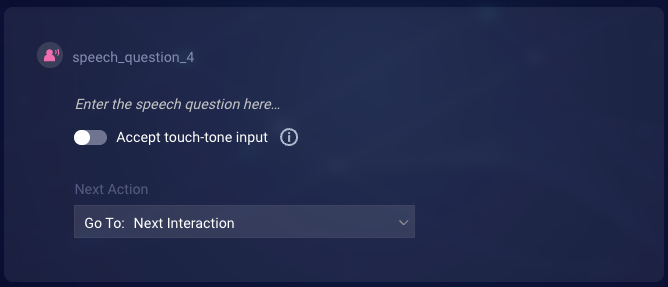
Speech
This interaction is supported only in Voice bots.
A Speech question uses text-to-speech (TTS) technology to synthesize a message in real time and deliver it via synthetic speech. Like all questions, it expects and waits for a user response.
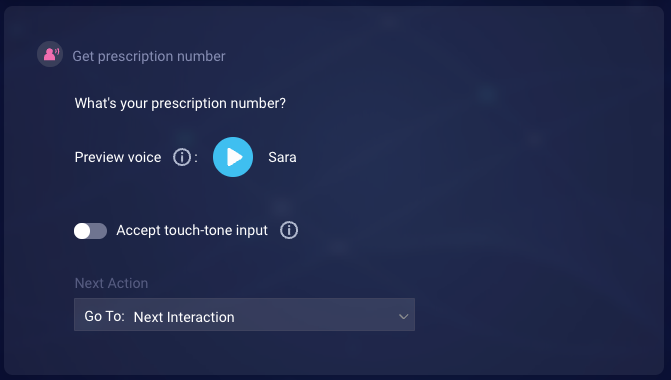
You might want to use a Speech question to ask an open-ended question, e.g., “Enter or say your birth date?” Alternatively, you might want to use it to support an IVR (Interactive Voice Response) menu that routes the consumer, e.g., “To schedule an appointment for a COVID vaccine, press or say 1. To refill a prescription, press or say 2…”
Question to send
Enter the question to deliver via speech in the space indicated. You can also apply SSML to ensure the conversation is human-like.
Accept touch-tone input: By default, the bot always listens for a spoken response from the consumer, but you can turn this on if you also want to allow the consumer to respond using the keypad on their phone. If you enable this setting, the bot will listen for touch tones (DTMF input) in addition to speech. To accept only touch-tone input, turn on the Accept only touch-tone input setting on the Touch-Tone tab of the interaction's settings.
- Enable the toggle.
- Click Settings, and specify values for the touch-tone settings (discussed at the end of this article).
Next action
Configure the Next Action as needed. For example, in the case of an IVR menu, you might want to define a custom rule for each menu option. In general, use custom rules to guide the bot flow.
Interaction settings
Configure the interaction’s settings, for example:
- Allow consumer interruptions: Learn about preventing and allowing consumer interruptions.
- Handle consumer silence with: Learn about handling consumer silence.
Handling consumer responses
If the question supports touch-tone input, and the consumer enters “5”, the bot receives “5”.
If the consumer says “five”, the bot receives one of the following:
- 5
- 5.
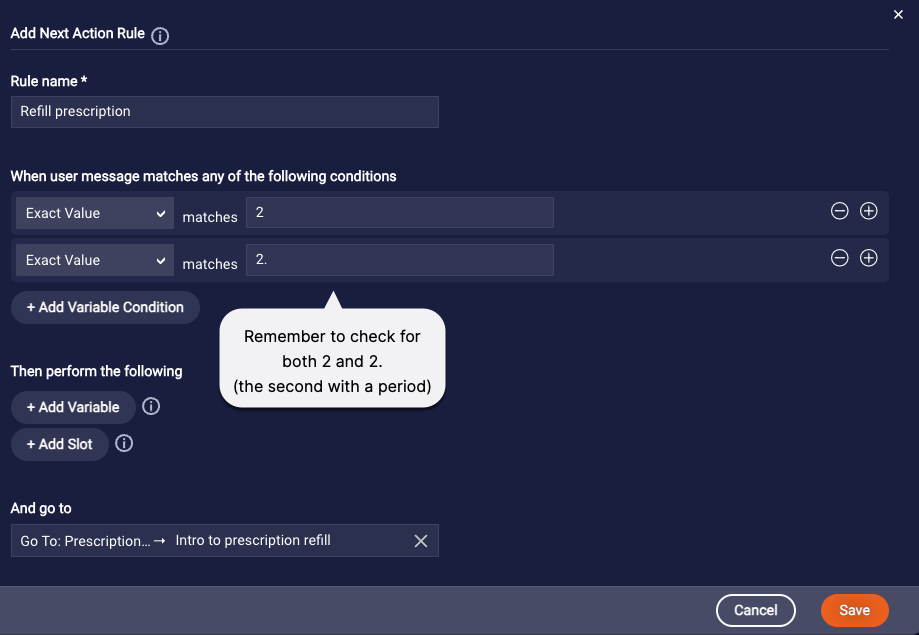
Keep this in mind when creating any custom rules in the interaction to validate the consumer’s response. In the case of consumer speech, you must account for both possibilities: with and without the period. See our examples that follow.
Additionally, use caution when using the hints and pattern library that are available in the UI. You’ll need to customize the values based on the info above.

Handling failures
A failure when synthesizing and delivering the question isn’t likely to happen, but if it does, the bot will still move to wait for the consumer response.
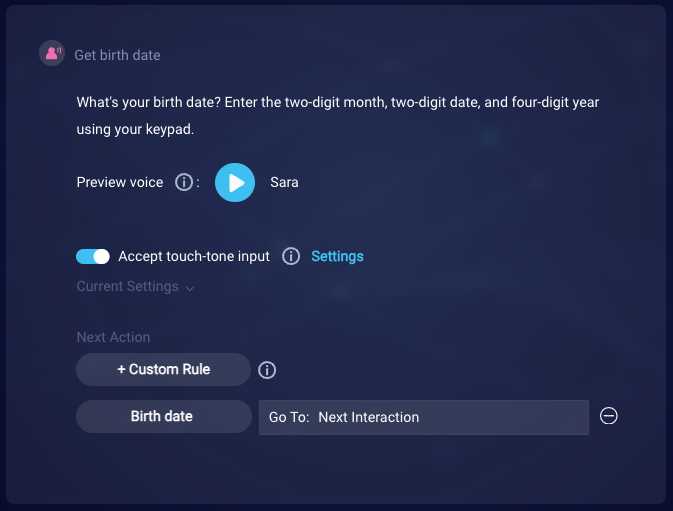
Example: What’s your birth date?
In this example, we ask an open-ended question to support a scenario where the consumer is scheduling a COVID vaccine. The open-ended question is, “What’s your birth date?”
We start by entering the question in the interaction. We also turn on Accept touch-tone input. And we configure the touch-tone settings to meet our requirements. The question itself explains to the consumer how to respond.
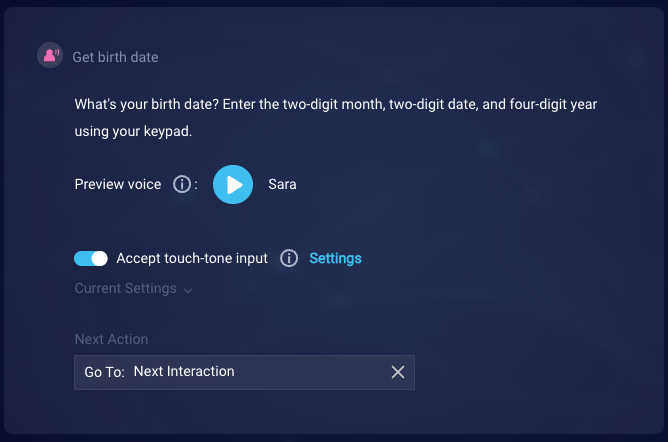
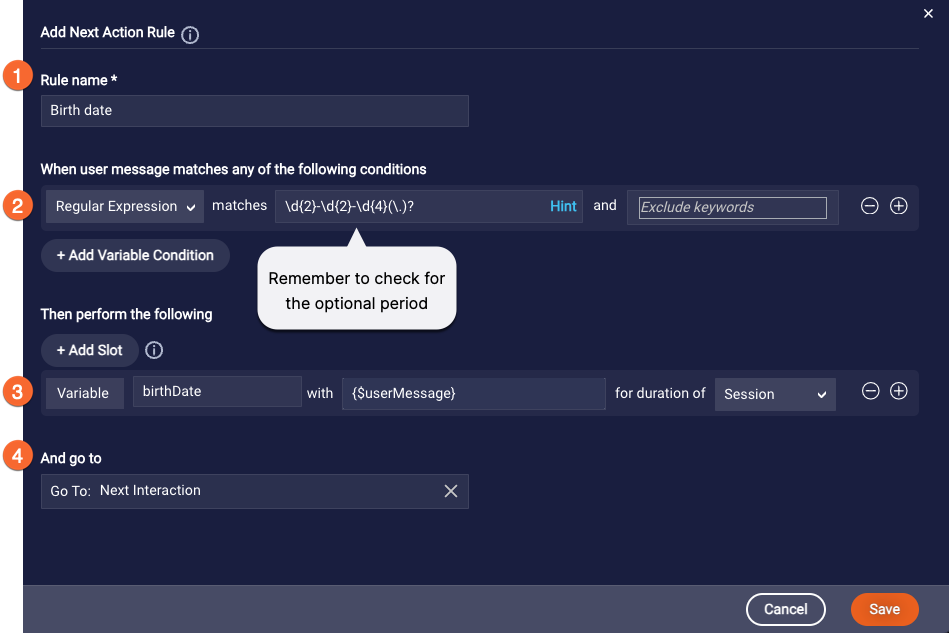
Next, we add a custom rule that checks whether the consumer’s response is valid, i.e., it’s in MM-DD-YYYY or mmddyyyy format.
We name the rule (1), and specify the Regular Expression pattern that we want to match (2). We also capture the date as a variable (3), so we can use it during the conversation. And we specify the next action to go to when the date is valid (4).
In the end, our interaction looks like this:
While we didn’t do this in our example, you could also add a final rule to catch and handle all messages from the consumer other than those caught by the Birth date rule. In the rule, the condition would use the No Match match type. If you don’t add this type of final rule, and the consumer’s response to the question isn’t recognized, a fallback response is sent. The question is then repeated.
Example use case: Implement an IVR menu
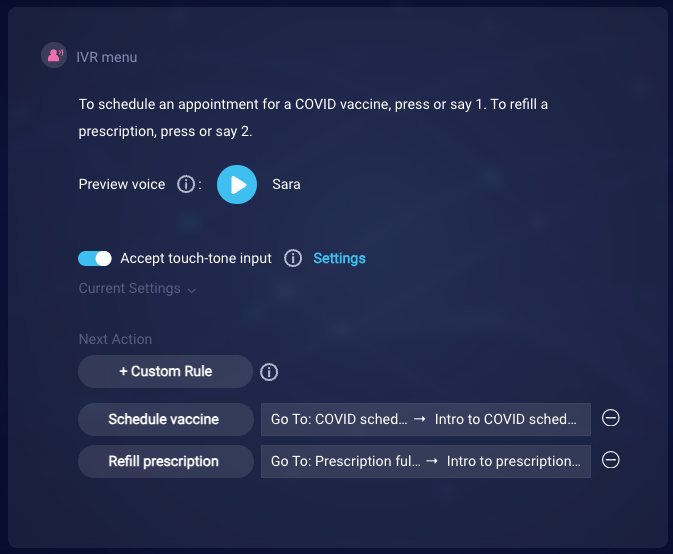
In this example, we implement an IVR menu to support a scenario where the consumer is scheduling a COVID vaccine.
Like in the previous example, we start by entering the question in the interaction. We also turn on Accept touch-tone input. And we configure the touch-tone settings to meet our requirements. The question itself explains to the consumer how to respond.
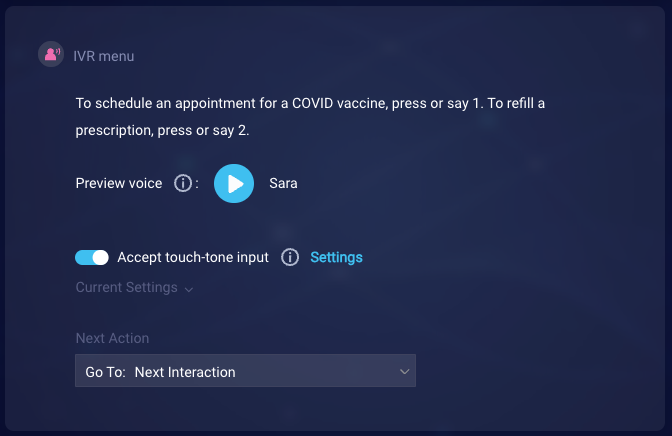
Next, we add a custom rule that checks whether the consumer pressed 1 or said “one” to schedule a COVID vaccine. So we can direct the conversation flow accordingly.
We name the rule (1), and specify the exact values that we want to match (2). We also specify the next action to go to when the exact value is matched (3).
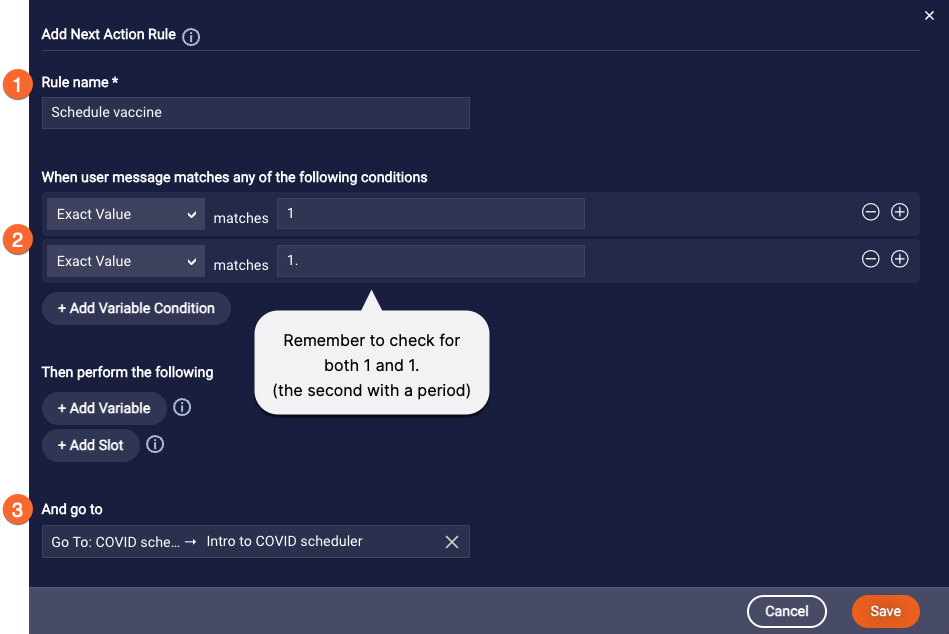
As mentioned earlier, if the question supports touch-tone input, and the consumer enters “1”, the bot receives “1”. And if the consumer says “one”, the bot might receive either “1” or “1.” so you must account for both possibilities.
We add a second, similar rule that checks whether the consumer pressed 2 or said “two” to refill a prescription.
In the end, our interaction looks like this:
Audio
This interaction is supported only in Voice bots.
An Audio question plays a pre-recorded audio question. Audio questions can be useful if certain info is already available in recorded form, or if the info is best conveyed using content that is not exclusively speech. Like all questions, it expects and waits for a user response.
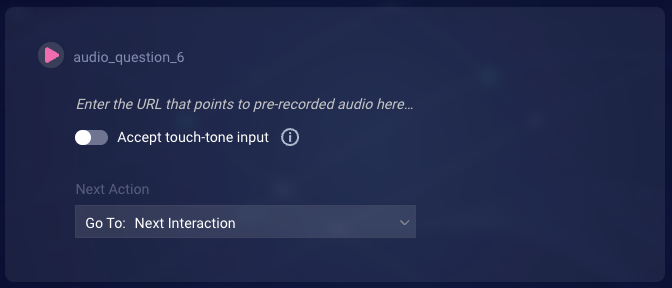
You might want to use an Audio question to ask an open-ended question, e.g., “Enter or say your birth date?” Alternatively, you might want to use it to support an IVR (Interactive Voice Response) menu that routes the consumer, e.g., “To schedule an appointment for a COVID vaccine, press or say 1. To refill a prescription, press or say 2…”
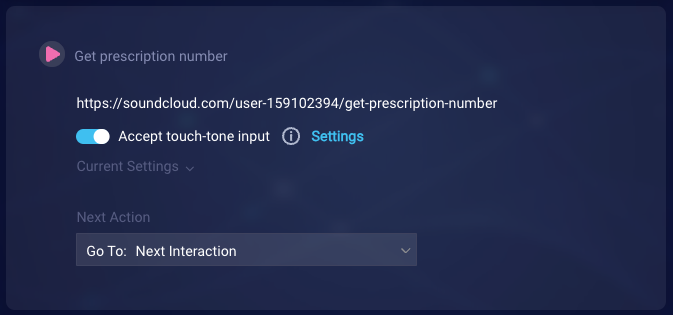
Audio to play
Enter a well-formed URL (HTTP or HTTPS) in the space indicated. The URL can point to either a WAV or MP3 file. Alternatively, you can enter a variable, or a combination of both a URL and a variable.
Contact your LivePerson representative to have the URL’s domain whitelisted.
Accept touch-tone input: By default, the bot always listens for a spoken response from the consumer, but you can turn this on if you also want to allow the consumer to respond using the keypad on their phone. If you enable this setting, the bot will listen for touch tones (DTMF input) in addition to speech. To accept only touch-tone input, turn on the Accept only touch-tone input setting on the Touch-Tone tab of the interaction's settings.
- Enable the toggle.
- Click Settings, and specify values for the touch-tone settings (discussed at the end of this article).
Next action
Configure the Next action as needed. For example, in the case of an IVR menu, you might want to define a custom rule for each menu option. In general, use custom rules to guide the bot flow.
Interaction settings
Configure the interaction’s settings, for example:
- Message When Audio Fails: Ignore this setting, as it’s for future use. If the audio fails, the consumer won’t hear anything (there will be silence).
- Allow consumer interruptions: Learn about preventing and allowing consumer interruptions.
- Handle consumer silence with: Learn about handling consumer silence.
Handling consumer responses
If the question supports touch-tone input, and the consumer enters “5”, the bot receives “5”. And if the consumer says “five”, the bot still receives “5”. Keep this in mind when creating any custom rules in the interaction to validate the consumer’s response. See our examples for Speech question.
Handling failures
If there’s a failure when playing the audio file, the consumer won’t hear anything (there will be silence).
Example use cases
Audio questions behave a lot like Speech questions. For example use cases, see Speech question.
Touch-tone settings for Speech and Audio questions
Settings you’ll likely want to change:
- Minimum Digits: The minimum number of digits to fetch from the consumer (example: 7). This value must be 1 or higher. Rarely will you want to set this to a value other than 1. Learn more below.
- Maximum Digits: The maximum number of digits to fetch from the consumer (example: 10). This value can’t be higher than 128. If the consumer enters more than the maximum number of digits, only the maximum number is sent to the bot.
- Accept only touch-tone input: Select this if you want to enforce touch-tone input as the only type of input that's allowed. If you select this and the consumer instead tries to speak the answer, the system treats the situation as if no input were provided.
Other settings you can change:
- Inter-digit Timeout: Once the minimum number of digits are received by the bot, this is the number of milliseconds to wait for input for the next digit and all following digits until the maximum digits are received (example: 10000). Enter a value greater than zero. If this timeout is reached, some entered digits aren’t received by the bot. There is no default message that is sent when an inter-digit timeout occurs; the bot should validate the consumer’s input. Learn more below.
- Terminating Digit: The digit used to terminate input if fewer than the “Maximum Digits” have been gathered (example: #).
If you turn on support for touch-tone (DTMF) responses in Speech and Audio questions, don’t disable the Allow consumer interruptions setting in the interaction. There is no way to prevent consumer interruption in questions that support touch-tone responses.
Setting the minimum digits and inter-digit timeout
Understanding how to properly set the minimum digits and inter-digit timeout can be tricky and is best explained by way of an example.
Example: Assume you add a question that requires a response of 5 digits. You might then expect that you should configure the minimum and maximum digits as 5 and 5. This configuration works fine if the caller enters 5 digits. But what if the caller enters only 3 digits? Usually you want those 3 digits to be made available to the bot, so the bot can respond with something like, “I heard 5, 6, 5. This isn’t 5 digits, so please try again.”
If you do go ahead and configure a minimum of 5 digits, then when fewer than 5 digits are provided (and no other input is provided), the bot will continue to wait for input. So, it is almost always that case that you will want to set the minimum digits to 1.
Additionally, consider the value for the inter-digit timeout. The purpose of the inter-digit timeout is this: Once the consumer types in or taps the minimum number of digits (which we’ve said should usually be 1), the digit collection system will wait for the next digit for as many milliseconds as you configure for the inter-digit timeout. If no additional digit is pressed in that time, the digit collection system will pass the digits entered so far to the bot.
How long should the digit collection system be configured to wait for “the next digit?” Something around 2500 milliseconds is a good starting point.