Why use an Auto Escalation dialog?
The purpose of the Auto Escalation dialog is to free the consumer from being stuck within a question. This can happen when the bot doesn't recognize the consumer's input. Because the bot can't determine the next step that should happen, the fallback response is sent, and the consumer is returned to the place where the failure occurred. The fallback response is repeated after each unrecognizable input, resulting in a stuck conversation. The consumer's predicament is illustrated in the Messaging bot example below.
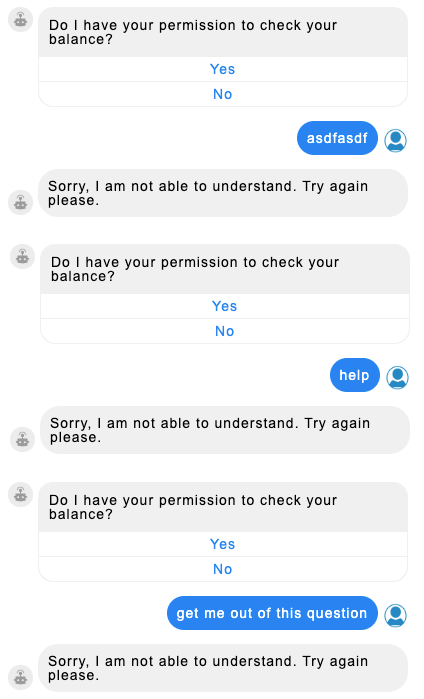
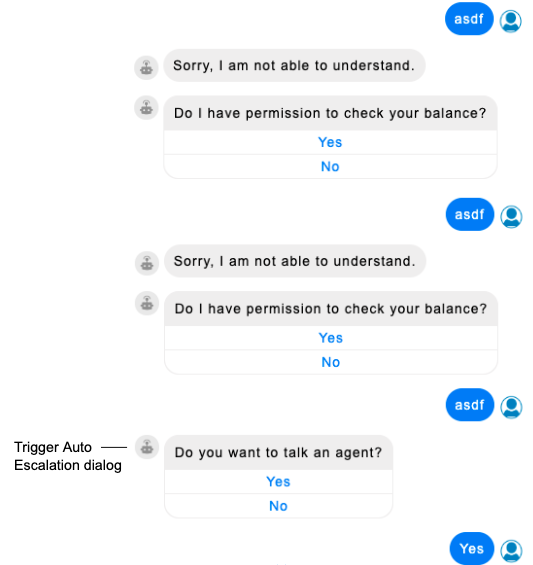
The Auto Escalation dialog solves this problem by offering the consumer the option of being transferred to a human agent (or another bot). You configure the number of times that the fallback response should be sent within a question. Once that threshold is reached, the Auto Escalation dialog is triggered automatically.
Limitations
If you’ve implemented a KnowledgeAI integration in the Fallback dialog within the bot, don’t use an Auto Escalation dialog, as it will never be triggered by the system. Here’s why:
The purpose of the Auto Escalation dialog is to handle cases where the consumer repeatedly receives a fallback response like, “Sorry, I don’t understand” — in a repetitive loop — because the bot doesn’t understand the consumer’s response.
If you have a KnowledgeAI integration within the Fallback dialog, you’ve essentially solved that issue using a different solution, i.e., with a search of the knowledge base for an answer. So, an Auto Escalation dialog is never triggered if the Fallback dialog includes a KnowledgeAI integration of some kind.
If you require a way to escalate to an agent in cases where the knowledge base search repeatedly fails, you can accomplish this: In the KnowledgeAI interaction’s post-process code, define a botContext variable that keeps count of the number of loops. After a certain number of loops, use setTriggerNextMessage to trigger the transfer.
botContext.setTriggerNextMessage('agent_transfer');
Add an Auto Escalation dialog (Messaging)
A bot can have only one Auto Escalation dialog.
- Open the bot, and click Add Dialog in the lower-left corner.
-
In the dialog that appears, specify the following:
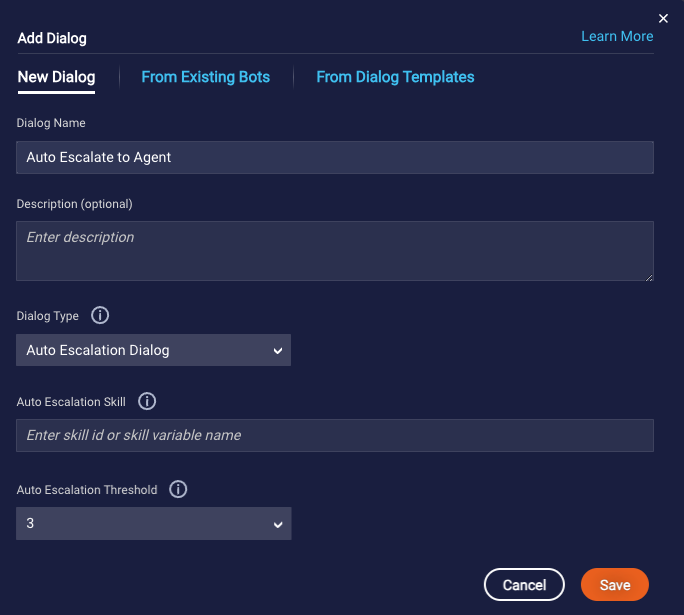
- Dialog Name: Enter a descriptive name.
- Description: Enter an optional description of the dialog's purpose and behavior.
- Dialog Type: Select "Auto Escalation Dialog."
-
Auto Escalation Skill: Specify the ID of the skill to which to escalate (transfer) the conversation. You can select from the IDs of the skills configured for your account; alternatively, enter a botContext variable like
{$botContext.skillId}or an environment variable. You can edit this information later in the Escalation Integration interaction's settings. -
Auto Escalation Threshold: Select the maximum number of consecutive times the fallback message should be sent within a question before triggering the Auto Escalation dialog. Example: You set the threshold to 3. The consumer enters an incorrect answer three times, receiving the fallback response each time. After the fourth incorrect answer, the Auto Escalation dialog is triggered.
You can edit this information later in the dialog's settings. LivePerson recommends setting this to "3," but you can set this to a different value based on your confidence that the fallback response will resolve the user's issue.
-
Click Save.
By default, the Auto Escalation dialog includes a Yes/No multiple choice question that asks the consumer if they want to speak to a human agent.
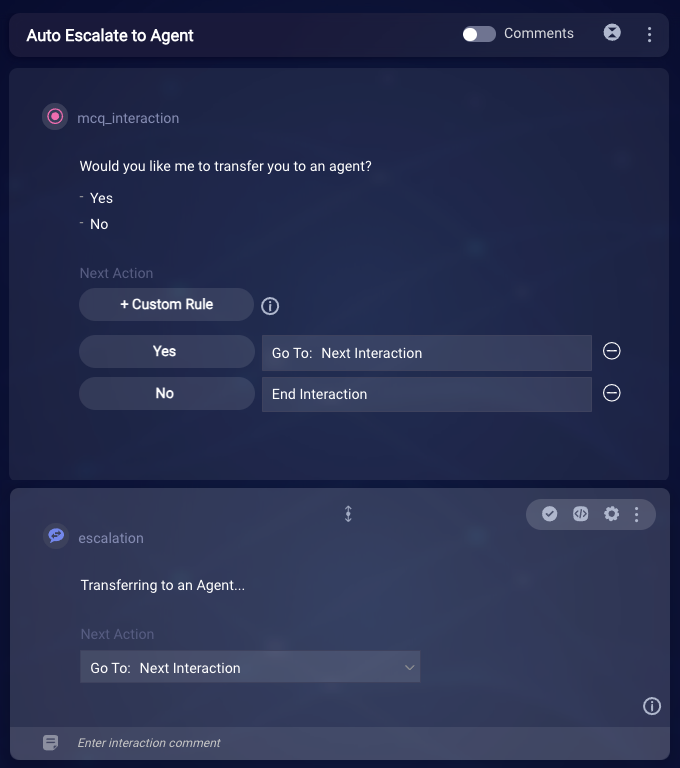
If the consumer says Yes, the flow moves to the next interaction, which is an Agent Transfer interaction. This interaction performs the transfer to the specified skill.
If the consumer says No, the dialog's flow is stopped.
-
If the default dialog implementation doesn't meet your requirements, build out and/or modify the dialog.
- To change the Auto Escalation Threshold setting, go to the dialog's settings.
- To change the Agent Skill Id setting, go to the settings in the Agent Transfer interaction.
Add an Auto Escalation dialog (Voice)
Use of Auto Escalation dialogs in voice bots isn't yet ready for Production use. Stay tuned, as we're working on a fix to be released soon.
A bot can have only one Auto Escalation dialog.
- Open the bot, and click Add Dialog in the lower-left corner.
-
In the dialog that appears, specify the following:
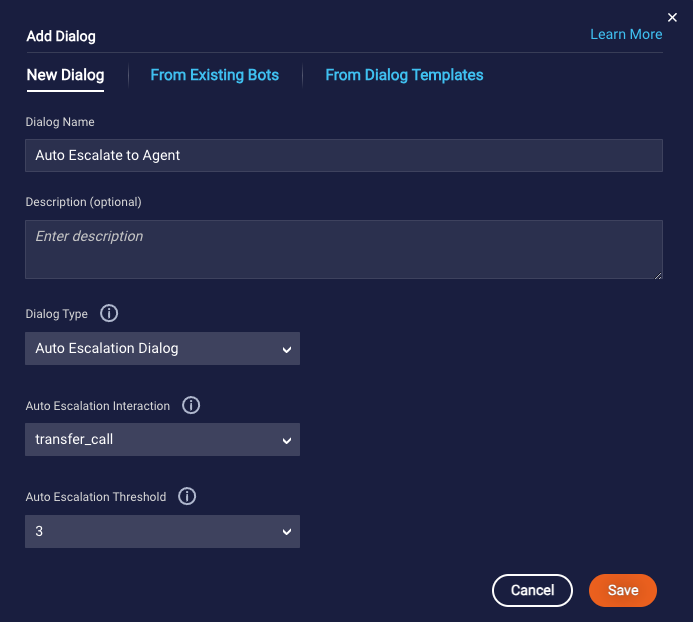
- Dialog Name: Enter a descriptive name.
- Description: Enter an optional description of the dialog's purpose and behavior.
- Dialog Type: Select "Auto Escalation Dialog."
- Auto Escalation Interaction: Select the Transfer Call interaction to which this dialog should direct the conversational flow. You can't create the dialog unless this interaction exists elsewhere in the voice bot.
-
Auto Escalation Threshold: Select the maximum number of consecutive times the fallback message should be sent within a question before triggering the Auto Escalation dialog. Example: You set the threshold to 3. The consumer enters an incorrect answer three times, receiving the fallback response each time. After the fourth incorrect answer, the Auto Escalation dialog is triggered.
You can edit this information later in the dialog's settings. LivePerson recommends setting this to "3," but you can set this to a different value based on your confidence that the fallback response will resolve the user's issue.
-
Click Save.
By default, the Auto Escalation dialog includes a Speech question that asks the consumer if they want to speak to a human agent.
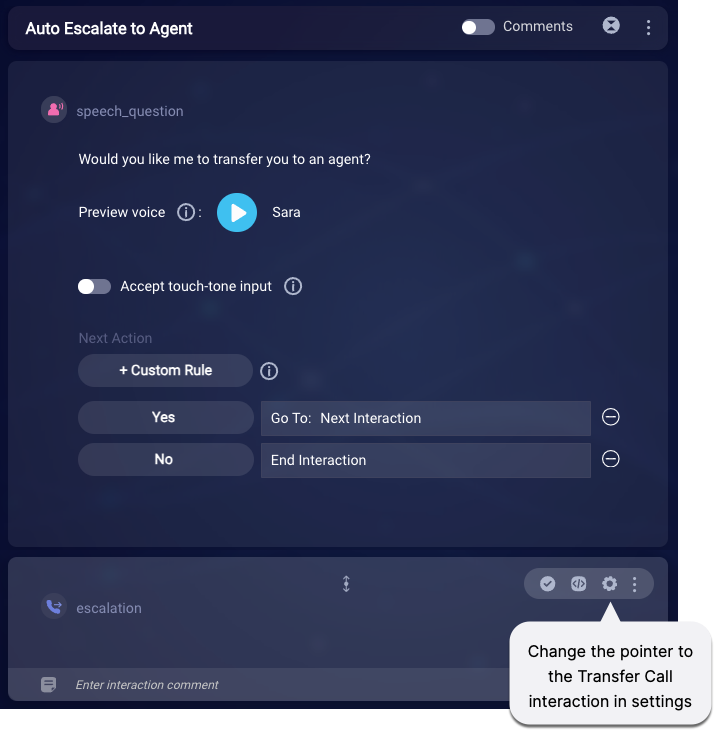
If the consumer says Yes, the flow moves to the next interaction, which is a "blank" Transfer Call interaction. This interaction redirects the conversational flow to the Transfer Call interaction specified in its Advanced settings.
If the consumer says No, the dialog's flow is stopped.
-
If the default dialog implementation doesn't meet your requirements, build out and/or modify the dialog.
- To change the Auto Escalation Threshold setting, go to the dialog's settings.
- To change the Transfer Call interaction that is triggered, go to the Advanced settings in the "blank" Transfer Call interaction that's in the Auto Escalation dialog (see image above).
Best practices
For info in best practices, see the documentation on the relevant interactions:
- Agent Transfer interaction
- Transfer Call interaction (Only for voice bots)
FAQs
How does the Auto Escalation Threshold counter work?
In general, the counter is incremented each time a failure response is sent for a question interaction. More specifically, this happens if any of the following occurs:
- The built-in fallback response is triggered. This can be the one that's specific to the question or the built-in, default fallback response.
- A fallback dialog that contains only text interactions exists and is triggered.
- A fallback dialog that contains an API integration exists and is triggered. The integration call fails due to either zero results being returned or some other failure. The failure condition isn't handled via an API failure match condition, which triggers a system error message. It's the system error message that results in incrementing the counter.
What's the point of the "blank" Transfer Call interaction?
At first glance, it might seem that this interaction is unnecessary, as you could simply specify the Transfer Call interaction in the question's Next Action "yes" rule.
The "blank" Transfer Call interaction exists to accommodate the use case where you don't want to include the question. In such a case, you need an Auto Escalation dialog, so you can take advantage of its functionality: Count the number of times that a failure response is sent, and escalate after a threshold is reached. But when this happens, you want to handle it by immediately redirecting the flow to a Transfer Call interaction elsewhere in the bot. The "blank" Transfer Call interaction supports this use case.
While the interaction appears "blank," it isn't. You specify the Transfer Call interaction to trigger in its settings.
