
The Functions Command Line Interface (CLI) tool will enable you to develop, test and manage your functions from the comfort of your local machine. If you want to integrate Functions in an automated process (e.g. CI/CD), the CLI is the perfect place to start. You can inspect the CLI's code and find detailed documentation on the CLI's public GitHub repository.
How to install
The CLI is optimized for use with macOS and Linux. If you want to use the CLI from a Windows machine, we recommend using the Windows Subsystem for Linux.
Use the command npm install -g liveperson-functions-cli or yarn global add liveperson-functions-cli to install the CLI on your local machine. Once the CLI has been successfully installed you can display the current version using lpf version:

The user using CLI should have admin privileges. Otherwise, the correct functionality of the CLI cannot be guaranteed.
Overview Functionality
All CLI functionality is available through the lpf command followed by:
init |
Initialize the project with the necessary files. |
login |
Performs the login with Conversational Cloud Credentials. |
logout |
Performs the logout. |
create |
Creates either functions or schedules |
add |
Adds domains to the currently logged account. |
pull |
Pulls a function from LivePerson Functions. |
push |
Pushes a function to LivePerson Functions. |
deploy |
Deploys a function on LivePerson Functions. If the passed function is already deployed, it will be redeployed. |
undeploy |
Undeploys a function on LivePerson Functions. |
invoke |
Invokes a function (remote or local). |
debug |
Starts a debug port in the range of 30500 – 31000 for a passed function. |
get |
Gets information about the passed domain. Possible domains are deployments, functions and accounts. |
logs |
Exports function logs into as a CSV file. |
metrics |
Displays or exports a function's invocation metrics. |
help |
Shows help for the cli and the supported commands. |
autocomplete |
Displays autocomplete instructions (only supports zsh and bash). |
version |
Shows the currently installed version and informs you of potential updates. |
Local Development
Local development with Functions is easy using the CLI if you require a more detailed step-by-step guide, than please refer to CLI deep dive
Initialization
The development process should start with initializing your functions environment using lpf init in an empty folder or an existing functions project. This will create the basic structure of your functions project. Additionally, it will add all the required files for local development, such as snippets or the debugger runtime.
Each time you update the CLI or download a project created with the CLI it is recommended to reinitialize with lpf init, as changes to the CLI tools can introduce new features that have to be added to the project's codebase.
Development and Testing
To create a new function locally use lpf create:function from your project's root folder. After following the steps, a new folder for your function will be created.
You can develop your function's code within this folder by modifying the index.js using the IDE of your choice, similarly to the Functions UI. To alter your function's metadata (e.g. description), you can do so in the config.json.
Modifying the config.json should be done with care. The function name is immutable and used as an identifier within the Functions platform.
Testing a function locally can be done by using the lpf invoke FUNCTION_NAME --local or lpf debugger FUNCTION_NAME to either invoke or debug the function. In both cases, the input property of the config.json will be used for payload. For a step-by-step guide please consult the CLI deep dive.
Pushing and Deploying
Pushing the function with lpf push FUNCTION_NAME will create or update a function on the Functions platform. This can overwrite changes done to the function as it will update a pre-existing function.
Once the function exists on the platform or is already deployed, you can check its status using lpf get functions:

Using lpf deploy FUNCTION_NAME, you can (re)deploy your function. This will changes its state to productive.
Example CI Setup
You can use the CLI to integrate into a CI/CD solution to automate your development and deployment of functions.
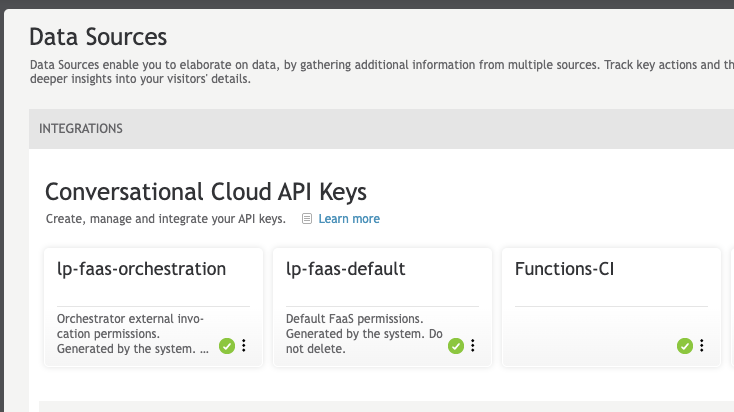
We recommend authenticating with a bot user to use the CLI in an automated environment. To create a bot user, first create an API key in your Conversational Cloud:
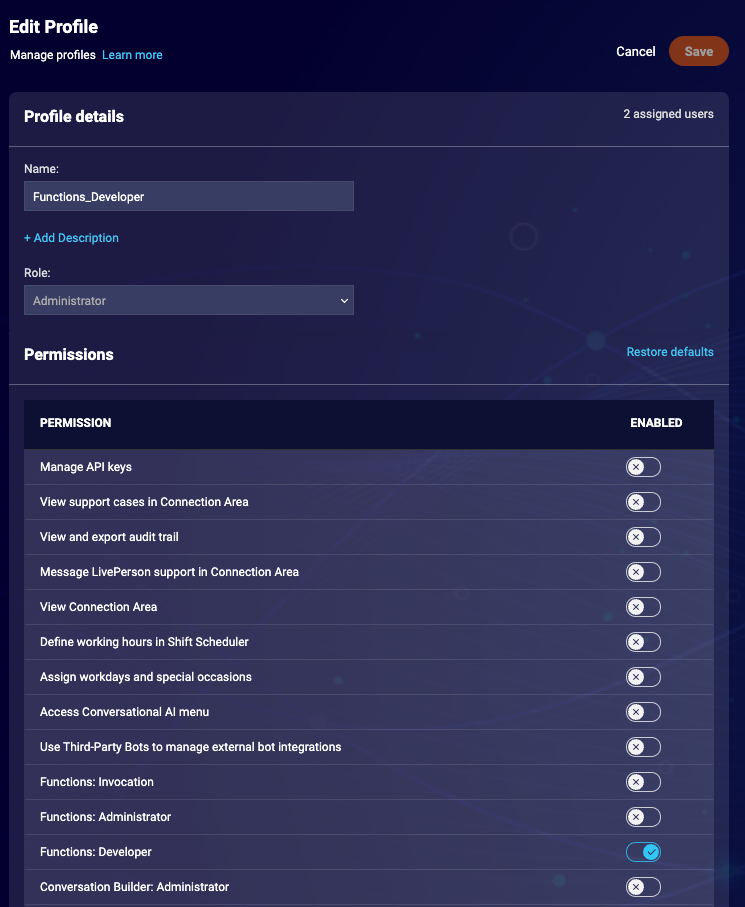
This API key should have Data Access and User Login permissions. Afterwards, create a profile with the Functions developer permission checked:
Lastly, we create the actual bot user. Choose "bot" as user type. Next, choose the API key as the login method and select the previously created key from the list. Assign the Functions Developer profile and save the user:

When executing the following curl command you should receive a valid BEARER token which can be used to log into the account using the cli:
curl --location --request POST "https://<AGENTVEP DOMAIN>.liveperson.net/api/account/<ACCOUNT ID>/login?v=1.3" \
--header 'Content-Type: application/json' \
--header 'Accept: application/json' \
--data-raw '{
   "username":  "<BOT LOGIN NAME>",
   "appKey": "<API KEY>",
   "secret": "<API SECRET>",
   "accessToken": "<ACCESS TOKEN>",
   "accessTokenSecret": "<ACCESS SECRET>"
}'
To get the correct domain for your account, use the Domain Retrieval tool select the value for agent-vep from the list. Fill out all the other fields with data from your account.
The request will result in a JSON that contains bearer property which we will need for authorization. To login to your account use lpf login --token <BEARER> --accountId <ACCOUNT_ID> --userId <USER_ID>.
The bearer token will stay valid for a sufficient time for most CI/CD jobs. If you wish to invalidate the bearer token and remove the credentials from the CLI use the command lpf logout --accountId <ACCOUNT_ID> --delete
Here is a simple example for a shell script which can be a blueprint for your Functions CI/CD integration. It clones a repository, gets the login credentials, pushes the function to the Functions platform, and (re)deploys it.
# Clone your existing code base
git clone YOUR_FUNCTIONS_REPO && cd YOUR_FUNCTIONS_REPO

# Get the bearer token from the agentvep API using curl and jq
BEARER=$(curl --location --request POST "https://va.agentvep.liveperson.net/api/account/$ACCOUNT_ID/login?v=1.3" \
--header 'Content-Type: application/json' \
--header 'Accept: application/json' \
--data-raw '{
   "username":  "'"$BOT_USER_NAME"'",
   "appKey": "'"$APPKEY"'",
   "secret": "'"$SECRET"'",
   "accessToken": "'"$ACCESSTOKEN"'",
   "accessTokenSecret": "'"$ACCESSTOKENSECRET"'"
}' | jq -r .bearer)

# Log into your account with the bot user
lpf login --token $BEARER --accountId $ACCOUNT_ID --userId $USER_ID

# Initialize
lpf init

# Push function and confirm all warnings
lpf push YOUR_FUNCTION --yes

# (Re)deploy function
lpf deploy YOUR_FUNCTION --yes

## Logout and delete your credentials
lpf logout --accountId $ACCOUNT_ID --yes