
Deep Dive CLI
Our Functions CLI tool allows you to bring your local setup to Functions development and automate your interactions with the Functions platform. For a more general overview of the CLI, please visit its Foundations chapter. The CLI package is open-source and hosted on GitHub.
Login
There are two ways to log in to your Functions account using the CLI. You can use username and password to sign in or alternatively use a bearer token. The latter way is preferred for automated solutions such as a CI pipeline. More information can be found in our CI/CD guide.
To initialize a login, either use your lpf login and follow the command prompt entering accountId, username and the user's password in succession:
Once you have successfully logged in, the CLI will save your login information locally for easy access later on. The CLI will retain accountId and username and any valid auth token.
You can sign-out using the lpf logout command. There are situations where you want to delete the login information completely (e.g. you want to use a different user for the same account). lpf logout --delete will let you altogether remove the login information of any account you select from your local machine:

Install and Initialize
Installation and updating the CLI are handled using npm install -g liveperson-functions-cli. You can also check for updates by using the lpf version. Once the CLI has been installed, you can check out the documentation using lpf help or head to our GitHub Page.
Before developing, debugging, or deploying any function, you will have to initialize your environment. This is a mandatory step as it creates all the files for the CLI to work correctly. Use it with an empty folder or an existing repository with lpf init.
We advise against changing the file or folder names or the structure in which they are generated as the CLI might not be able to cope with such a change.
We recommend using lpf init before working on an existing repository to keep your repository up-to-date with any updates to the CLI that might have affected the repository's default structure. lpf init will create files required by git such as a README and a preconfigured .gitignore for your convenience. The settings.json stores a locally used account configuration used by the debugging feature to reproduce the production environment for testing accurately.
Create
After using npm init to initialize your Functions folder you can use lpf create:function to create a function. Similar to login or all other commands for this matter, the CLI supports wizards meant for manual creation of functions and inline commands meant for automated processes.
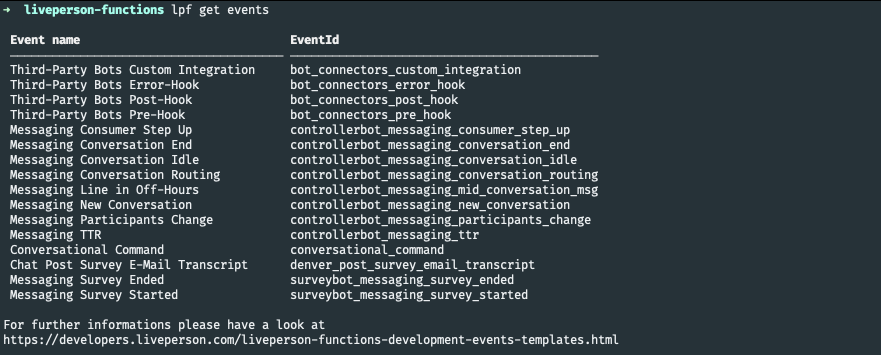
Let's create a function using the inline method. Before we can start, we can start using the lpf get events command to receive an up-to-date list of all events and their respective Ids:
You can now either select an event from the list or use "No Event" as an Id to create a function that does not react to any event. In this example, we will use:
lpf create:function -n exampleFunction -d "This is an example function" -e "No Event"
The CLI will have created a functions folder wherein the exampleFunction and its configuration files are stored if it does not exist.
The create:function command should always be called in the root folder of your project, i.e. the folder in which you called lpf init earlier
Aside from listing the event Ids, all steps have been executed on your local machine. Suppose you encounter problems such as not being able to retrieve the list of events. Please check if your user has been assigned the Functions Developer Permission.
If you navigate to the newly created folder of your function, you will find two files:
- index.js: Contains the logic of your function
- config.json: Contains all meta information and configuration of your function
Both of these files are the only ones relevant from the CLI's and Functions' perspective and, as such, shouldn't be changed in their location or renamed.
The config.json should look similar to this:
{
    "name": "exampleFunction",
    "event": "No Event",
    "description": "This is an example function",
    "input": {
        "headers": [],
        "payload": {}
    },
    "environmentVariables": [
        {
            "key": "",
            "value": ""
        }
    ]
}
The input and the environmentVariables are important for the development and debugging of your function.
The name property is the unique key that references your local function to a function that might exist on a Functions account. As such, pushing the same version of your function with a slightly altered name to the same account will result in two functions on this account. Keep the following restrictions in mind:
- Only alphanumeric characters are allowed (no whitespaces)
- Restricted to 50 characters
- Must be unique for a given account
The event contains the event Id. Select a valid Id with the lpf get events command. Once a function has been pushed to an account, the event cannot be changed. The functions have to be removed and re-pushed to adjust the event.
The description is a mutable string and has similar restrictions to the function's name:
- Only alphanumeric characters are allowed (whitespaces allowed)
- Restricted to 100 characters
Development
The primary use case for utilizing the CLI for development rather than the Functions UI is the comfort of using your IDE of choice, sharing code between accounts and building custom scripts (e.g. unit-tests, linters) to improve the quality of your code.
The environment variables still fall under the same restrictions and limitations as set by the UI and will be verified during upload to your account:
- Both name and value of the environment variables need to have less than 200 characters
- Only alphanumeric characters are allowed for the name (whitespaces forbidden)
- The value has to be a
String.NumbersandObjectsare not allowed.
The environment variables are injected at runtime and can be accessed with process.env['YOUR_ENV'].
Developing your function is straightforward: We only allow JavaScript code to be run on the Functions platform. Your code will be executed inside a Node.js v18.16.0 runtime, supporting most ES2020 language features. Please confer this chart for more information.
Code Snippets
If your choice of IDE is either Visual Studio Code or a JetBrains IDE (e.g. Webstorm), then we provide Snippets (or Live Templates in Jetbrains' case) to speed up your development process.
Your code editor should automatically pick up the .vscode and .idea folders generated by the lpf init command. Within, you can find the respective snippets. If your IDE does not automatically import the snippets, use this guide for VSCode and this one for your JetBrains IDE.
Snippets should be easily activated using the code completion of your IDE like here shown for vscode:
An up-to-date list of all snippets can be found in the CLI's public GitHub repository
Debugging
Debugging your function on your local machine can give you valuable information about its behaviour. Use the lpf debug YOUR_FUNCTION command to start the debugging process. This will generate some boilerplate code around your function required by the debugger to mock specific dependencies:
You can configure your local account set up to reflect your production account by changing the settings.json created during the lpf init of your repository. The following properties can be changed:
-
secrets: An array of key/value pairs that contain
String-based secrets. - whitelist: An array of domains which the functions will be allowed to call.
This information will not be pushed to our services and therefore not be checked for validity. Please read this chapter about the secret/whitelist specifications. It is important to note that we do not recommend storing real secrets on your local machine as cleartext. This is not a secure method of storing any credential and should be used for testing only.
Once you have used the lpf debug command and started the debug process, you can place your breakpoints. To start debugging, you have three options:
- vscode: Start the "Attach FaaS Debugger" task from the launch.json
- Intellij IDE: Start the "Attach FaaS Debugger" task from the top-bar
- Other debuggers: Run
node ../bin/debug.js YOUR_FUNCTIONand
The lpf debug command quits after one debug invocation of the functions and will automatically remove the boilerplate code. If there was an unforeseen error and the boilerplate code is not automatically removed, you will have to manually remove any residual code from the index.js file.
Deploy
Deployment of your function is a two-step process:
First, you have to upload your function to your account using the lpf push method:
If your function is currently in the process of being (un)deployed, we will not allow you to push and update your function.
Once pushed, you can confirm its location by using the lpf get functions | grep YOUR_FUNCTIONNAME command. It should be in Draft or Modified state depending on whether or not the function has already been deployed in the past on your account. Next, use the command lpf deploy FUNCTION_NAME. This will cause the function to be (re)deployed. After a short period, you should receive the confirmation.

The CLI can fail during the deployment process for reasons such as timeouts or network issues. The deployment process does not require continuous connection to your local CLI. Therefore, you should use the lpf get functions | grep YOUR_FUNCTIONNAME to check the state of your function before retrying.
If you want to undeploy the function, it is the same process: use the command lpf undeploy FUNCTION_NAME to undeploy the lambda. However, you cannot delete the function from your account using the CLI once pushed.
Test
Invoking a function
The CLI allows you to invoke the function remotely if it is in a productive state with lpf invoke YOUR_FUNCTION or locally, which is analogous to a debug invocation with lpf invoke YOUR_FUNCTION -l.
In both instances, the lpf invoke command will automatically use the input property set in your function's config.json as an invocation payload.
Unit testing a function
There are numerous ways to ensure the continuous quality of your function. One of these is creating unit tests for it.
The CLI will ignore any file that is not the index.js or the config.json — so do not worry about adding your tools
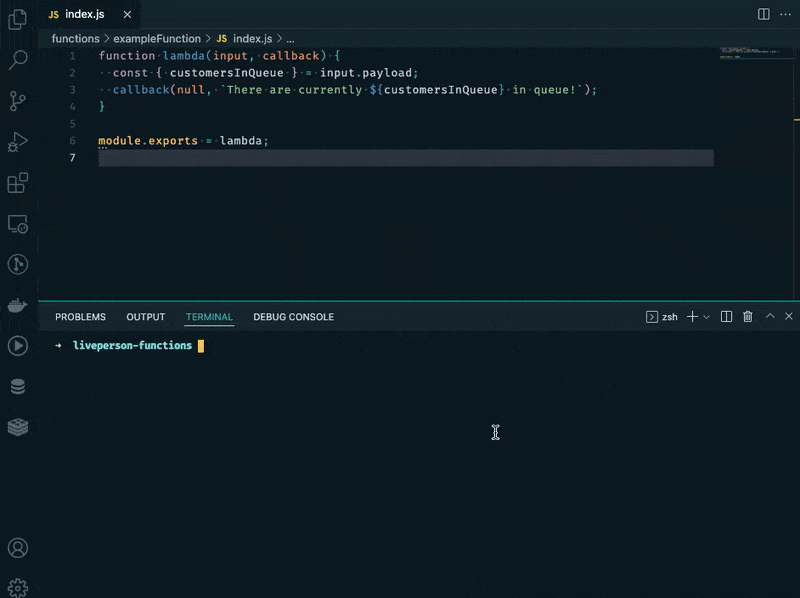
First, we have created this simple function which returns a custom string for a given input:
function lambda(input, callback) {
  const { customersInQueue } = input.payload;
  callback(null, `There are currently ${customersInQueue} in queue`);
}

module.exports = lambda;
The next step is installing mocha (or your preferred testing framework) in your function's folder using yarn add mocha --dev. This installs the necessary packages and a package.json specifically for your function.
You can add an index.test.js file for your unit tests, such as:
let lambda = require("./index.js");
let assert = require("assert");

describe("the function", function () {
  it("returns correct string of number of customers in queue", function () {
    const input = {
      payload: {
        customersInQueue: 5,
      },
    };
    const callback = (_, data) => {
      assert.equal(data, "There are currently 5 in queue");
    };
    lambda(input, callback);
  });
});
In the last step, you can add the following lines to your package.json:
…
  "scripts": {
    "test": "node_modules/mocha/bin/mocha index.test.js",
    "publish": "node_modules/mocha/bin/mocha index.test.js && lpf push"
  },
…
You can now manually test your function using yarn test or use yarn publish to force testing before publishing the function on an account.