
Overview
The following documentation outlines the configuration for the connector and how to implement functions specifically for
Google Dialogflow ES, also known as Google Dialogflow Essentials
Configuration
See the Getting Started guide first to complete pre-requisite steps.
You will be presented with following screen to complete the Vendor Settings if you select Dialogflow ES.
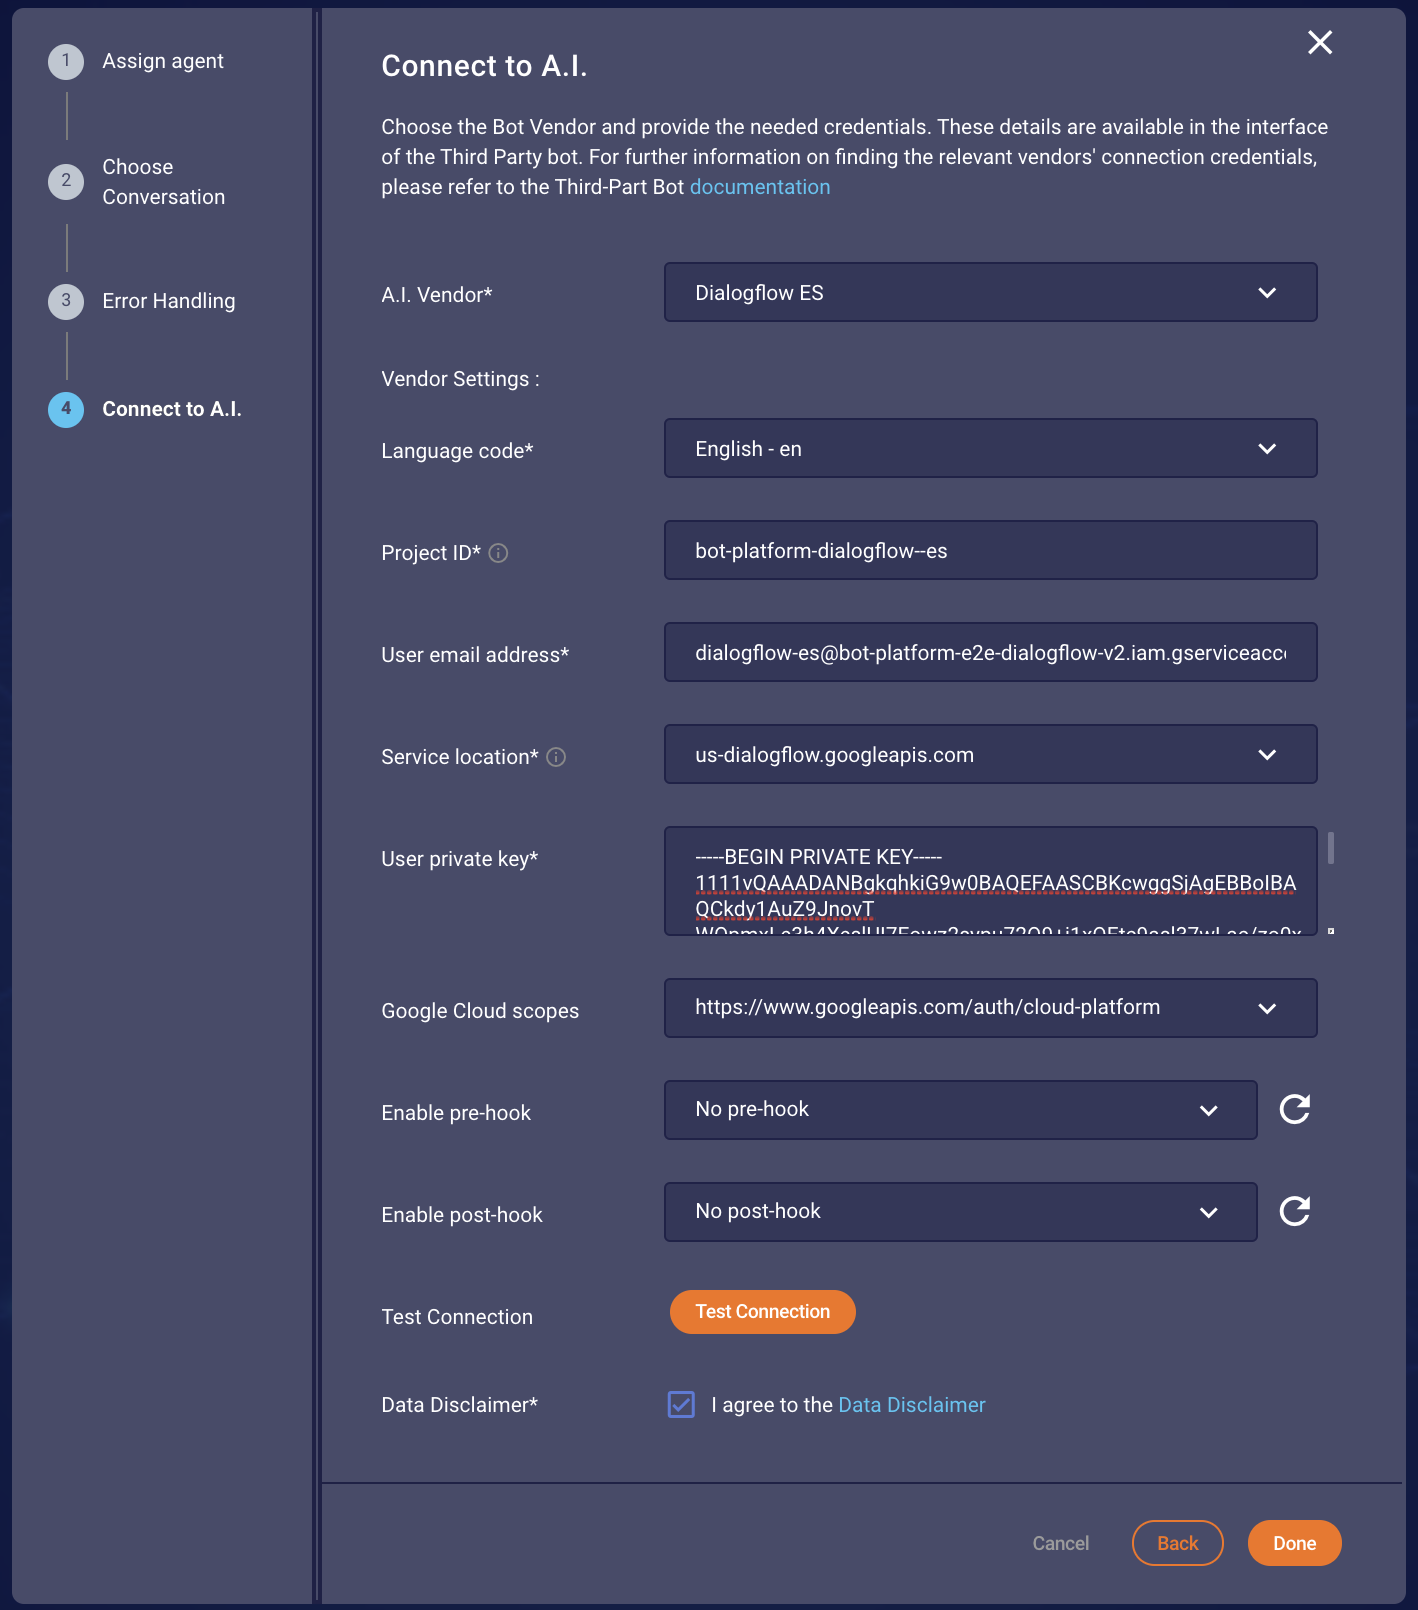
Figure 1.1 Dialogflow ES Vendor Step
The parameters are as follows:
| Item | Description | Example |
|---|---|---|
| Language code | Language code for Dialogflow | en-US |
| Project ID | Dialogflow project id | bxx-xxxxxxx-xxx-dialogflow-es |
| User email address | Email address of the Google Service account | dialogflow-xxxxxx@bxx-xxxxxxx-xxx-dialogflow-v2.iam.gserviceaccount.com |
| Service location | Location of the Dialogflow API Backend | us-dialogflow.googleapis.com |
| User private key | Private key of the IAM Account, please keep the formatting as provided by Google | -----BEGIN PRIVATE KEY----- ABabcLe3h4XeslUI7Eowz2sypu72Q9+j1xOEtc9asl37wLac/zo0xy7wNxnDau+x … XXXXXXXXXXXXXXXXXXXXXXXXXXXXXXXXXXXXXXXXXXXXXXXXXXXXXXXXXXXXXXXX IFRnWV9jafiw2t92CY9mRzqF5puk8iRtMiCRjy3u4L+RHdvYkZPqO9CZUPvq9t0q q+J780stgv56BE7TAuIjRPkN+GPcqnm69qQvJdzSPc5dw5ZmM8b5TtIvlipzjU89 BSioVh/nHPX2QX2MKSbue+k= -----END PRIVATE KEY----- |
| Google Cloud scopes | Authentication scopes of the used IAM role | https://www.googleapis.com/auth/cloud-platform |
Dialogflow ES adheres to Google’s oAuth2. Some degree of familiarity with Google IAM policies and IAM console is necessary for setting up a valid Dialogflow ES client with Read Only API access. Follow the Dialogflow ES documentation available here in order to set up the necessary Service Account
While creating the service account a JSON file can be retrieved, containing most of the necessary parameters.
{
  "type": "service_account",
  "project_id": "[PROJECT-ID]",
  "private_key_id": "[KEY-ID]",
  "private_key": "[PRIVATE-KEY]",
  "client_email": "[SERVICE-ACCOUNT-EMAIL]",
  "client_id": "[CLIENT-ID]",
  "auth_uri": "https://accounts.google.com/o/oauth2/auth",
  "token_uri": "https://accounts.google.com/o/oauth2/token",
  "auth_provider_x509_cert_url": "https://www.googleapis.com/oauth2/v1/certs",
  "Client_x509_cert_url": "https://www.googleapis.com/robot/v1/metadata/x509/[SERVICE-ACCOUNT-EMAIL]"
}
Figure 1.2 Private key JSON generated during the Service Account setup
The config wizard expects each of the pieces of auth data to be copied from the JSON file, without quotes. For the private_key especially, do not modify the string, do not remove any of the newline characters.
You have to acknowledge the Data Disclaimer in order to use Third-Party Bots.
To validate the credentials provided, you can now perform a connection test to see if the configuration you have provided is working and the bot is reachable. You will be able to proceed in any case, but only if Test Connection will result in Connection Successful the bot is expected to later start successfully. Please note that your bot should be capable of handling unsupported messages either via fallback intents or as your design pleases. This will ensure the success of the call to the API of Dialogflow ES for testing the connection.
Limitations
Dialogflow ES has a limitation on the length of the text it can process. Any query longer than 256 characters will cause Third-Party Bots to invoke a custom event in Dialogflow. To handle this gracefully, we recommend building a simple intent that handles a DIALOGFLOW_CHAR_LIMIT event.

Figure 1.3 Create an intent with an event using the string: DIALOGFLOW_CHAR_LIMIT

Figure 1.4 Add a custom response in the Text response section.