
Integration interactions make programmatic calls to retrieve or post data to external systems and perform actions. They perform their work and then execute the next action.
If an integration retrieves data, that data can be stored in custom fields, so you can use it in subsequent interactions.
Integrations are similar to questions in that you can define conditions that each perform different next actions (based on which condition is met). Common uses for this include checking whether the integration call was a success or failure, having a condition triggered by the value of an API response, and having these events direct the flow of the conversation in a desired manner.
Integration
Use the Integration interaction to make a programmatic call for some reason, for example:
- To retrieve or post data to an external system
- To perform some action
Before you can add an Integration interaction, you need to create the integration itself.
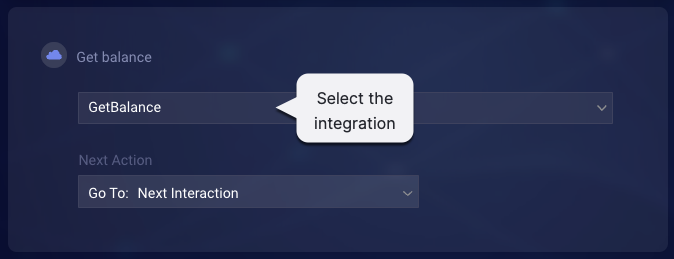
Integration name
Select the name of the integration to invoke.
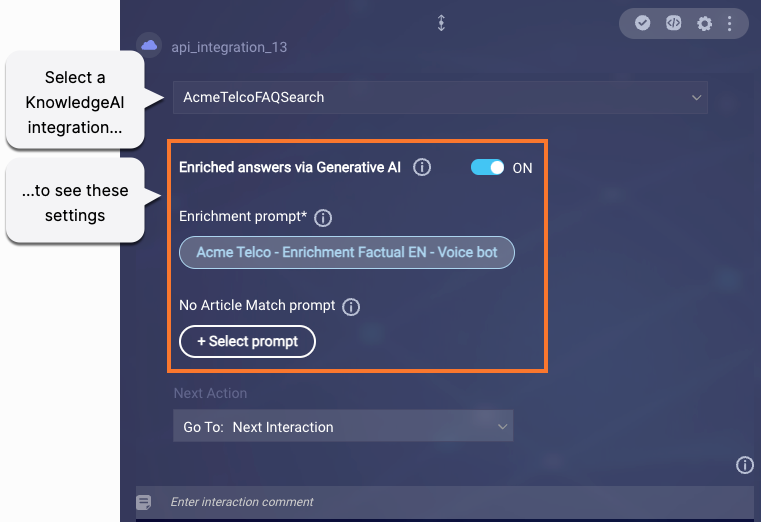
Settings for KnowledgeAI integrations
If you select an integration whose type is "KnowledgeAI," settings for additional features dynamically appear:
Learn about these features:
- Enhance (rephrase) user's query using conversation context (LivePerson SLM)
- Enrich answers via Generative AI
Defining rules based on the result of the API integration
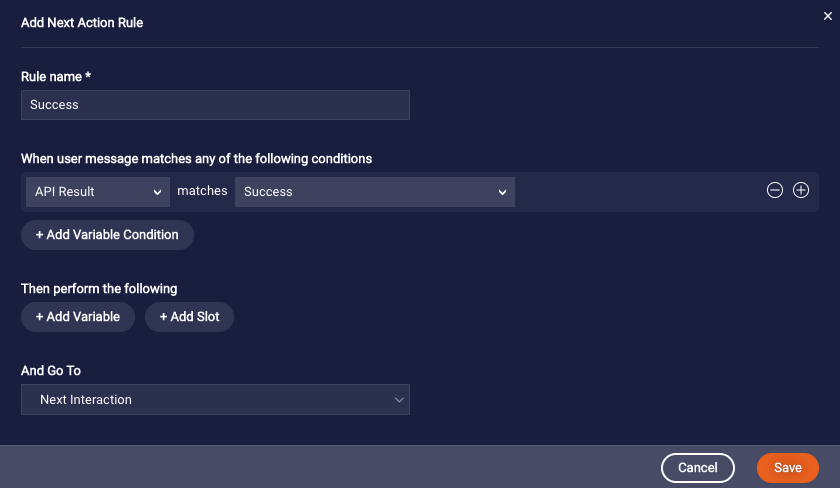
It's recommended that you take advantage of the ability to define rules based on the result of the API integration.
In our example below, we've added a rule that checks for a "success" result, and we've configured the next step to continue to the next interaction…
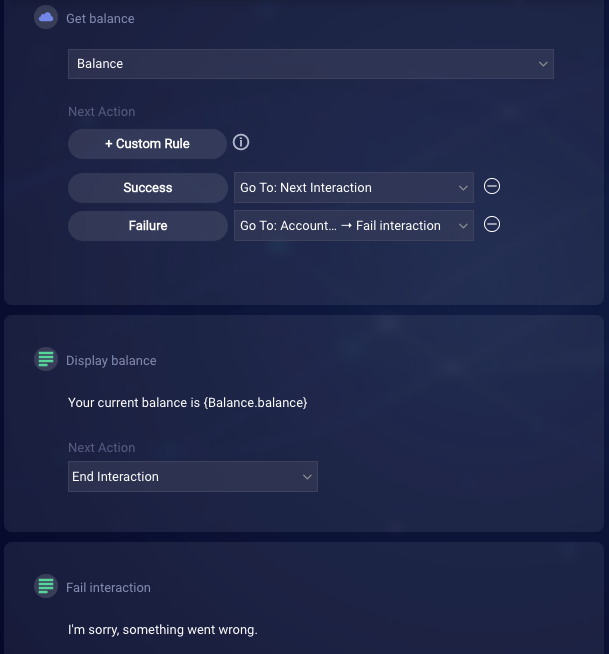
…so, if our "Balance" integration succeeds, the user's balance is displayed (and then the interaction ends). We've likewise added a second rule that checks for a "failure" result, and then we've configured the next step to continue to a "fail" interaction. In this case, if our "Balance" integration fails, the user is notified that something went wrong.
Best practices
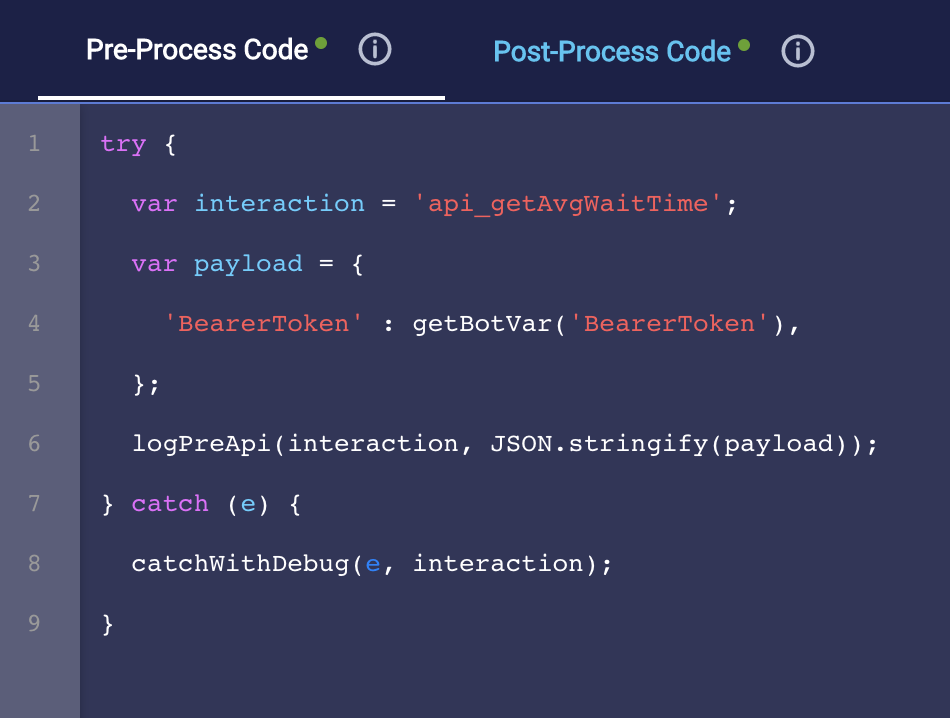
In the Pre-Process Code, save the API payload and log a custom event. This can be useful for debugging later on. The example below conveys the idea, but note that it relies on some helper functions whose definitions aren’t shown.
Knowledge AI
Use a KnowledgeAI™ interaction in a bot when you want to search a knowledge base for articles. This interaction always performs the search using the consumer’s most recent message as the search phrase.

Powering bots with intelligent answers can increase containment: It helps to ensure that the conversation stays between the bot and the consumer and that the consumer's need is resolved by the bot.
This interaction isn't supported in Voice bots. Instead, use an Integration interaction that uses a KnowledgeAI integration. Learn more.
Watch the video
How the Knowledge AI search works
-
The search phrase: The Knowledge AI interaction always passes the value of
{$userMessage}(which stores the consumer’s most recent message) into the search as the search phrase. - The search: When performing the search, the search mode is always “KnowledgeAI.” This cannot be changed. Learn about the search flow.
- The results: The answers that are returned must meet or exceed the confidence score that you specify within the interaction’s configuration. This minimum threshold can be VERY GOOD, GOOD or FAIR PLUS.
How the answers are rendered
When you configure a Knowledge AI interaction, you specify an Answer layout for the answers, i.e., one of these:
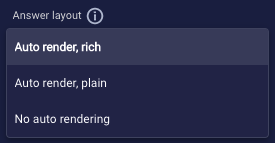
The first two options are rendered automatically, and each uses a particular layout. With these options, there's no need to follow the Knowledge AI interaction with subsequent interactions that display the answers. The Knowledge AI interaction handles it all: both the knowledge base search and the rendering of the answers. When it meets your needs, one of these options is the simpler choice.
If you require control over the article content and layout that's used, you can choose to use a custom answer layout instead of auto rendering. In this case, you must follow the Knowledge AI interaction with subsequent interactions that display the answers.
Select an answer layout based on the target channels and your requirements. See this topic on interaction support.
The "Auto render, rich" answer layout
This layout looks like this:
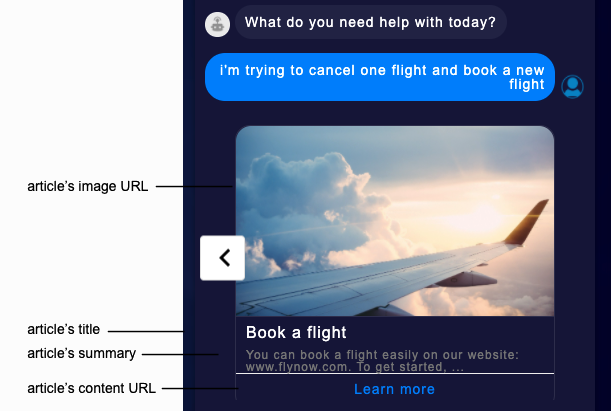
With this layout:
- Anywhere from one to three results are returned based on the maximum number of answers that you've specified in the interaction.
- The results degrade gracefully to the "Auto render, plain" layout when the channel in use doesn't support the carousel.
The "Auto render, plain" answer layout
This layout doesn’t include rich elements like images. If the channel is Web messaging, which supports href tags, the output looks like this:

On all other channels, it looks like this:
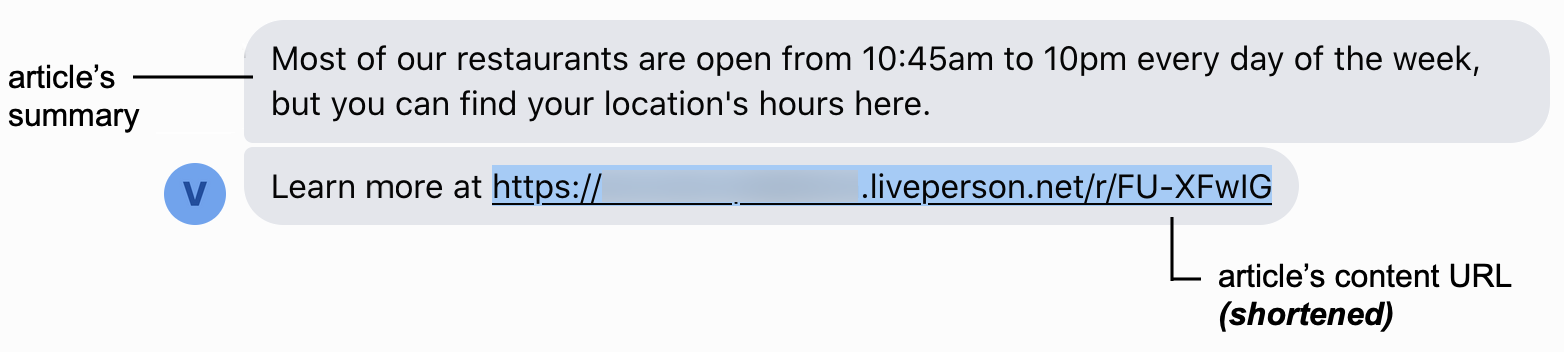
With this layout:
- Only a single, best result is returned regardless of the maximum number of answers that you've specified in the interaction.
- Any HTML in the article's content is not removed. (Take note of the formatting applied to Cancel Flight in the image above.) Use HTML in your source knowledge base only when your target channels support it.
Best practices
When integrating answers from KnowledgeAI into a bot, carefully consider where in the bot flow it’s best to do this. You want the consumer’s utterance to be answered by the right, topically relevant knowledge base, at the right time. For example, in a bot that can handle billing tasks and questions, plug in a “Billing questions” knowledge base. This kind of contextual approach is more focused, so it generally yields a high answer rate.
In contrast, strategies that are less targeted can yield a lower answer rate. For example, plugging a general purpose knowledge base into the Fallback dialog is an option, but it could yield a low answer rate.
Knowledge bases
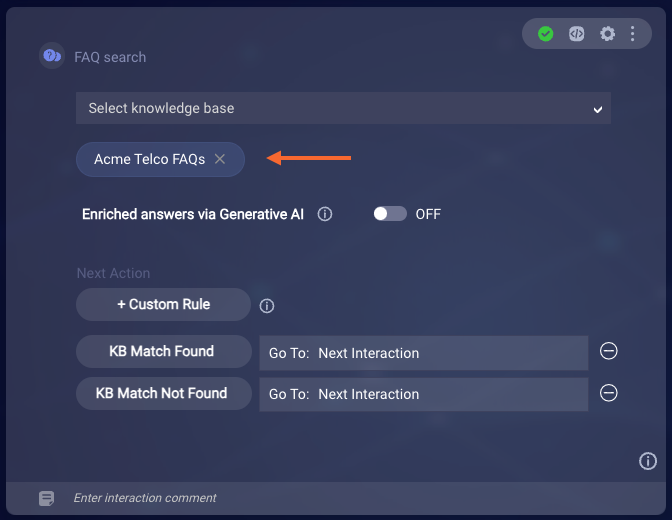
On the face of the interaction, select the knowledge bases to search. You can select anywhere from one to five.
The first knowledge base that you select filters the list of remaining ones you can choose from: All of the knowledge bases must belong to the same language group. For example, UK English and US English are fine together. Behind the scenes, the system validates the first two characters of the ISO language code.
You can select multiple internal knowledge bases, or you can select multiple external knowledge bases that don’t use LivePerson AI. But you can't mix the two types together in a single interaction.
Enhance (rephrase) user's query using conversation context (LivePerson SLM)
Often the user’s query doesn’t include enough context to retrieve a high-quality answer from a knowledge base. To solve this, you can turn on this setting if you want the system to gather additional conversation context (conversation turns) and use it to rephrase the user’s query before searching the knowledge base. Rephrasing is done using KnowledgeAI’s Query Contextualization feature.
As mentioned in the article at the link above, queries that are not in English are not enhanced.

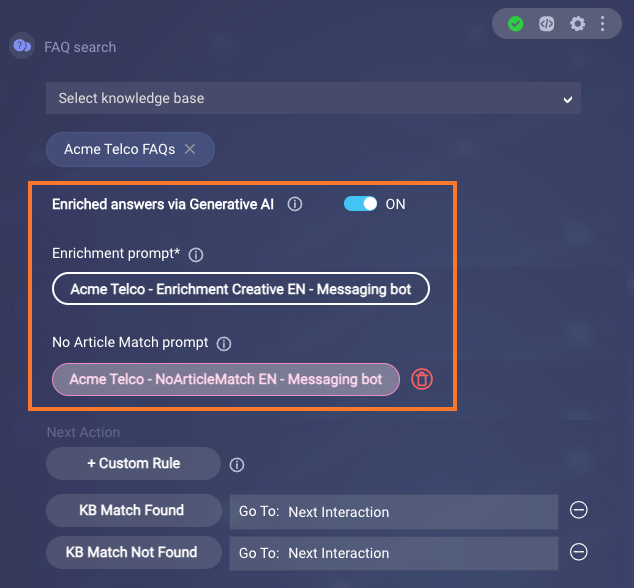
Enriched answers via Generative AI
To enrich the automated answers via Generative AI, turn on the Enriched answers via Generative AI toggle. Then select an Enrichment prompt and optionally a No Article Match prompt. Learn more.
Basic settings
- Message When Results Not Found: Enter the message to send to the consumer when there is no response returned from the knowledge base search. This might be due to no articles being found or due to a failed search. If you don't want this message to be sent, enter "BLANK_MESSAGE".
Learn about basic settings common to all interactions.
Advanced settings
-
Min Confidence Score for Answers: Select the minimum score that a result must have in order to be returned, either VERY GOOD, GOOD, or FAIR PLUS. If you downgrade this threshold to FAIR PLUS, be sure to test whether the quality of the results meets your expectations. It's generally recommended to keep the quality above FAIR PLUS.
This field isn't shown if you've selected an external knowledge base that doesn't use LivePerson AI. In this case, the results are simply those returned by the call to the external CMS.
- Max Number of Answers: Select the maximum number of matched articles to retrieve from the knowledge base and send to the consumer, anywhere from one to five. The default value is 1.
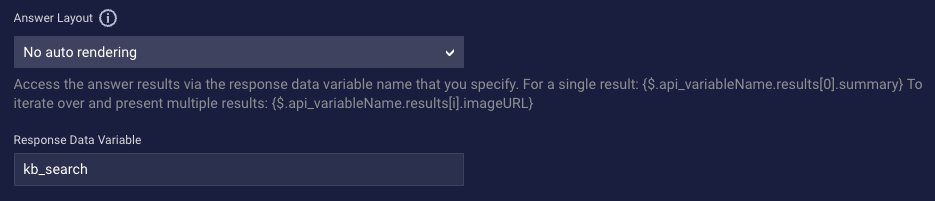
- Answer Layout: Select "Auto render, rich," "Auto render, plain," or "No auto rendering" based on your requirements. These layout options are discussed farther above.
-
Link Text for Content URL: This setting is available when you select an "auto rendering" option for the Answer Layout. Enter the "learn more" text to use. You can enter a botContext or environment variable here, e.g., {$botContext.<name>}. When the "Auto render, rich" layout is used, and when the "Auto render, plain" layout is used and the channel is Web messaging, this is the text for the
hreflink to the article's content URL. When the "Auto render, plain" layout is used in any other channel, this value is sent as static text: [this value] + [article's content URL in shortened form], for example, "Learn more at www.mysite.com/abc." For illustrations, see the images earlier in this topic. - Default Image URL: This optional setting is available only when you select "Auto render, rich" for the Answer Layout. If you enter an image URL, then when an article doesn't have an image URL within the knowledge base, this image is used in the rich output. This presents a uniform consumer experience across all articles, even when some articles have images but others don't. You might specify a company logo. Remember to whitelist the image URL. You can also enter a botContext or environment variable here, e.g., {$botContext.<name>}.
- Response Data Variable: This setting is available only when you select "No auto rendering" for the Answer Layout. Enter the name of the response data variable that will store the answer results. The default variable name is "kb_search."
Direct the conversation flow based on the result
By default, a Knowledge AI interaction includes two custom rules: one rule for when the knowledge base search returns an answer and the other rule for when the search doesn’t.
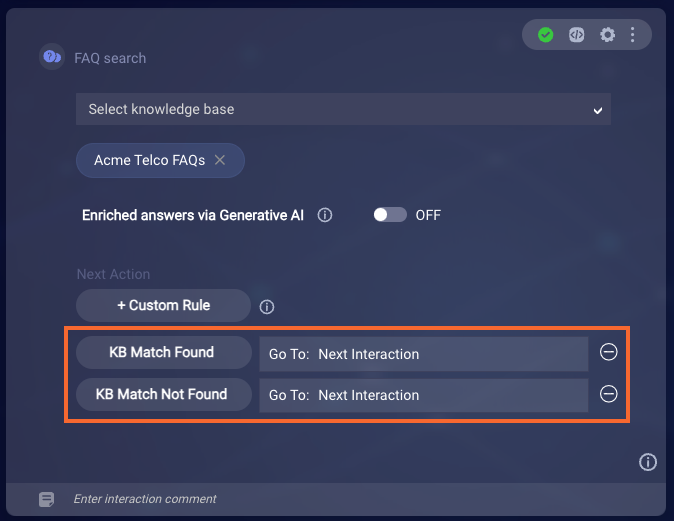
Within each rule, the condition specifies the particular search result, either "Found" or "Not Found."
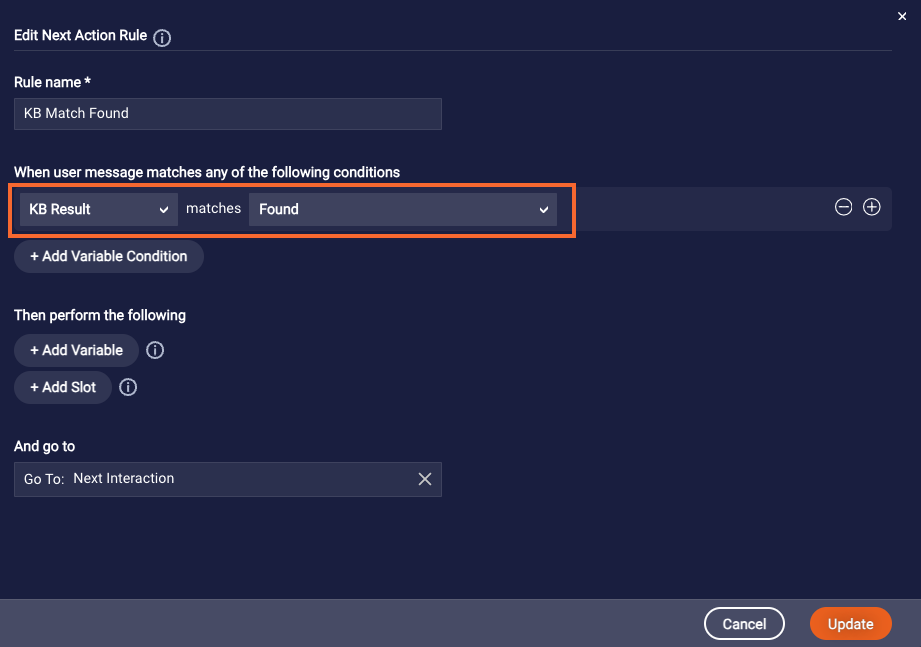
Configure the Next Action for each of these rules based on the direction in which the conversation should flow in each case.

If you're not using Generative AI and you delete the Match Not Found rule, then when a search is performed and no result is found, the fallback message is sent ("Sorry, I could not find anything for that."). However, if you've configured the Message when results not found setting in the interaction, then that message is sent instead.
If you're using Generative AI and you use a No Article Match prompt, then the Match Not Found rule is never triggered. This is because, when you use that kind of prompt, you always get a result—an answer from the LLM service—even when no matched articles are found in the knowledge base.
No auto rendering: Using a custom answer layout
Choose the "No auto rendering" answer layout when you require control over how the answers are rendered. With this option, you must manually add the interactions that display the article content.
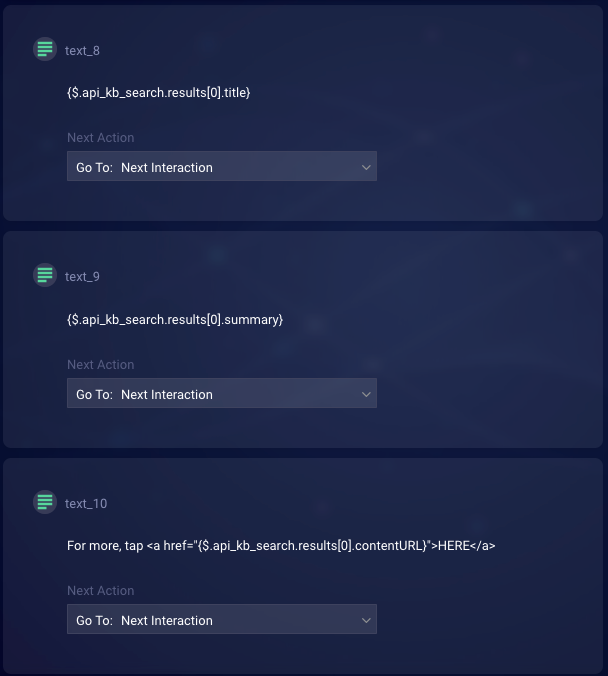
To display a single, best result, use the syntax below, where "variableName" is the response data variable name that you specified in the Knowledge AI interaction's settings:
{$.api_variableName.results[0].title}
{$.api_variableName.results[0].summary}
{$.api_variableName.results[0].detail}
{$.api_variableName.results[0].imageURL}
{$.api_variableName.results[0].contentURL}
For example:
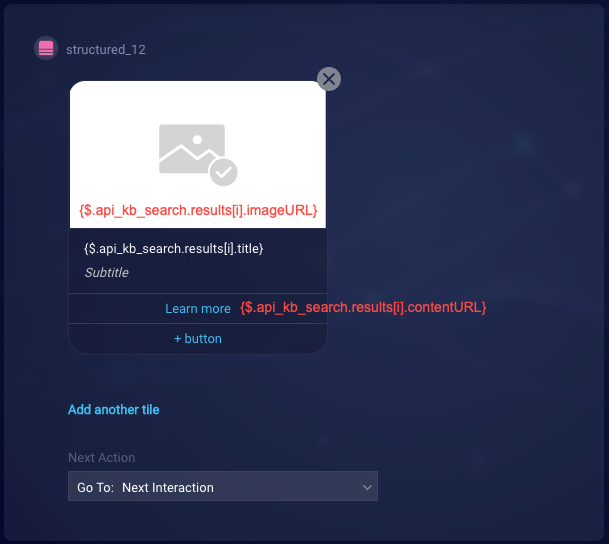
To iterate over and display multiple results, use the syntax below in a similar manner:
{$.api_variableName.results[i].title}
{$.api_variableName.results[i].summary}
{$.api_variableName.results[i].detail}
{$.api_variableName.results[i].imageURL}
{$.api_variableName.results[i].contentURL}
For example:
Agent Transfer
In a messaging bot, use an Agent Transfer interaction when you want to manually transfer the conversation to another messaging bot or to a human agent.
In a voice bot, use this interaction when you want to manually transfer the conversation to another voice bot. (Transfers to human agents in third-party contact centers are done using the Transfer Call interaction.)
Notes
- If you add an Agent Transfer interaction to a Voice bot after creating and starting the bot's agent connector, you must restart the existing agent connector before testing the change.
- If, given your use case, you need to prevent context switching from occurring during the transfer (e.g., messages are sent after the transfer that shouldn't be), you can do so.
- Be aware that manual transfers aren't the only way to perform transfers to other bots. Transfers can also be done automatically using a collaborative bot group.
For some practice with this interaction type, complete the Escalate to an Agent tutorial, which involves a messaging bot.
Interaction configuration
Message to send
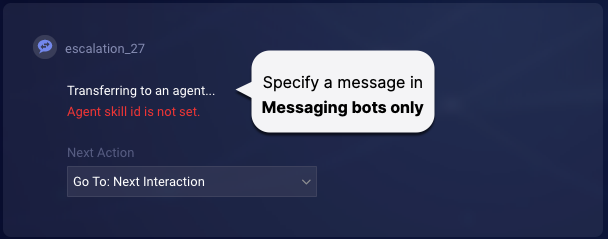
In messaging bots only, in the interaction, enter the message to send to the user prior to being transferred, something like, “Hold on while I connect you with an agent.” You can enter either static text, use a variable, or a combination of both. If you need to insert a new line, use an escape character like so: \\n.
This field is required in messaging bots, so if you don't want to send a message, enter "BLANK_MESSAGE" here. That satisfies the underlying, system requirement for a message, but it doesn't actually send one. The default value is, "Transferring to an agent…"
Advanced settings
-
Agent ID: Optional. Used for bot-to-human transfers only. Specify the ID of the human agent to which to transfer the conversation. (You can obtain the ID from the address bar when the user profile is displayed in Conversational Cloud.) For Messaging, specify the agent ID as
<account ID>.<agent ID>. For Live Chat, specify just the<agent ID>. Transfer of the conversation to this agent ID occurs if the agent is available. If the agent isn't available, the conversation is added to the queue for the skill specified in Agent Skill ID in this interaction, and the conversation is routed according to Conversational Cloud’s Transfer to agent rules. -
Agent Skill: Mandatory; without this, the transfer won’t work. Select the name of the skill to which to transfer the conversation. Behind the scenes, the system retrieves the skill's ID as the value to use. You can also enter a bot context variable that stores a skill ID, for example,
{$botContext.skillId}. You can't enter a bot context variable that stores a skill name.When the transfer is attempted, the value is evaluated.
If the value isn't numeric, the fallback message is sent to the user. (This never happens if you select a skill name.)
If the value is numeric and the bot responds, the conversation is added to the queue for the selected skill. The conversation is then routed according to Conversational Cloud’s Transfer to agent rules.
If the value is numeric, but the bot doesn't respond for more than 3 minutes (e.g., the chat server becomes overloaded and drops the message), an attempt is made to transfer to the Fallback Skill ID if one is specified in the agent connector (in Advanced Options). Otherwise, the transfer fails. For information on handling failures, see below.
-
Transfer Bot Context: Used for manual, bot-to-bot transfers only. Select this to automatically pass the user's intent and/or message from the sender bot to the receiver bot. This lets the receiver bot know the appropriate dialog to start after the transfer.
Best practices
Send a transfer message
When transferring the consumer to a live agent, it's customary to send some form of message to the user like, "Hold on while I connect you with an agent" (see step 2 above). You might want to send this as a Text statement in the dialog. However, supplying the message as a part of the interaction's configuration guarantees the message is the last one seen by the consumer prior to the transfer (because the message is sent as a part of the post body in the underlying Transfer API).
In the interaction, you don't have to supply a message, but if you don't, you'll need to set the field to BLANK_MESSAGE to satisfy the system requirement for a value.
Add a time delay to the transfer if needed
If you're sending one or more messages to the consumer before the transfer, it's recommended that you add to the Agent Transfer interaction an interaction delay that accounts for each message to be sent. The transfer is an asynchronous process, and you don’t want the bot to start it too soon. The cumulative delay on the Agent Transfer interaction provides the time delay that’s needed.
For example, if you're sending 3 messages before the transfer, each with its own 2000 millisecond delay, you might add a 6000 millisecond delay to the Agent Transfer interaction (3 messages x 2000 millisecond delay per message = an aggregate 6000 millisecond delay).
Specify the delay in the Interaction Delay field in the Agent Transfer interaction's settings.
Handle transfer failures
First, if an immediate error occurs when calling the transfer API (due to an invalid skill ID or a system failure of some sort), a failure response will be returned. You can catch and handle these errors by adding a custom rule to the interaction that checks for a “failure” result. (For an example of this, see farther above in the Integration interactions section in this article.)
Second, most often in Chat, but occasionally with Messaging, it can happen that the transfer API call is successful, but an attempt at transferring to a skill will fail after some time. When this happens, the platform sends the message __agent_escalation_failed__ to the bot. If you don’t have a dialog set up to catch this pattern, the bot will treat it like any other consumer message. In most cases, it will go to the Fallback dialog.
Setting up a dialog to catch the __agent_escalation_failed__ pattern allows you to send an appropriate message to the consumer, e.g., "Sorry, we're unable to perform the transfer at this time. Please try again later."
If the __agent_escalation_failed__ message is sent 3 times to the bot, and the 4th attempt also fails, the escalation stops, and the following default response is sent to the consumer, "Not able to transfer to Agent at this time. Please try later." Alternatively, if you've specified a "default user-friendly response" (for when errors and exceptions occur) in Bot Settings, that response is sent instead.
Secure Form
This interaction is supported only in Messaging bots.
There might be times when you want the bot to collect sensitive or private data from the consumer, such as their credit card info. You can use the Secure Form interaction to present a secure form to the consumer for this purpose.
Benefits of secure forms
A secure form is an online form that’s designed and implemented with security measures that protect the info being submitted. The form is developed with the goal of safeguarding sensitive or private data from unauthorized access, data breaches, or misuse. There are many benefits of using secure forms, such as:
- Data privacy: Secure forms help maintain data privacy and confidentiality because the data is encrypted during transmission.
- Data integrity: Encryption prevents unauthorized modifications, ensuring the data submitted by consumers remains unchanged during transmission.
- Prevention of data breaches: Without encryption, data transmitted over the Internet can be intercepted by malicious actors, leading to potential data leaks and breaches.
- Trust and reputation: Consumers are more likely to trust a website or organization that prioritizes their data security.
- Compliance with regulations: Depending on your jurisdiction, there might be data protection laws that require you to implement appropriate security measures when handling consumer data.
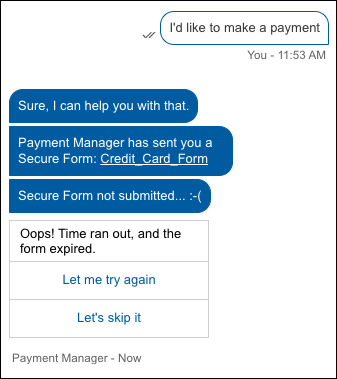
Consumer experience
-
During an automated conversation, the secure form invitation is presented to the consumer. Once the consumer clicks the invitation link, the form is presented in a slideout window:
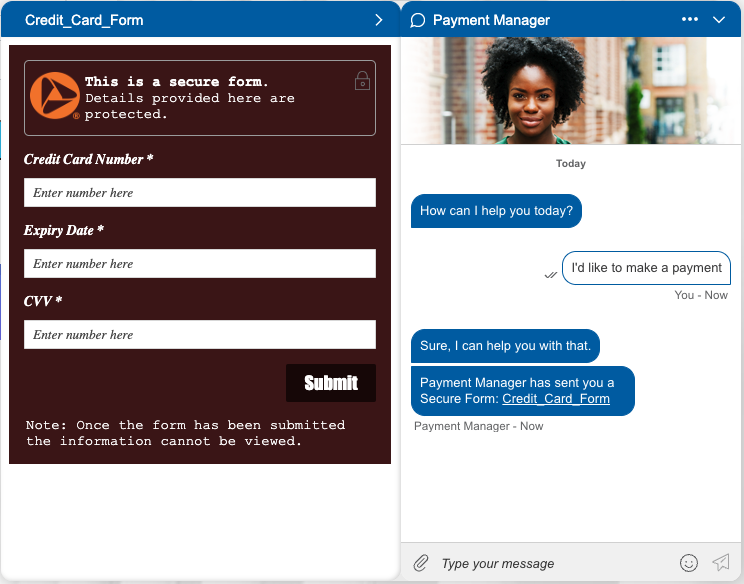
- The consumer enters their info and submits the secure form.
- The data is saved to LivePerson’s PCI-compliant vault, so it can be used for a short period of time. Also, the bot is notified of the successful form submission.
-
Most commonly, the conversation is then transferred to an agent that’s trained in handling sensitive info.
Currently, the bot cannot access the data provided via the secure form, so the bot can’t push that data to your external systems.
- The agent gets the ring signaling a new conversation and accepts the conversation.
- The agent then handles the sensitive info as required.
Before you begin
Before adding the Secure Form interaction to a bot:
- Learn about LivePerson secure forms in our Community Center.
- Request that your LivePerson representative activate 1) the Secure Forms feature and 2) the Secure Form Studio for your account. This requires that we flip several switches under the hood. Learn about account setup and necessary permissions in the Community Center.
- In LivePerson’s self-service Secure Form Studio, create the secure form and customize the styling for your brand. You can access the studio via the Management Console in Conversational Cloud. Learn about best practices in the Community Center.
Add and configure the Secure Form interaction
In the bot, add the Secure Form integration interaction at the point in the dialog flow where you want to present the secure form to the consumer.
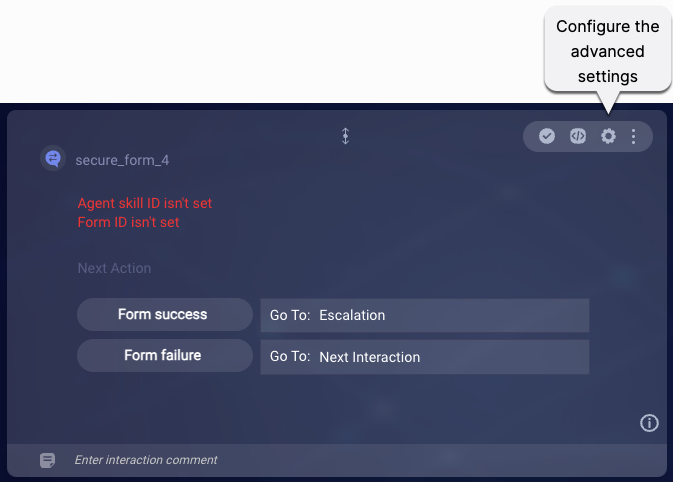
Advanced interaction settings
- Form title: Enter a descriptive title to display at the top of the secure form.
- Form ID: Enter the ID of the secure form that you created via LivePerson’s Secure Form Studio.
- Agent skill ID: Enter the ID of the skill to which to transfer the conversation after successful submission of the form. You must enter a direct, numeric value. Typically, agents assigned to the skill have PCI-compliant certifications, so they understand how to handle sensitive or private consumer info. The skill is defined in Conversational Cloud.
- Agent ID (optional): Enter the ID of the agent to which to transfer the conversation. Typically, this agent has PCI-compliant certification, so they understand how to handle sensitive or private consumer info. (You can obtain the ID from the address bar when the user profile is displayed in Conversational Cloud.) For Messaging, specify the agent ID as <account ID>.<agent ID>. For Live Chat, specify just the <agent ID>. Transfer of the conversation to this agent ID occurs if the agent is available. If the agent isn’t available, the conversation is added to the queue for the skill specified in Agent skill ID in this interaction, and the conversation is routed according to Conversational Cloud’s Transfer to Agent rules.
- Transfer message to consumer: Enter the message to send to the consumer immediately after successful submission of the form and just before transfer to an agent. Example: Thanks! We’ve got your info. Transferring you to an agent now…
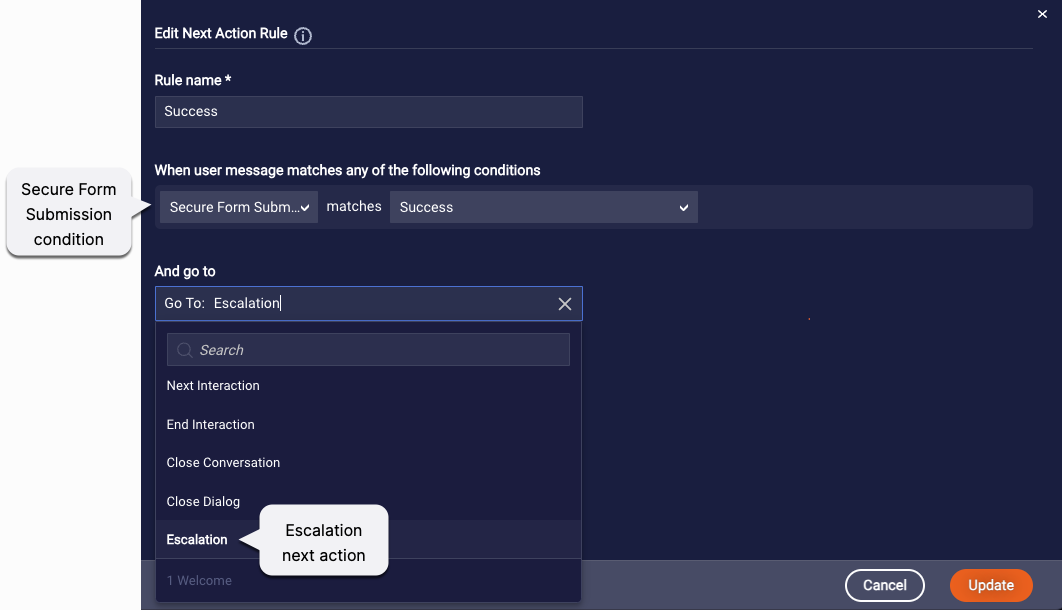
Next action - Form success flow
In most cases, after the consumer enters their info and submits the secure form, you’ll want to transfer the conversation to an agent that’s trained to handle sensitive data. Since this flow is most common, the default “Form success” rule specifies “Escalation” as the Next Action.
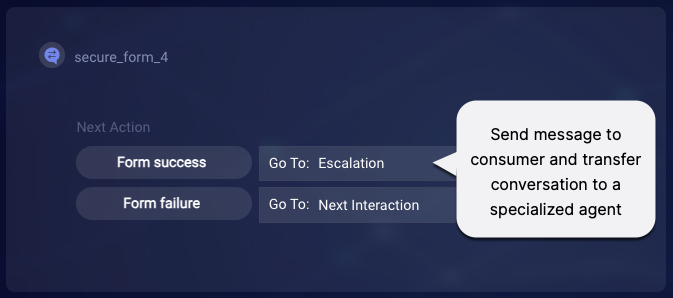
The "Escalation" next action sends the message that's configured in the Transfer message to consumer setting in the interaction's settings, and then it transfers the conversation to the skill or agent specified in the interaction’s settings.
In the success flow, you don’t have to transfer (escalate) the conversation to an agent, although this is most common. Change the default rule as needed.
Keep in mind that, currently, the bot cannot access the data provided via the secure form, so the bot can’t push that data to your brand’s external systems. Nor can you use the data to drive or otherwise inform the bot flow.
Next action - Form failure flow
Once the secure form is presented to the consumer, the clock starts ticking, and the secure form expires after a period of time. This time period is configurable, as discussed in our secure forms documentation in the Community Center.
If the consumer fails to submit the form within the specified period of time, the bot receives a result of "failure" for the secure form submission, and the "Form failure" rule in the interaction is triggered. Specify a next action for this scenario per your requirements.
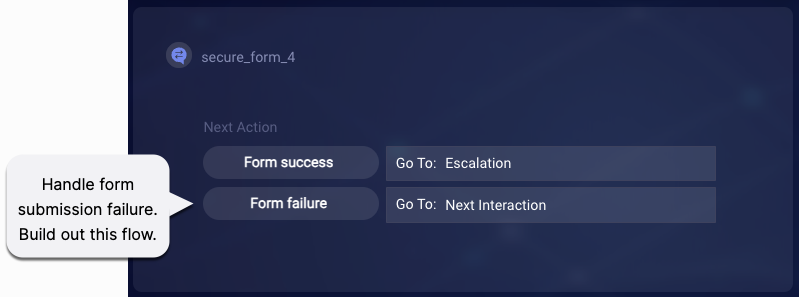
In our example below, we've redirected the flow to a question that asks the consumer whether they'd like to try again.
FAQs
Where can I learn about the security measures that support this solution?
The Secure Forms interaction simply presents the secure form to the consumer, and then drives the bot flow as you have configured it. You can learn about LivePerson secure forms in our Community Center. There you’ll find info on:
- Payment Card Industry Data Security Standards (PCI-DSS) compliance
- Security measures that are used
- Impact on conversation transcripts
- And more
Can I handle a failed transfer?
Failed transfers shouldn’t be common, but currently it isn’t possible to catch and handle a failed transfer. The bot can’t handle this case.
File Upload
Learn about approaches to adding suppport for uploading of files by consumers.
Dynamic Routing
Dynamic Routing is the intelligent routing of consumer conversations to the most qualified agents — bot or human — based on intent data and other contextual data: consumer inputs, past interactions, loyalty tier, and other attributes. Dynamic routing makes possible highly personal consumer journeys and routing at scale. It is a key architectural component of Conversation Orchestrator, one of LivePerson’s Conversational AI applications.
LivePerson Conversation Builder includes a Dynamic Routing interaction that significantly simplifies the usage of the Dynamic Routing capability. While there are other methods of implementing Dynamic Routing, using this interaction instead is recommended for its ease of use and lack of code.
The Dynamic Routing interaction is only available to brands who log in with single sign-on via Conversational Cloud. It isn’t available if you log into Conversation Builder directly.
This section provides basic information on Conversation Builder’s Dynamic Routing interaction. For detailed information on using this interaction, see the Conversation Orchestrator getting started documentation.
How the interaction works
A Dynamic Routing interaction does the following:
-
It automatically performs an
askMavencall to get the next routing actions for the current conversation.askMaven is the Conversation Builder JavaScript function that conveniently wraps Conversation Orchestrator’s Next Actions API. You don’t need to manually add this call; the Dynamic Routing interaction automates the logic.
-
It sets the following in the Conversation Orchestrator namespace:
- orchestrator.channel: The channel in use
- orchestrator.userMessage: The most recent user message
- orchestrator.intent: The ID of the most recently matched Dialog Starter intent
-
It iterates through the next actions returned by the
askMavencall and automatically performs all the actions in the order they were returned. For example, it might send a message to the consumer, and then transfer the conversation to a particular skill. A next action can be one of:- Send a message
- Route to skill
- Route to agent
Note: If the next action returned by the
askMavencall is just to send a message, the bot does this and then transfers to the fallback skill specified in the interaction. If a fallback skill isn't specified, the conversation flow continues to the next action in the dialog.
Prerequisites
Before using the Dynamic Routing interaction, make sure that Conversation Orchestrator’s Conversation Context Service is enabled for your account. If your account is relatively new, it’s likely that this was done automatically for you by LivePerson when your account was set up. However, brands with older accounts will need to enable this manually.
Enabling the Conversation Context Service for your account is necessary because when the Dynamic Routing interaction performs the askMaven call, the CCS is used to store and pass some information.
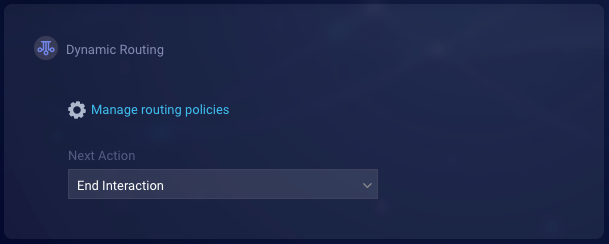
Interaction configuration
Routing policies
In the interaction, click Manage routing policies. As a convenience, this link takes you to Conversation Orchestrator, where you can define and prioritize your routing policies if you haven’t done so already.
Basic settings
-
Fallback Skill ID: If the
askMavencall returns just a next action of “send message,” doesn’t return any next actions, returns an error, or fails for some reason, this is the ID of the agent skill to which the conversation is transferred. You can specify the ID using a bot context variable like {botContext.skillId}, or you can enter a direct, numeric value. If this setting isn’t set, the conversation flow continues to the next action in the dialog. - Fallback Skill Name: Enter the name of the agent skill that you specified in the Fallback Skill ID setting. Entering the name provides you with something display-friendly and “readable” by which to readily understand which skill is being used (since the skill ID is a number).
Advanced settings
- Escalation Message: This is the message to send to the consumer before transferring the conversation as determined by the next actions, for example, “Hold on while I connect you with a suitable agent who can assist you.” You can enter static text, use a variable, or both. If you need to insert a new line, use an escape character like so: \\n.
Overriding standard behaviors
Optionally, you can add Pre-Process or Post-Process code to the interaction to override standard behaviors. For example, you might want to direct the flow to a different interaction, not to the Dynamic Routing interaction, based on certain conditions. You could do this in the Pre-process Code.
Using the Dynamic Routing bot
If you are setting up a new routing or concierge bot, it might be helpful to use the Dynamic Routing bot. The bot already includes the Dynamic Routing interactions and additional, out-of-the-box functionality, such as routing by intent.
FAQs
How many Dynamic Routing interactions can I add within a bot?
You can add just one.
How does disambiguation work when a Dynamic Routing interaction is used?
Disambiguation is the responsibility of the bot, so if you want to let the consumer clarify their intent before the flow moves to the Dynamic Routing interaction, implement a Disambiguation dialog.
Why can’t I add custom rules to the interaction?
As mentioned above, the end result of this interaction is always a transfer. Custom rules that control the next action can’t be specified because the transfer happens asynchronously.
Can I alter the behavior of the askMaven call that’s performed by the Dynamic Routing interaction?
No, this can’t be done. If you’d like to do this, the Dynamic Routing interaction isn’t the best solution. Use one of the more manual methods.
Apple Pay
For Apple Messages for Business only.
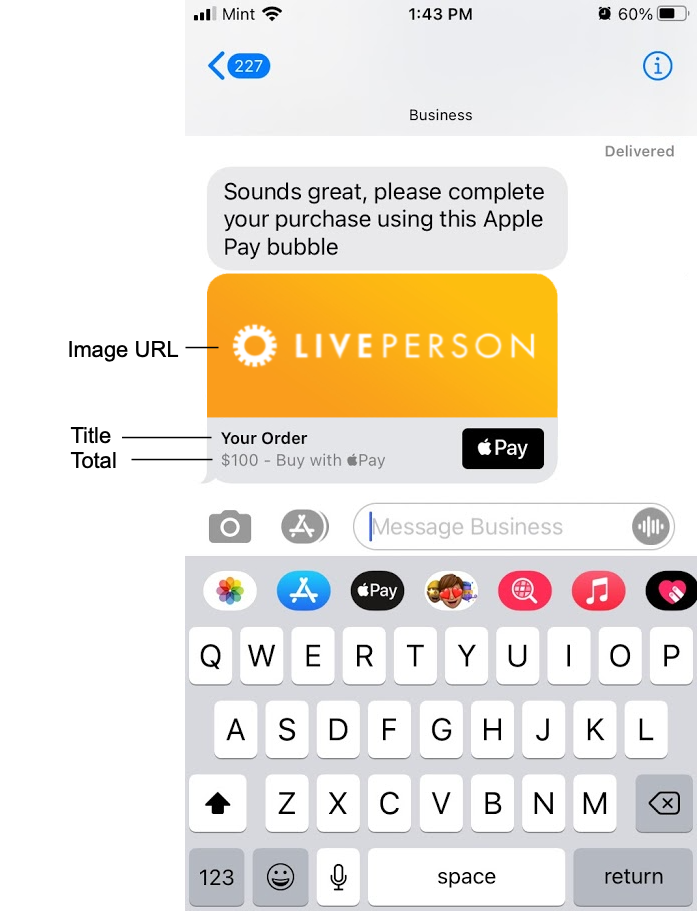
If your business uses Apple’s Messages for Business service to chat with consumers via the Messages app, you can use the Apple Pay integration interaction to let the consumer make a payment for goods and services using Apple Pay.
The interaction has been developed per Apple's Apple Pay specifications. Keep in mind Apple's guidelines.
Prerequisite setup steps
- Review and follow LivePerson’s Apple Messages for Business setup guide.
- As a part of the setup for Apple Pay in specific, you’ll need to create and set up your merchant account and the services needed to use Apple Pay, and you’ll need to provide your Merchant ID in Apple Business Register. For more info on these steps, see this section on Apple's developer site. Contact your LivePerson representative (other contact options: chat with us on this page, or message Support) for help with this if needed.
- Implement your own merchant session endpoint.
Once this setup is completed, you can add the Apple Pay integration to your bot and configure it as described below.
Interaction configuration
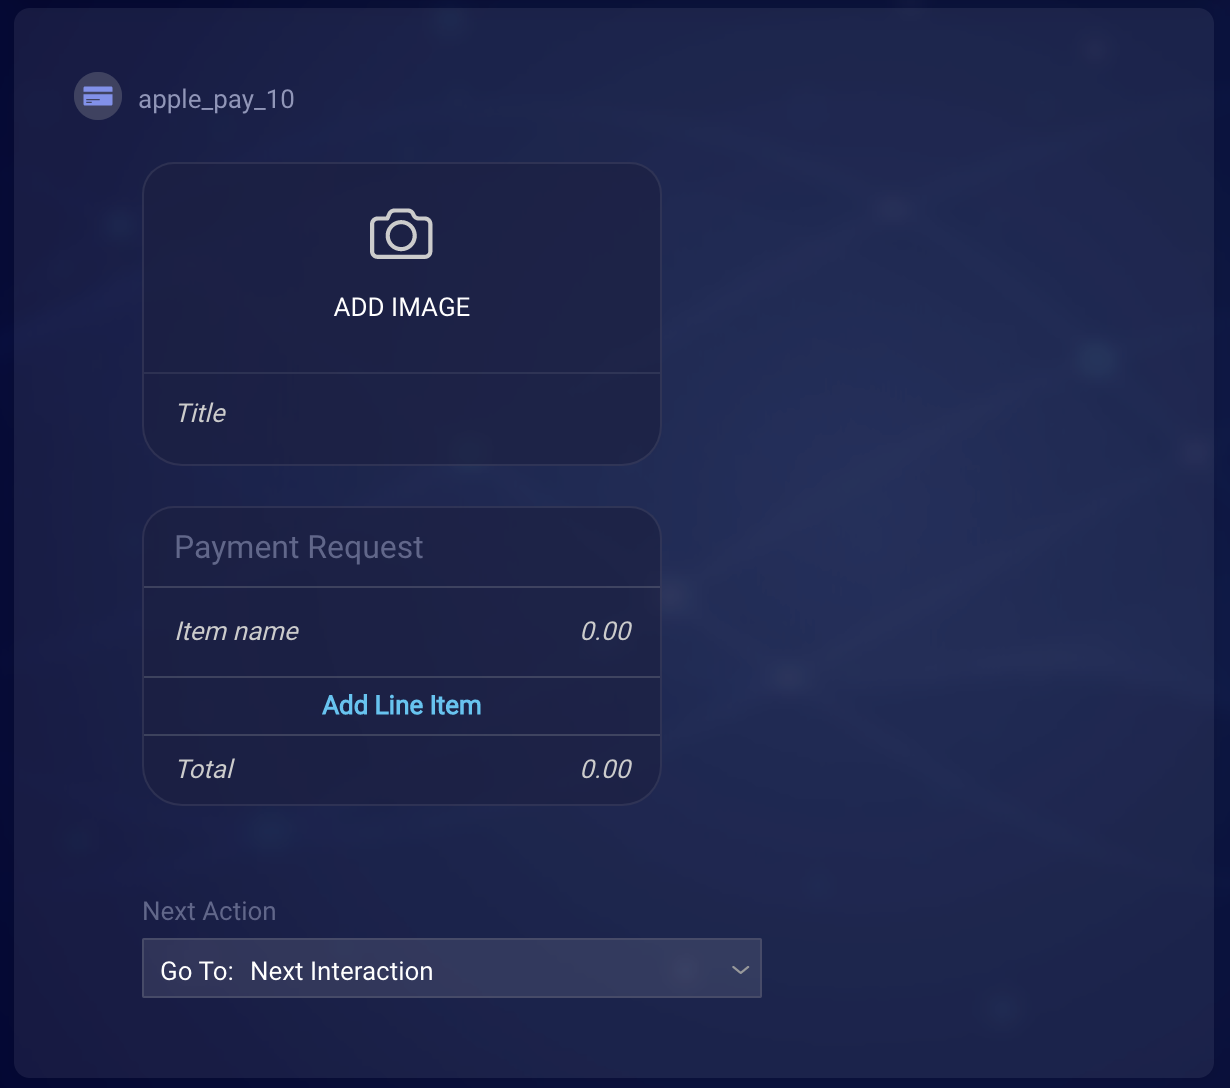
Tile settings
| Setting | Description | Required? | Example |
|---|---|---|---|
| ADD IMAGE → Image URL | The URL of the image to display. The domain in the URL must be whitelisted. If used, specify an image that’s appropriate for the overall pay experience. | Optional | https://www.mysite/images/mylogo.jpg |
| ADD IMAGE → Image Style | The size of the image, either Icon (smallest), Small, or Large. | Optional | Icon |
| Title | The title of the Apple Pay bubble. | Required | Your order |
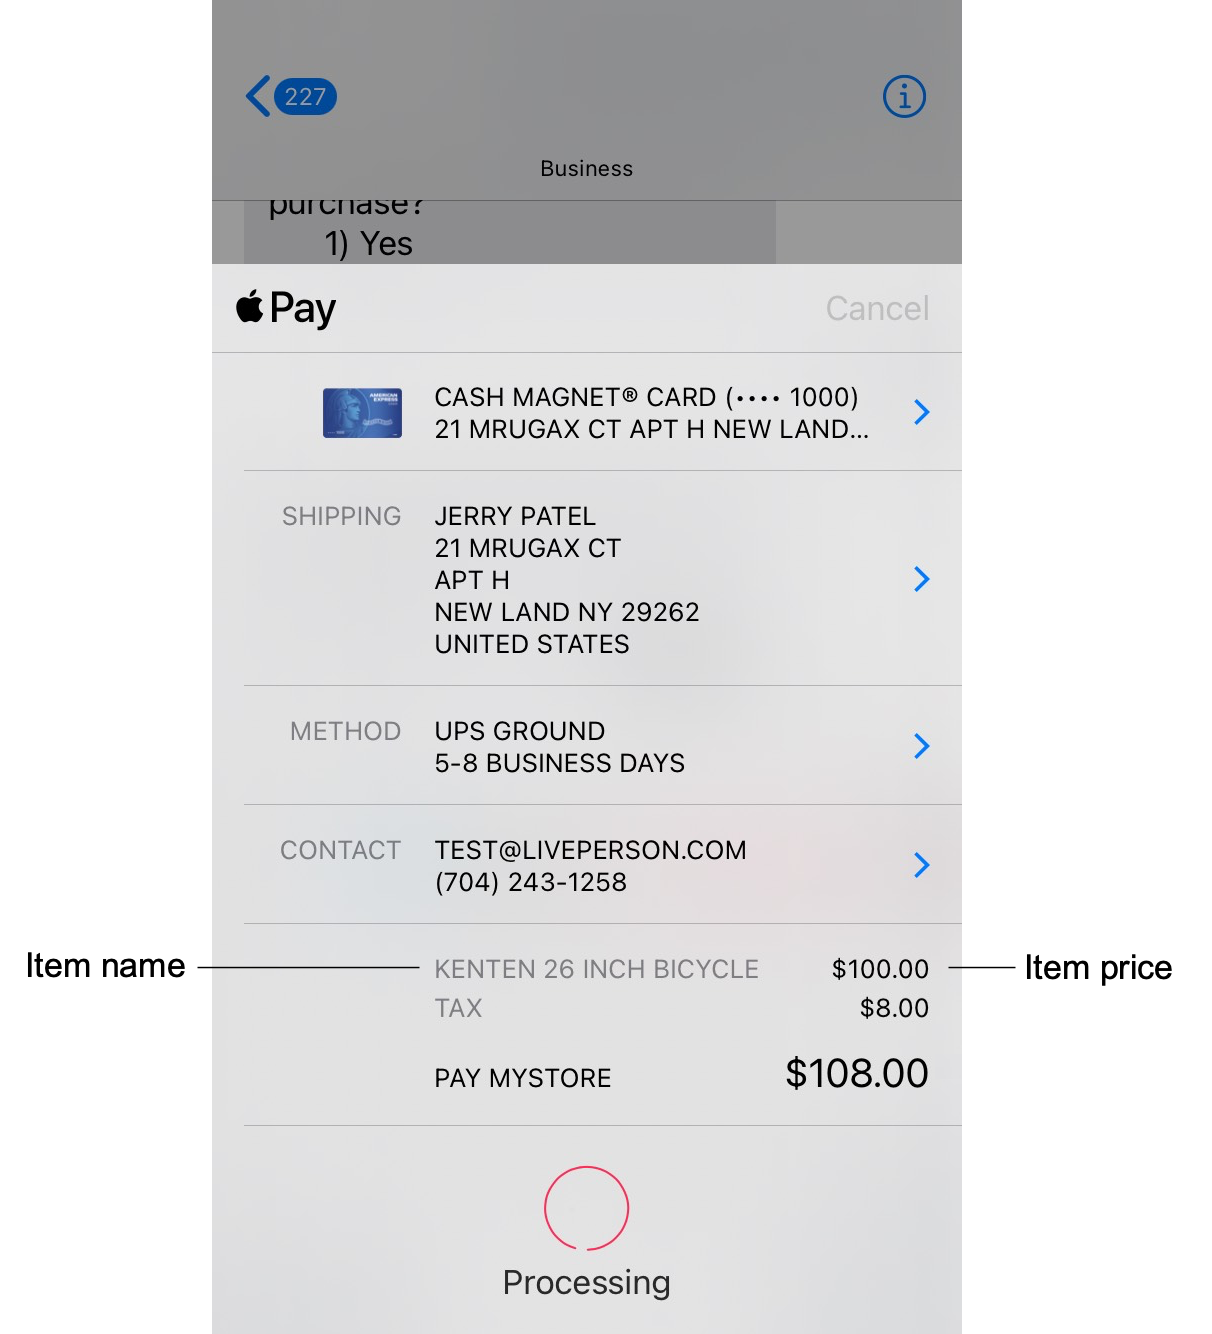
| Item name | A short description of the item. You can specify a botContext or integration variable name. You can also express these using an array enumerator, i.e., specify the variable using “i” as the index. | Required | {applePayData.lineItems[i]} |
| Item price | The amount of the item. You can specify a botContext or integration variable name. You can also express these using an array enumerator, i.e., specify the variable using “i” as the index. | Required | {applePayData.itemPrices[i]} |
| Total | The total amount for all items, in effect, the subtotal (minus tax). You can specify a botContext or integration variable name. | Required | {$botContext.total} |
Advanced interaction settings
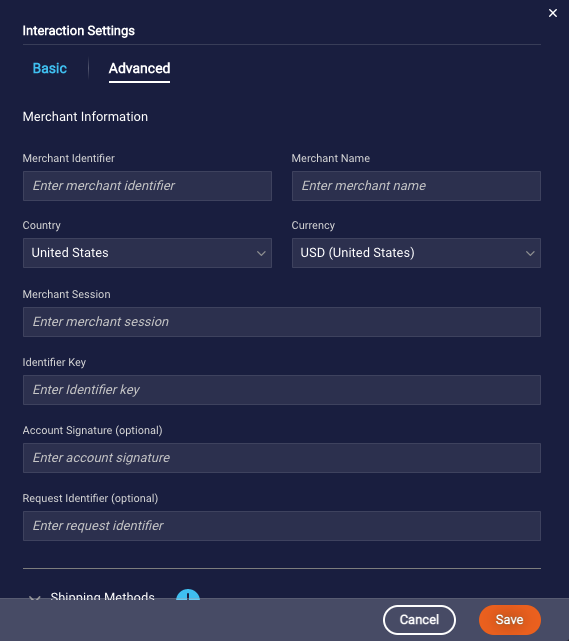
Merchant Information
- Merchant Identifier: The unique identifier that represents you as a merchant for Apple Pay.
- Merchant Name: The canonical name for your store, suitable for display and consisting of 64 or fewer UTF-8 characters.
- Country: Your two-letter ISO 3166 country code as a merchant.
- Currency: The three-letter ISO 4217 currency code for the payment.
- Merchant Session: A unique token representing the transaction between the consumer and you as the merchant. This token is used by Apple to confirm that the pay session was created by a valid merchant and that it is being used within the time bounds allowed by Apple. Create an integration that points to your merchant session endpoint, and provide the response received from the endpoint here. You can specify a botContext or integration variable name.
- Account Signature: This field allows for the account signature to be generated and added as a part of the request, for extra validation. The field stores a signed hash of the merchant session payload. The hash is sent as a part of the structured content request to the connector, which validates it and rejects it if invalid. You can enter an alphanumeric string or specify a botContext or integration variable name. This field is optional and only needed for accounts using this sign/validate flow from Apple. Note that opting in to this additional verification requires some internal account configuration; please contact your LivePerson representative (other contact options: chat with us on this page, or message Support) for help with setting this up.
- Request Identifier: This field stores the unique identifier representing the merchant session request. The request identifier is a consistent ID throughout the lifetime of the pay session, and it’s used by LivePerson APIs and services to track the pay session from start to finish. You can enter an alphanumeric string or specify a botContext or integration variable name.
Shipping Methods
You can add a list of available shipping methods. For each shipping method, specify:
- Name: A short description of the shipping method.
- Shipping Cost: The cost associated with the shipping method.
- Description: An additional description of the shipping method.
- ID: (Optional) A value that you provide to identify the shipping method.
The shipping method fields can be updated dynamically via an API call, i.e., you can specify a botContext or integration variable name in these fields.
The first shipping method that you add is used as the default method.
Additional Fields and Payment Capabilities
- Required Billing Fields: Select the billing contact fields required to process the transaction. Tip: Select only the fields that are needed to process the payment. Selecting unnecessary fields adds complexity to the transaction; this can increase the chances of the customer canceling the payment request.
- Required Shipping Fields: Select the shipping contact fields required to fulfill the order. For example, if you need the customer’s email address or phone number, select these.
- Merchant Capabilities: Specify the payment capabilities supported by you as the merchant. You must include “3DS.”
- Supported Networks: Specify one or more of the payment networks supported by you as the merchant.
Endpoint URLs
Only the Payment Gateway URL is required. This URL is called by Apple Pay to process the payment through the payment provider.
The optional endpoint URLs are for receiving and managing any updates a customer might make before confirming the payment. These include:
- Payment Method Update URL: Called by Apple Pay when the customer changes the payment method.
- Shipping Method Update URL: Called by Apple Pay when the customer changes the shipping method.
- Shipping Contact Update URL: Called by Apple Pay when the customer changes their shipping address information.
- Fallback URL: A URL that opens in a web browser so the customer can complete the purchase if their device is unable to make payments using Apple Pay.
- Order Tracking URL: Called by Apple Messages for Business after completing the order; provides you with an opportunity to update the order information in your system.
For more on these endpoints, see this topic on Apple developer's site.
Transfer Call
This interaction is supported only in Voice bots.
There might be times when you want the bot to transfer the conversation to a human agent in a third-party voice contact center. In this case, use a Transfer Call integration to transfer the conversation to the center in one of two ways:
- Make a SIP call to the center over a SIP trunk. What’s a SIP call? SIP stands for Session Initiation Protocol. It’s a specific set of rules that allow you to make and receive phone calls over the Internet (i.e., without the use of the phone carrier network), using any device (computer, desktop phone, mobile phone, etc.). Contact centers often set up and use SIP calling due its many benefits: flexibility, affordability, scalability, and more.
- Make a call to the center’s E.164 number over the public switched telephone network (PSTN). What’s an E.164 number? It’s a type of phone number that’s assigned to devices and services in the PSTN. It’s also a unique identifier that helps to route calls to the correct destination.
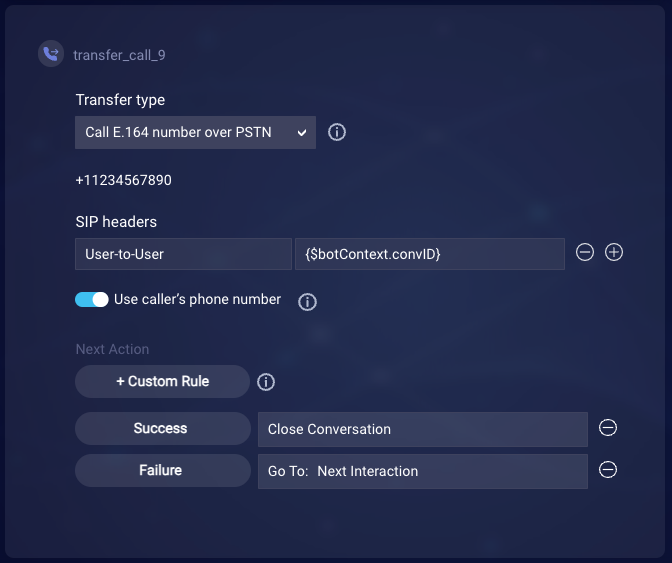
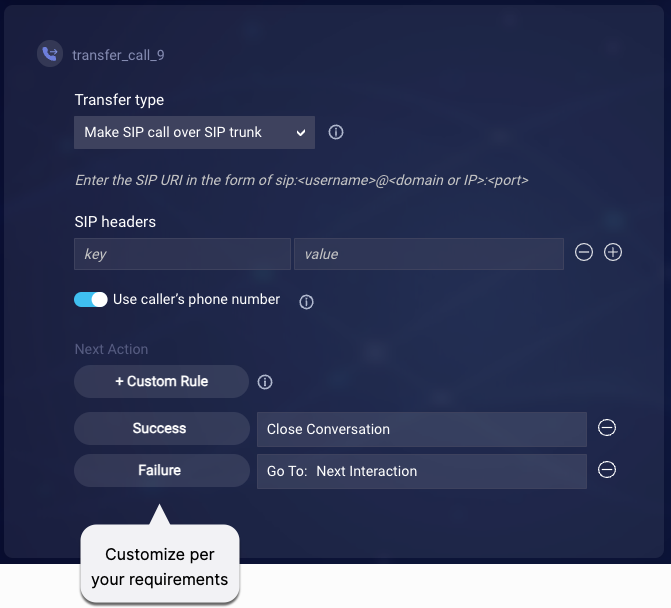
Transfer type
Select the type of call to make:
- Make SIP call over SIP trunk
- Call E.164 number over PSTN
Need help setting up a SIP Transfer using a specific communications vendor, such as Avaya? Contact your LivePerson representative for assistance.
SIP URI or E.164 number
For a SIP call, enter the SIP URI to which to transfer the call in the space indicated. This takes the form of:
sip:<username>@<domain or IP>:<port>
You’ll need to obtain this URI from the administrator of the third-party voice contact center solution.
Alternatively, for a call to an E.164 number, enter the E.164 number. This takes the form of:
[+][country code][subscriber number including area code]
Don't include any spaces in the E.164 number.
SIP headers
Regardless of the type of call you make (SIP or E.164), under SIP Headers, you can use the free-form fields to add key/value pairs for the contextual information to pass along in the call. The contact center’s system uses this information to route the call to the best possible agent. Here again, you’ll need to obtain the keys from the administrator of the third-party voice contact center solution. For the values, you can enter a string, a botContext variable, an environment variable, or a combination thereof.
Generally speaking, for security reasons, don’t capture and store within Conversation Builder any data that needs to be secure. So, when it comes to the SIP headers in particular, don’t directly include any sensitive information (password, authentication token, etc.) or personally identifiable information (consumer’s credit card number, etc.).
Use these best practices for specifying headers:
- Add a SIP header for the conversation ID.
- Optionally, use your own authentication API to obtain the authentication token for the SIP transfer, and specify that variable in another SIP header.
- Optionally, use the Conversation Context Service to store additional data. You might use the service to store the authentication token and possibly more data that’s been gathered during the bot flow. (See code examples of writing data to and reading data from the Conversation Context Service.) Once the data is set in a variable, you can specify that variable in another SIP header.
In the case of a PSTN-based transfer using an E.164 number, the SIP headers might be dropped by intermediate service providers. If you need to ensure that the headers are sent, use a SIP transfer over a SIP trunk instead.
Use caller's phone number
This setting determines who the "calling party" is. Turn this on if you want the caller's phone number to be shown to the recipient as the calling number when the call is transferred. Turn this off to use the Voice bot’s phone number instead.
Success and Failure rules
In the interaction, note the Success rule that’s provided by default. This closes the conversation with the Voice bot when the transfer is successful. You can keep this rule as is.
Customize the Failure rule per your requirements. A failure isn’t likely to happen, but it can occur if the Transfer Call interaction is configured improperly. So, the Voice bot should handle failures gracefully. For example, you might want to play a message to the consumer, e.g., “We’re unable to transfer you to an agent at this time. Please try again later.” A more complex solution might involve logging a ticket in your CRM system, so you can call the consumer back.
Notes about call transfers
- If the Transfer Call integration is configured properly, the transfer will begin, and a success notification will be received by the Voice bot. This causes the Voice bot conversation to be closed, as per the Success rule in the interaction. Note that Conversation Builder doesn’t wait for the third-party voice contact center to actually respond.
- Once the call transfer is initiated, the call is handled according to the business logic of the contact center’s telephony system.
Best practices
- Play a transfer message to let the consumer know the transfer is happening, e.g., “Just a second. Let me connect you with one of our agents.” You can do this by adding a Speech or Audio statement immediately before the Transfer Call interaction.
- Add a time delay to the transfer if needed. If you’re playing one or more responses before the transfer, it’s recommended that you add to the Transfer Call interaction an interaction delay that accounts for each response you need to play. This gives the Voice bot sufficient time to play the messages before transferring the conversation. For example, if you’re playing 3 messages before the transfer, you might add a 6000 millisecond delay to the Transfer Call interaction (3 messages x 2000 millisecond delay per message = an aggregate 6000 millisecond delay.) Specify the delay in the Interaction Delay field in the interaction’s settings.
Send SMS
This interaction is supported only in Voice bots.
During an automated voice conversation, there are times in the flow when you might need to send an SMS message to the consumer. Use the Send SMS integration to do this. It’s useful for sending:
- Instructions
- Reminders
- A link to the directions to your office
- A link to the results of a product search
- And more
Sending an SMS message doesn’t affect the voice conversation with the bot.
Message to send and mobile number
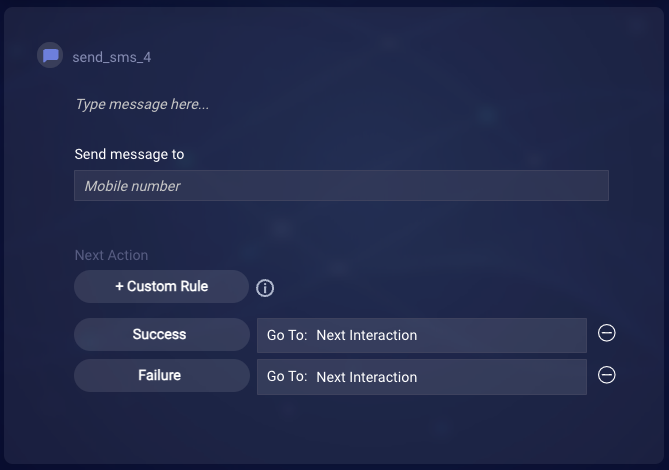
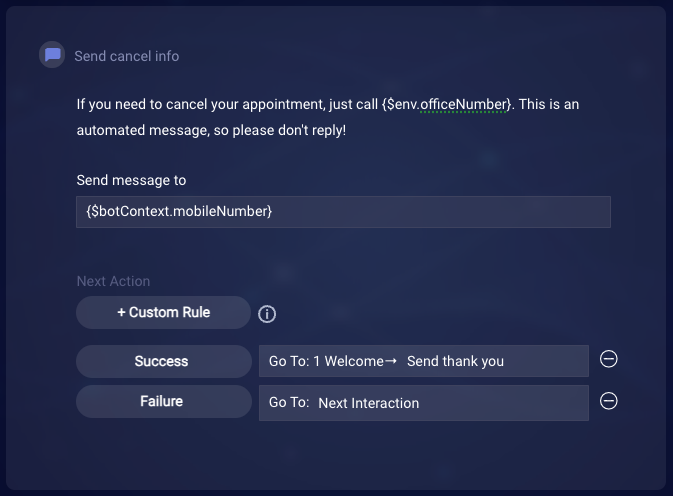
Enter the message to send. About 160 characters are allowed. As a best practice, include some language to indicate to the consumer that they should not reply to the message since this will not work.
Also enter the consumer’s mobile number.
For the mobile number, enter " + " (plus sign) followed by the number in e.164 format, for example " +18605551212 ". Typically, you’ll specify a botContext variable here because you’ve saved the consumer’s number to the bot’s context. As a best practice, use a botContext variable or an environment variable.
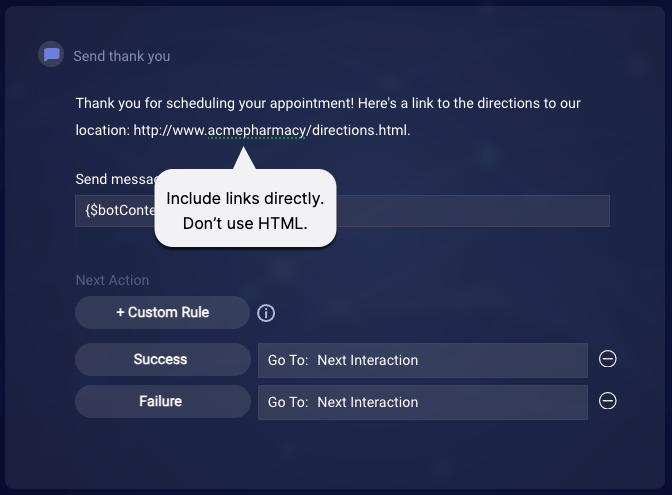
Limitations
The SMS channel doesn’t support HTML, so neither does the Send SMS integration. If you need to include a link, add it directly like so:
Handling success and failure
Configure the Success and Failure rules to direct the bot’s flow to the appropriate interaction for each case.
Taking care to handle failures is a best practice. Make sure to handle failure cases by configuring the Failure rule to direct the bot’s flow to the appropriate interaction.
Best practices
If the consumer attempts to reply to the SMS message, this will not work. So, include some language in the message to indicate that they shouldn’t do this.
That said, you can use LivePerson’s Connect to Messaging (C2M) functionality to move the conversation from Voice to Messaging. This is done via an Integration interaction.
Transfer to Messaging
This interaction is supported only in Voice bots.
Check out the Transfer to Messaging tutorial.
During an automated voice conversation, there are times in the flow when you might want to transfer the call to one of your supported messaging channels. Use the Transfer to Messaging integration interaction to accomplish this.
The Transfer to Messaging interaction makes three API calls (internally) to LivePerson’s Connect-to-Messaging (C2M) system:
- Authentication: This first call is used to authenticate with LivePerson’s Connect-to-Messaging (C2M) system. If authentication is successful, the C2M system provides an access token to use when making the subsequent API calls.
- Eligibility: This second call checks whether the consumer is reachable via the messaging channel.
- Invite: This last call initiates the messaging conversation with the consumer.
Use cases
You might want to use the Transfer to Messaging interaction if:
- Your consumers prefer Messaging. You interact with them over Voice and Messaging, but you aim to always redirect the conversation to their channel of choice.
- You want to reduce the volume of calls handled by your agents. High call volume can overwhelm agents and lead to lower call answer rates. You intend to redirect calls to Messaging to alleviate these pain points and raise consumer satisfaction (CSAT).
- You mostly or solely communicate with your consumers over messaging. In this case, the primary and perhaps only purpose of your voicebot is to redirect your consumers to a messaging channel.
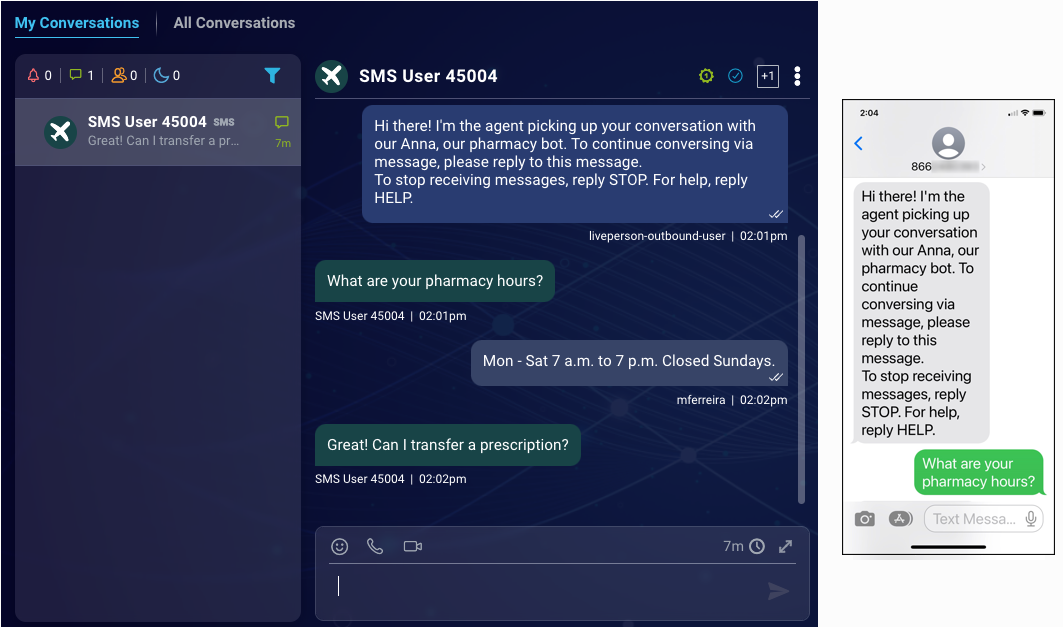
Consumer experience
- The consumer converses with the Voice bot over the Voice channel.
- The Voice bot uses LivePerson’s C2M system to initiate a messaging conversation with the consumer by sending them a message on the messaging channel.
- If the consumer replies to the message, an agent in Conversational Cloud picks up that messaging conversation. And the conversation over messaging continues.
Notes
- Both the voice and messaging conversations can happen in parallel as two separate conversations. But this depends on your needs.
- Does your solution use summaries of ongoing and historical conversations generated by Generative AI? If so, when the transfer to messaging occurs, a summary of the voice conversation is created. Learn about automated conversation summaries.
Before you begin
- Learn about LivePerson’s C2M solution in our Community Center. Also familiarize yourself with the C2M API documentation in our Developer Center.
- Request that your LivePerson account representative activate LivePerson's C2M system for your account.
- Request from your LivePerson account representative the credentials info (client ID and client secret) that the Transfer to Messaging credential must use. (This credential is needed to establish a secure and authorized communication channel between the Conversation Builder Voicebot and LivePerson’s C2M system.)
-
Configure the C2M system in the C2M Web Tool, specifically:
- Under API Handoffs, create an API handoff. This is the group of configuration settings to use when the Voicebot calls the Eligibility API.
- Under Settings > Device Check, turn on the mobile device check that checks whether the consumer’s phone number is a landline or mobile number.
- Under Settings > Channels, enable the messaging channels that you’ll use.
- Under Settings > Routing, select (to enable) the skills that you’ll use.
Add and configure the Transfer to Messaging interaction
In the bot, add the Transfer to Messaging integration interaction at the point in the dialog flow where you want the transfer to occur.

Post body
The Post body is where you specify the data to include in the POST request that will be made during the Eligibility API call.
To specify the POST body, click + Add JSON. This opens a window where you can enter JSON in the middle panel. To get this done quickly, we recommend that you copy and paste one of the available channel-specific templates, and then edit it to suit your needs.
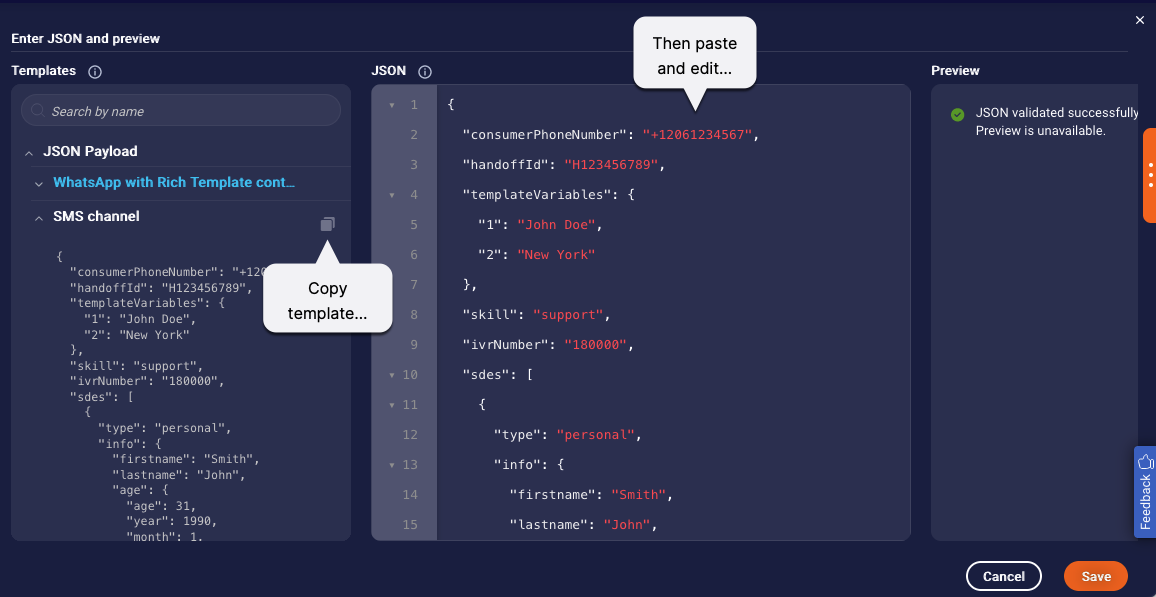
When specifying the post body, keep the following in mind:
- Include all required parameters. Info on these is available in our C2M API documentation. Use the API documentation to guide you.
- The templates are robust and illustrate all of the engagement attributes that can be used. Remove what you don’t need.
- Use botContext and environment variables as you require. For example, typically, the consumer’s phone number will be set in a botContext variable.
- Ensure the JSON is well-formed.
Credential
Selecting a credential is required, as the credentials must be used to authenticate with LivePerson’s C2M system. You can select from all of your account’s credentials of type “Transfer to Messaging.”
Learn how to create a Transfer to Messaging credential.
Next action
Build out the success and failure flows in the bot. And log custom events in the bot along the way. This traceability can support resolving issues.
Once the success and failure flows are built out, specify next actions in the Transfer to Messaging interaction accordingly. There are four flows/rules you must account for:
- Token Failure: Typically, this failure occurs if there is something wrong with the credentials. You might want to configure this rule so that it redirects the bot flow to a dialog that sends a message like, “Oops! Something went wrong. Try again at a later time.”
- Eligibility Failure: This failure occurs if the consumer isn’t reachable via the messaging channel. You might want to configure this rule so that it redirects the bot flow to a dialog that sends a message like, “I’m sorry. The device tied to your phone number isn’t capable of receiving a message. Do you have an alternate number we can use?” The dialog would then perform the transfer using the alternate number.
- Invite Success: This is the success flow for the voice conversation, where the message has been sent successfully to the consumer on the messaging channel. Remember that both the voice and messaging conversations can happen in parallel as two separate conversations. But this depends on your needs. You might want to redirect the bot flow to a dialog that simply sends a message like, “We’ve just sent you a message. We’ll close this voice call now and continue over messaging. Good-bye!” The dialog would then close the voice conversation. Overall, build out the success flow however you require.
- Invite Failure: This failure occurs if there’s already a messaging conversation open on the given channel between the consumer and an agent. You might want to configure this rule so that it redirects the bot flow to a dialog that sends a message like, “I’m sorry. We can’t send you a message at this time. Try again later.” You’ll need to support this flow with some logging, so you can know to notify your agents to close the open conversations.