Introduction
The Web View Integration API was designed to allow an external system to post information back to a bot. For example, if a user is directed to an external web form to collect data (e.g., for lead generation or payment), this API can be used by that external form to send the data back to the bot.
The Web View API can be used by the external system to:
- Set session-scoped variables in the bot runtime
- Post a message to the chat client
- Invoke a dialog starter to trigger a dialog flow
Limitations
Don’t use this API to post Personally Identifiable Information (PII) or Payment Card Industry (PCI) data because the data is not masked.
If you use this API to post a message back to the bot, there’s a time restriction: That message must be sent within 24 hours of receipt of the consumer’s most recent message via the channel. Otherwise, the message sent via the API is ignored by the bot, which means the bot won't respond to it.
Getting started
Retrieve the domain
Use the LivePerson Domain API to retrieve the domain, providing your account ID and the cbExternalIntegrations service name.
Review the API terms of use
Review our API terms of use.
Requirements
If you have IP restrictions in place, you'll need to do some whitelisting before using this API.
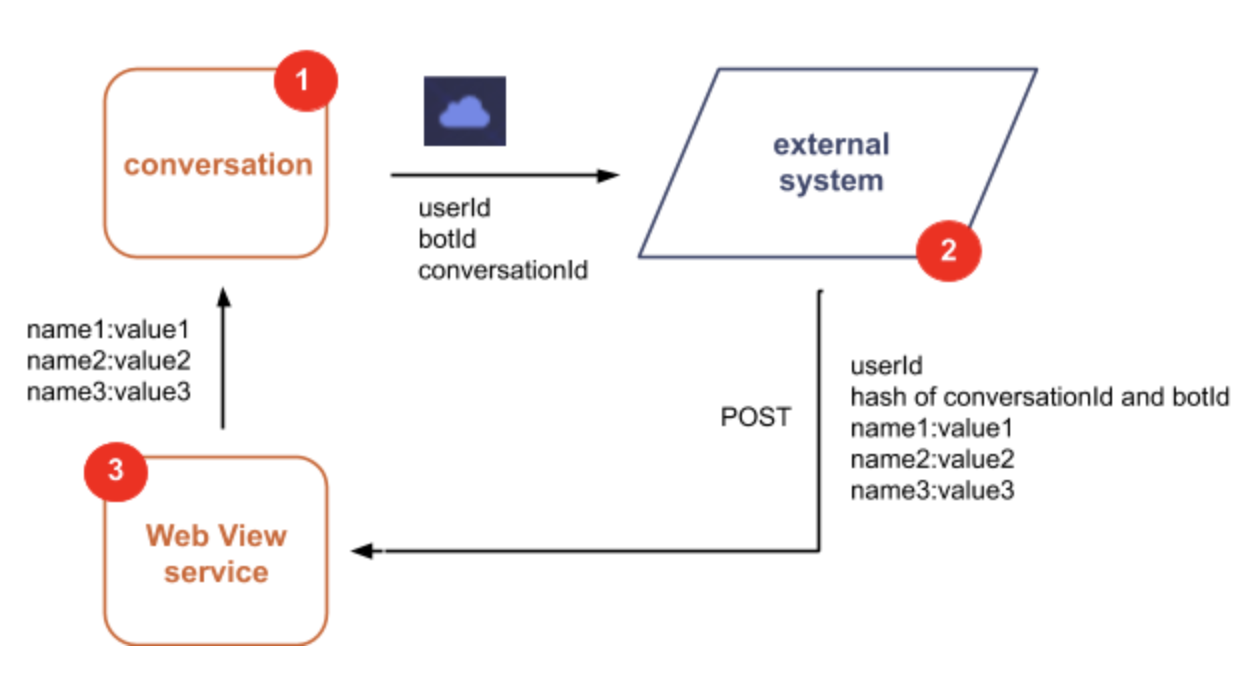
The API requires three fields that the external system must obtain from the conversation:
- userId: The user ID can be retrieved using the getUserPlatformId function.
- botId: The bot ID can be retrieved from the bot settings; see the Bot ID field.
- conversationId: The conversation ID can be retrieved using the getConversationId function.
Request
Use the POST method to set session-scoped variables in the bot runtime.
| Method | URL |
|---|---|
| POST | https://{domain}/thirdparty-services-0.1/webview |
Headers
| Name | Value | Notes |
|---|---|---|
| Content-Type | application/json | |
| Authorization | The API access key that you need to pass; originally retrieved from the conversation | This is an SHA authorization token that is a combination of the conversationId and the botId. It should be generated by creating a sha256 hash: auth = sha256hex(conversationId + “ || “ + botId) For example: sha256hex(“abcd || xyz”) Note the space, two pipe characters, and space after the conversationId. |
BODY/POST parameters
| Name | Description | Type/Value | Required | Notes |
|---|---|---|---|---|
| botId | The bot ID | string | Required | |
| conversationId | The conversation ID | string | Required | |
| userId | The consumer's user ID | string | Required | |
| message | The message to send to the bot runtime | string | Optional | If set, this message is posted to the chat client. To also trigger a dialog starter, this message must match to a Dialog Starter interaction in one of the bot’s dialogs. If unset, the Web View service only posts the variables. |
| contextVariables | The key/value pairs that can be passed to the bot platform | object:list of strings | Optional | These key/value pairs can be used in the bot runtime using the Get Web View Variables JavaScript functions. |
Example
curl -X POST \
  https://{domain}/thirdparty-services-0.1/webview \
  -H 'Authorization: F8488E6143818BB0364717A91F235F7F7F0FE91C464EC6FAC7ECF0D3393EBBAF' \
  -H 'Content-Type: application/json' \
  -d '{
    "botId": "795bb1534e34fc89050304e6f6827c41c50410d7",
    "conversationId": "a845678d-fe5a-429e-bc46-b25d524b9fa7",
    "message":"webrequest",
    "userId": "b849678d-fe4a-439e-bc46-b25d524b9fa7",
    "contextVariables": [{"name": "PaymentId","value": "534e34fc89050304e6f6827c41c50410d7"}, {"name": "PaymentStatus","value": "PROCESSED"}]}'
Retrieving the Web View variables
Use the Get Web View Variables JavaScript functions to retrieve the variables set via the Web View API from the bot runtime.
Example guide
This guide provides a sample implementation for this API.
Step 1: Information needed
In order to call the Web View Integration API, the following data is needed:
- Bot ID
- Conversation ID
- User ID
- Message (optional)
- Context variables (actual data to be passed)
- A hosted form with the API integrated (detailed below)
The Bot ID can be found in LivePerson Conversation Builder in the bot's Bot Settings (expand More Settings).

The conversation ID can be retrieved with the botContext.getConversationId() method in bot code.
The user ID can be retrieved with the botContext.getUserPlatformId() method in bot code.
Note: If you're using a platform that already has access to the conversation ID and/or user ID (such as LivePerson Functions), you can simply take them from there.
Step 2: Set up the form link in Conversation Builder
In this guide, we'll be passing the required data to a URL with the bot ID, conversation ID, and user ID in the query string. The URL format will look like this:
http://{formUrl}?userId={userId}&convId={convId}&botId={botId}
We'll use the methods mentioned above to construct the URL.
In the Global Functions of our bot, we’ll use the code below to retrieve the necessary data and then set the URL in the bot variable formURL, which we’ll use later to provide a link to the user to fill out the form.
function __initConversation() {
 var userId = botContext.getUserPlatformId();
 var convId = botContext.getConversationId();
 var botId = '7a4e10287a6b90cee1de9910f0b5010985eef16a';
 botContext.setBotVariable('formURL', 'https://static-assets.dev.fs.liveperson.com/cb_test/web_view_test/web_view/index.html?userId=' + userId + '&convId=' + convId + '&botId=' + botId, true, false);
}
Step 3: Send the form link to the visitor
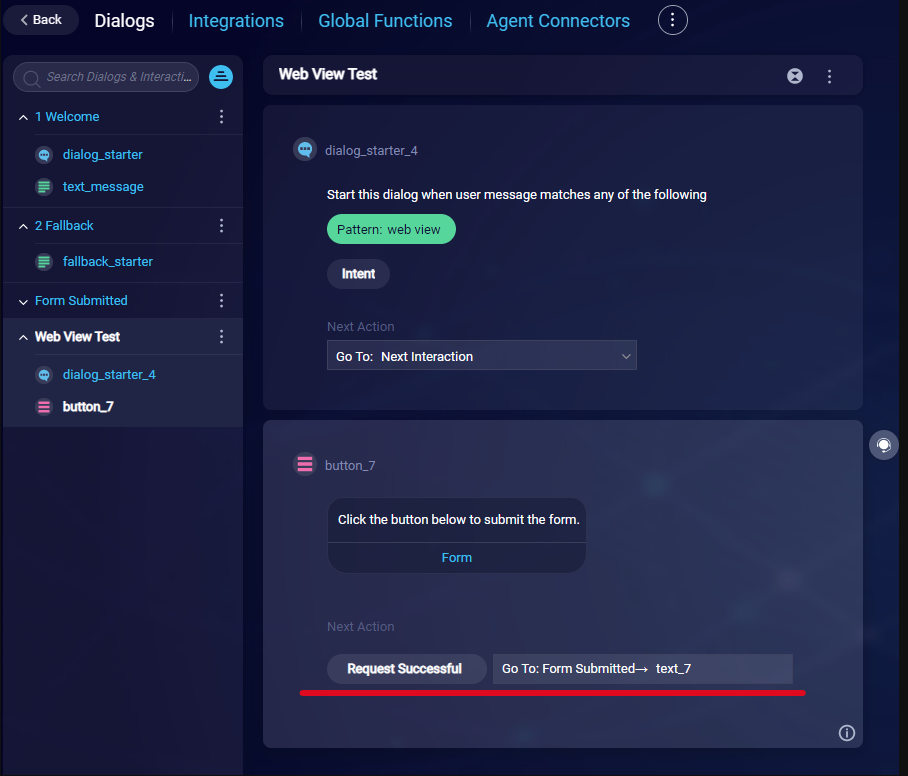
In the bot, we have a simple dialog to present the form link to the visitor. The dialog has a simple pattern match for triggering.
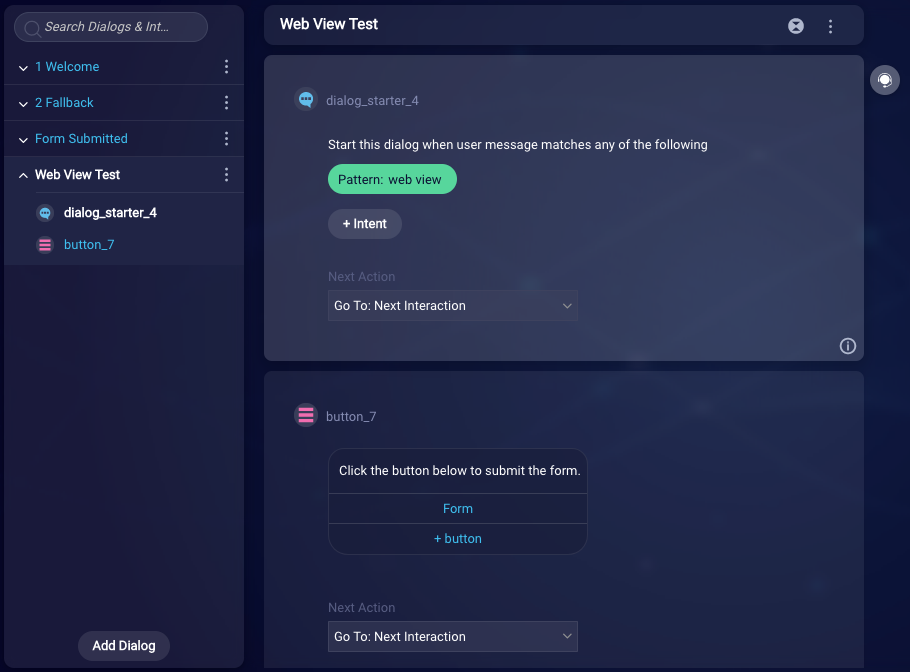
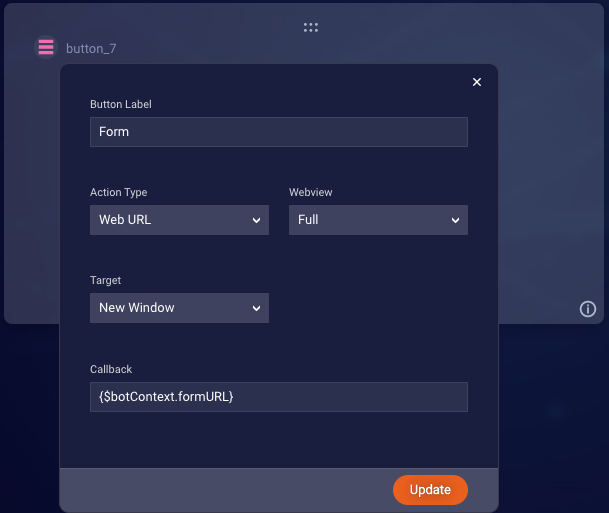
The dialog also has a single Button Question interaction with a single button. This button uses the formURL bot variable that was created in the Global Functions as the Callback. This way, when the visitor clicks the button, they will be directed to the form URL.
Step 4: Call the API from the browser
For the purposes of this guide, we created a simple HTML page, with a basic form, in order to submit some collected information back to the bot. We are not performing any validation, but you might want to do so in your form.
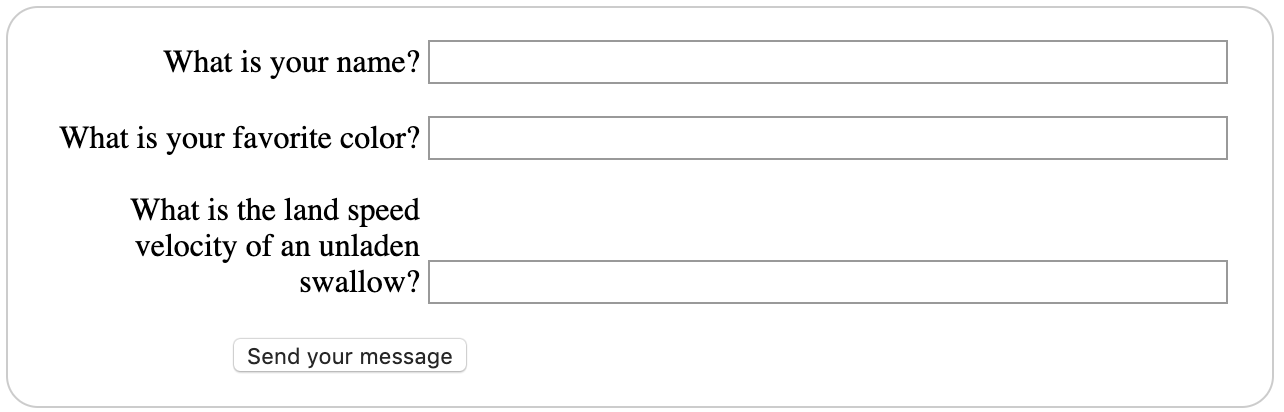
After the user fills out the form, the method below is called to submit the data back to the bot. We retrieve the data from the query string, then retrieve the form data, then set the domain and authorization, and finally post data to the bot.
// Post data when form is submitted
submitForm = async function() {
 // Get data from query string
 const queryParams = new URLSearchParams(document.location.search);
 const userId = queryParams.get('userId');
 const conversationId = queryParams.get('convId');
 const botId = queryParams.get('botId');

 // Get data from form
 const name = document.querySelector('input[name="user_name"]').value;
 const color = document.querySelector('input[name="favorite_color"]').value;
 const swallow = document.querySelector('input[name="unladen_swallow"]').value;

 // use correct domain for your region
 const domain = 'https://va.bc-intg.liveperson.net/thirdparty-services-0.1/webview';
  // encode auth string
 const authString = `${conversationId} || ${botId}`;
 const auth = await sha256(authString);

 const res = await postData(domain, auth, {
   botId,
   conversationId,
   userId,
   message: "request successful", // optional
   contextVariables: [
     {"name": "name", "value": name},
     {"name": "color", "value": color},
     {"name": "swallow", "value": swallow}
   ],
 });
}
Note: The authorization for the bot must be in the format of “{conversationId} || {botId}”, then sha256 encoded. You will need to do this in whatever method your platform supports.
The postData method referenced above looks like this:
// Post data to Web View API
async function postData(url = '', auth, data = {}) {
 const response = await fetch(url, {
   method: 'POST',
   mode: 'cors',
   headers: {
     'Authorization': auth,
     'Content-Type': 'application/json',
   },
   body: JSON.stringify(data),
 });
 return await response.json();
};
Step 5: React to the submitted data in the bot
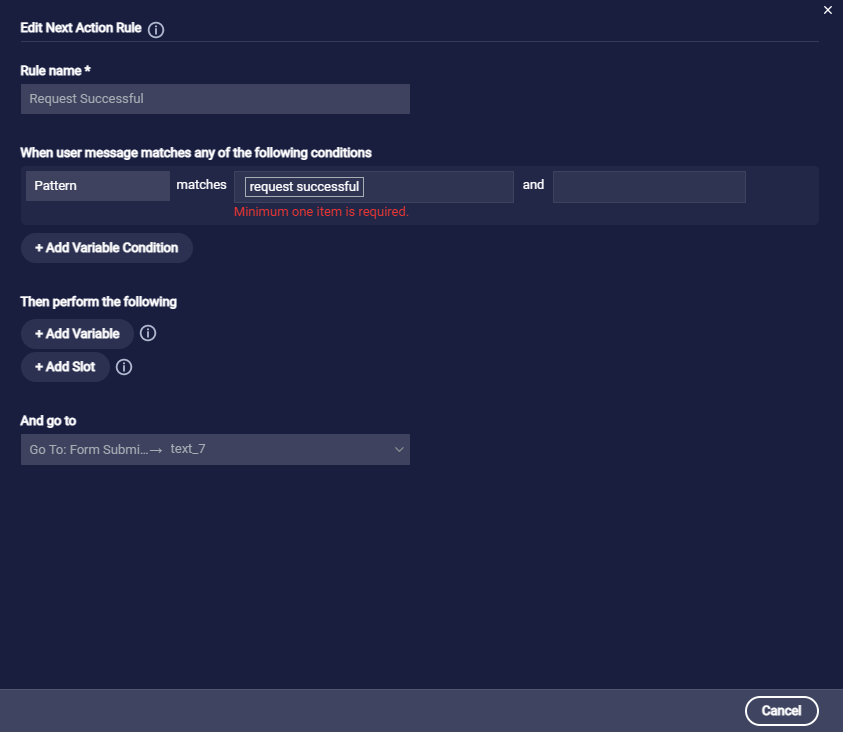
When we called the Web View Integration API upon submitting the form, we passed a “message” parameter with a value of “request successful.” This “message” can be used in the dialog flow. You can see in the images below that we have a custom rule to pattern match the message that we sent.

In the pre-process code for the interaction, we have the following code to retrieve the visitor’s name that was sent in the API payload. This value is then assigned to a bot variable, which we can use in the text interaction.
var visitor_name = botContext.getWebViewVariable('name');
var visitor_color = botContext.getWebViewVariable('color');
var visitor_swallow = botContext.getWebViewVariable('swallow');
botContext.setBotVariable('visitor_name', visitor_name, true, false);
botContext.setBotVariable('visitor_color', visitor_color, true, false);
botContext.setBotVariable('visitor_swallow', visitor_swallow, true, false);
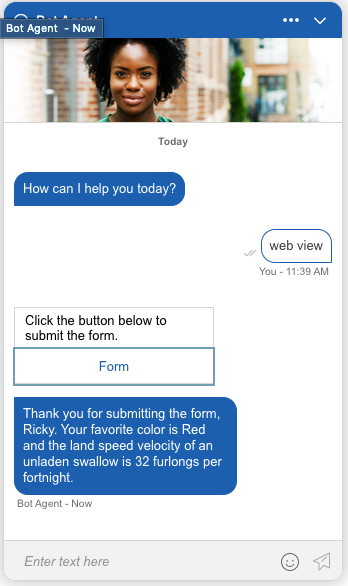
There's an end-to-end demo. Simply type “web view” to trigger the appropriate dialog. Click the link to access the form, fill it in, and then submit the form. The bot will then respond, confirming that the form was filled.