
LivePerson Conversation Builder allows users to configure API integrations that are invoked when processing a dialog. Integrations are useful for sending or receiving necessary data from other systems.
The Conversation Builder templates include common integrations. For example, the Simple FAQ template includes a Knowledge Base integration.
Want some practice with integrations? The Integrations tutorial provides a walkthrough of adding one. You'll need to complete the Dialogs and Patterns tutorial and the Intents tutorial first, as they build on each other.
Integration types
An integration can be one of the following types:
-
 API: API integrations allow Conversation Builder to perform some action or access the features or data of an external service. For example, you might want to retrieve information on specific items in your product catalog, so you can use that information in interactions in a dialog.
 -
 Email: Use an Email integration when you want Conversation Builder to send an email as the result of a bot's dialog flow. For example, if the consumer completes a survey, you might want to send a thank you email to the consumer or send the survey results to a moderator or administrator for collection.
 -
 KnowledgeAI: Use a KnowledgeAI integration to search a knowledge base for articles. One use case for this type of integration is within a fallback dialog, to funnel user utterances into a knowledge base search. If an appropriate search result is found, it can be displayed. If no results are found, you might then display a "sorry" message or transfer the conversation to a human agent.
 -
 LivePerson Agent Escalation: A LivePerson Agent Escalation integration transfers the conversation to a human agent or another bot.
 -
 File: Use a File integration to take a file that was uploaded by the consumer to Conversational Cloud via a File Upload interaction and upload it to your external file share or system.
 -
 LivePerson Functions (FaaS): Use a LivePerson Functions integration to invoke a function (
lambda) that is deployed to the LivePerson Functions platform. There are no constraints here; if there is some custom logic (a function) you want to invoke with a bot, you can do it with this integration.
Retrieve service domains
Do you need to dynamically retrieve a domain for a given service in the bot? Don’t hard code it. Conversation Builder offers a scripting function named getLPDomain.
Check the API response status
You can obtain the HTTP status code of the API response using this special variable syntax:
var statusCode = botContext.getBotVariable("api_<RESPONSE DATA VARIABLE NAME OF INTEGRATION>Status");
So, for an API Integration with the following settings:
- Integration Name =
RegisterNamespace - Response Data Variable Name =
RegisterNamespace
You would get the response status code by using the following:
var statusCode = botContext.getBotVariable("api_RegisterNamespaceStatus");

botContext.printDebugMessage(">>> api_RegisterNamespaceStatus statusCode:" + statusCode);
You can then check if the value matches the desired HTTP response code for successful operation and then proceed to trigger the next desired message interaction within your dialog.
if (statusCode === 204 || statusCode === 201) {
    botContext.printDebugMessage(">>> api_RegisterNamespaceStatus API success");
    botContext.setTriggerNextMessage("saveContext");
} else {
    botContext.printDebugMessage("!!! api_RegisterNamespaceStatus API failure");
    botContext.setTriggerNextMessage("sdeSender_FAILED");
}
Typically, this block of code is placed in the Post-Process Code section attached to calling an API integration within a dialog.
Process API results
When it comes to processing the results returned from an API call, there are two ways to accomplish this:
- Option 1 - In the Integration interaction’s Post-Process Code
- Option 2 - Via custom data fields in the integration
Both are viable options, but the first option has a few advantages:
- It’s easier to find bot variables in the Post-Process Code. You work with them much closer to where they were first set up.
- Changes made to Post-Process Code are traceable because they show up in the bot’s Change History. If you change something in the integration’s Transform Result Script, it isn’t visible in the Change History.
Option 1: Process API results with post-process code
In the Integration interaction’s Post-Process Code, use the following logic:
- Validate all fields in the response, for example, check for missed fields.
-
If you need to save the response from the API call to help with debugging later on, use logCustomEvent. In our example below, we’re using a
logPostApifunction that uses abotContext.CustomEvent(user_message, event_name, event_details)function to store the full response.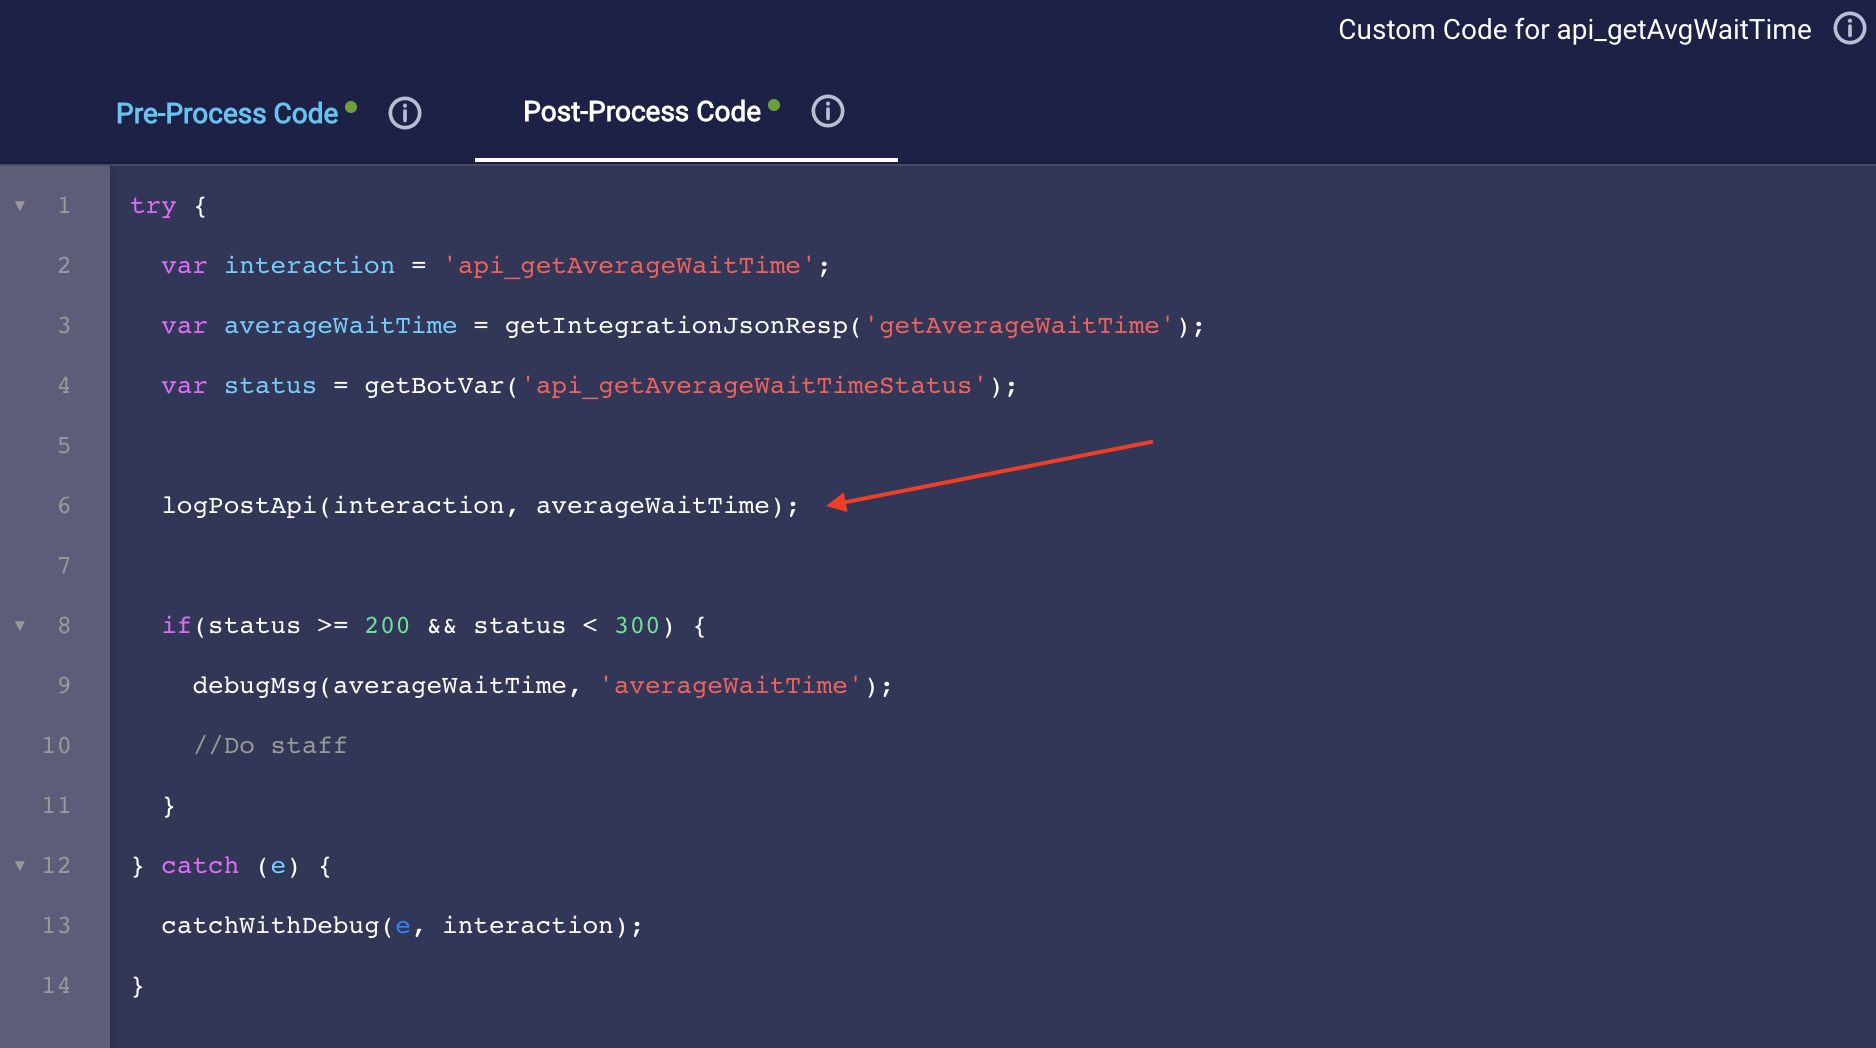
Need a function here? Define it in Global Functions and call it from the Post-Process Code. This is a best practice that allows for code reuse.
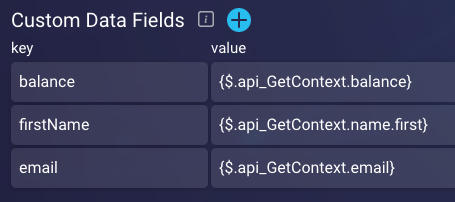
Option 2: Process API results with custom data fields
Custom data fields allow you to use key/value pairs to capture data from an API response for later use in dialogs. API variables are named in the key field, with the path to the JSON value you are saving in the value field. For the value, use the following syntax: For an API named ‘GetContext’, $.api_GetContext serves as the base for the JSON path:
{$.api_GetContext.<JSON_PATH>}
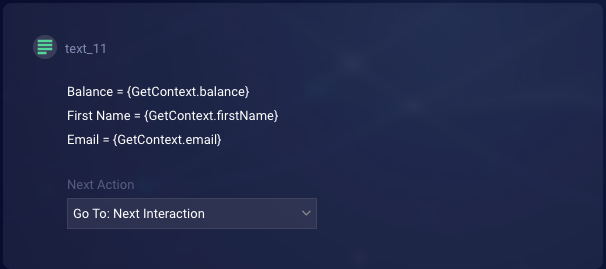
Once you have created these variables, you have access to their values within the dialogs. To do so, use curly braces notation containing the integration name with the variable name you’ve created.
These variables are also accessible in the pre-process or post-process code editors, should you need to use their values in your bot logic:
var firstName = botContext.getBotVariable('GetContext.firstName');
Iterating through results
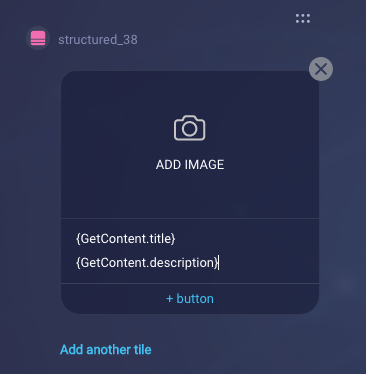
Occasionally, you might want to iterate through the JSON data to display multiple results from an API. This can be useful when using Structured Content (or List Picker and Time Picker for Apple Messages for Business) to display multiple instances of an item a user has searched for. With this in mind, Conversation Builder has provided a way to record an API result as having an iterable value for use within dialogs. To illustrate, assume you have an API that returns items for sale and is structured in the following JSON format:
{
 "items": [
   {
     "title": "TITLE ONE",
     "description": "Description 1",
     "image": "https://www.beautyarmy.com/wp-content/uploads/2019/12/stack.jpg"
   },
   {
     "title": "TITLE TWO",
     "description": "Description 2",
     "image": "https://www.salesbabu.com/wp-content/uploads/2014/02/stock.png" alt=""
   },
   {
     "title": "TITLE THREE",
     "description": "Description 3",
     "image": "https://3.imimg.com/data3/QJ/UW/MY-14248082/stock-inventory-management-system-with-pos-point-of-sale-500x500.jpg"
   }
 ]
}
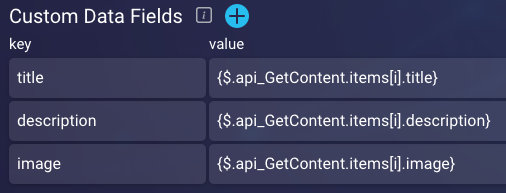
To capture each value to reproduce in a dialog, you need to iterate through this “items” array and save each key as an API variable. Assuming that you have an API named 'GetContent', you would use the following syntax to properly capture this data:
{$.api_GetContent.items[i].title}
Take care to include the bracketed i in your value, as this signifies that the program needs to iterate through the “items” array to save all of the “title” values.
With these variables now set, they can be used within Structured Content interactions to display each of the titles, descriptions, and images together. Add your API variables to the relevant areas of the Structured Content tile, referencing the variables in the same way that was done in the previous example. When saved, Conversation Builder will iterate through each of the variables to display the correct content together in the user's messaging window.

Transform an API result
You can invoke non-LivePerson APIs from Conversation Builder. With JavaScript code, you can process the responses (typically in a JSON format) and use the information within the dialogs of your bot.
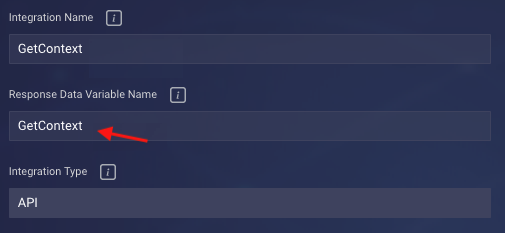
The following screen from the API integration setup shows that you must remember to use the "Response Data Variable Name" with the “api_” prefix when it comes to Transform Result Script (the place where you manipulate the API response as you want).

-
Get the raw API response and save it in a variable:
var getContextData = botContext.getBotVariable("api_GetContext"); -
Turn this into a JavaScript object, so you can access the properties:
var getContextJsonResponse = JSON.parse(getContextData.jsonData);If you were to debug log the
getContextJsonResponse, this would give you an object such as:{ "api_GetContext" : { "_id": "5d15f436966b92b943be9219", "index": 5, "guid": "4f60a28d-3eae-4f2d-abd2-184931b57c6e", "isActive": false, "balance": "$1,023.36", "picture": "http://placehold.it/32x32", "age": 23, "eyeColor": "blue", "name": { "first": "Moon", "last": "Petty" }, "company": "KONGENE", "email": "moon.petty@kongene.ca", "phone": "+1 (962) 489-3119" } }The first property of that object is named
api_GetContext, so adjust this with whatever the name you gave to your Bot Response Variable when defining the integration and append to the “api_” prefix. -
Clean the JSON.
To access the actual JSON from your response, you would need to perform one more extraction like this to make it easier to reference:
var jsonResponse = getContextJsonResponse.api_GetContext;Where
jsonResponsewould now be:{ "_id": "5d15f436966b92b943be9219", "index": 5, "guid": "4f60a28d-3eae-4f2d-abd2-184931b57c6e", "isActive": false, "balance": "$1,023.36", "picture": "http://placehold.it/32x32", "age": 23, "eyeColor": "blue", "name": { "first": "Moon", "last": "Petty" }, "company": "KONGENE", "email": "moon.petty@kongene.ca", "phone": "+1 (962) 489-3119" } -
Extract the key/value pairs from the JSON-format response and create bot-level variables as required.
This means you can now access the various properties directly via these lines of code:
 var company = jsonResponse.company;
 var guid = jsonResponse.guid || false;
 var age = jsonResponse.age || false;
 var email = jsonResponse.email || false;
The
|| falseconstruction means if the requested value does not exist, we will return false. This allows us to easily check later on if this was populated. (You could also use null in place of false if you prefer, as that is a FALSE value within JavaScript when it comes to conditional comparisons.) -
Set bot-level variables using those values and output them within a text interaction:
botContext.setBotVariable("guid", guid, true, false);
botContext.setBotVariable("age", age, true, false);
botContext.setBotVariable("email", email, true, false);
botContext.printDebugMessage("*** checking values were set: " + guid + age + email);

Delete an integration
If the bot is no longer using a particular integration, you might want to delete the integration. Before doing so, make sure there are no integration interactions that reference the specific integration.
Deleting an integration affects only the bot for which it was added.
To delete an integration
- Open the bot, and click Integrations in the upper-left corner.
- In the left panel, move your mouse over the integration name, and click the
 icon that appears.
 - Click Delete Integration, and then click Yes in the confirmation dialog.