What's a post-conversation survey bot?
A post-conversation survey bot lets you collect feedback from consumers at the end of a conversation with a custom bot or human agent. The survey bot can ask:
- Specialized questions designed to provide First Call Resolution (FCR), Customer Satisfaction (CSAT), and Net Promoter Score (NPS) survey metrics
- Questions that reflect your brand's key performance indicators
- Free-text questions
Use a post-conversation survey bot to measure bot/agent and skill performance and to identify opportunities to improve on your quality targets.
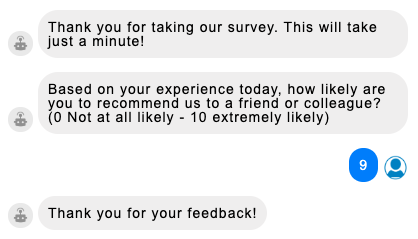
See also this in-depth introduction to surveys and survey metrics in the Community Center.
To use survey bots created in LivePerson Conversation Builder, you must be on the LivePerson platform, i.e., you log into Conversation Builder via single sign-on through Conversational Cloud. This feature isn't supported on the Google Cloud Platform (GCP) where you log into Conversation Builder directly.
Survey bots are supported only in Messaging, not in Live Chat.
The survey flow
Survey triggering
When a conversation is ended (either by the consumer or the agent), if the conversation's last skill matches one assigned to the survey bot, the survey bot automatically begins the survey.
The above also means that:
- There is no need to "transfer" to the survey. This happens automatically.
- A conversation that doesn't have an assigned skill can't trigger a survey.
If a conversation is closed automatically because it's been idle for a time, a survey isn't triggered.
Survey timeout
By default, a survey times out (expires) after one hour, but you can change this time period if desired. You can also configure a "Session Expired" message to send to the consumer if they try to enter text after the session has expired. Both of these settings are found in Bot Settings, discussed farther below.
Survey outcomes
A survey can be closed in the following ways:
- The survey is completed.
- The survey times out.
Both outcomes are tracked and reported on as part of the Analytics Builder, so you can fully analyze the results.
Prerequisite steps
Enable the feature
Before you can begin building survey bots, the feature must be enabled in Conversation Builder by LivePerson. Please contact your LivePerson account representative (other contact options: chat with us on this page, or message Support) to enable this feature.
Configure account-level settings
There are a few account-level, survey settings that you can configure; these settings affect all survey bots in the account.
For changes to take effect, you must redeploy the Post-Conversation Survey connector.
To configure account-level settings
1 - Access the Bot Accounts application.
2 - Select the organization.
3 - On the Account Details tab, specify the following:
-
Name & Avatar for Survey Bots: Click the edit (pencil) icon to display the settings for customizing the survey bot's name and picture that are shown to consumers during conversations. Note that the domain in the picture URL is whitelisted automatically; there is no action required by you. If you leave the picture URL unspecified (this is an optional field), no picture is used.
-
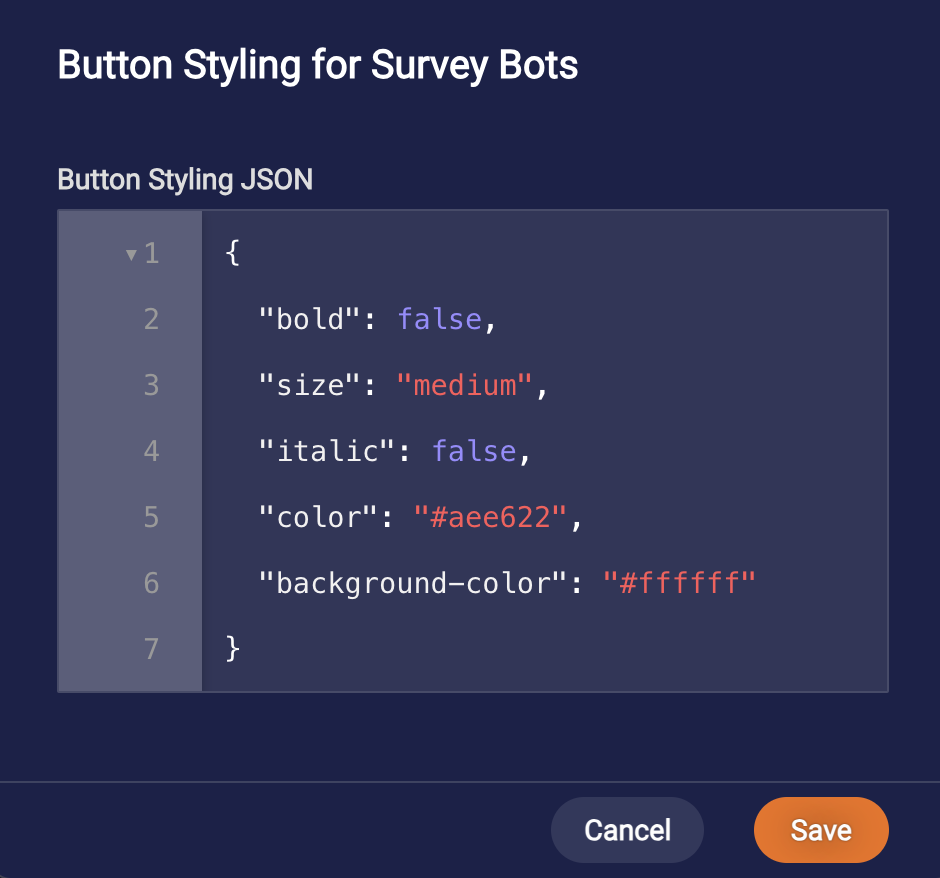
Button Styling for Survey Bots: To customize the style of buttons, i.e., the response options in post-conversation survey bots, click the edit (pencil) icon, enter the JSON, and click Save. Learn about specifying styling. Note that the styling isn’t applied when testing the survey bot in the Preview tool because that isn’t an end-to-end flow.
-
Target Interactive Conversations: Sending surveys to consumers who aren't interacting with your brand can negatively impact your CSAT score without cause. You can enable this setting to send surveys to engaged consumers only.
Once you enable the setting, you specify the minimum number of messages that must be sent (by the consumer and by the bot/human agent) for the survey to be sent. You must specify values for all the subsettings, though default values are provided.

During a conversation, each condition is checked. A survey is only sent if all conditions are true.
Note that a message's status isn't taken into account when counting the number of messages sent by an agent or a user. This means that a message will be counted as sent in the situation where the message was sent but wasn't delivered to the recipient for some reason.
This is an account-level setting, so it's applied to all your post-conversation survey bots. However, you can override this setting on a per bot basis; do this in an individual bot's Bot Settings.
-
Survey Request Interval: This setting determines how often a consumer is sent a survey. When configuring this, consider how frequently you want a response from the same consumer, as sending surveys too often can create a poor experience.
If this setting is disabled, the consumer always receives a survey when all conditions are met.
If this setting is enabled, you can apply the specified time interval 1) to all bots collectively, i.e., at the account level, or 2) to each bot individually, i.e., at the survey bot level. As an example, assume you have surveys A, B and C, and you enable this setting with a value to 20 days.
With option 1, if survey bot A joins the conversation with the consumer, the consumer will not receive survey A again, or receive surveys B and C, until 20 days have passed.
With option 2, they will not receive survey A again until 20 days have passed. During this time, they still might receive surveys B and C.
-
Survey Sampling: If you have high traffic, you don’t need to send surveys to all your consumers; you can send them to a subset. That’s what this setting is designed for. If it's disabled, all consumers are sent surveys when all conditions are met. You can enable this setting to send surveys to a percentage of randomly sampled consumers. Use the slider to specify the percentage. The default value is 50%.
Tying it together: The three settings described above control when consumers get surveys and how often. Collectively, they work as follows:
First, recognize that the point at which a survey bot joins a conversation is distinct from the point at which the survey is sent to the consumer.
When the survey bot joins the conversation, the system first checks Survey Sampling. If it’s enabled, the flow continues or the survey is rejected based on the outcome of the sampling logic. If it continues, the system checks if there’s an existing throttling value based on Survey Request Interval. If one is found, the flow continues or the survey is rejected based on whether the time interval has lapsed. If no throttling value is found, it sets the throttling value immediately. After that, messages are fetched and evaluated against Target Interactive Conversations. If the targeting conditions aren’t met, the survey is rejected, but the throttling value remains in use. If the conditions are met, the consumer is sent the survey.
Keep in mind that the fact that the throttling value is set when the survey bot joins the conversation with the consumer—not when the survey is sent to the consumer—means that consumers can be throttled even though they have never received a survey.
4 - Redeploy the Post Conversation Survey connector for your changes to take effect.
Create the survey bot
- Access Conversation Builder.
- From the Bots dashboard, click New Bot in the upper-right corner.
- In the Choose a Bot Template window, select Survey Bot.
- In the Survey Bot window, specify the following:
- Name: Enter a name for the bot that's concise and clear.
- Description: Enter a description that's meaningful to you and others.
- Bot Language: Select a language.
- Skill: Select the skill(s) that will trigger this survey bot. You can use the available controls to sort and filter the skills and to search for a skill. A skill can be assigned to only one survey bot. You can add skills in Conversational Cloud.
-
Click Create Bot.
This creates a survey bot that includes a single dialog of type "Survey" (that's also named "survey" by default). Define the survey in this dialog.
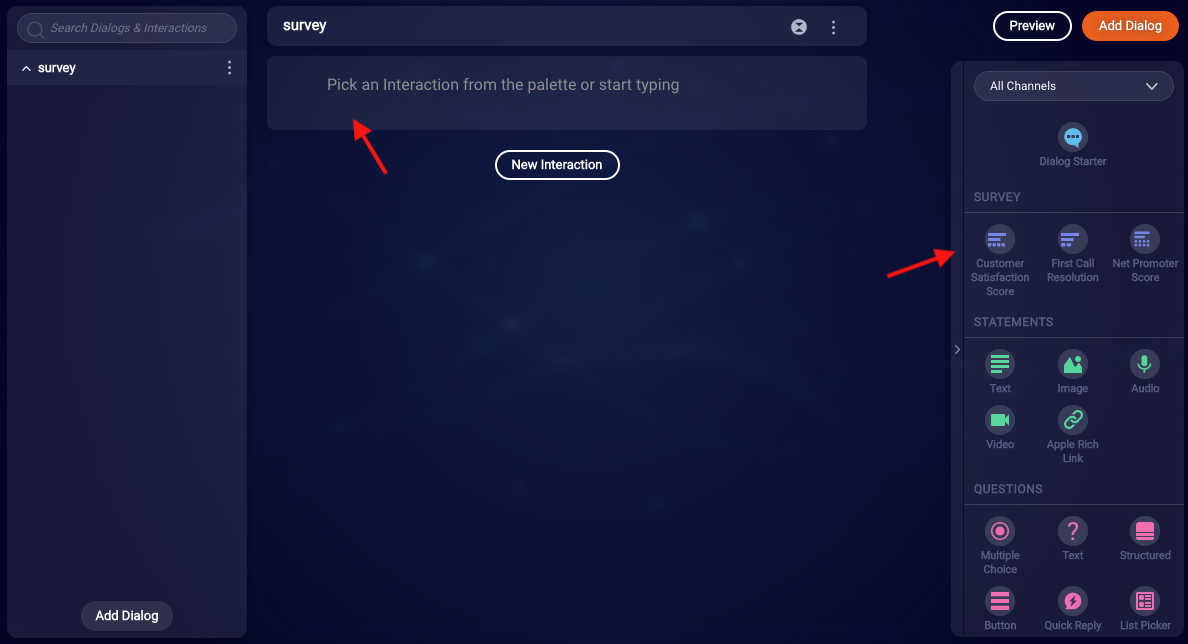
For easy visibility, in the dashboard that lists your bots, the skill(s) assigned to a survey bot are listed beneath the bot name.

Build out the survey bot
In the dialog that's of type "Survey," define the survey. There are several types of survey questions:
First Call Resolution (FCR)
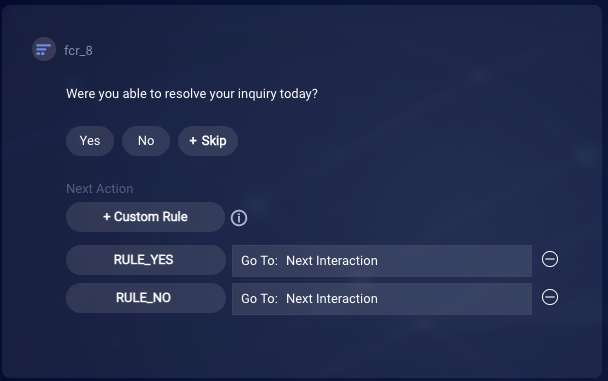
This question is used to measure operational efficiency in resolving consumer issues. This interaction asks a standard FCR question: Were you able to resolve your inquiry today? Feedback on this helps you to measure and improve agent/bot and skill performance.
Customer Satisfaction (CSAT)
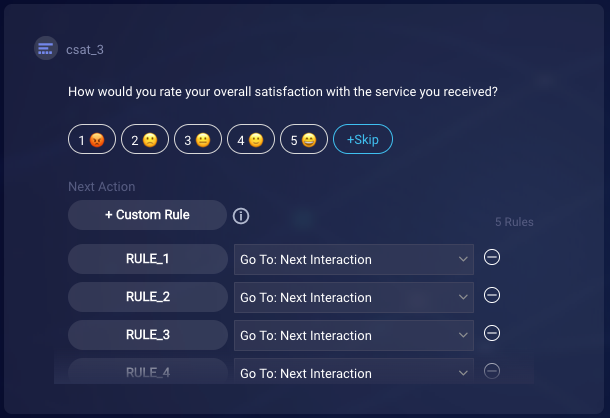
Customer Satisfaction (CSAT) metrics are used to measure the frequency at which your brand meets or exceeds consumer expectations. This interaction asks a standard CSAT question: How would you rate your overall satisfaction with the service you received?
Net Promoter Score (NPS)
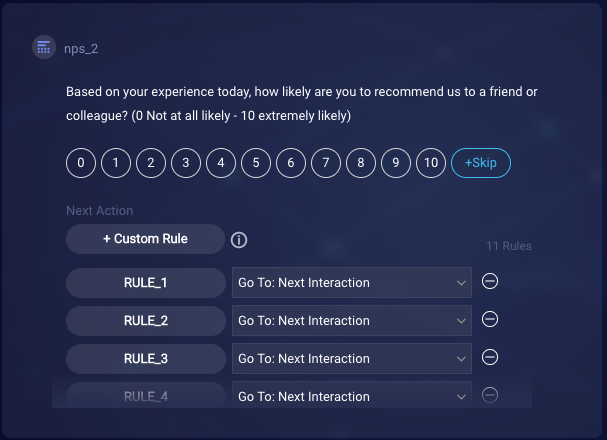
Net Promoter Score (NPS) metrics are commonly used to measure the loyalty of a consumer to a brand. This interaction asks a standard NPS question: Based on your experience today, how likely are you to recommend us to a friend or colleague?
Closed-ended, custom
A closed-ended question is a multiple choice question that has a custom, predefined list of answer choices. Use this interaction when you need quantifiable data and want to categorize your consumers.
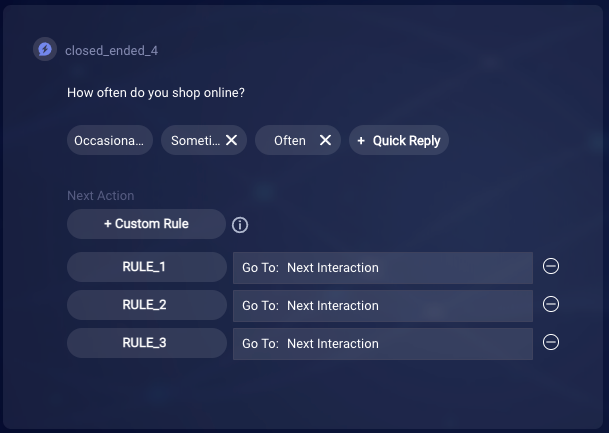
In the closed-ended question, every answer choice has two values:
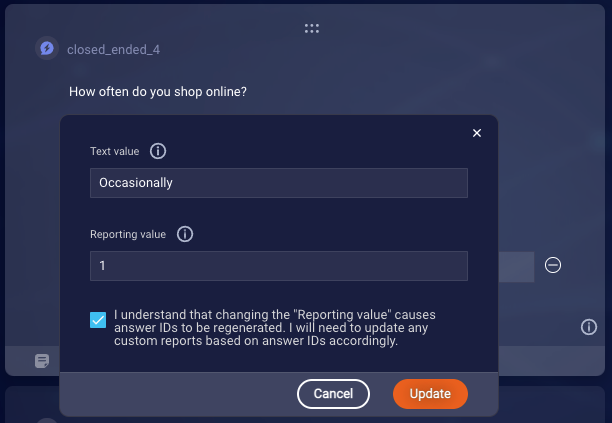
- Text value: This value is shown to the consumer as the answer choice.
- Reporting value: When the answer choice is selected by the consumer, this value is reported in Analytics Builder.
As you can see from the Acknowledgment checkbox in the image above, changing the Reporting value causes answer IDs to be regenerated. Therefore, if you change the Reporting value, you'll need to update accordingly any custom reports that are based on answer IDs.
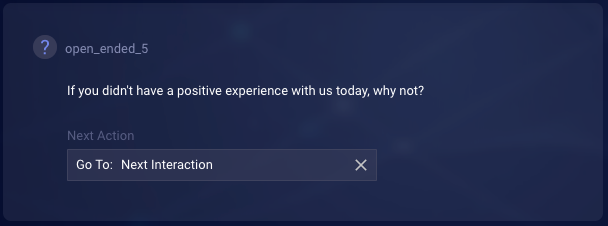
Open-ended, custom
An open-ended question allows the consumer to provide an answer in their own words, instead of being constrained by a predefined list of answer choices. Use this interaction when you want to offer the opportunity for this type of free-form feedback.
All survey questions
- Cannot be changed from one interaction type to another.
- Have a limit of 256 characters for the survey question.
- Support any emojis. Just copy and paste them in, but remember to update the rules accordingly.
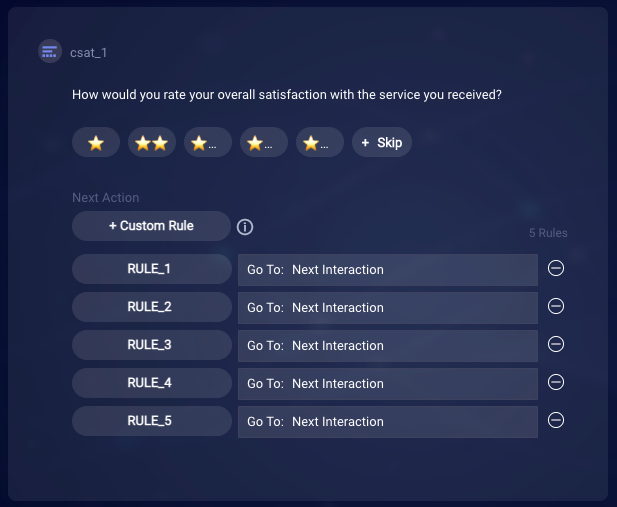
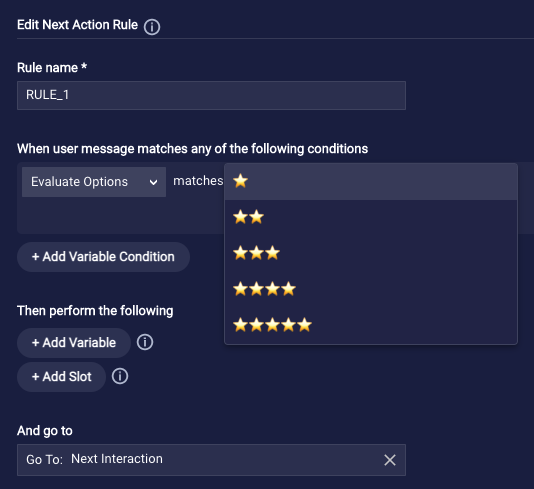
FCR, CSAT and NPS questions
- These are predefined in the sense that you can't edit their structure, i.e., add or remove answer choices. However, you can change the question and answer text.
- In a survey bot, you can include only one of each of these.
- You can add a skip option to each of these.
Closed-ended and open-ended, custom questions
- In a survey bot, you can include as many of these as required.
- You can add a skip option to closed-ended questions but not to open-ended questions.
When the target channel is Apple Messages for Business, applicable survey questions are automatically sent to the consumer as List Picker interactions.
Customize interaction text (FCR, CSAT and NPS)
You can customize the question text and the answer choice text for the FCR, CSAT and NPS interactions. To do so, simply replace the text with your own. For example, you might want to change the language that’s used.
When working with the answer choices, if you move your mouse over an answer, you can see both the answer text (text value) and the actual, underlying value that’s reported to Analytics Builder.

The actual value never changes, not even when you change the answer text (text value).
Take care when changing the answer text; remember to update the conditions in the rules accordingly.
Reorder answer choices (FCR, CSAT and NPS)
Reordering an answer choice has no impact on its text value or actual value. You must manually change the answer text (text value) if desired. The actual value never changes.
To reorder an answer choice, select it so that it’s in focus, and click the “<” (Previous) or “>” (Next) button.
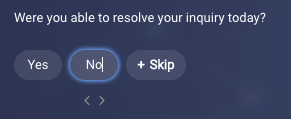
Alternatively, you can use the hotkeys:
- Previous = Shift + Ctrl
- Next = Shift + Alt
Make survey questions optional
To add a Skip option to an FCR, CSAT or NPS question and thereby make the question optional, click the +Skip response and turn it from Off (blue) to On (white).
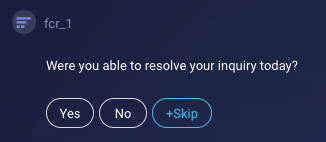
Clicking Skip automatically adds a custom rule for the "skip" response, so you can build out the survey logic as you require.
To add a Skip option to a closed-ended, custom question, manually add "Skip" as one of the answer choices. This too adds a custom rule for the "skip" response, so you can build out the survey logic as you require.
You cannot add a Skip opton to an open-ended, custom question.
In an NPS interaction, don't enable Skip if your targeted channel is Facebook. Facebook doesn't support structured content that has more than 11 quick replies. The NPS question plus the Skip option is 12 quick replies. Using Skip will cause the conversation to end abruptly.
Configure the display format
In the Advanced Settings of many of the survey interactions, you can configure several display settings:
- Display Choices As
- Choices per Row
- Text Only Fallback → List Style for Choices
1 — Use the Display Choices As setting to specify whether and how to send the answer choices to the consumer. You can select:
- Quick Reply: Select this to send the answer choices as quick replies in channels that support them. In text-based channels, the format specified in List Style for Choices will be used.
- Button: Select this to send the answer choices as buttons in channels that support them. In text-based channels, the format specified in List Style for Choices will be used.
- Do not display: Select this to hide the answer choices in all channels. Only the survey question will be sent to the consumer. If you select this, the List Style for Choices setting plays no role.
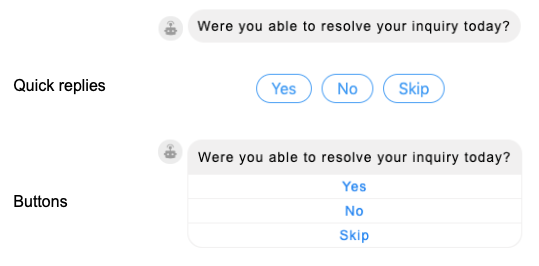
2 — The Choices per Row setting is available when you select to display the choices as quick reply "chips" (in Display Choices as). Select the number of answer choices to present in a single row in the Web Messaging channel. Example: You have 8 answer choices, and you select "3" here. So, 3 choices will be presented in the first row, 3 in the second row, and the remaining 2 in the last row. Note that a maximum of 3 rows are used; the third row includes all the answer choices not included in the first 2 rows. Important: Used in Web messaging only. In all other channels, all choices are on 1 row.
3 — When you deploy your survey bot to a channel that doesn't support rich content formatting (for example, SMS), the survey questions are automatically sent as plain text. Use the List Style for Choices setting to control how the choices are presented in a text-only fallback scenario. You can select:
- 1. 2. 3. 4. or a. b. c. d.: Select either of these to send the answer choices using the indicated format. For the Net Promoter Score (NPS) interaction in specific, we recommend the letter format. The numeric format can confuse consumers because the NPS scores themselves range from 0 to 10 (note they start with zero), but the numeric format starts numbering the options with 1. Since these don’t match, selecting a score can be confusing.
- no list: Select this to hide the answer choices. Only the survey question will be sent to the consumer. In the question, make sure to include information on how to respond (e.g., “type 1 for very bad, 5 for excellent, or something in-between.”).
Handle free text answers
The handling of free text answers works in a survey bot just like it does in a custom bot. For example, when presented with the CSAT yes/no question, if the consumer types "yes" or "Yes" instead of selecting "Yes," the response is understood. If the consumer enters anything else, the fallback response is sent. You can use conditions to catch other patterns if desired.
Handle unrecognizable responses
In the survey interactions in a survey bot, the fallback response is required, and there's a default value provided.
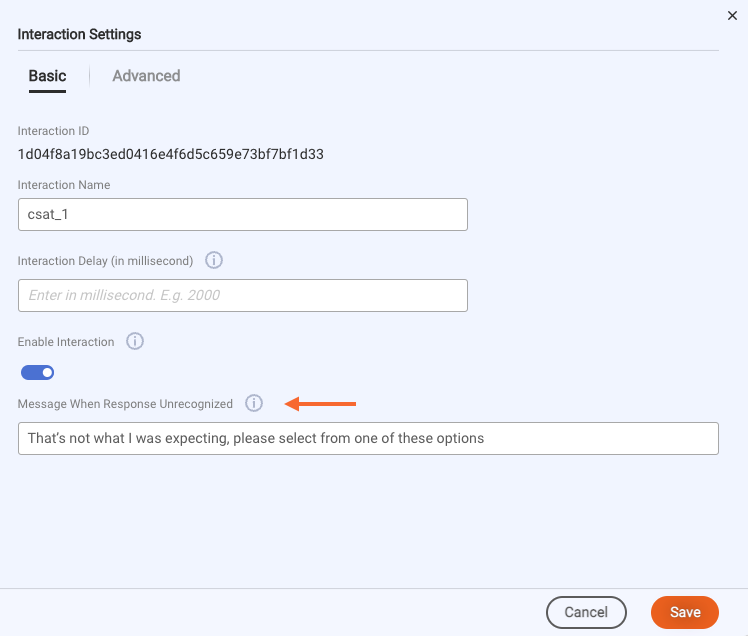
You can customize the default fallback responses in the survey interactions.
You cannot create a Fallback dialog.
Add standard interactions
You can use only a subset of the standard interaction types in the Survey dialog; unavailable interactions are hidden from view on the toolbar.
Configure the survey bot's settings
Learn about basic bot settings and how to configure bot settings.
Settings that are specific to survey bots include:
- Skill: If desired, change the skill(s) that will trigger this survey bot. You can use the available controls to sort and filter the skills and to search for a skill.
- Max number of fallback responses: Consumer responses that are repeatedly unrecognized by the bot result in a loop where the fallback response is sent repeatedly. This setting stops the loop and closes the survey. You can specify the maximum number of fallback responses to send (the default is 3) before closing the survey. You can't specify zero to disable this behavior; it is always on. You can customize the closing message that is sent just before the survey is closed.
- Target Interactive Conversations: Use this setting to override, on a per bot basis, the rules for targeting surveys based on consumer engagement. When this setting is disabled, the account-level Target Interactive Conversations setting that's set in Account Details in the Bot Accounts application is used. However, when this bot-level setting is enabled, it has priority over the account-level setting. This bot-level setting works just like the account-level setting. For more details, see the discussion on configuring account-level settings farther above on this page.
- Email Transcript: Enable this to offer an emailed transcript of the survey to the consumer. For more on this, see farther below.
- Thank You Message: Enable this to send a Thank You message before the survey conversation is closed. For more on this, see farther below.
- Session Expired Message: Enable this to customize the message to the consumer that's proactively sent when the session expires. You can customize the message to suit your requirements. If you disable this setting, the default message is proactively sent instead of a custom message. The default message is, "The survey has expired. Thank you for your time." (See also the Session Length setting, a related setting that's displayed for all bots.)
Add support for emailed transcripts
If desired, you can add support for emailing a transcript of the main conversation to the consumer, and grant the consumer the option to accept or decline this at the end of the survey.
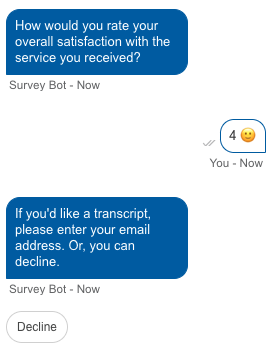
There are a few steps involved in the setup.
First, there are some configuration steps to complete to allow LivePerson’s email servers to send emails to your consumers on your behalf.
To prevent phishing and spoofing attacks, many email providers enforce strict security measures, requiring that incoming emails be authenticated using the Sender Policy Framework (SPF) together with DomainKeys Identified Mail (DKIM).
About SPF and DKIM
SPF is a protocol that allows the owner of a domain to specify which mail servers are permitted to send emails on behalf of that domain. It works by adding a DNS record that lists the IP addresses or hostnames of authorized mail servers. When an email is received, the receiving mail server checks the SPF record to verify that the email came from an authorized server. If the email's origin matches the SPF record, it's considered legitimate; otherwise, it may be marked as spam or rejected.
DKIM is an authentication method that allows the sender to sign their emails with a digital signature. The signature is added to the email headers and is created using a private key. The corresponding public key is published in the domain's DNS records. When the email is received, the receiving server can use the public key to verify the signature, ensuring that the email has not been altered in transit and that it indeed comes from the claimed domain. This helps confirm the integrity and authenticity of the message.
Adding support for SPF plus DKIM
To use LivePerson’s email servers, you must set up support for SPF plus DKIM. Follow this workflow:
-
Contact your LivePerson representative to request support for SPF plus DKIM. Provide us with the email address of your administrator. You’ll also need to provide the name of your Domain Name Server (DNS) host. This is the domain that you want to authenticate, e.g., mycompanyname.com. Often, but not always, this is the same place that you host your website.
-
LivePerson will configure the backend to use a specific outgoing email server that supports SPF and DKIM.
-
LivePerson will prepare the necessary DNS records for you to add to your domain’s configuration as a part of DKIM setup and send them to the email address that you provided in step 1.
-
Set up SPF and DKIM as instructed below.
Setting up SPF
Access your domain’s Domain Name System (DNS) settings, and create a new SPF record or update your existing SPF record.
If you don't have an existing SPF record, publish the following SPF record:
v=spf1 include:sendgrid.net -all
If you already have an existing SPF record, insert include:sendgrid.net right before the terminating mechanism in the record. For example, if your current SPF record looks like this:
v=spf1 a -all
Then update it to:
v=spf1 a include:sendgrid.net -all
Setting up DKIM
Access your domain’s Domain Name System (DNS) settings, and add the DNS records that you received from LivePerson (step 3 above) to your configuration.
It can take up to 48 hours for the records to be verified after you upload them into your DNS host, so you will likely have to come back later to verify everything is working.
Adding support for emailed transcripts to the bot
Open the post-conversation survey bot. In the bot's Bot Settings, enable the Email Transcript bot setting. This adds an Email Transcript survey interaction to the end of the survey dialog.

(Disabling the bot setting removes the Email Transcript interaction from the dialog. And if you manually delete the interaction, this disables the bot setting.)
Next, configure the Email Transcript interaction:
- Change the message text and the label for the Decline button as desired.
-
Configure the interaction's basic and advanced settings. Most notably, specify the Sender Name and Sender Email. These are the name and email address from whom the consumer receives the email.

- Keep the Next Action as "Close Dialog" (which is the default) to close the conversation if appropriate.
Note the following:
- For convenience, the Email Transcript interaction includes two default rules. One rule uses a Regular Expression to validate whether the consumer has entered a valid email address. If you inadvertently delete this rule, you can easily add it back manually; to enter the RegEx, use the "Hints" feature that's available.
- The Email Transcript interaction can precede or follow a Thank You Message interaction (discussed below), if used. However, the two must be last in the dialog flow. You can move them to reorder them, but this constraint is enforced.
Add support for a Thank You message
If desired, you can add support for sending a Thank You message to the consumer at the end of the survey.
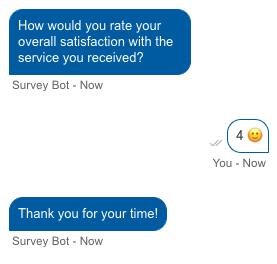
There are a few steps involved in the setup.
First, in the bot's Bot Settings, enable the Thank You Message bot setting. This adds a Thank You Message interaction to the end of the survey dialog.
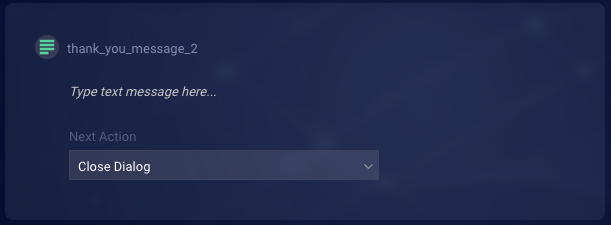
(Disabling the bot setting removes the Thank You Message interaction from the dialog. And if you manually delete the interaction, this disables the bot setting.)
Second, configure the Thank You Message interaction:
- Enter the Thank You message.
- Configure the interaction's basic and advanced settings.
- Keep the Next Action as "Close Dialog" (which is the default) to close the conversation if appropriate.
The Thank You Message interaction can precede or follow an Email Transcript interaction (discussed above), if used. However, the two must be last in the dialog flow. You can move them to reorder them, but this constraint is enforced.
Close the survey conversation
Close a survey conversation by setting Close Dialog as the Next Action in the final interaction in the survey dialog.
Make sure that a custom bot that triggers a survey bot also uses Close Dialog. Close Dialog allows a post-conversation survey to be triggered, but Close Conversation does not.
Deploy the survey bot
You don't manually deploy a survey bot. When LivePerson enables this feature for your brand, this deploys the underlying agent connector that's shared by all survey bots. Therefore, as soon as you create a survey bot and assign it a skill, the bot is active and can receive conversations. Typically, brands don't develop in their Production environments, but if you do, for this reason, it's recommended that you assign to the survey bot a "test" skill that isn't used in a production campaign and use that to validate the bot before assigning it a production skill.
Trigger the survey bot
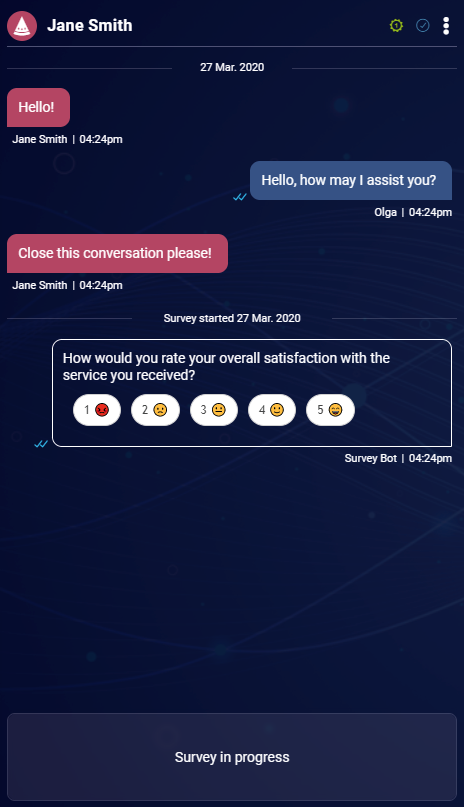
In order to trigger the survey, start a conversation on the account and skill on which you’ve defined the survey and bring the conversation to an end, either from the consumer or the agent side. Once the conversation closes, the survey will be triggered, and the agent workspace will show the caption, “Survey in progress.”
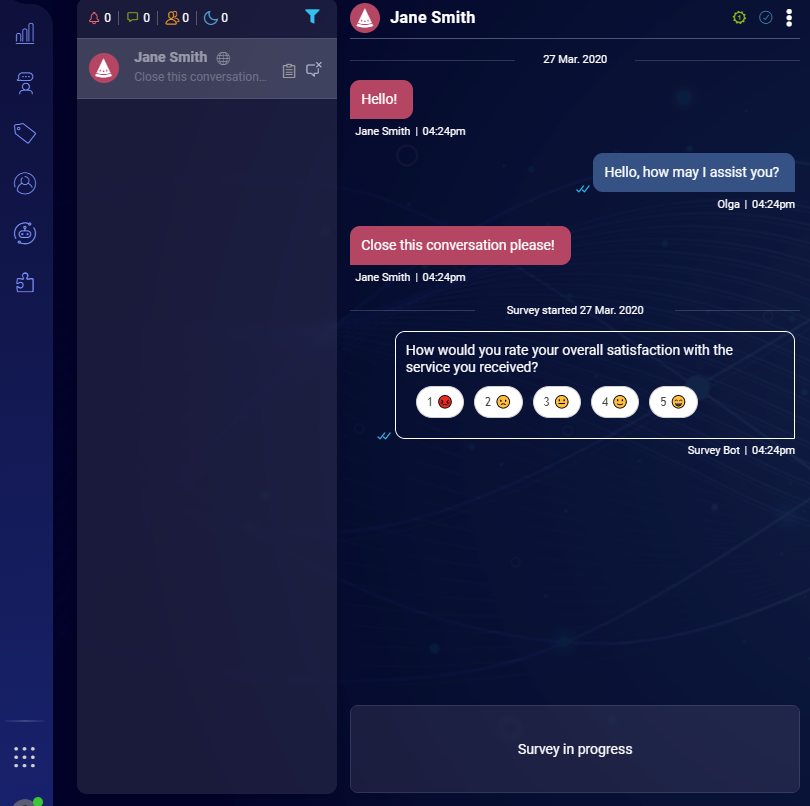
While the survey is active the agent won’t be able to write in the conversation. The survey will end when the consumer finishes entering the survey (if you've specified "Close Conversation" as the next action) or when the survey times out. In cases of an error with the survey flow or the survey bot, Conversational Cloud will close the survey after 48 hours as part of a conversation cleanup process.
The agent experience
Once a conversation ends and a survey begins, the conversation no longer appears in the Open Conversations list in Conversational Cloud. Instead, it appears in the All Conversations list with a status that indicates the survey is in progress:
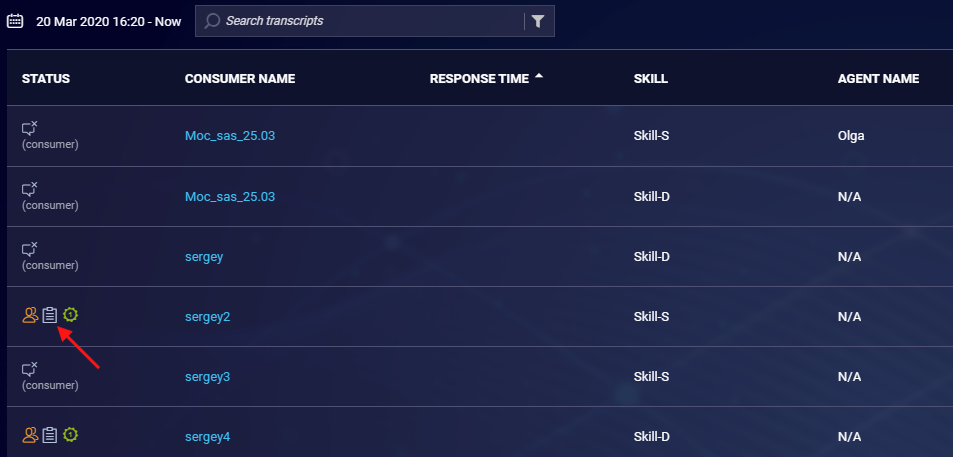
If an agent has permissions to view survey results, the agent can see the survey transcript.
The manager experience
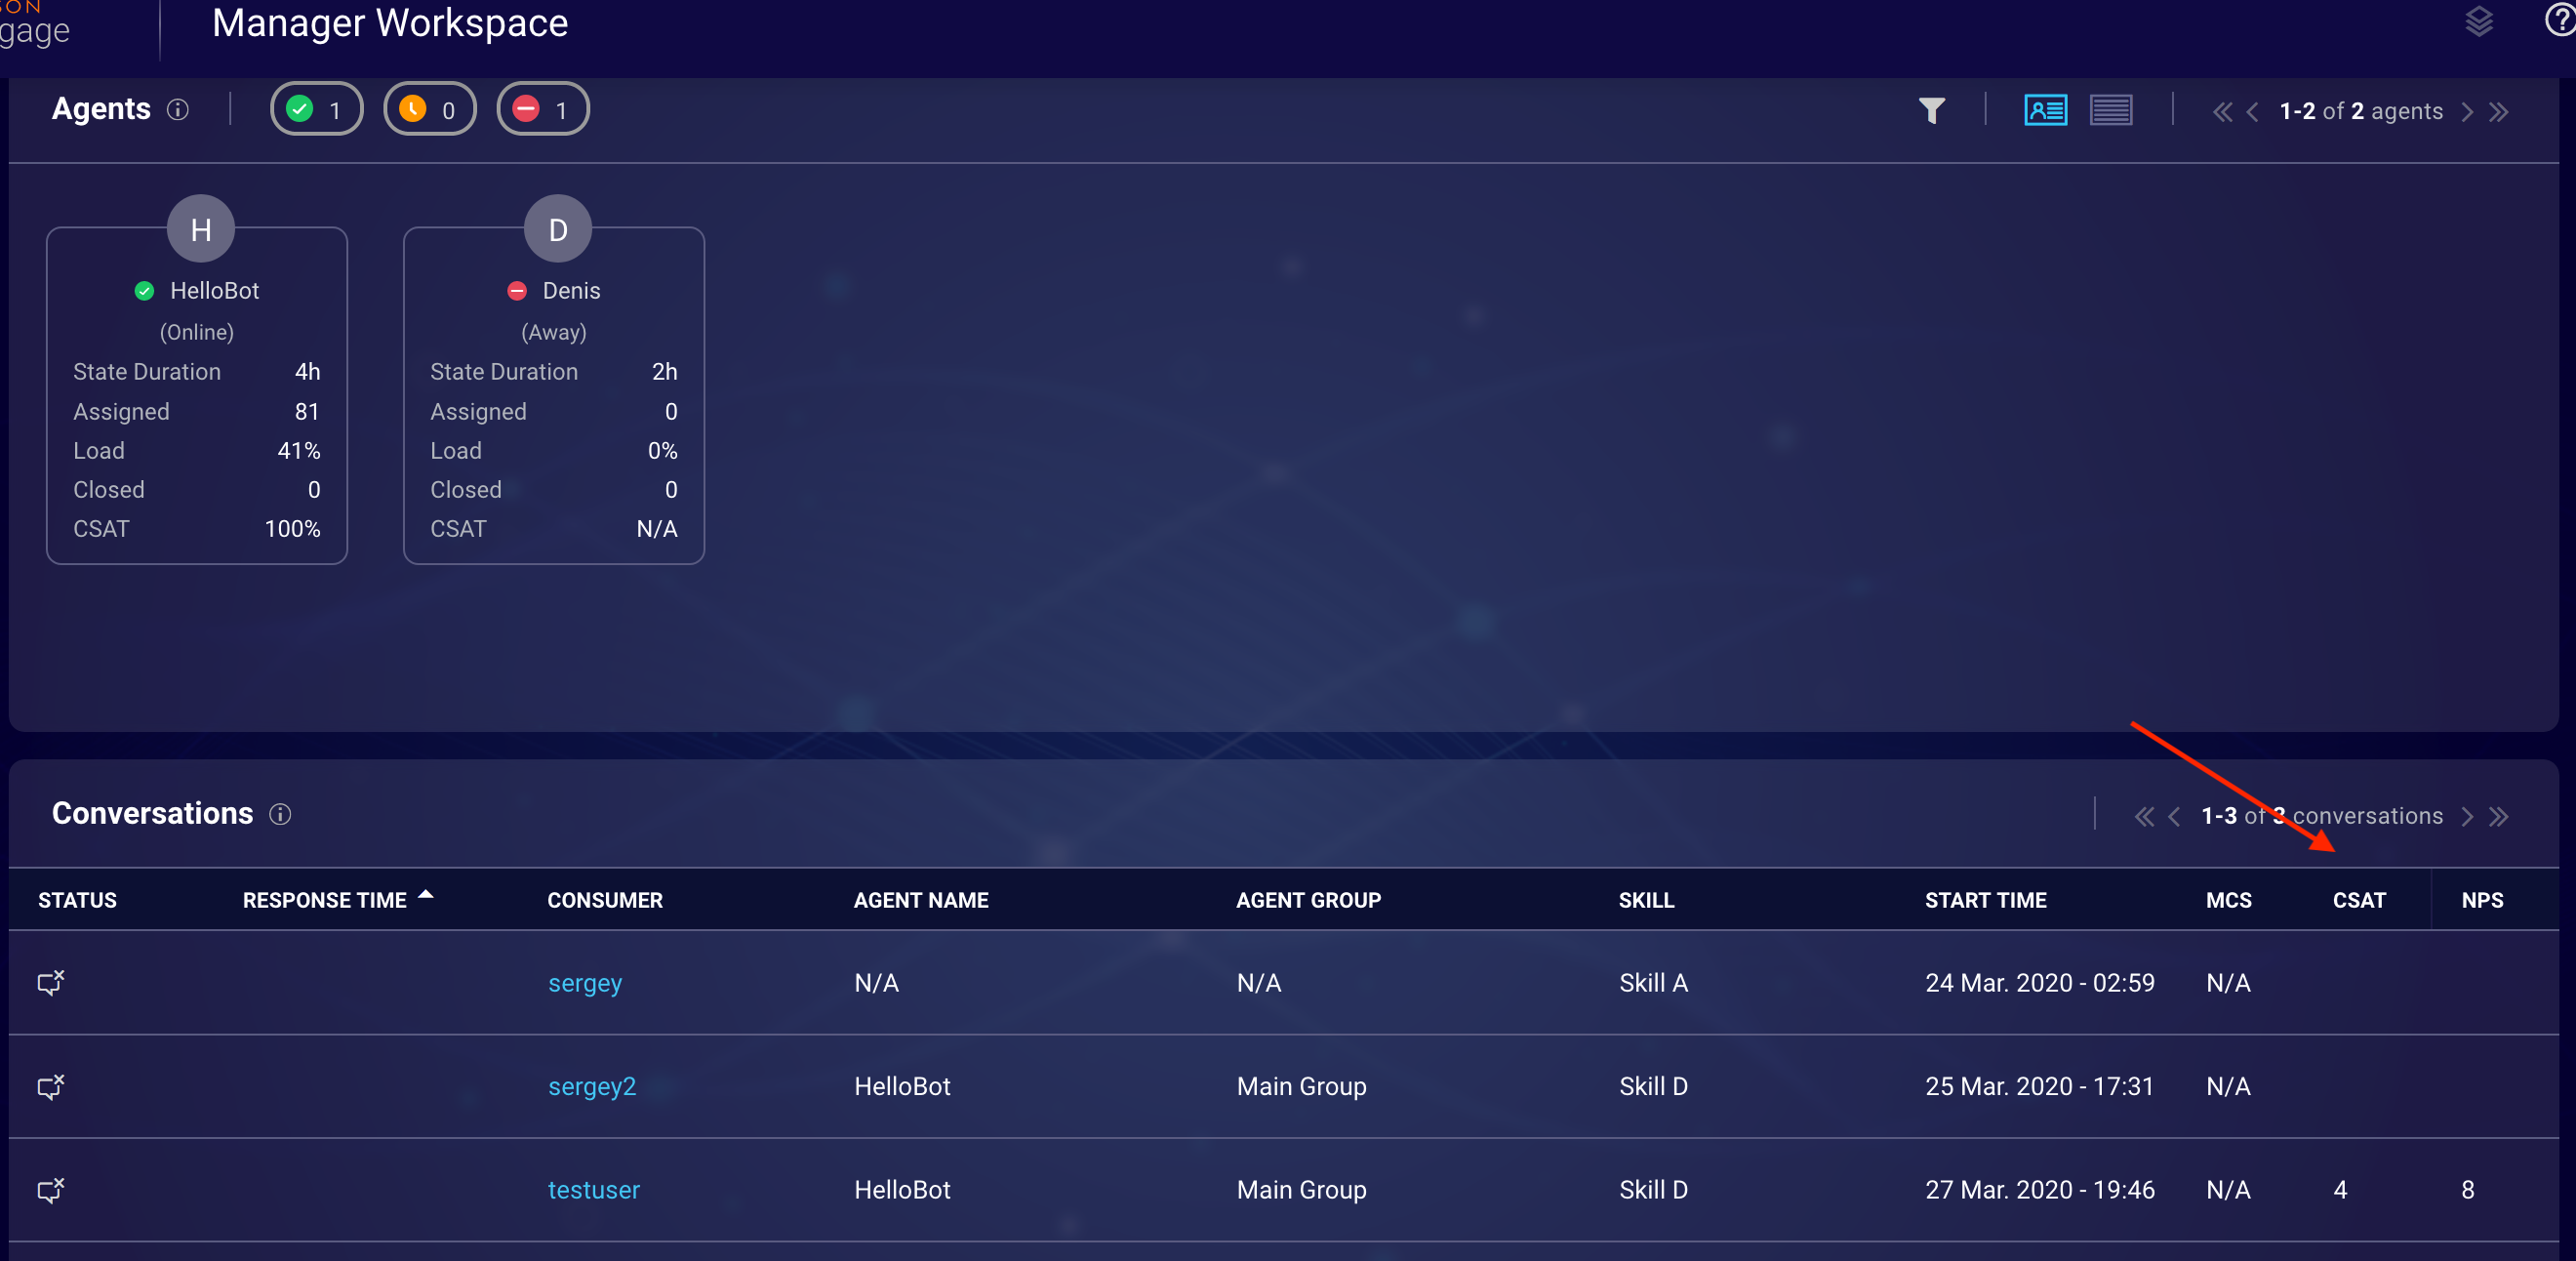
In the Conversations panel of the Manager Workspace, managers can view the survey scores (CSAT and NPS only) for all conversations shown.
Reporting
Analytics Builder
Metrics from survey questions are captured in Conversational Cloud and exposed via the Analytics Builder application. You'll find this information in the predefined Survey Dashboard for Messaging, which you can use out-of-the-box or manipulate to create customized reports.
Bot Analytics
In the Bot Analytics application, you'll see survey bots reported in the same way as custom bots. There is no difference between the two.
Report of IDs
If you make use of survey, question, and answer IDs in your reporting, you can download a report on these for a given survey bot. In Conversation Builder, open the survey bot, access the Bot Settings, scroll down to Generate IDs report, and click the Download icon. This type of report is often helpful for users that have migrated from Bot Studio to Conversation Builder for creation and management of survey bots. It can help you quickly build or rebuild custom reports that use the IDs.
Monitoring
If you have Bot Status Access permissions, you can use the Bot Status application that's intended for monitoring agent connectors to monitor your survey bots. In Bot Status, you can redeploy the connector as a troubleshooting technique.
Troubleshooting
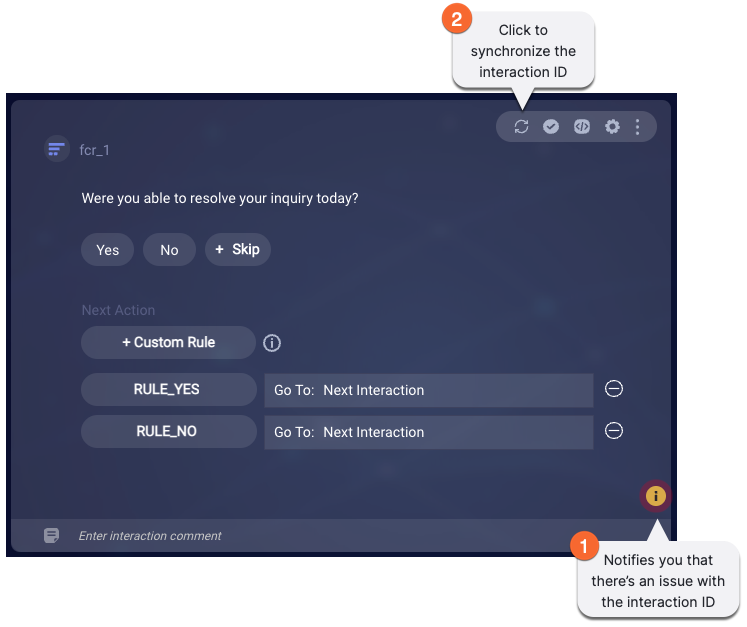
Sometimes, an interaction in a survey bot gets into a state where its ID isn’t synchronized with underlying systems. This can adversely affect reporting. You can fix this situation quickly with the ![]() (Synchronize interaction ID) icon that dynamically appears:
(Synchronize interaction ID) icon that dynamically appears:
FAQs
How do I disable a survey bot?
If you need to temporarily remove a survey bot from your customer traffic flow (i.e., prevent it from triggering), access the bot's Skill setting in Bot Settings, and assign a test skill or any unused skill.
Are survey bots supported in text-only channels?
Yes, this works just like for a custom bot. The survey questions are displayed as plain text.
Can a consumer skip a survey entirely?
There's no way for the consumer to indicate they want to skip the survey entirely (e.g., no Skip button). However, the consumer can close the window to leave the survey.
If a consumer starts, then abandons a survey, what gets captured?
Responses are counted (captured) as they are sent. If, for example, the consumer answers the first 2 of 5 survey questions, then the results would still include the first 2.
