
The Lead Gen template is designed to capture contact information from a customer and send the results to either an email address or SMS number. In addition, there is an option to display products or services to the customer as a channel specific gallery or list. The products could come from a Shopify collection if available.
The template can be configured to handle Web, SMS, Apple Messages for Business, WhatsApp and Facebook Messenger. Escalation to an agent is also included.

Included items
Dialogs
- Welcome
- The Welcome dialog greets the user and then navigates to the first interaction in the LeadGen dialog.
- Lead Gen
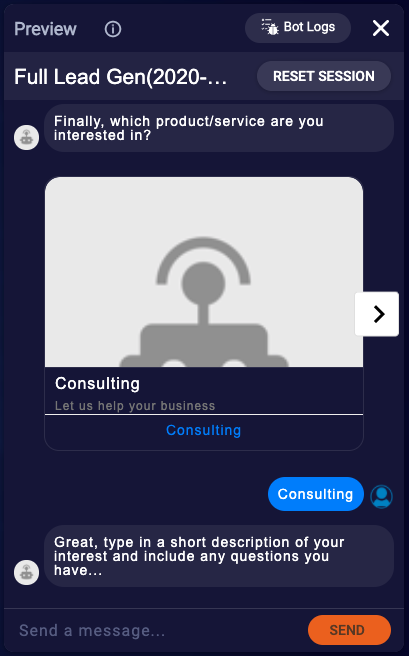
- This is the main dialog for collecting the user’s contact information.
- By default this dialog collects (and attempts to validate) the user’s name, email address and phone number. There is also an interaction to collect a description of their interest.
- Options for AMB
- If you are deploying to Apple Messages for Business, you can use this List Picker driven dialog to display your product or service offerings.
- You can add rich images to the List Picker (though recommended to keep them small for faster loading).
- Options for SMS
- If you are deploying to SMS (or WhatsApp), you can use this text driven dialog to display your product or service offerings.
- This Text Question will display as an A, B, C… style menu.
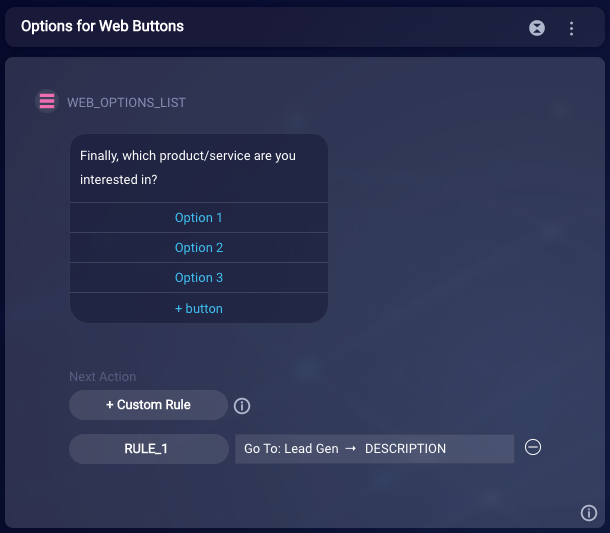
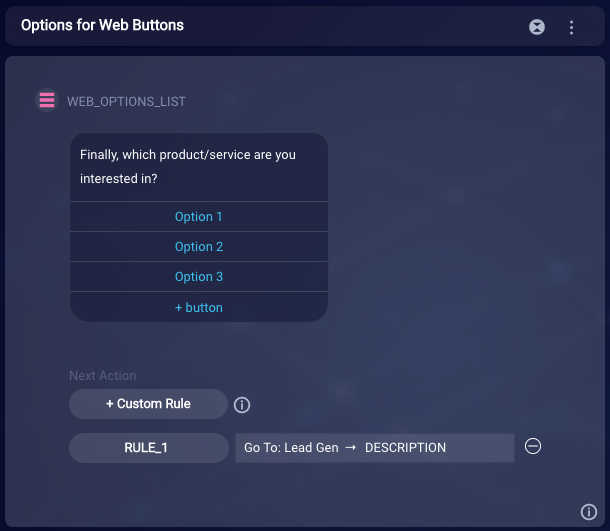
- Options for Web Buttons
- If you are deploying to Web (or FB Messenger), you can use this button driven dialog to display your product or service offerings.
- Options for Web Gallery
- If you are deploying to Web (or FB Messenger), you can use this Gallery driven dialog to display your product or service offerings.
- This gallery can be populated manually with images and content. If you would like a dynamically populated gallery, use the Options for Web Gallery API dialog.
- Options for Web Gallery API
- If you are deploying to Web (or FB Messenger), you can use this dynamically populated Gallery driven dialog to display your product or service offerings.
- This gallery is connected to an integration for Shopify, but you could use any API that returns an array of results.
- Fallback
- Will display when the user enters an utterance that is not recognized.
- EscalateLiveAgent
- This will perform a transfer to a particular Conversational Cloud skill.
Integrations
- Agent_Transfer
- As you would expect, this will perform a transfer to a Conversational Cloud skill.
- You will need to configure the skill name, id and transfer message in the Global Functions.
- Get_Categories
- For the API driven options gallery, this integration with Shopify will return the title and image URL from your Shopify account.
- You will need to configure your Shopify account information in the Global Functions.
- Send_Email
- This integration will send an email to the ownerEmail address supplied which contains all of the collected fields from the LeadGen dialog.
- You will need to configure your email address, subject and other information in the Global Functions.
- Send_SMS
- This integration will send the LeadGen results to an SMS number using your Twilio account information.
- You will need to configure your Twilio account information in the Global Functions.
Configuration needed
To customize this template, you will need to do the following.
General dialog customization
You will want to review each of the dialogs, starting with Welcome and Lead Gen, and customize the verbiage used to greet your customer and request their details. This is done simply by editing the text copy of the interactions and hitting Enter or using the menu to Save.
Lead Gen dialog
The name, email and phone number steps of the LeadGen dialog are performing some level of validation on the user’s response using RegEx. You can supply your own RegEx if you prefer.
For email address and phone number capture, we allow a certain number of attempts before we escalate to an agent. These can be configured to your liking in the Global Functions.
// Max count of fail user inputs
setVariable('maxEmailInvalidAttempts', 2);
setVariable('maxPhoneInvalidAttempts', 2);
If you want to remove some of the lead gen capture interactions (e.g., phone number), you will need to be sure to review the Next Action navigation so that the previous interaction will go to the next interaction in the dialog.
Also, if you are using SMS as opposed to Email to send out the results, you will need to change the appropriate variables from "true" to “false” in Global Functions.
setVariable('sendEmail', 'true');
setVariable('sendSMS', 'false');
Channel detection
Navigate to Global Functions.
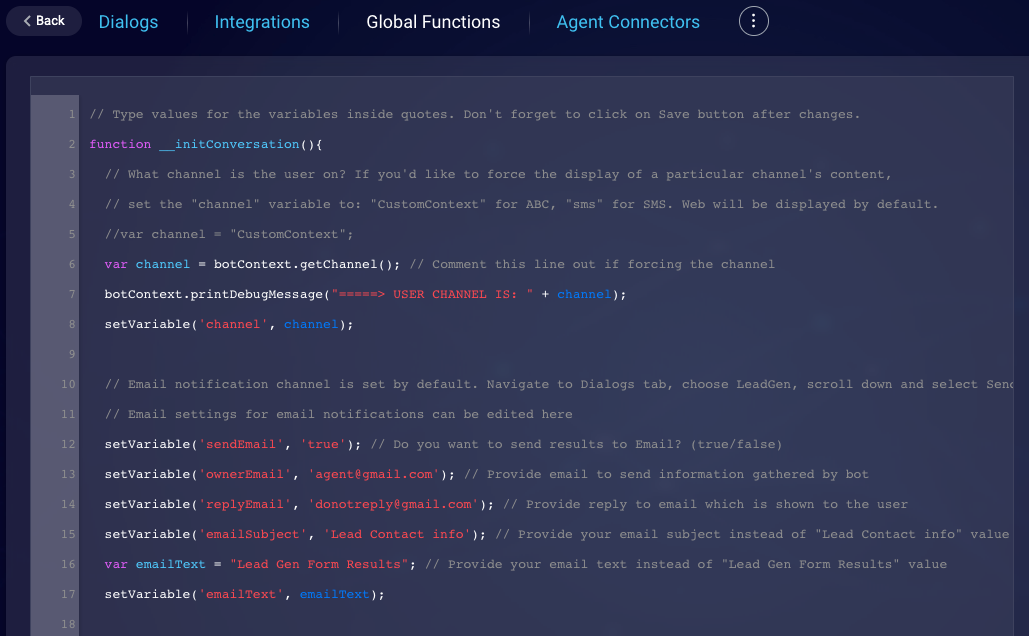
The first thing our functions do is to get the particular channel the user is coming from. If you would like to force the channel to make the AMB or SMS option dialogs appear, you can set the channel variable to the following:
// What channel is the user on? If you'd like to force the display of a particular channel's content,
  // set the "channel" variable to: "CustomContext" for AMB, "sms" for SMS. Web will be displayed by default.
  //var channel = "CustomContext";
  var channel = botContext.getChannel(); // Comment this line out if forcing the channel
  botContext.printDebugMessage("=====> USER CHANNEL IS: " + channel);
  setVariable('channel', channel);
Options dialogs
The Options dialogs are offered for a few different channels:
-
List picker for Apple Messages for Business
-
Simple list with a, b, c, etc. variants for SMS
-
Text card with buttons OR product gallery for Web
Enable or disable Options dialogs
To configure the display (or not) of these options, navigate to the Global Functions.
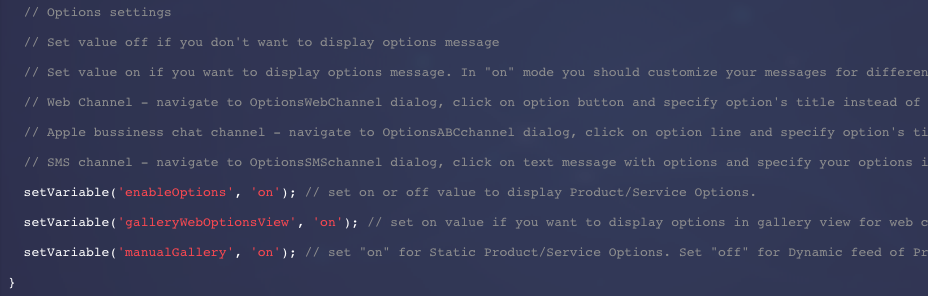
Options are set to be shown by default, but if you don’t want them to be shown in your bot flow just type ‘off’ value for the 'enableOptions' variable:
| Variable Name | Description |
|---|---|
| enableOptions | If you want to display the Product or Service options to your customer, set this to "on". Otherwise, set to “off”. |
| The following are for web client users only. AMB and SMS will be shown automatically. | |
| manualGallery | If you want to manually populate the content for this gallery, set this to “on”. If you’d like to dynamically populate your products or services using an API (currently set to Shopify), set this to “off”. |
| galleryWebOptionsView | If you’d like to display your content as a scrolling gallery, set this to “on”. If you’d prefer to use a button tile, set this to “off”. |


Configure Options dialogs
Each of the Options dialogs are displaying a number of products or services to the user.
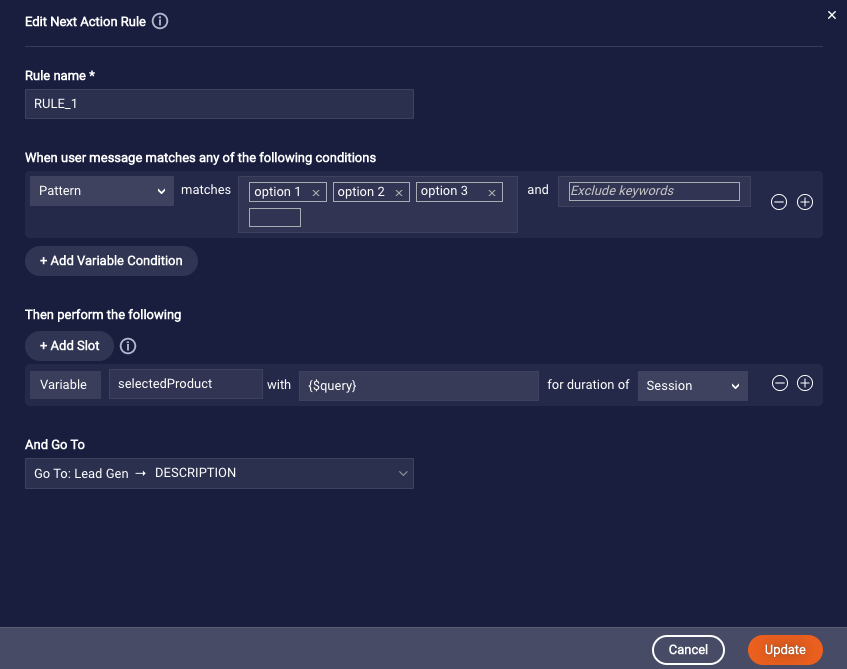
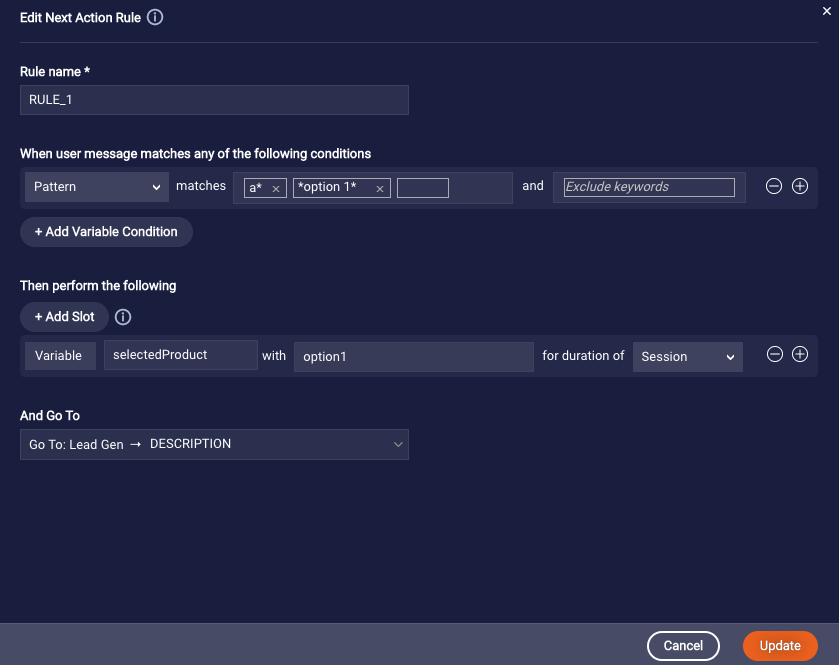
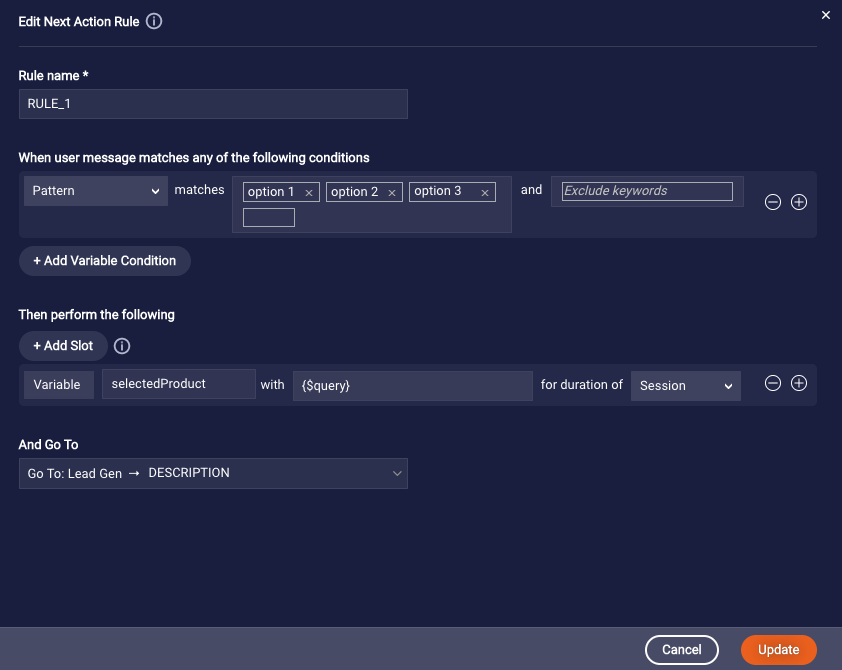
Based on the user's selection, each dialog also sets the result to a variable called selectedProduct. When you add your own products and services to these interactions, be sure to configure the conditions and patterns so that your products and services will be matched and sent to the variable.
If you want to display these Options dialogs, after you have configured the Global Functions appropriately, depending on which channels you are supporting, you will want to populate the various options interactions with your content.
Options for Apple Messages for Business
If supporting Apple Messages for Business, you will want to replace and customize the ListPicker that displays your products and services. Just tap on the images or the text fields to edit. You can see over in the preview how it will appear (if you have hard coded the channel in the Global Functions).

Options for SMS
If you are supporting SMS, you will need to update the list-based menu options. Though they may not look like they are displaying properly in the Chat Preview, they will on SMS.
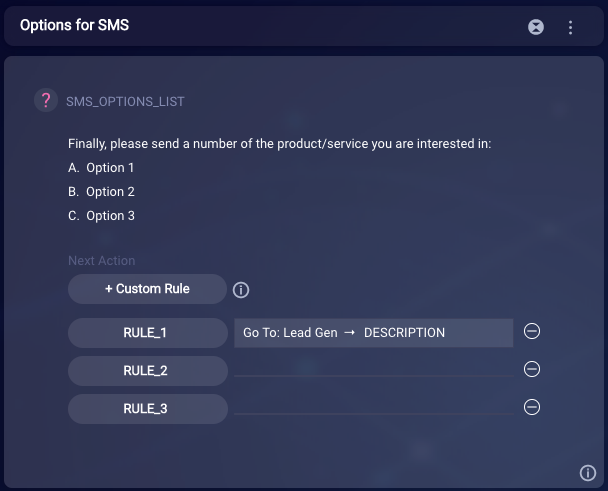
As mentioned previously, be sure to add a custom rule for each of your menu items (as shown below).
Options for Web Buttons
If you are supporting a web client and want to show your options as a button tile, once you have configured the Global Functions accordingly, be sure to set up your custom rule (as shown below).
Agent Escalation Integration
If the user requests an agent or if they reach the max invalid attempts on email or phone, they will be escalated to a LivePerson Agent.
In Global Functions, customize the following values:
| Variable Name | Description |
|---|---|
| escalationBotMessage | What the bot should say prior to hand off |
| botAgentSkillId | The skill id you will transfer to |
| botAgentSkillName | The skill name you will transfer to |
Email Integration
The Send to Email integration is enabled by default.
If you would like to use this, modify the following values in Global Functions:
| Variable Name | Description |
|---|---|
| sendEmail | If you want to send the user’s info to an email address, set to ‘true’, otherwise set to ‘false’ |
| ownerEmail | Email to send information collected by bot |
| replyEmail | Reply To email address, displayed to the user in their email program |
| emailSubject | Email subject |
| emailText | Initial email text, instead of "Lead Gen Form Results" value |
SMS Integration
If you are going to use the SMS integration instead of email, setup your Twilio account information in the Global Functions.
| Variable Name | Description |
|---|---|
| sendSMS | If you want to send the user’s info to an SMS number, set to ‘true’ (this is set to ‘false’ by default) |
| clientNumberTo | Phone number to receive information gathered by bot (do not add the + to the phone number) |
| twillioNumberFrom | Twilio phone number to send information gathered by bot to your phone number (do not add the + to the phone number) |
| twilioAuthToken | AuthToken from your Twilio account |
| twilioAccountSid | AccountSid from your Twilio account |
| twilioAuthorization | Generated Bearer token (see below) |

You can find both your account SID and auth token in the Twilio Console after signing up for a free Twilio trial account.
How to Work with your Free Twilio Trial Account
How to generate a Bearer Token
In order to use the Twilio API, the standard Account SID and Auth Token are not enough. A Bearer token must be generated by calling the API using Postman once.

| POST | https://api.twilio.com/2010-04-01/Accounts/YOUR_SID/Messages.json |
| Authorization: Basic Auth | Username: YOUR_SID Password: YOUR_AUTH_TOKEN |
| Headers | application/x-www-form-urlencoded |
| Body (raw) | Be sure to enter the values for these variables (in blue): Format=json&To=%2BclientNumberTo&From=%2BtwillioNumberFrom&Body=This%20is%20a%20test&Method=post&__referrer=sms-mms |
When this has been set up in Postman, hit Send. This will hit the API, sending a text message to the "To" and will generate your Bearer token. Tap on the Headers tab in Postman and copy THE ENTIRE string, including the “Basic”. This will be your twilioAuthorization value.

Shopify Integration
You can populate the Options for Web Gallery API dialog with products from your Shopify store.

In the Global Functions, edit the following values:
| Variable Name | Description |
|---|---|
| shopifyAPILink | Middleware Link where sms will be sent https://SHOPIFY_API_KEY:SHOPIFY_API_SECRET@STORE_DOMAIN/ENDPOINT |
| shopifyAccessToken | AccessToken for your Shopify Store |
| shopifyHost | Your store’s Host name |
More info on how to generate a Shopify Access Token is described here.