
Interaction categories
There are four, general categories of interactions:
-
Dialog Starter: Dialog Starter interactions are how dialogs are initially triggered, so most dialogs start with a Dialog Starter interaction (fallback dialogs work differently). The user starts things off by supplying some user input — a message or a question. In response, the bot tries to match the user input with a pattern or intent that’s specified in a dialog starter in one of its dialogs. If a match is found, that dialog is triggered, and its flow begins.
-
Statements: Statements simply display information and then execute the next action. They don’t expect or wait for a user response.
-
Questions: Questions present information to the user (a text-based question, a list of things to pick from, etc.), and they expect and wait for a user response before executing the next action. In a question interaction, you can define conditions that evaluate the user’s response against a set of criteria. If a condition is met, its next action is then performed. For example, if the user enters a valid email address, then an email could be sent.
-
Integrations: Integrations make programmatic (API) calls to retrieve or post data to external systems and/or to perform actions. Integrations simply perform their work and then execute the next action. However, if the integration retrieves data, that data can be stored in custom fields, so you can use it in subsequent interactions. Integrations are similar to questions in that you can define conditions that each perform different next actions (based on which condition is met). Common uses for this include checking whether the integration call was a success or failure, having a condition triggered by the value of an API response, and having these events direct the flow of the conversation in a desired manner.
-
Code: Code interactions are for creating custom logic or displaying a custom bot response.
Interaction support
See this topic.
Order of operations
In each interaction, there’s a message stack that is created to handle all messages generated by the interaction based on its data and/or code. Messages are always appended to the bottom of the stack. And the entire message stack is sent at one time based on the interaction delay.
Statements
- Execute the interaction's Pre-Process code.
- Prepare the content of the interaction for the target channel.
- Execute the interaction's Post-Process code.
- Wait for the time set in the interaction delay (if set), and send the message stack to the consumer.
- Execute the interaction's next action.
Integrations
- Execute the interaction's Pre-Process code.
- Wait for the time set in the interaction delay (if set), and process the content of the interaction.
- Execute the interaction's Post-Process code.
- Evaluate the custom rules (if any), and execute the interaction's next action on the basis of the custom rules.
Questions
- Execute the interaction's Pre-Process code.
- Prepare the content of the interaction for the target channel.
- Execute the interaction's Post-Process code.
- Wait for the time set in the interaction delay (if set), and send the message stack to the consumer.
- Wait for the user (consumer) response.
- If there are custom rules, evaluate them. If the consumer's input matches a rule, go to step 7. If it doesn't, the fallback flow is triggered (learn about the Message When Response Unrecognized setting), and skip steps 7 and 8.
- Execute the interaction's Process User Response code.
- Execute the interaction’s next action. If you’ve used setTriggerNextMessage in the Process User Response code, this overrides the custom rules. Otherwise, the next action is executed based on the custom rules.
Universal interaction
You can use the Universal interaction as either a statement or a question interaction depending on your requirement. In its Basic settings, there’s a User Input Required setting. If you don’t enable this, the order of operations is the same as that for statement interactions (discussed above). Alternatively, if you enable this, the order of operations is the same as that for question interactions (also discussed above).
Guided Routing interaction
- Execute the interaction's Pre-Process code.
- Prepare the interaction’s info to send to the LLM, and query the LLM.
- Execute the interaction's Post-Process code.
- Send a message to the consumer about the matched route.
-
Route the consumer.
If the LLM can’t determine a matched route, steps 2 through 4 are repeated. Learn about the Guided Routing flow.
In Silent mode:
- Execute the interaction's Pre-Process code.
- Prepare the interaction’s info to send to the LLM, and query the LLM.
- Execute the interaction's Post-Process code.
- Route the consumer.
Tips on order of operations
- The need for Post-Process code isn’t common. Still, there are use cases, for example, to check an API’s status in an integration.
- Before using Process User Response code, consider whether the requirement can be met using custom rules, which are much simpler to implement. In general, use one or the other. And when using both, be mindful of the hierarchy described above.
- If you use setTriggerNextMessage in code at any point in the above process flows, the next step in the flow never happens. The conversation moves immediately to the specified interaction.
General guidelines and best practices
One of the goals and challenges in developing interactions is creating a unified implementation and consumer experience across channels. When working with structured content in particular, LivePerson recommends that you find the "common denominator" across mobile messaging, web messaging, and Facebook Messenger with respect to a given element's attributes. For example, in a structured question, Conversational Cloud allows up to 128 characters for the button label, but Facebook does not allow more than 20 characters. Depending on your implementation, constraints like this might play a role.
For details on constraints like this, refer to Rich Messaging best practices as well as the Messaging channels section in the LivePerson Community Center.
Your bot implementation should meet Conversational Cloud requirements and those of the specific channels in use.
Whitelisting
For info on whitelisting rich media, see this section.
URL shortening
If you have long web links, you might want to enable the shortening of URLs. You can enable this at the bot level using the Shorten URLs setting in the bot's Bot Settings.
As an example, if you enable URL shortening, a URL like this…
https://www.myexamplesite.com/account/{$botContext.accountID}/veryverylongstringhere?key1=value1&key2=value2
…is shortened to this:
http://{abbreviated domain}/{unique code}
Note:
- If you enable URL shortening, it’s applied only to URLs that start with http:// or https:// . Of those, it's applied to all types of URLs (for websites, for images, etc.) in all types of interactions.
- If the URL contains only the domain (e.g., http://www.mysite.com), the URL isn't shortened.
- To support backwards compatibility, button interactions use URL shortening even though the Shorten URLs bot setting is set initially to Off. To disable URL shortening for buttons, enable the bot setting, save the change, disable the setting, and then save the change again. From this point forward, button interactions will respect the value of the setting and work like all other interactions.
Images
As long as the image is whitelisted (discussed above), it will be sent to the consumer. Provide high-resolution images in the appropriate format: JPEG for photos, PNG for bitmap/raster artwork. Make sure the images are interesting and aesthetically pleasing, and verify their quality before use. Keep the images as small in size as possible, so they load quickly.
The Apple developers' site provides some good, general guidelines regarding resolution, size, optimization, and more.
Add an interaction
When selecting an interaction to add, make sure it's supported by the channel you will be using.
To add a new interaction to the end of the dialog
-
Click New Interaction, which appears below the last interaction, and then select the interaction icon from the toolbar that appears. Alternatively, select the last interaction, and then select the interaction on the interactions toolbar on the right.
Either method adds the interaction as the last unless you added a Dialog Starter interaction, which is always inserted at the start of the dialog.
To add a new interaction between two interactions
-
Select the interaction that should precede the one you want to add (to highlight it), and then select the interaction on the interactions toolbar.
This inserts the interaction after the one you selected unless you inserted a Dialog Starter interaction, which is always inserted at the start of the dialog.
Name an interaction
If you name your interactions (1), it's easier to see and understand a dialog's flow (2).
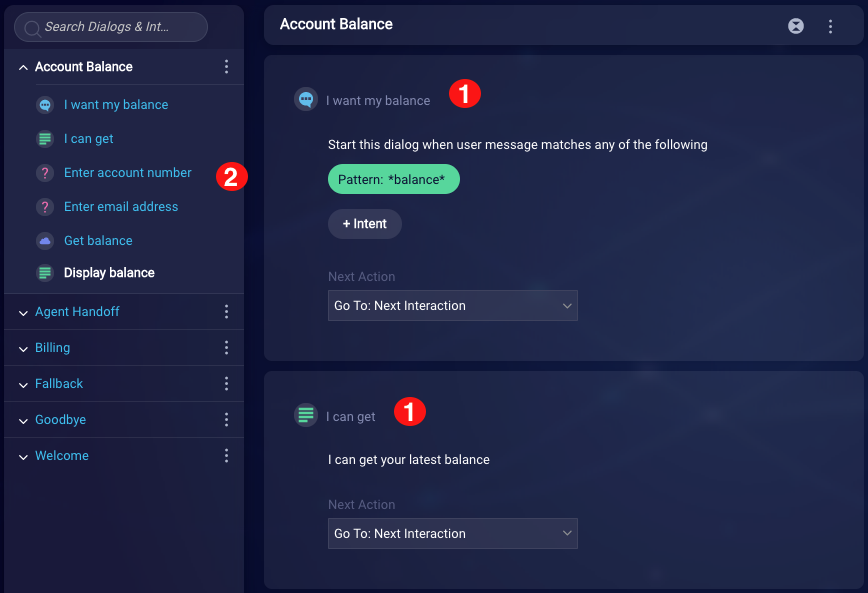
-
To name an interaction, replace the text in the upper-left corner of the interaction tile.
The name must be unique with respect to all interactions in the bot.
Specify patterns in interactions
Patterns are combinations of keywords, wildcards and alternates that are compared to consumer input. Typically, the input is considered a match to a pattern if it fits the pattern exactly. Therefore, the simple pattern hello matches only the consumer input of "hello" or "Hello."
Pattern matching does not consider the case of the pattern. The process is case-insensitive.
When the bot detects a match to a pattern in a dialog starter, that dialog’s flow begins. Or, if the pattern is configured in a custom rule (e.g., to check for a match to the consumer’s answer to a question), the appropriate interaction is triggered in response.
Understanding the wildcard
| Pattern | Matches | Notes |
|---|---|---|
bye (no wildcard) |
bye | User must say only this word |
bye* |
bye see you later bye thank you |
|
*bye |
good-bye thank you bye |
|
*bye* |
all set good-bye for now all set good-bye bye for now |
Best practices for patterns
- Patterns should reflect actual user utterances and native language (syntax, dialect, and so on).
- Semantically speaking, don’t use overly broad patterns. For example,
*order*might match more than one dialog in the bot. - Use exclusion keywords as needed to refine the pattern matching.
- Don’t use patterns that conflict with other patterns or intents. For example, a
*claims*pattern and a*dental claims*pattern conflict with each other.
Cautionary notes about patterns
In general, when using patterns, we recommend that you keep them as basic as possible, so they’re not only processed quickly but also yield predictable results. So, use simple “exact match” patterns whenever possible. And always consider using an intent instead.
Complex patterns involving RegEx aren’t supported, but you can use a few special characters to represent variable elements or define specific conditions:
- Asterisk: Also known as a "wildcard" (examples above); matches any character
- Pipe: Denotes alternates
- Parentheses: Encloses a group of alternates
Take care when using these special characters, as the results might not always be what you expect. Use the following as guidance:
| # | Pattern uses | Rule applied | Pattern example | Pattern matches to |
|---|---|---|---|---|
| 1 | No pipes or parentheses | Pattern must match whole utterance | seeya John |
seeya John |
| 2 | Asterisks at front and end. No pipes or parentheses | Pattern can match a substring of the utterance | *seeya John* |
seeya John bye, cool seeya John, cool seeya John bye |
| 3 | Pipes | Pattern must match whole utterance | seeya|bye John |
seeya John, bye John |
| 4 | Asterisks at front and end. Includes pipes OR parentheses | Pattern can match a substring of the utterance | *seeya|bye John* |
seeya John bye, cool bye John later |
| 5 | Pipes and parentheses | Pattern can match a substring of the utterance | seeya (later|tomorrow) John |
seeya later John seeya tomorrow John, cool seeya later John bye |
In our examples above, you might be surprised by #5: The pattern seeya (later|tomorrow) John matches “cool seeya later John bye”. This is because the underlying pattern matching logic is such that using parentheses and pipes together leads to a match whenever a substring of the input matches the pattern. Thus, it works like when using opening and closing wildcards (asterisks).
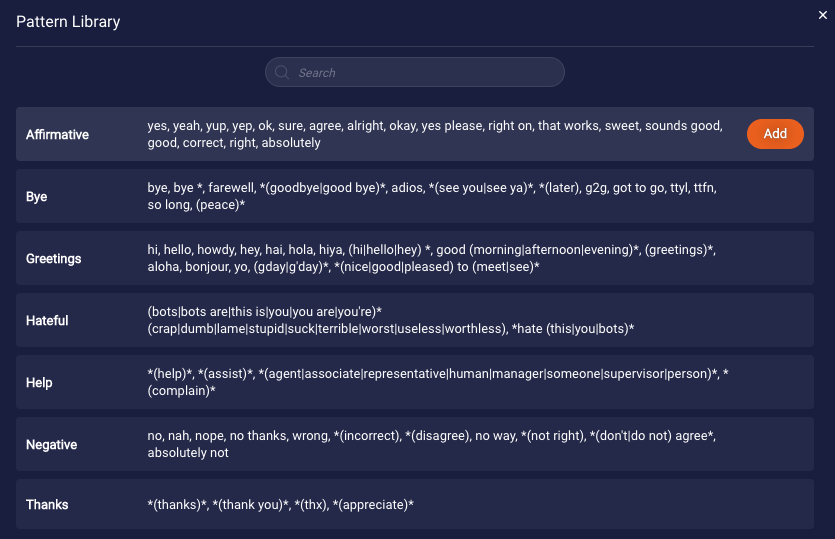
Popular patterns
When you're specifying a pattern in a dialog starter or in a condition in a custom rule, you'll see a library that's available.

The library contains a list of popular patterns. Click Add to append a set of patterns to the current list.
Using a pattern of * (star only)
If you use a pattern of * (star only) to match all consumer utterances, make sure there are no other dialog starters that use patterns. This results in undeterministic behavior: It's possible that the * will catch all incoming consumer messages, rendering useless the other patterns in the other dialog starters.
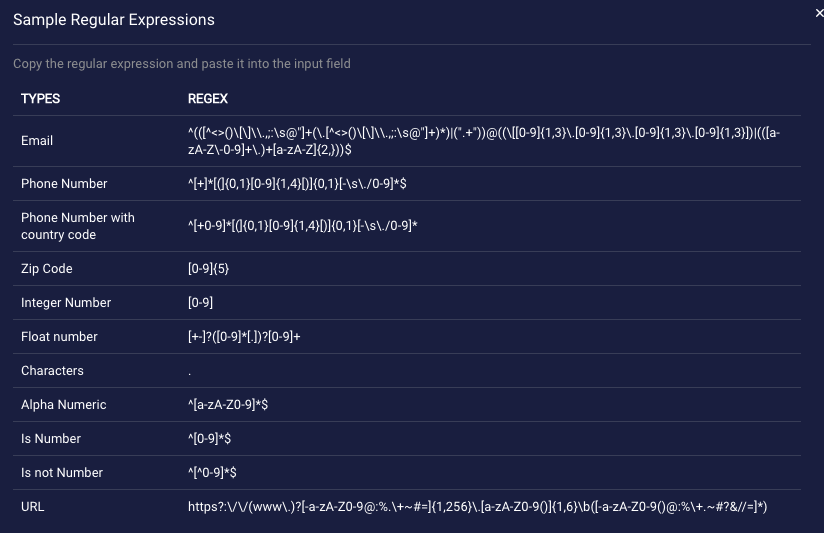
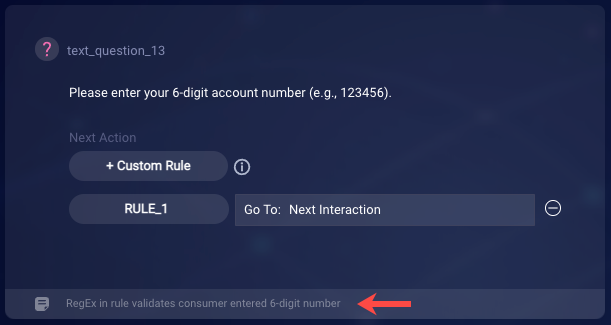
Specify Regular Expressions in interactions
You can match consumer input to regular expressions in interactions.

When defining a condition using a regular expression, click Hint to view and quickly copy commonly used regular expressions.
Use variables and slots in interactions
For info on this, see this section.
Format text
Formatting
You can use the following subset of HTML tags:
-
<p>and<br> -
<strong>,<b>and<i> -
<ul>,<ol>and<li> -
<a href="">, with support for HTTP, HTTPS, phone (tel) and email (mailto)
Examples of valid anchor tags:
<a href="https://example.com/test.jpg">click here</a><a href="https://example.com/1$2324%342523">click here</a><a href=”tel:+123456789”>phone</a><a href=”mailto:a.b@example.com”>email</a>
Examples of invalid anchor tags:
<a href="javascript: alert(’test’)">click here</a><a href="https://example.com/test.jpg" onmouseover="alert('test')”>click here</a><a onmouseover="alert('test')" href="https://example.com/test.jpg">click here</a>
The HTML tags render in LivePerson Conversation Builder's Preview tool and in the Web messaging/chat window based on the capability of the respective tool, window, and channel in use. Be sure to test in the target channel to verify support.
Line Breaks
CTRL+ENTER: Hold control and hit enter/return.
This does not render when using the Preview tool inside Conversation Builder. You will not see line breaks in the preview tool.
Character limit
One single text interaction has a limit of 1000 characters on the word boundary before it gets split into 2 parts. However, you can override this behavior with the setAllowMaxTextResponse scripting function.
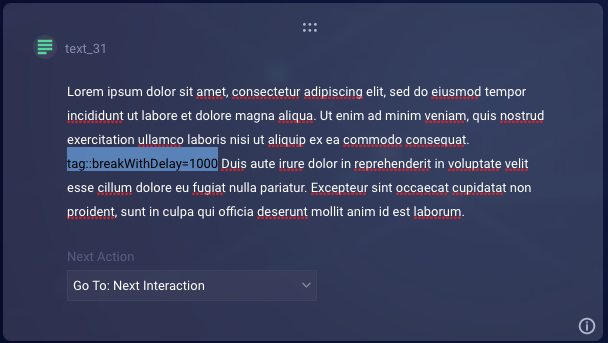
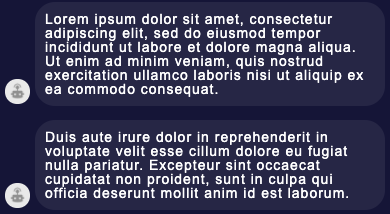
Break point within a large block of text
Add the following special tag inline inside your text interaction to force a break into 2 separate blocks of text:
tag::breakWithDelay={some value}
Note the following when using this tag:
- The delay value is in milliseconds. 1000 = 1 second.
- The maximum value that you can use with this tag is 10000 (10 seconds).
- Using multiple tags back-to-back in an attempt to exceed the maximum value isn’t recommended, as support for this might be removed in the future.
- If there’s a delay specified in the Interaction Delay setting in the interaction’s settings, that delay takes precedence and is used. That said, you still need to specify a value in the tag for the tag to work properly.
Add comments
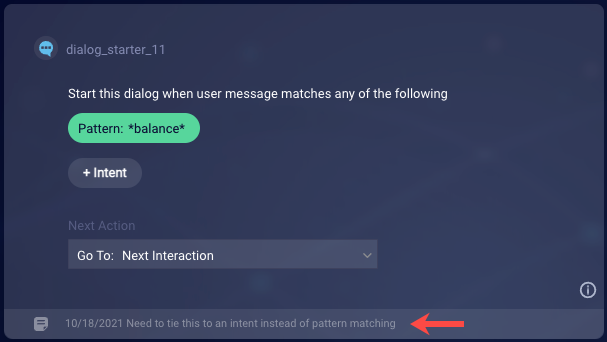
You can add comments to an interaction to annotate your solution, i.e., to describe what the interaction is for, what it does, and what it needs.
Use comments to quickly explain things. They are particularly helpful when you work in a collaborative context that includes multiple bot builders, and when the person maintaining the bot isn’t the one who built it originally.
Comments are displayed at the bottom of the interaction like so:
To add a comment to an interaction
- Select the interaction.
-
Enter the comment in the field provided at the bottom of the interaction, and press Enter. You can enter only text; HTML tags are not allowed.
In a comment, a maximum of 240 characters is allowed. If you go over this limit, you are notified:

To show or hide comments
When you select an interaction, if it has a comment, the comment is always shown. This is done as a convenience because you're actively working in the interaction.
However, you can toggle on and off the display of comments in the other interactions in the dialog. To do this, use the Comments slider at the top of the dialog.

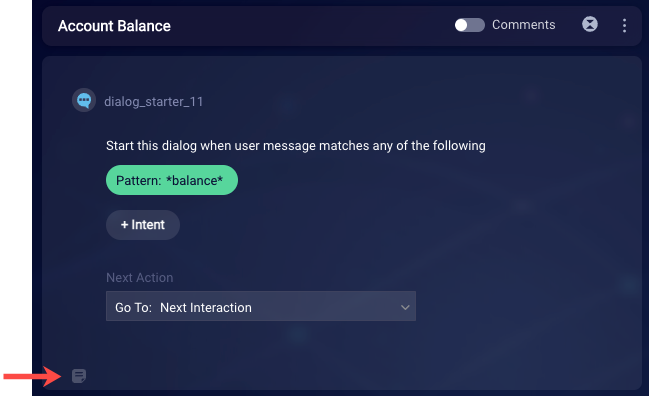
When comments are hidden throughout the dialog, you’ll see a small icon in the lower-left corner of an interaction to let you know that a comment exists for the interaction.
Save changes
Some but not all changes are automatically saved after you make them. As a general rule, always do a manual save after making changes.
To save changes to an interaction
- Select the interaction.
- Click the
 (Save) icon in the upper-right corner.
Move an interaction
You can move any type of interaction except a Dialog Starter interaction. Dialog Starter interactions always stay at the start of dialogs.
You can move an interaction within the same dialog or across dialogs.
To move an interaction
- On the Dialogs page, within the dialogs panel on the left, select
 (Move icon) beside the interaction.
 - Drag the interaction to the desired location, and drop it.
Duplicate an interaction
You can duplicate any type of interaction except a Dialog Starter interaction. A dialog can only have one Dialog Starter interaction.
To duplicate an interaction
- Select the interaction.
- Click
 in its upper-right corner, and click Duplicate. The copy is added directly beneath the original. (You can move it if desired.) The copy is given the same name as the original but with “_copy” appended.
 - Change the name of the copy as appropriate.
Disable an interaction
A disabled interaction is ignored in a dialog flow. Consider disabling an interaction as an alternative to deleting it (deletion is non-recoverable). Disabling can be particularly useful during testing, for example, when testing two different variants of an interaction.
To disable an interaction
- Select the interaction, click the
 (Settings) icon in its upper-right corner.
 - On the Basic tab, click the Interaction Enabled slider to turn it to the off position.
Delete an interaction
Deleting an interaction is a non-recoverable action, so consider disabling the interaction as an alternative.
After you delete an interaction, verify that the interaction flow isn't broken as a result. You might need to modify the Next Action field in the remaining interactions so that the conversation flow works as expected.
To delete an interaction
- Select the interaction.
- Click in its upper-right corner, and click Delete.
- Click Continue to confirm the deletion.
Troubleshooting
See this section.