In this tutorial we will demonstrate the mechanism that enables the consumer to get messages sent by the agent. These messages may be sent while the consumer is connected or offline.
Prerequisites
At the end of the Getting Started tutorial, we created the lp.env file. In order to launch lp-shell with your previous settings, type the following:
docker run --env-file lp.env -it lpinc/shell
You should get a shell line.
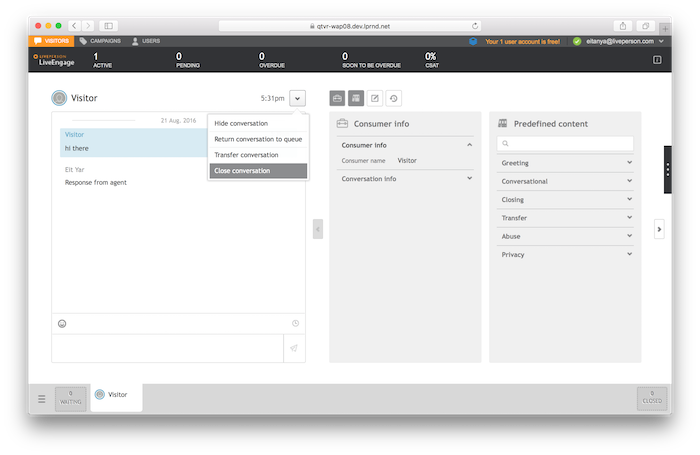
Make sure that you have closed any previous conversation sessions by clicking Close conversation in the Agent Workspace.
Step 1 — Find Your Consumer ID
When you get messages from the server, you must identify which messages were published by you, and which were published by the agent. To do so, you must know your consumerId. To find out your consumerId, refer to the content of the LP_JWT by base64-decoding the middle part of the JWT (between the two periods):
echo $LP_JWT | sed -e 's/.*\.\(.*\)\..*/\1/' | base64 --decode
You will now be able to see the content of the JWT:
{
	"sub": "19f98cd2-63b9-42e4-bc0d-9222b86574e1",
	"aud": "acc:qa57221676",
	"iss": "https://idp.liveperson.net",
	"exp": 1879957364,
	"iat": 1469717324
}
The sub property contains your consumerId.
Note: If you encounter issues when using the shell base64 command, you can use online tools such as base64decode.org.
Step 2 — Create a Conversation
Open the WebSocket connection using the following:
wscat -k 60 -H "Authorization:jwt $LP_JWT" -c "wss://$LP_ASYNCMESSAGINGENT/ws_api/account/$LP_ACCOUNT/messaging/consumer?v=3"
Replace the __LP_ACCOUNT__ with your account ID, and then send a request on the connection to create a new conversation with the following JSON object:
{"kind":"req","id":1,"type":"cm.ConsumerRequestConversation"}
In response, you will get the ID of the new conversation.
{
	"kind": "resp",
	"reqId": "1",
	"code": 200,
	"body": {
		"conversationId": "7507be78-60ef-4468-b3b1-baa47fbeea21"
	},
	"type": "cm.RequestConversationResponse"
}
Write down the conversationId from the response. We will need it in the next steps.
Step 3 — Agent Sends Messages
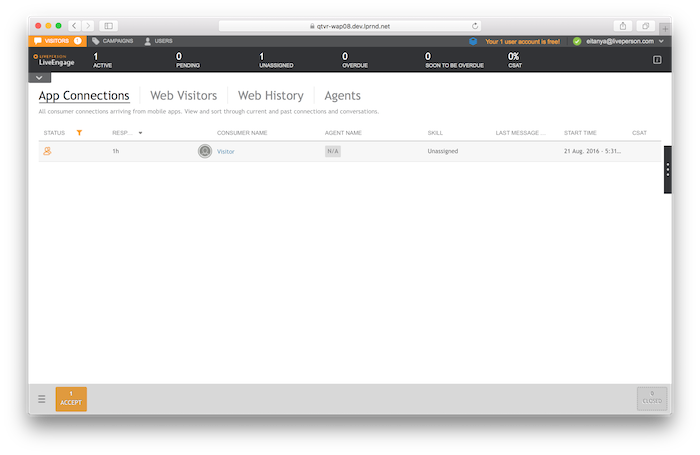
In this stage, switch to the Agent Workspace from Step 1, and accept the ring of the incoming request. Click the blinking Accept button.
Type a few messages in the Agent Workspace.
Step 4 — Subscribe to Conversation Content
In order to get existing or new messages from the agent side, the consumer should subscribe to the content of the conversation. Substitute the __YOUR_CONVERSATION_ID__ with the consersationId you got in the response in the previous step, and paste it into the opened WebSocket.
{"kind":"req","id":"22","body":{"fromSeq":0,"dialogId":"__YOUR_CONVERSATION_ID__"},"type":"ms.SubscribeMessagingEvents"}
Note: You can use the message builder () to build the above message.
In response, you will get a subscription success message:
{"kind":"resp","reqId":"22","code":200,"type":".ams.GenericSubscribeResponse"}
You will now get all the existing content of the conversation:
{
	"kind": "notification",
	"body": {
		"changes": [
			{
				"sequence": 0,
				"originatorId": "734d9867-40e3-52b9-a401-07e877676d64",
				"serverTimestamp": 1477840831162,
				"event": {
					"type": "ContentEvent",
					"message": "message from the agent",
					"contentType": "text/plain"
				},
				"dialogId": "__YOUR_CONVERSATION_ID__"
			}
		]
	},
	"type": "ms.MessagingEventNotification"
}
You will notice that you get all the messages that were published by you, or by the agent. In order to find which messages were published by you, refer to the originatorPId field. Messages that were published by you will have a value equal to the consumerId you found in Step 1, while messages from the agent will have a different originatorId.
Now close the conversation from the Agent Workspace by clicking Close conversation.