
What's an entity?
An entity is any word(s) or series of characters that consistently refers to (an attribute of) a single person, place, or thing, or set of same, e.g., SPORT, SIZE, HELP_DESK_TICKET_NUMBER, or CITY. Learn more.
There are three types of entities:
- Value Set - You define these, so they're brand-specific.
- Regular Expression - You define these, so they're brand-specific.
- Global - These universal entities are automatically detected by the system; see the complete list.
Use entities to fill slots in LivePerson Conversation Builder bots.
Interested in the performance? Check out the discussion on precision and recall in our October 2022 blog post.
Add a Value Set entity
- Access Intent Manager.
- Locate the domain list in the Intent Manager dashboard.
- Select the name of the relevant domain, and then select Build from the menu that appears.
- Select the Entities page.
- In the upper-right corner, click Add Entity.
- Specify the following:
- Entity Name: Enter the name of the entity using alphanumeric characters (no special characters). Consider using all capital letters and underscores (instead of spaces) as a convention; this makes the entities readily visible when they are used in intents and knowledge bases. Note that entity names are case-sensitive.
- Description: Enter a short phrase describing the entity. While this field is optional, it's often useful. Many entity names can be technical. A description adds clarity and is particularly helpful to a person not familiar with the domain.
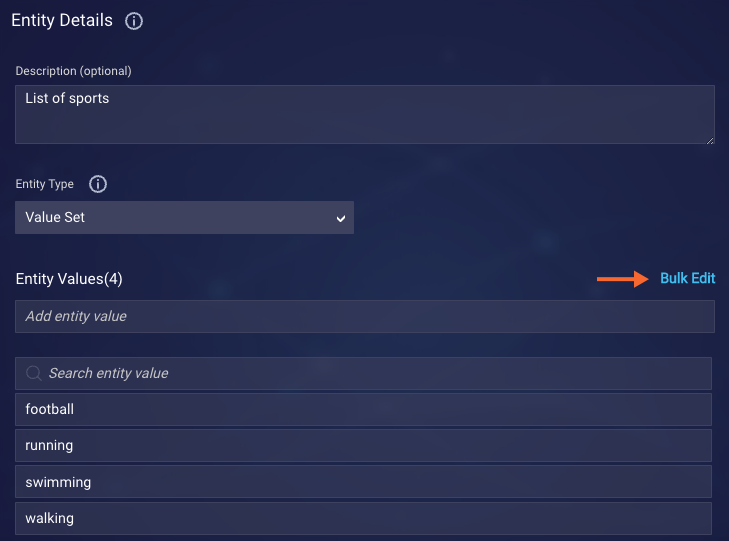
- Entity Type: Select "Value Set."
- Entity Values: Enter each entity value.
- Click Save.
- Train the domain so that the addition is reflected in a new model version.
Add a Regular Expression entity
Regular Expression entities are available only in domains using the LivePerson engine for NLU.
To add a Regular Expression entity
- Access Intent Manager.
- Locate the domain list in the Intent Manager dashboard.
- Select the name of the relevant domain, and then select Build from the menu that appears.
- Select the Entities page.
- In the upper-right corner, click Add Entity.
- Specify the following:
- Entity Name: Enter the name of the entity using alphanumeric characters (no special characters). Consider using all capital letters and underscores (instead of spaces) as a convention; this makes the entities readily visible when they are used in intents and knowledge bases. Note that entity names are case-sensitive.
- Description: Enter a short phrase describing the entity. While this field is optional, it's often useful. Many entity names can be technical. A description adds clarity and is particularly helpful to a person not familiar with the domain.
- Entity Type: Select "Regular Expression."
- Regular Expression: Enter the regular expression. All standard RegEx rules apply.
-
Sample Values: Enter five (5) example values that conform to the regular expression. These values aren't used during entity detection; they're used during domain training to improve the model's performance with respect to intent matching. Within Intent Manager, the sample values also serve as easy-to-read examples of the regular expression, making the expression more understandable at a glance.
Start with five (5) sample values. If your results aren't as expected, you can add more and then retrain.
- Click Save.
- Train the domain so that the addition is reflected in a new model version.
Add or update entity values in bulk
Use the Bulk Add or Bulk Edit features, respectively, to add or edit a set of entity values in bulk.
When you click the link, all of the values are placed into a single field. This means you can make changes to all or some of them in bulk. For example, you can:
- Insert a number of additional values at the top or bottom. This is handy if you have the values in a separate file. You can quickly copy them and paste them in.
- Select a number of values and delete them all at once. This is faster than doing so one by one.
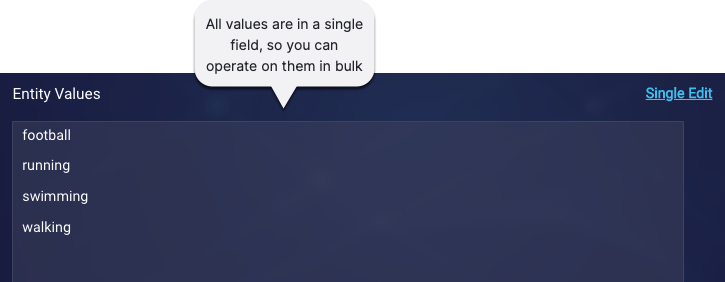
To save your changes, click the Update Entity button. Once you save the changes, they can’t be reverted. To cancel, navigate away from the page without saving the changes.
Take care when using this feature to avoid making unintended changes:
- To replace what exists, paste over it.
- To add to what exists, paste the additions into (not over) the list.
- Ensure that each value is on a different line.
Delete an entity
Deleting an entity is a non-recoverable action, so be certain about doing so before taking this action.
Before you delete an entity, ensure that it isn't being used in any intents or Knowledge Base articles.
To delete an entity
- Access Intent Manager.
- Locate the domain list in the Intent Manager dashboard.
- Select the name of the relevant domain, and then select Build from the menu that appears.
- Select the Entities page.
- In the left panel, select the entity.
- Click
 (3-dot icon), and select Delete.
 - In the confirmation dialog, click Yes.
- Train the domain so that the deletion is reflected in a new model version.