
Create a bot
Configure bot settings
- Open the bot, and click
 (3-dot icon) in the upper-left corner, just to the right of the menu bar.
 - Select Bot Settings.
- Click More Settings to display all the settings.
- Configure the settings as needed, and click Save.
List of bot settings
Post-conversation survey bots have some additional settings.
-
Name: Enter a name that’s concise and clear. Make sure abbreviations can be understood, and consider adding a prefix or suffix to indicate the environment (Dev, Prod, etc.) or language (En, Sp, Fr, etc.) if applicable. When you import a bot, by default, a date and timestamp is appended to the bot name; consider removing this because dates quickly become obsolete.
-
Description: Enter a description that’s meaningful to you and others. Consider including language that identifies the bot's goal and key behaviors.
-
Bot Type: Read-only. This is always Consumer Facing Bot.
-
Bot Language: Read-only. This setting identifies the language that the bot uses to respond. The language should be selected based on how the bot is trained: If the bot uses an intent domain, the bot language must be the same as the language of the domain that is associated with the bot. If these languages don't match, errors during NLU processing occur. Alternatively, if the bot uses only pattern matching, the bot language can be any language. You specify the bot language when you create the bot, and it can’t be changed afterward.
-
Bot Template: Read-only. To facilitate the rapid creation of bots, all bots are based on templates. The default template is Basic, which uses English and includes just a Welcome dialog. You select the template when you create the bot, and it can’t be changed afterward.
-
Channel Type: This identifies the bot as either for Messaging or Voice. You can’t change a bot’s channel type after you create the bot.
-
Bot Group: Optionally select the bot group for the bot. A bot can be a member of exactly one group.
-
Start conversations with: This is a setting that’s unique to Voice bots, and one that you might want to change. This determines the dialog that automatically starts off the conversation when the consumer first calls.
-
Bot ID: Read-only. This is a unique identifier that’s generated by the system. In some scenarios (for example, when using some APIs), you need to reference the bot ID. Here’s where you can find it.
-
Associated Domain: You can use this option to associate a domain with the bot. However, the Assist tool provides you with help in associating domains with dialogs, so typically you don’t need to specify a domain here.
-
Public: When you want other users in your Conversational Cloud account to be able to view and edit the bot, click the slider to On. The default value is Off.
-
Bot Environment: If desired, select the set of environment variables that you want to associate with the bot. Environment variables allow you to manage certain values and constants outside of the bot, and use of them when appropriate is considered a best practice.
-
Session Length: Select the length of the bot session, that is, how long the context of a conversation is maintained after the conversation becomes idle.
For Messaging bots, if this is unset, the default of one hour is used.
For Voice bots, if this is unset, the default of 10 minutes is used. Note that, if the consumer keeps talking, the session length is extended automatically.
Be aware that LivePerson Conversation Builder maintains its own session, and Conversational Cloud maintains its own session. This setting only determines the length of the Conversation Builder session.
If you have post-conversation survey bots, and you want to change this value, consult with your LivePerson account representative beforehand. The reason for this is that there’s a backend Conversational Cloud setting that automatically closes post-conversation survey bots after a period of time (typically, 48 hours) regardless of the activity within the survey conversation. We recommend setting Session Length to a value lower than the value of the backend setting (not to the same value) to ensure there’s clarity in reporting regarding which event has transpired in the system.
-
Small Talk: Enable or disable support for small talk (chitchat) in the bot. When you support small talk, you offer your consumers a more human-like experience.
-
Log Transcripts: If you don’t want to log transcripts of conversations held via the bot, click the slider to Off. The default value is On. Transcripts can provide insights for a variety of purposes. For example, they can inform the bot flow and help with tuning. However, some cases might prohibit transcript logging for privacy or other reasons.
If you turn this off, metadata on the conversation is still logged, but the content of the conversation isn’t. If you keep this on, you can access the logged transcripts in the Bot Analytics application: Select the bot and then access the Transcripts page.
-
Shorten URLs: Enable this if you want to shorten the URLs sent in interactions. This can be desirable if your web links are long. Disable this to keep URLs as they are. The default value is Disabled (Off).
-
Default User-Friendly Response: This is an error response that gets sent to the user. Because you can supply the response, you can customize it in terms of substance and language (Spanish, Italian, etc.). If you enter a value here, it's used in two circumstances.
First, when the bot encounters errors or throws exceptions, many times a default error response of, "Not able to understand your question. Can you please re-phrase it?" is sent to the user. Since this message is the same as the built-in, default Fallback message, it might confuse the user. To send a different response when errors occur, enter a value here. It won't replace or affect the Fallback message or a Fallback dialog, as they serve different purposes. Fallback handles when the user's utterance doesn't match a pattern or intent. In contrast, this error response is sent when the bot encounters an error or throws an exception.
Second, during a LivePerson agent escalation, if the escalation fails four times, the escalation then stops, and a default failure response of, "Not able to transfer to Agent at this time. Please try later." is sent to the user. To send a different response, enter a value here.
To enter a value, click the slider to activate it, enter the text in the field that appears, and save. There is no character limit.
-
Agent Annotations: This setting isn't supported and will be removed in a future release.
-
Debug Commands: When this setting is enabled, you can use the "reset" and "display userid" commands in the conversation for debugging purposes. Respectively, these commands reset the session and display the unique user ID for the consumer in the conversation.
If you disable this setting, the commands cannot be run in the conversation anywhere, i.e., they cannot be run in a channel post-deployment, nor can they be run within the Preview tool within Conversation Builder.
By default, the setting is enabled (on), so that during bot development you can run the commands. To disable them, manually disable this bot-level setting in each applicable bot.
As mentioned above, if you disable this, you are no longer able to use these standard debugging methods within the Preview tool in Conversation Builder. Therefore, LivePerson strongly recommends that you create separate development and production bots, so you can enable this in the former but disable it in the latter.
Configure voice settings (voice bots only)
- Open the bot, and click (3-dot icon) in the upper-left corner, just to the right of the menu bar.
-
Select Voice Settings from the menu.
These voice settings are discussed below.
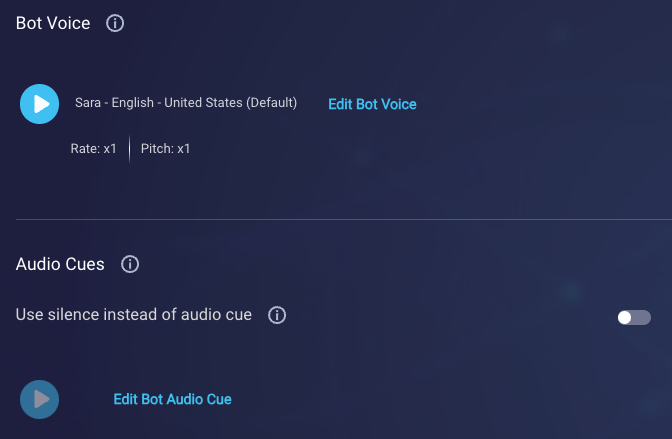
Bot Voice settings
You can select a voice and related attributes:
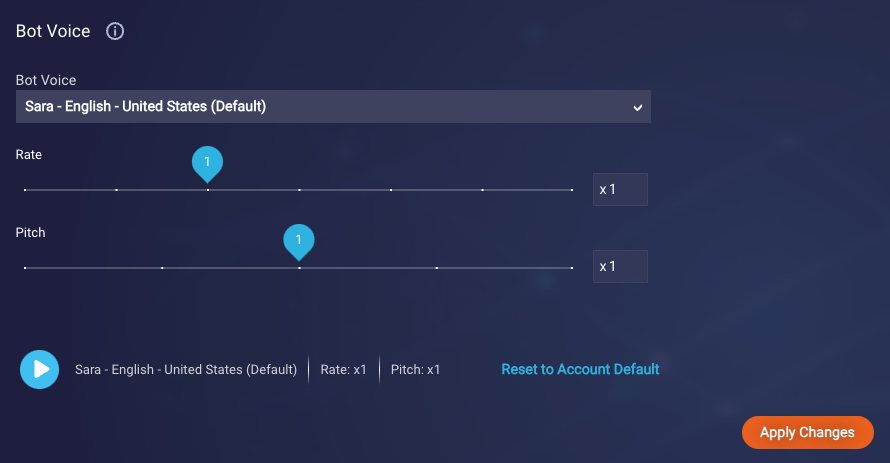
Make your desired changes, and click Apply Changes.
Later, if you want to revert to your account-level default voice and attributes, click Reset to Account Default.
If a message in an interaction in the bot contains SSML, these voice settings are ignored. In this case, be sure to fully specify the desired voice characteristics using SSML.
Audio Cue settings
Audio cues are also referred to as sound cues or earcons. Often, an audio cue is played when the bot is busy processing a consumer request to indicate to the consumer that the bot is at work. In this case, you can choose whether to just use silence or to play an audio cue.
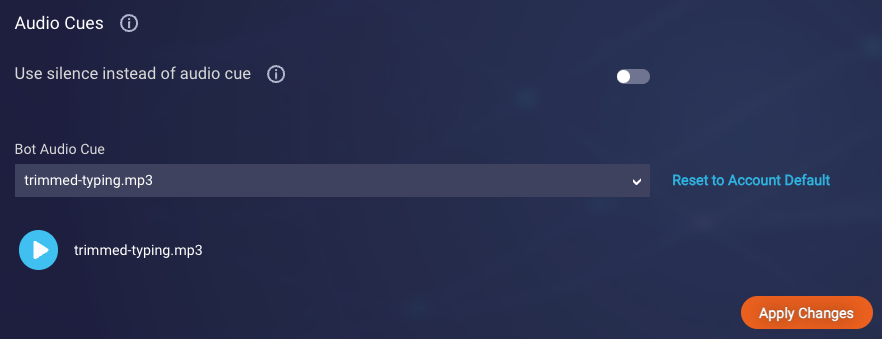
- To use silence, turn on the toggle.
- To use one of the audio cues that you've uploaded, click Edit Bot Audio Cue, and then select the audio cue from the list. Click Apply Changes.
- To use your account-level, default audio cue, click Edit Bot Audio Cue, and then click Reset to Account Default. Click Save.
Export a bot
Export of a bot creates a JSON file.
You might need to export a bot for a few reasons:
- You want to create a variation of the bot, so you plan to copy the bot by exporting it and then importing it back into the same environment.
- You want to move or copy a bot to another environment, so you plan to export it and import it into a different environment.
- You want an extra measure of backup that goes above and beyond saving versions of bots that you can restore—so you plan to archive the JSON file for safekeeping.
In case 2 above—moving or copying a bot to a different environment (that is, from one region to another)—check whether the bot has dependencies in the way of knowledge bases and domains (that contain intents and entities). If such dependencies exist, you’ll need to download the knowledge base and use the CSV export file to create a new knowledge base (with the same name so that all references work) in the target environment. Similarly, you'll need to download the domain and import the intents and entities into a new domain in the target environment, keeping the domain name identical. Take care of these dependencies before importing the bot. If you don’t import the domains first, the associations inside the bot to the intents and entities will break during the bot import. If that happens, you’ll need to reassociate the intents and entities manually.
To export a bot
- Open the bot, and click (3-dot icon) in the upper-left corner, just to the right of the menu bar.
- Select Bot Settings.
- Click More Settings, and then click the Export Bot icon
 .
. - Follow the browser prompts to access and save the JSON file to a location of your choice.
Import a bot
You can add a bot by importing a bot JSON file that was previously exported. This is useful when you need to make a copy of a bot (just export and then import back into the same environment), or you need to copy or move a bot from one environment to another.
Important notes
- Ensure the JSON specifies names for the bot and all dialogs and interactions therein. This will be the case if you originally exported the bot from Conversation Builder, but it might not be the case if the JSON was created via another platform. Please verify names exist for all such components.
- Before performing the import, verify that all dependencies (knowledge bases, domains, etc.) exist in the target environment. Learn more in our discussion of exporting a bot, which is farther above.
To import a bot
- From the dashboard that lists your bots, click Import Bot in the upper-right corner.
-
In the dialog box that appears, navigate to and select the JSON file, and click Open.
The bot is imported and given a name that includes a date and timestamp.
- Change the name of the bot and any other configuration as needed.
Delete a bot
Deleting a bot is a non-recoverable action, so be certain about doing so before taking this action.
If you want to delete a bot that is deployed, first stop the bot, un-deploy it, and remove any enterprise integrations that are running. This helps to ensure there are no adverse effects.
To delete a bot
- Open the bot, and click (3-dot icon) in the upper-left corner, just to the right of the menu bar.
- Select Bot Settings.
- Click More Settings, and then click the Delete Bot icon
 .
. - In the confirmation dialog:
- If you want to delete all the logs and analytics data for the bot, select the checkbox.
- Click Proceed.