
Following guide is going to present customization for the Watson Assistant on how to implement functions specifically for IBM Watson. It is intended for users who are familiar with IBM Watson cloud dashboard. Continue if you are familiar and have access to IBM Watson cloud dashboard.
Sending Native Content
Watson Assistant allows the user to define native response types to the action step. The supported Watson Assistant native types include Video, Audio, Image, Iframe, Option, Pause, and Text. Users can define single or multiple native content per step. The native content types can be defined with Watson wizard or using the JSON editor. (Figure 2.1 shows how to access both ways in IBM Watson action step.)
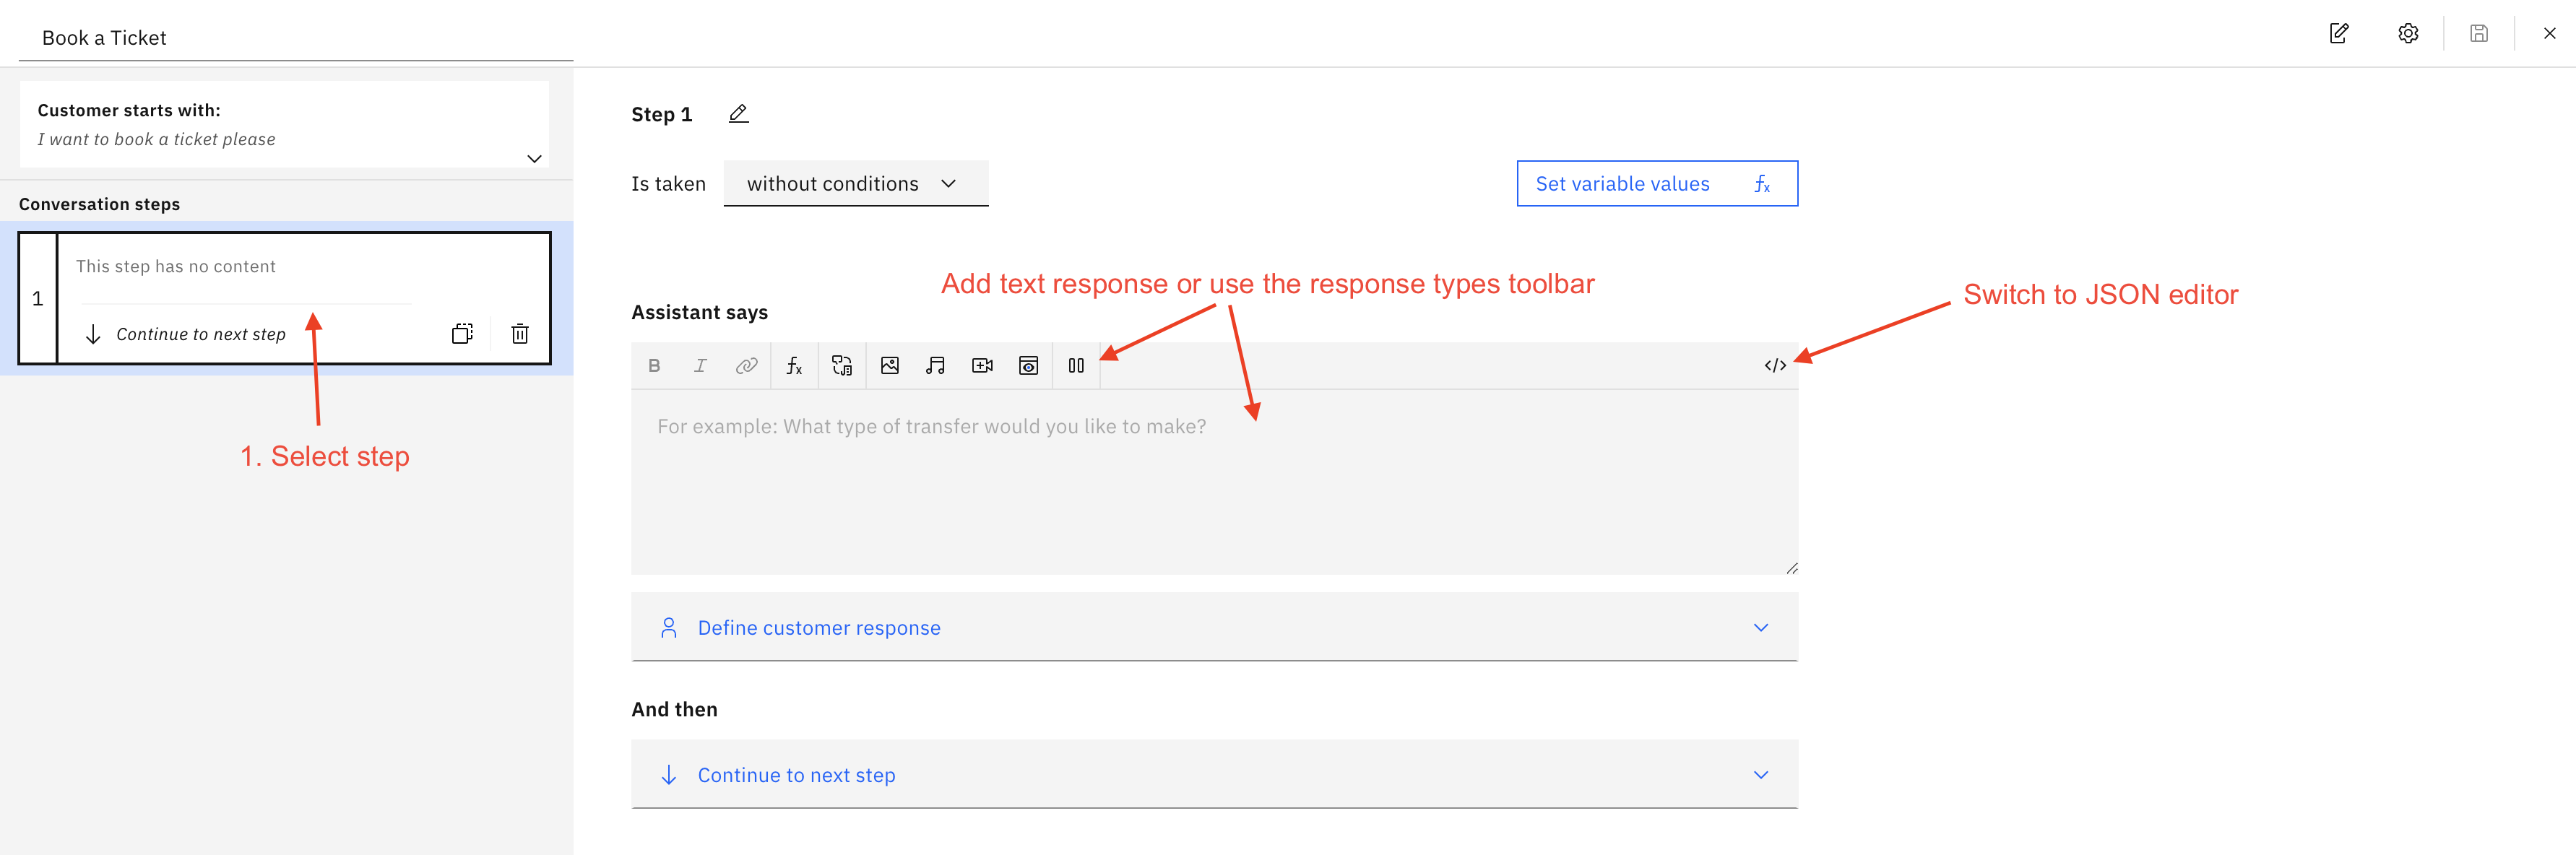
Figure 2.1 IBM Watson Action Native Rich Content Wizard and JSON Editor
Please note The response type Channel Transfer is not supported by Third-part bots connector
If you use JSON Editor then the usual body of the native content in the action step is as follows:
{
  "generic": [
    // Here comes array of objects of different Watson native contents that you can define.
  ]
}
Image
User can define Image type using the IBM Watson Assistant dashboard. To do this, an action step will need to be selected that will hold the image response. Click on the "Image response type" from the editor toolbar as shown in Figure 2.2.
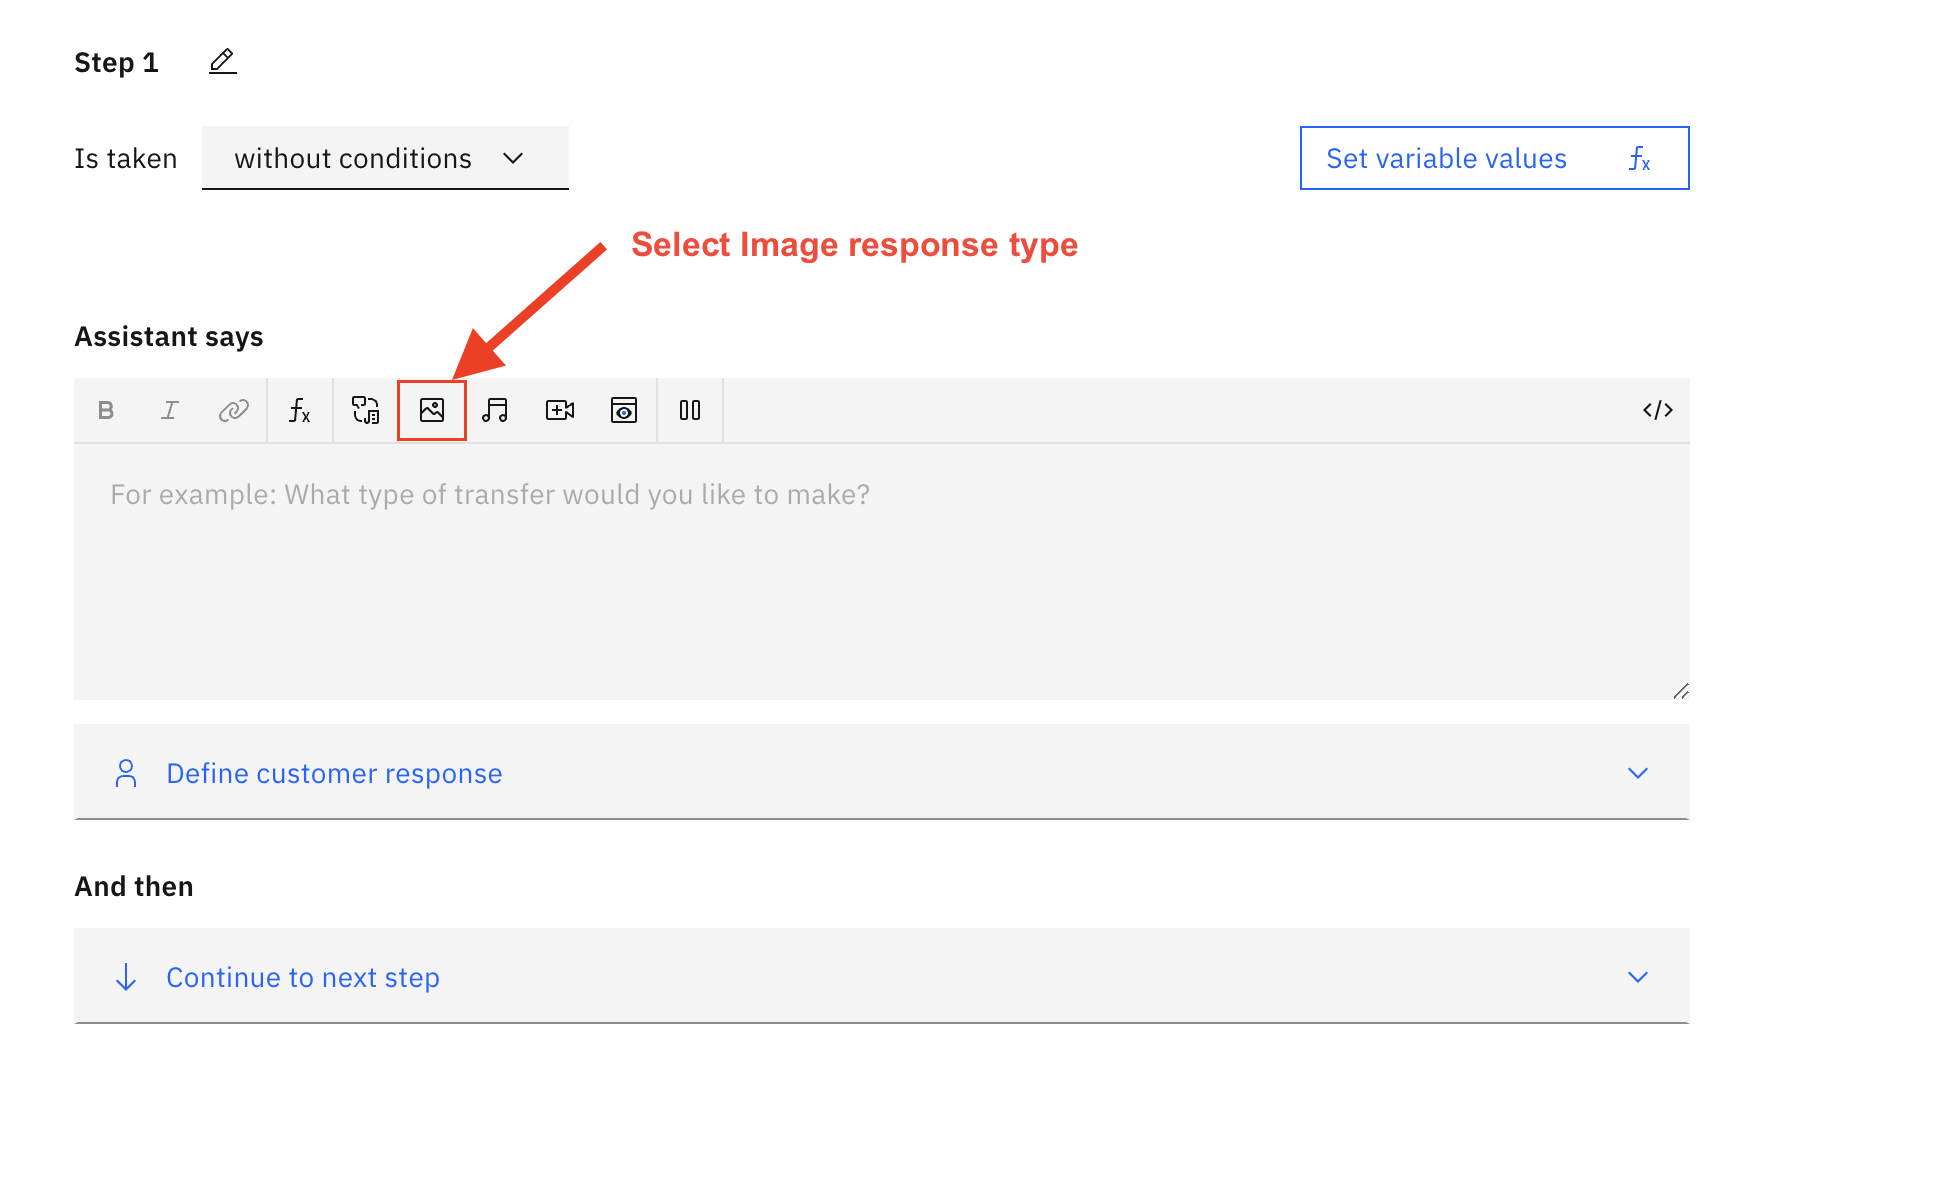
Figure 2.2 Response type of Image is highlighted
Once the image is selected you will be asked to fill in the information. "Image Source" URL must be provided. You can also describe the image using the title and description (an example filled form is shown in Figure 2.3).
Image URLs must be added to a whitelist via internal LivePerson configuration (Houston: messaging.rich.content.valid.urls).
Please note that you must add all possible domains to this list manually as wildcards are not supported. Moreover, All domains must be HTTPS secure.

Figure 2.3 Image fields filled example
If you are using the JSON editor you can add an Image type by posting the following JSON. Please make sure to change "source", "title", and "description" properties with your data.
{
  "generic": [
    {
      "response_type": "image",
      "source": "https://images.pexels.com/photos/699122/pexels-photo-699122.jpeg",
      "title": "A nice Iphone",
      "description": "showing initial details about the phone",
      "alt_text": ""
    }
  ]
}
List
Users can define List type using the IBM Watson assistant dashboard. To do this, an action step will need to be selected that will hold the list response. Click on the "Define customer response" and select Options from the sidebar as shown in Figure 2.4. or select Confirmation if you want to show Yes, No only
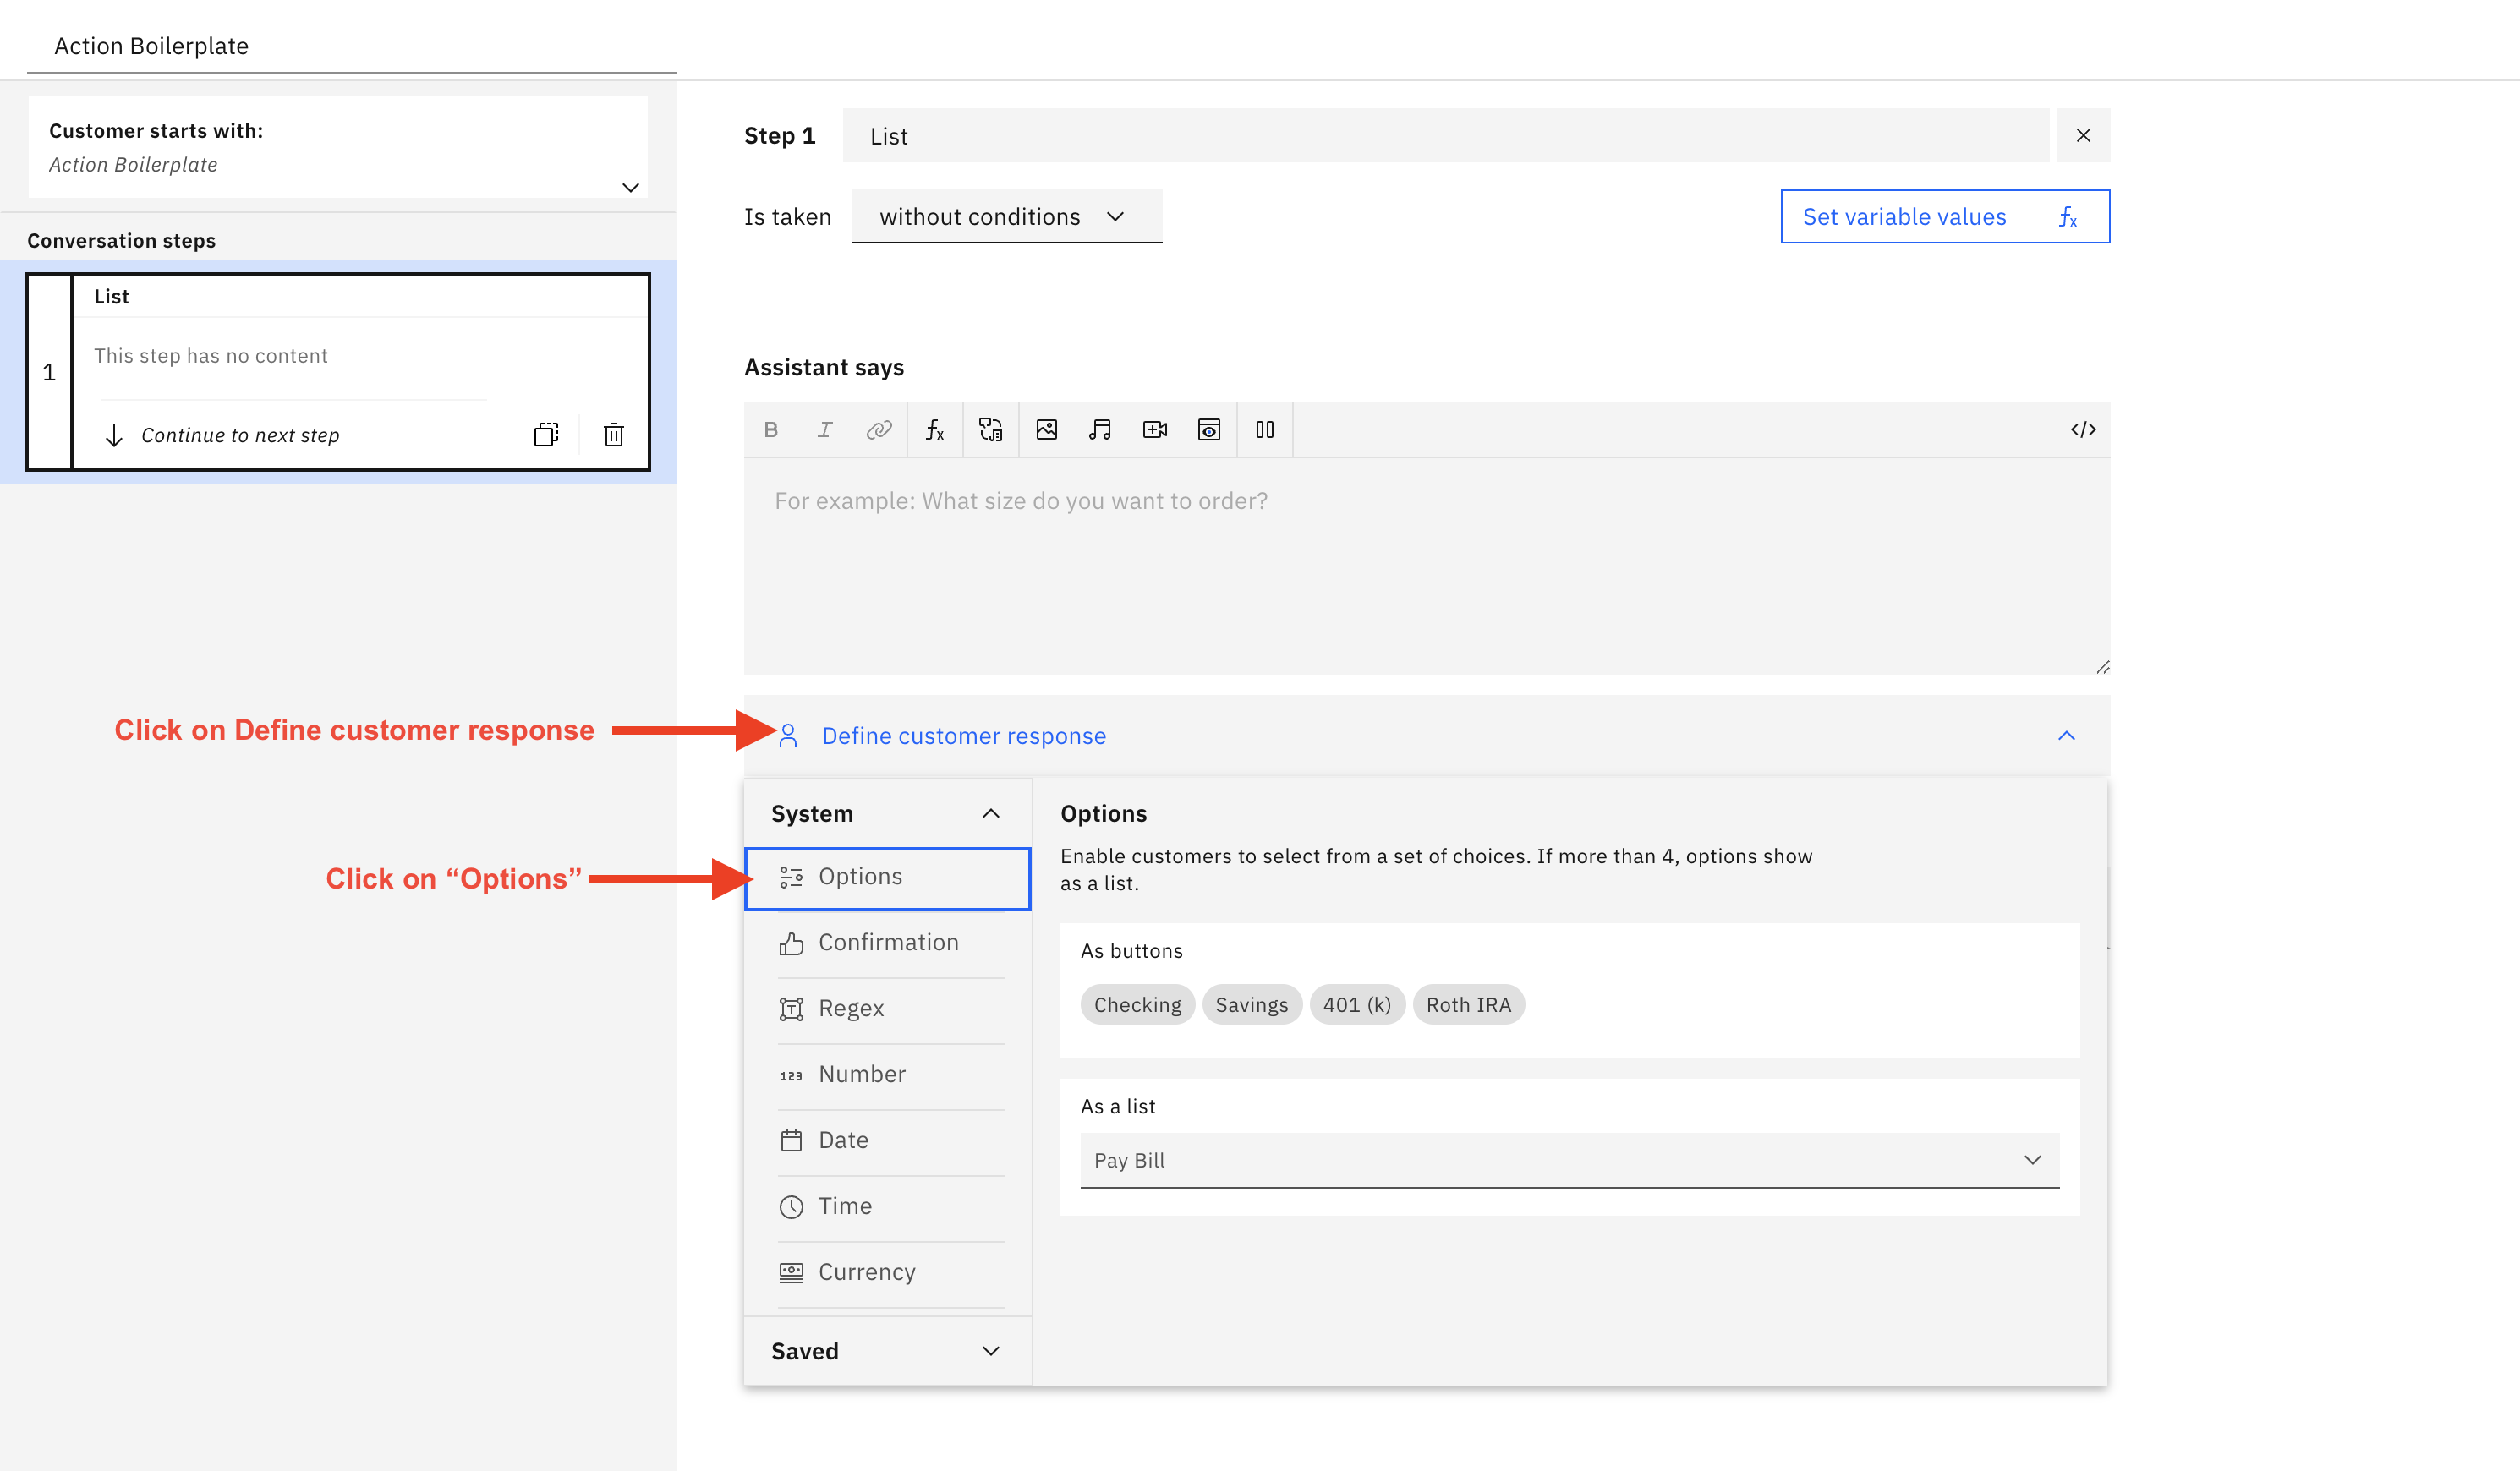
Figure 2.4 The response type of Option is highlighted as a customer response definition
Once the "Option" is selected the form that needs to be filled will be shown. You must provide different choices of options. option label and value are the same in actions but you can change it using JSON Editor, you can also add synonyms for better validation of the customer response (example filled form shown in Figure 2.5).
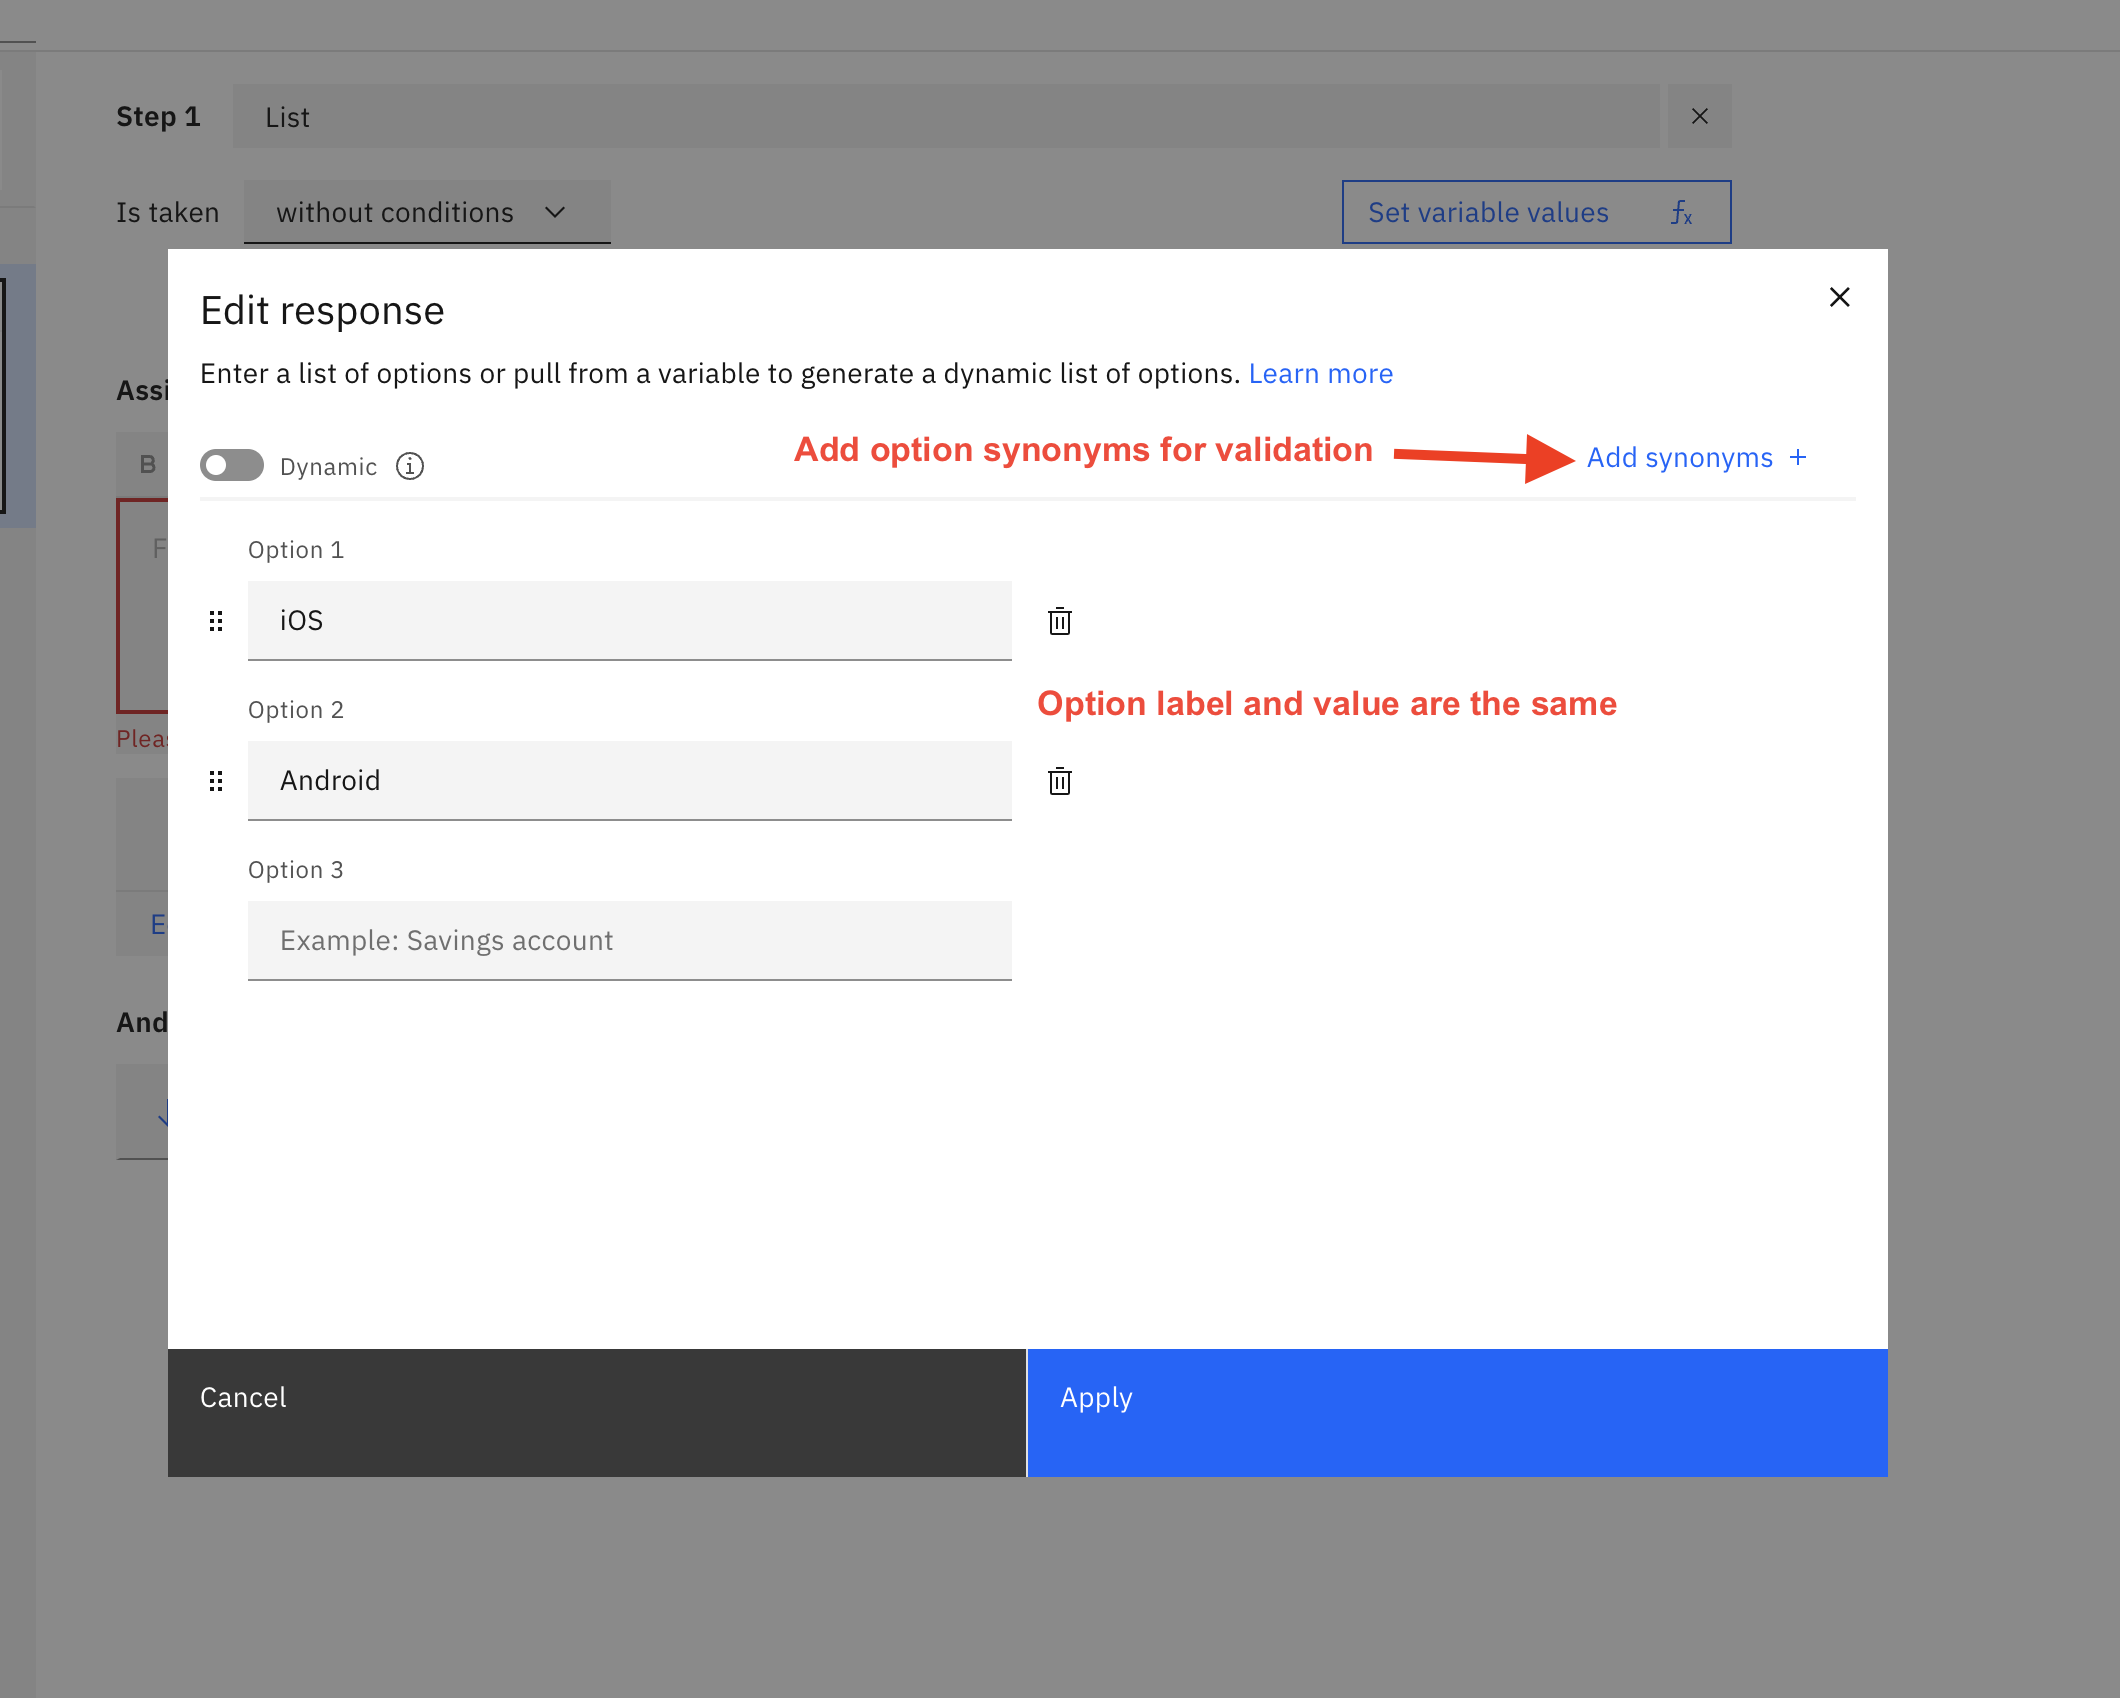
Figure 2.5 Options fields filled example
When defining customer response IBM Watson will validate the response from the customer and if it is not matched the assistant will try 3 times by default to request a customer response if invalid then go to the Fallback action defined by default in the assistant. To edit the validation response and number of tries as shown in Figure 2.6

Figure 2.6 Example edit customer response validation message and number of tries
If you are using JSON Editor then you have the following structure of Options. Note that "options" property is array of objects which holds the items for choosing are presented to the customer.
{
  "generic": [
    {
      "response_type": "option",
      "repeat_on_reprompt": true,
      "options": [
        // Here comes the list of options you want to present to user
      ]
    }
  ]
}
An example list filled with two options can be seen below. Please note that within the options object, "text" (value->input->text) is the value that you set for an option.
{
  "generic": [
    {
      "response_type": "option",
      "repeat_on_reprompt": true,
      "options": [
        {
          "label": "iOS",
          "value": {
            "input": {
              "text": "iOS"
            }
          }
        },
        {
          "label": "Android",
          "value": {
            "input": {
              "text": "Android"
            }
          }
        }
      ]
    }
  ]
}
Please note: Please include a text message before defining the customer response list; otherwise, the conversation will not succeed and will escalate.
Pause/Delay
Note: Using the delay as a single/sole response from the bot to the consumer, is effectively a ‘no response’ action. Using this allows the bot to receive a consumer message without responding to the consumer.
Users can define a Pause type if they want to send some delay in responding. For adding this content type, the action step will need to select that will hold a pause response. Click on the "pause response type" and the pause form will be shown in Figure 2.7
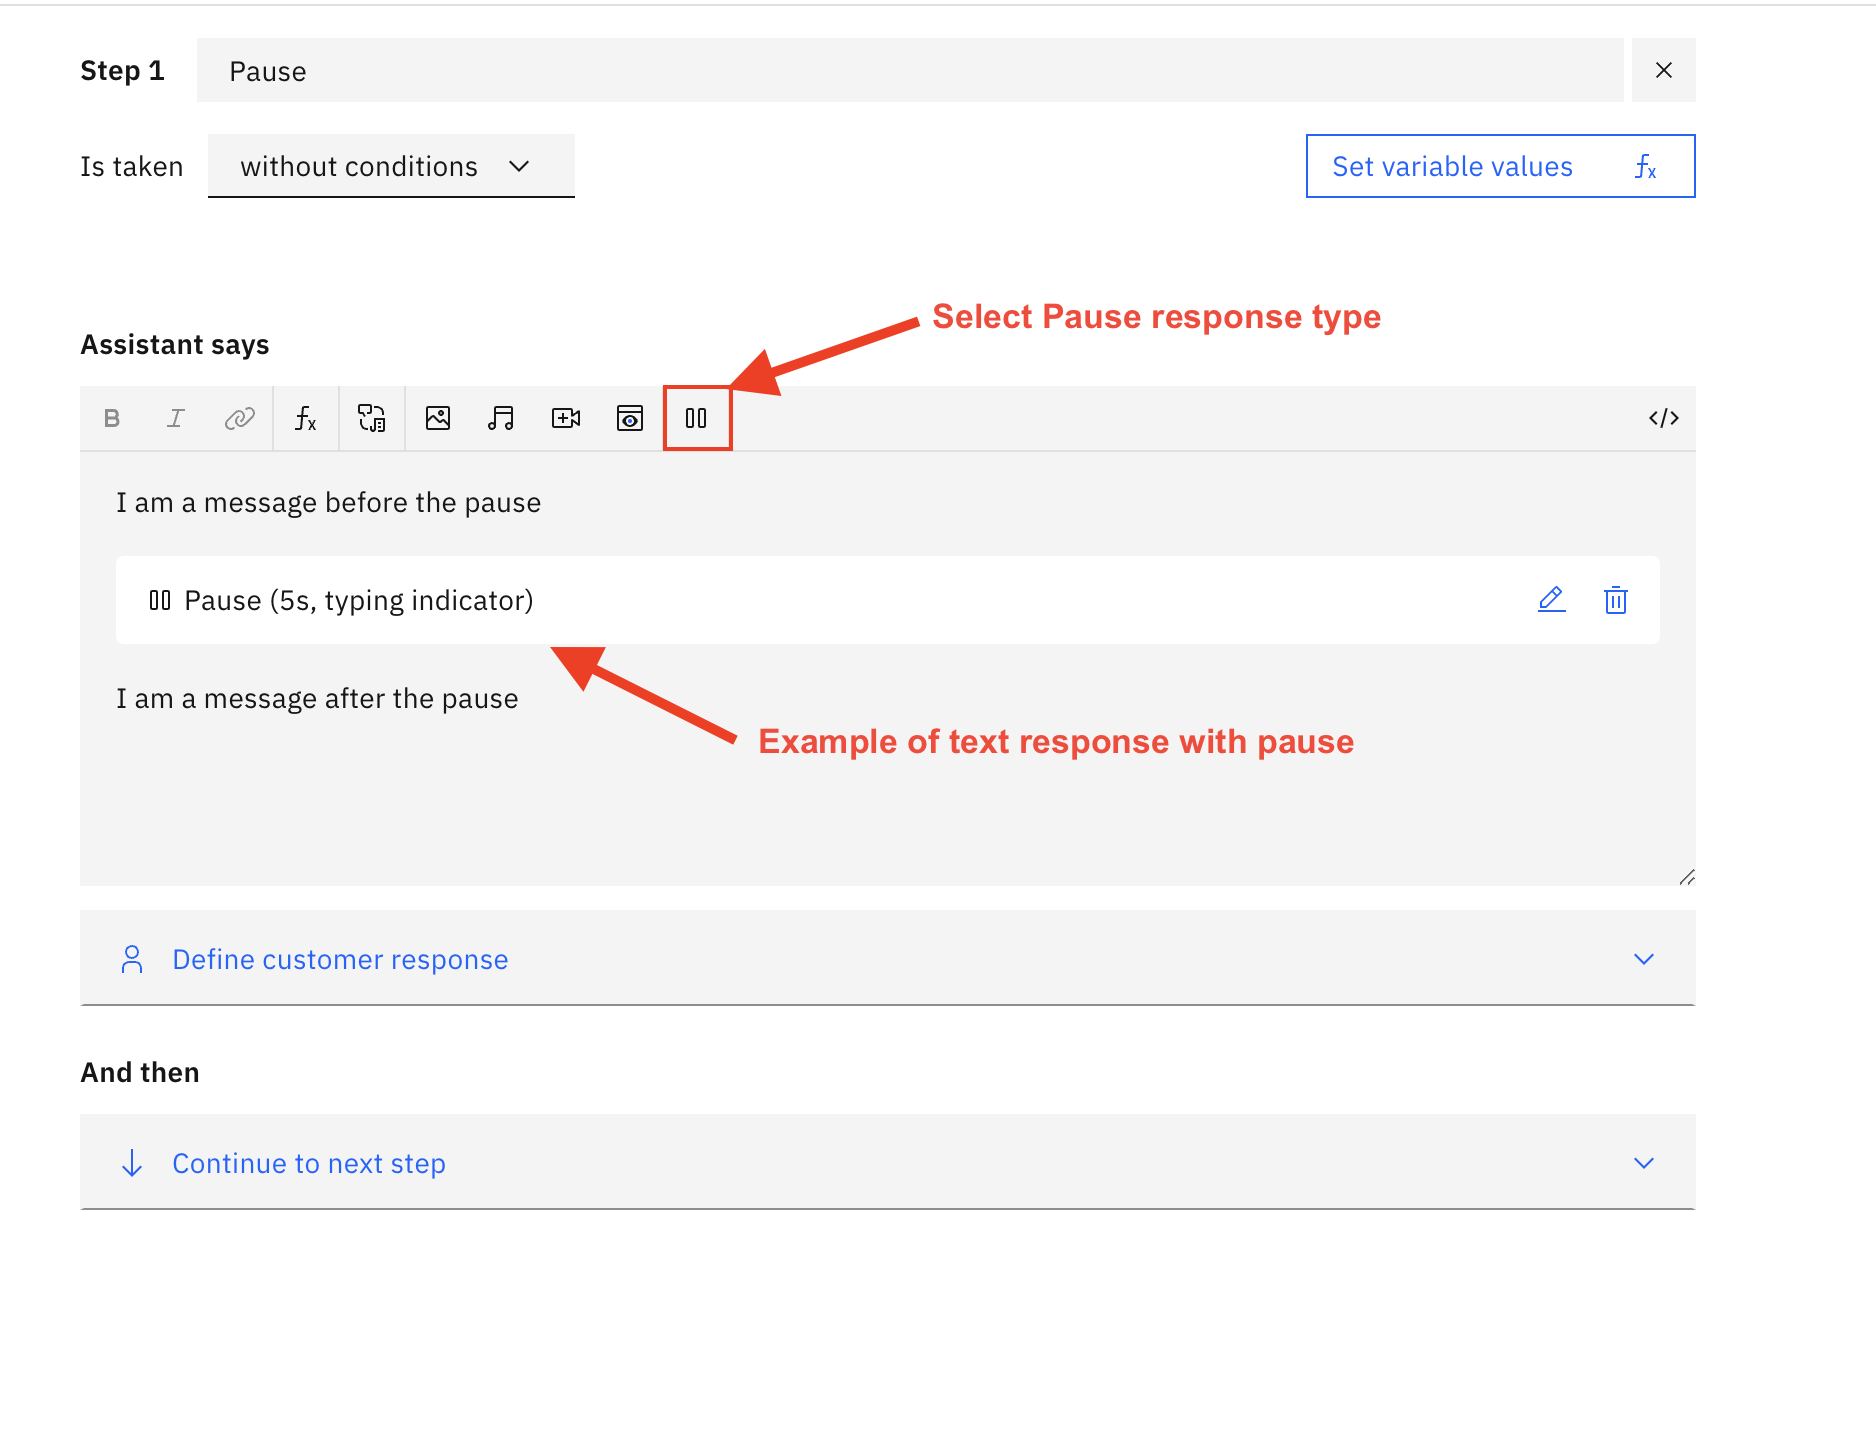
Figure 2.7 Pause response type is highlighted
Once the "Pause" is clicked the form will ask you to provide the duration (unit is in seconds). This allows the conversation to be paused for the amount of time defined in the "Duration" field. Moreover, If you want to show the user an indication of typing you can select that with Typing Indicator toggle. (An example filled form is shown in Figure 2.8). This will show an indication like "Agent is typing…" for the amount of time of delay that is set in "Duration".
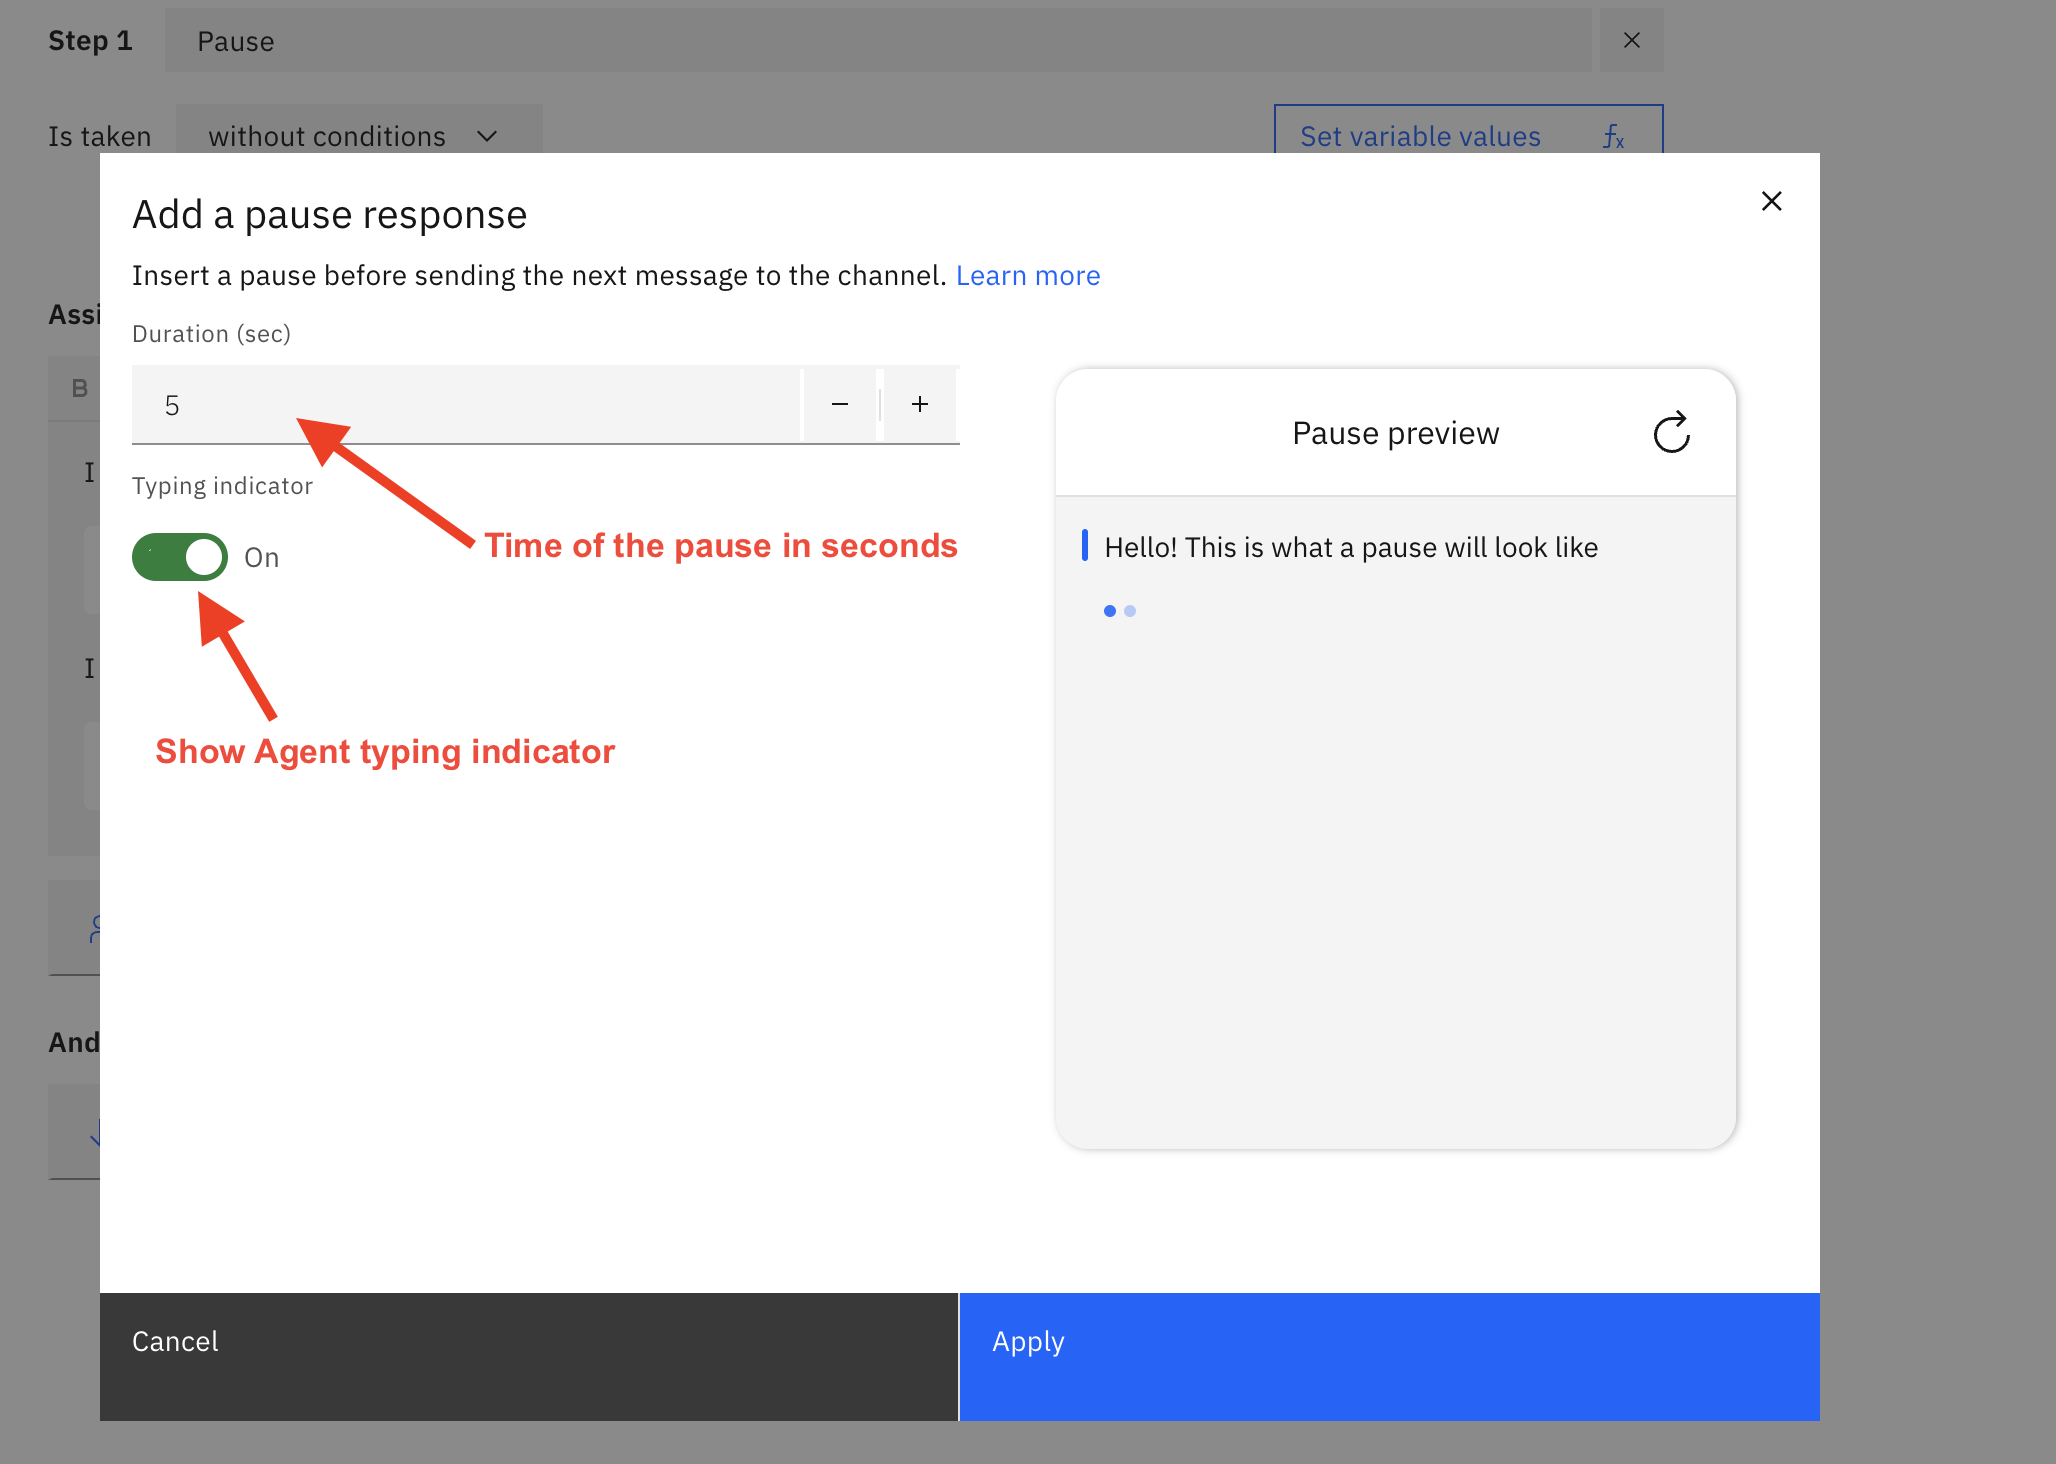
Figure 2.8 Pause fields filled example
If you are using JSON Editor you can use the following JSON structure to define a Pause content type. This example will pause for 5000 milliseconds with a typing indication on.
{
  "generic": [
    {
      "response_type": "pause",
      "time": 5000,
      "typing": true
    }
  ]
}
Text
Users can define a Text type to send some textual response. by directly typing the desired text using the response editor when the step is selected. You can add multiple response variations (an example filled is shown in Figure 2.9).
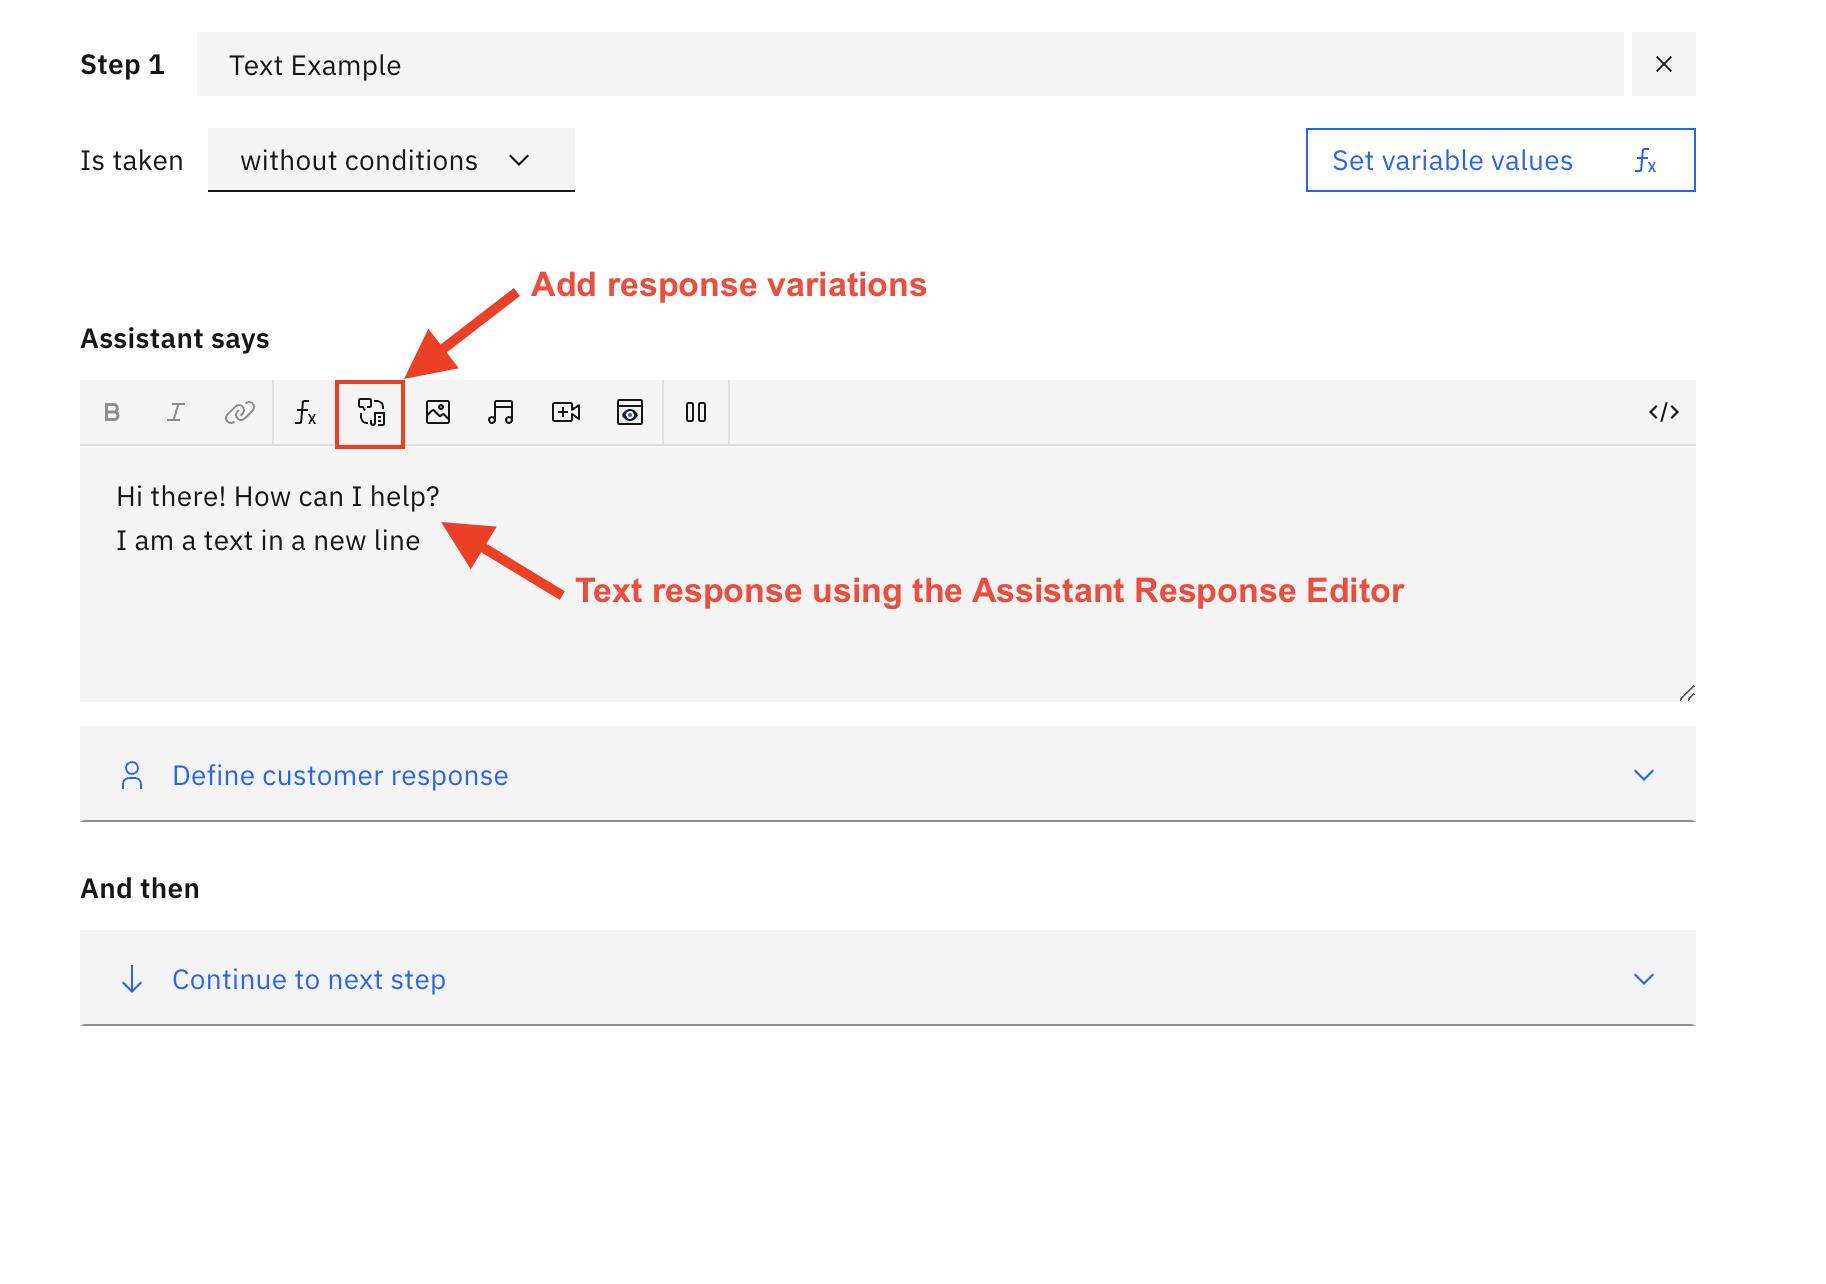
Figure 2.9 Text response filled example
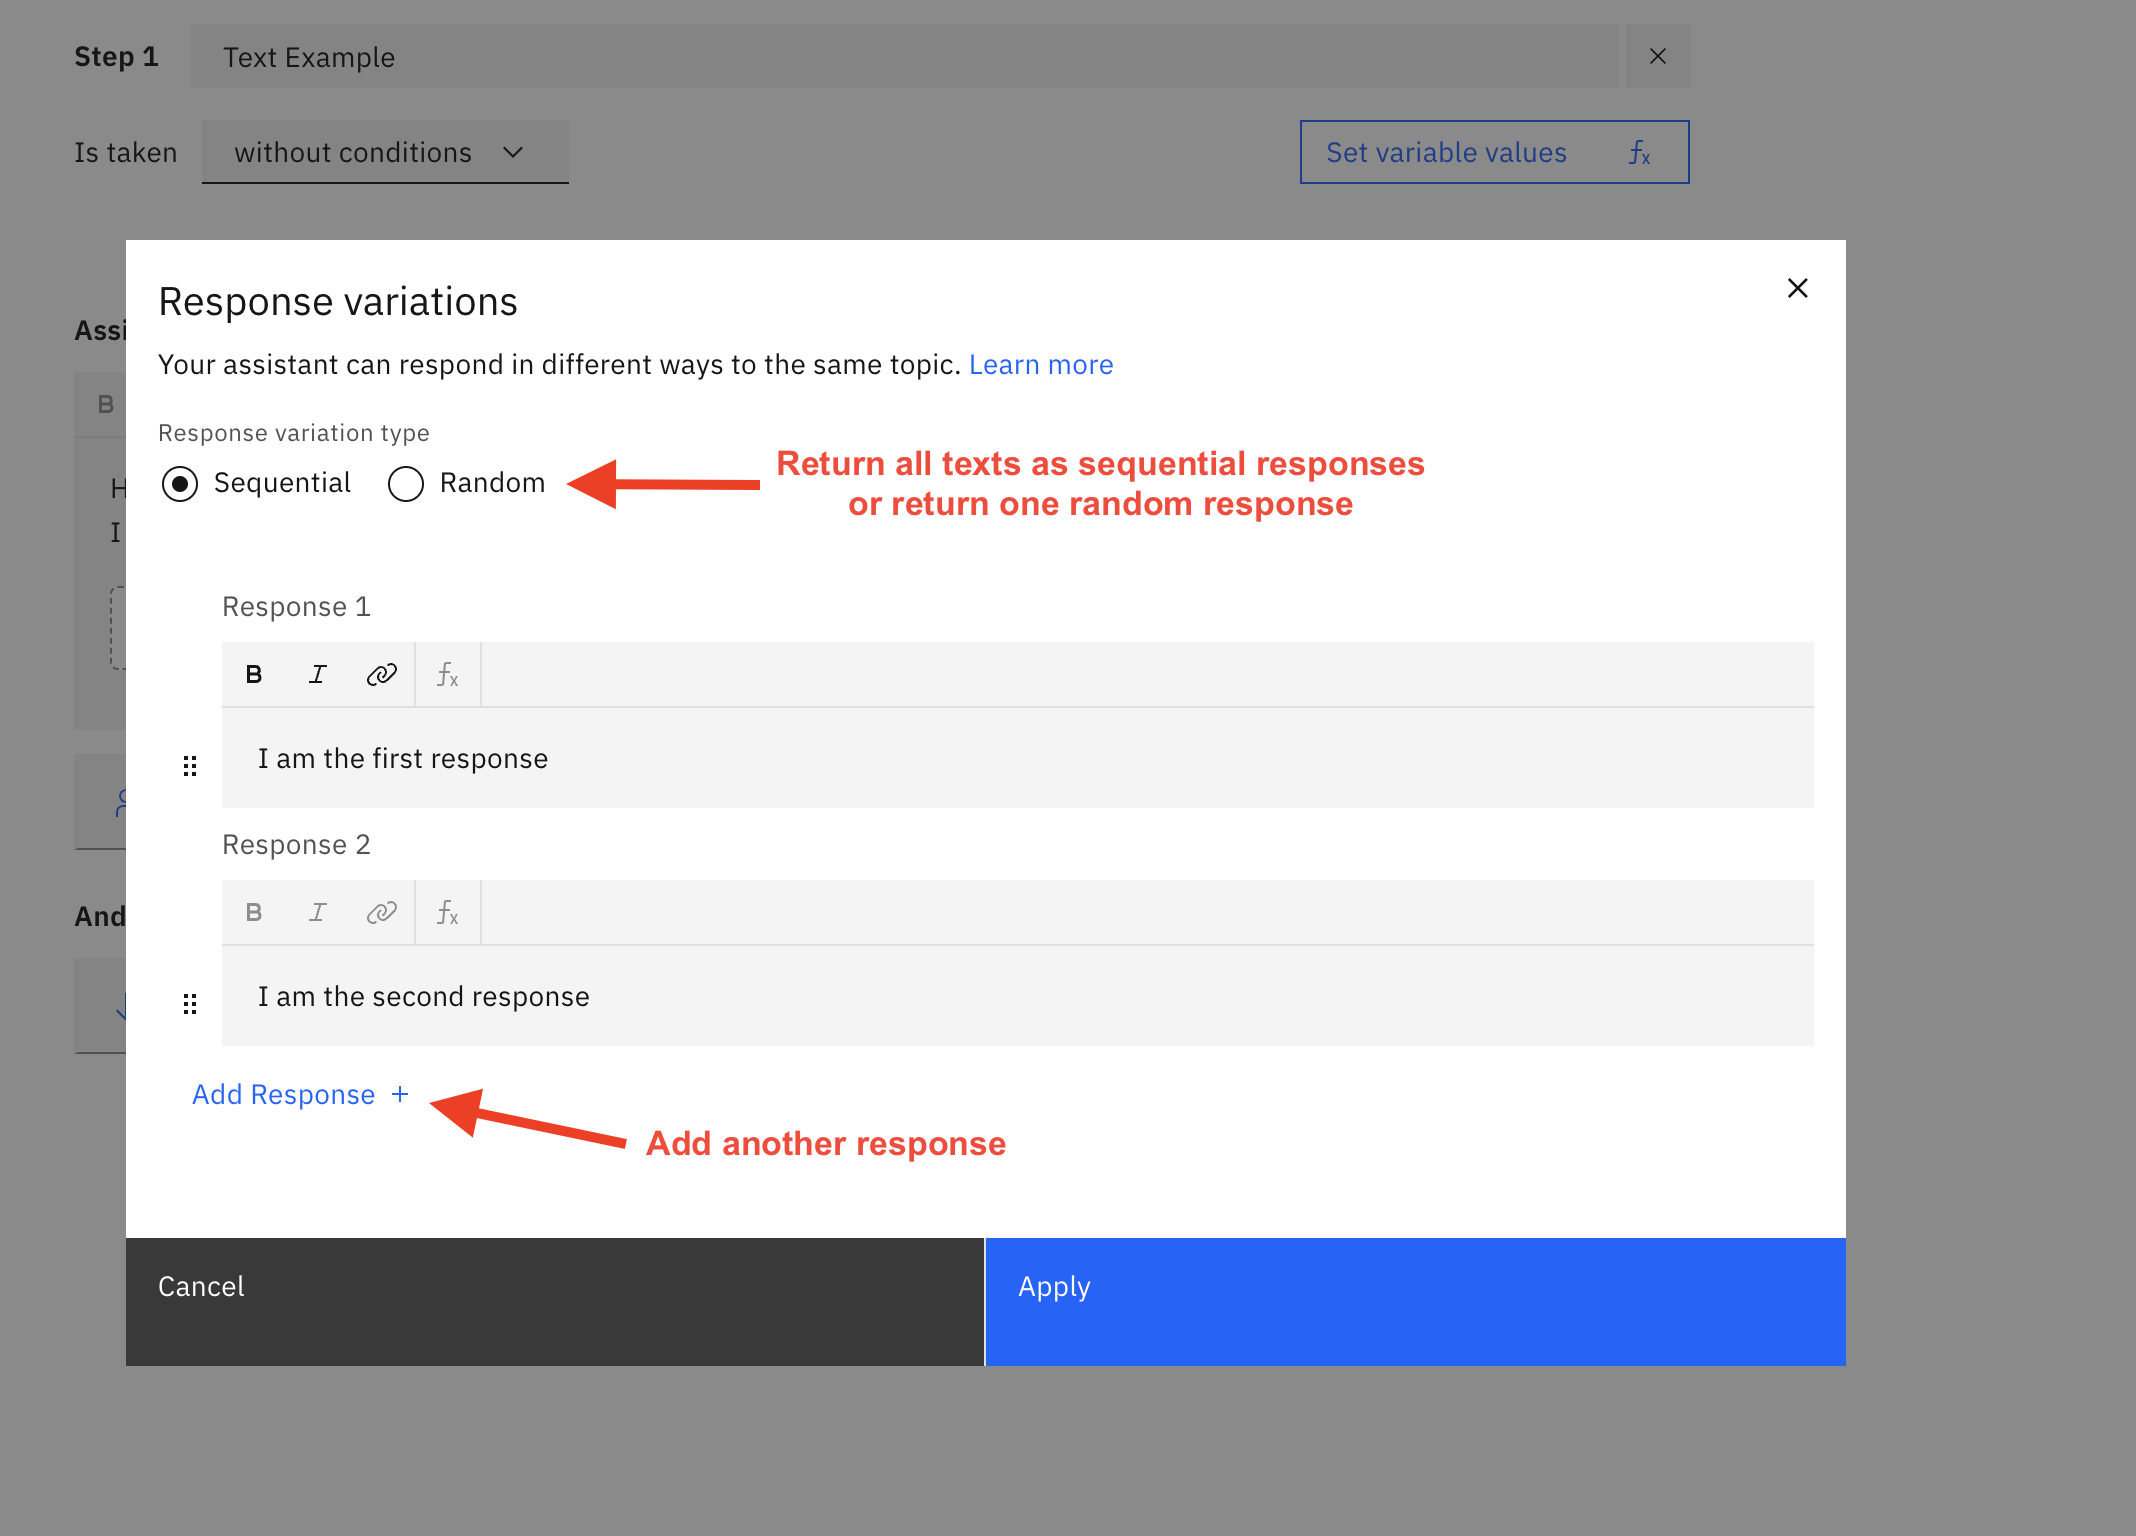
Figure 2.10 Text response variations example
If you are using JSON Editor you can use the following JSON structure to create text responses. The example below shows two text responses defined that will come sequentially.
{
  "generic": [
    {
      "response_type": "text",
      "values": [
        {
          "text_expression": {
            "concat": [
              {
                "scalar": "Hi there! How can I help"
              }
            ]
          }
        },
        {
          "text_expression": {
            "concat": [
              {
                "scalar": "I am happy to help"
              }
            ]
          }
        }
      ],
      "selection_policy": "sequential"
    }
  ]
}
Defining multiple responses with Watson Native content
Users can define a response with various content types. The following example shows a similar case using JSON Editor. The response will first send the text. Afterward, it will make a pause for 5 seconds and then finally send an image.
{
  "generic": [
    {
      "response_type": "text",
      "values": [
        {
          "text_expression": {
            "concat": [
              {
                "scalar": "Hi Good Morning!"
              }
            ]
          }
        },
        {
          "text_expression": {
            "concat": [
              {
                "scalar": "Hi Good Evening!"
              }
            ]
          }
        }
      ],
      "selection_policy": "sequential"
    },
    {
      "response_type": "pause",
      "time": 5000,
      "typing": true
    },
    {
      "response_type": "image",
      "source": "https://bgr.com/wp-content/uploads/2023/09/iphone-15-bgr-3.jpg",
      "title": "iPhone",
      "description": "iPhone concept example ",
      "alt_text": ""
    }
  ]
}
Transfer Conversation
When the Action step requires transferring the conversation to a live agent you can achieve that natively by selecting the Connect to agent option as shown in Figure 2.11
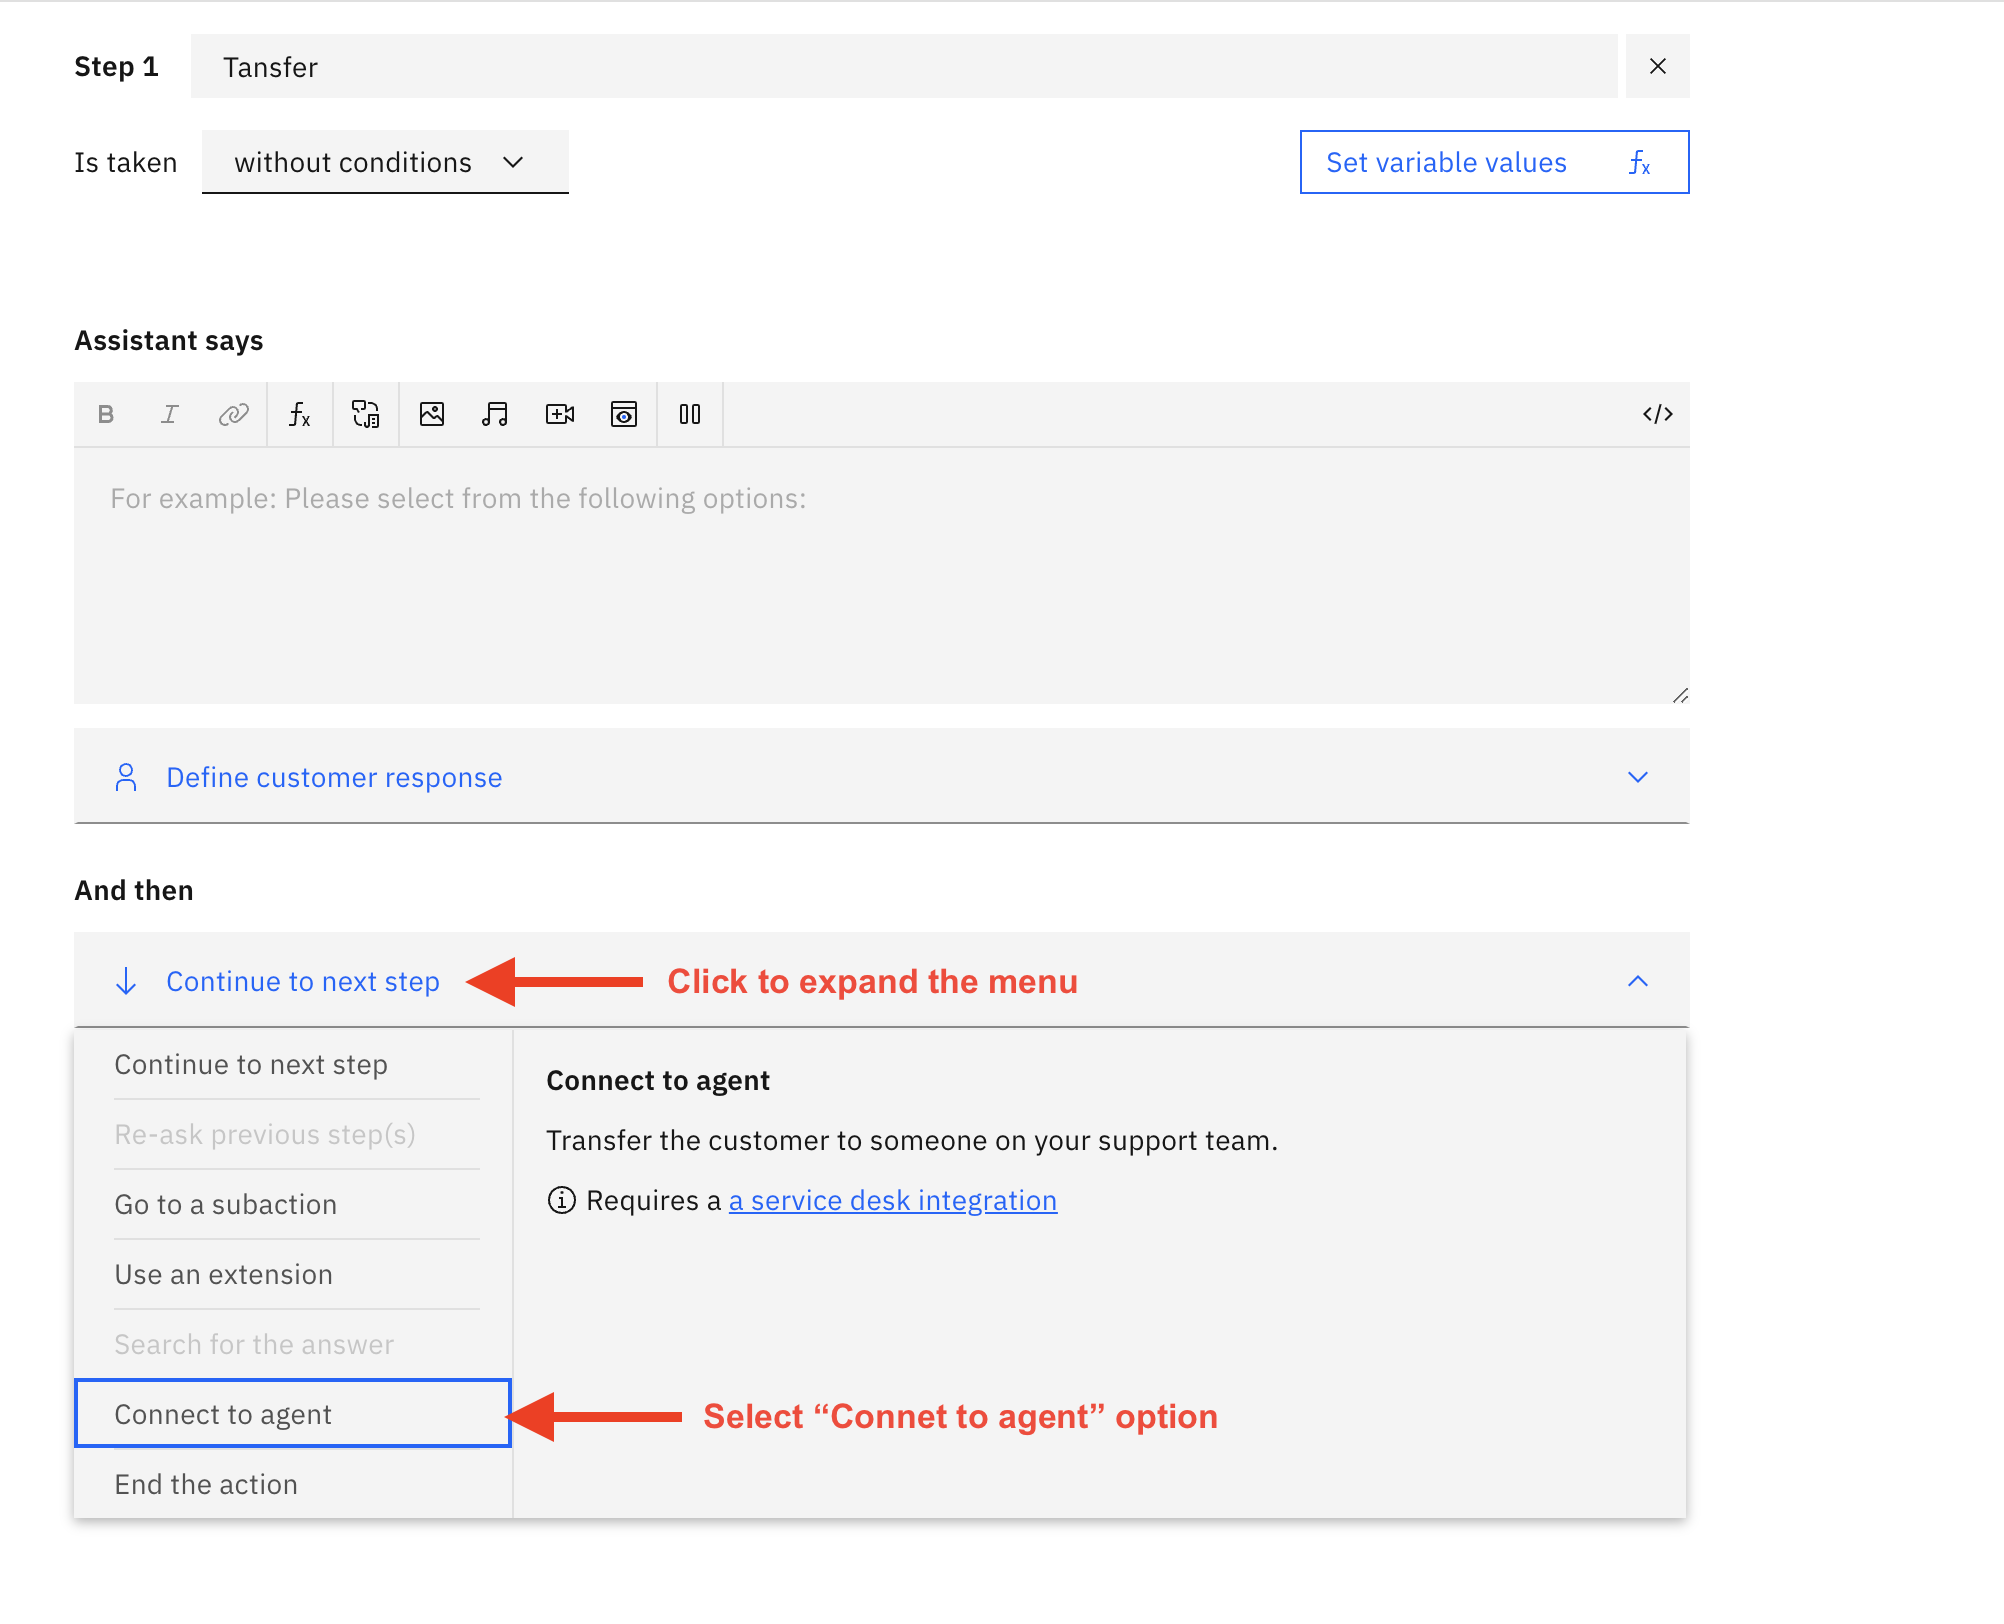
Figure 2.11 Watson Assistant Connect to agent transfer option
Once Connect to agent is selected you will be asked to fill in the transfer information. "Select integration" field please select other as it's the only supported option, then set the department option to the desired skill name. You can also show a transfer message to the consumer using the Response if agents are online field, and Message to agent (Optional) if you want to send a private text message to the support agent (example filled form is shown in Figure 2.12).
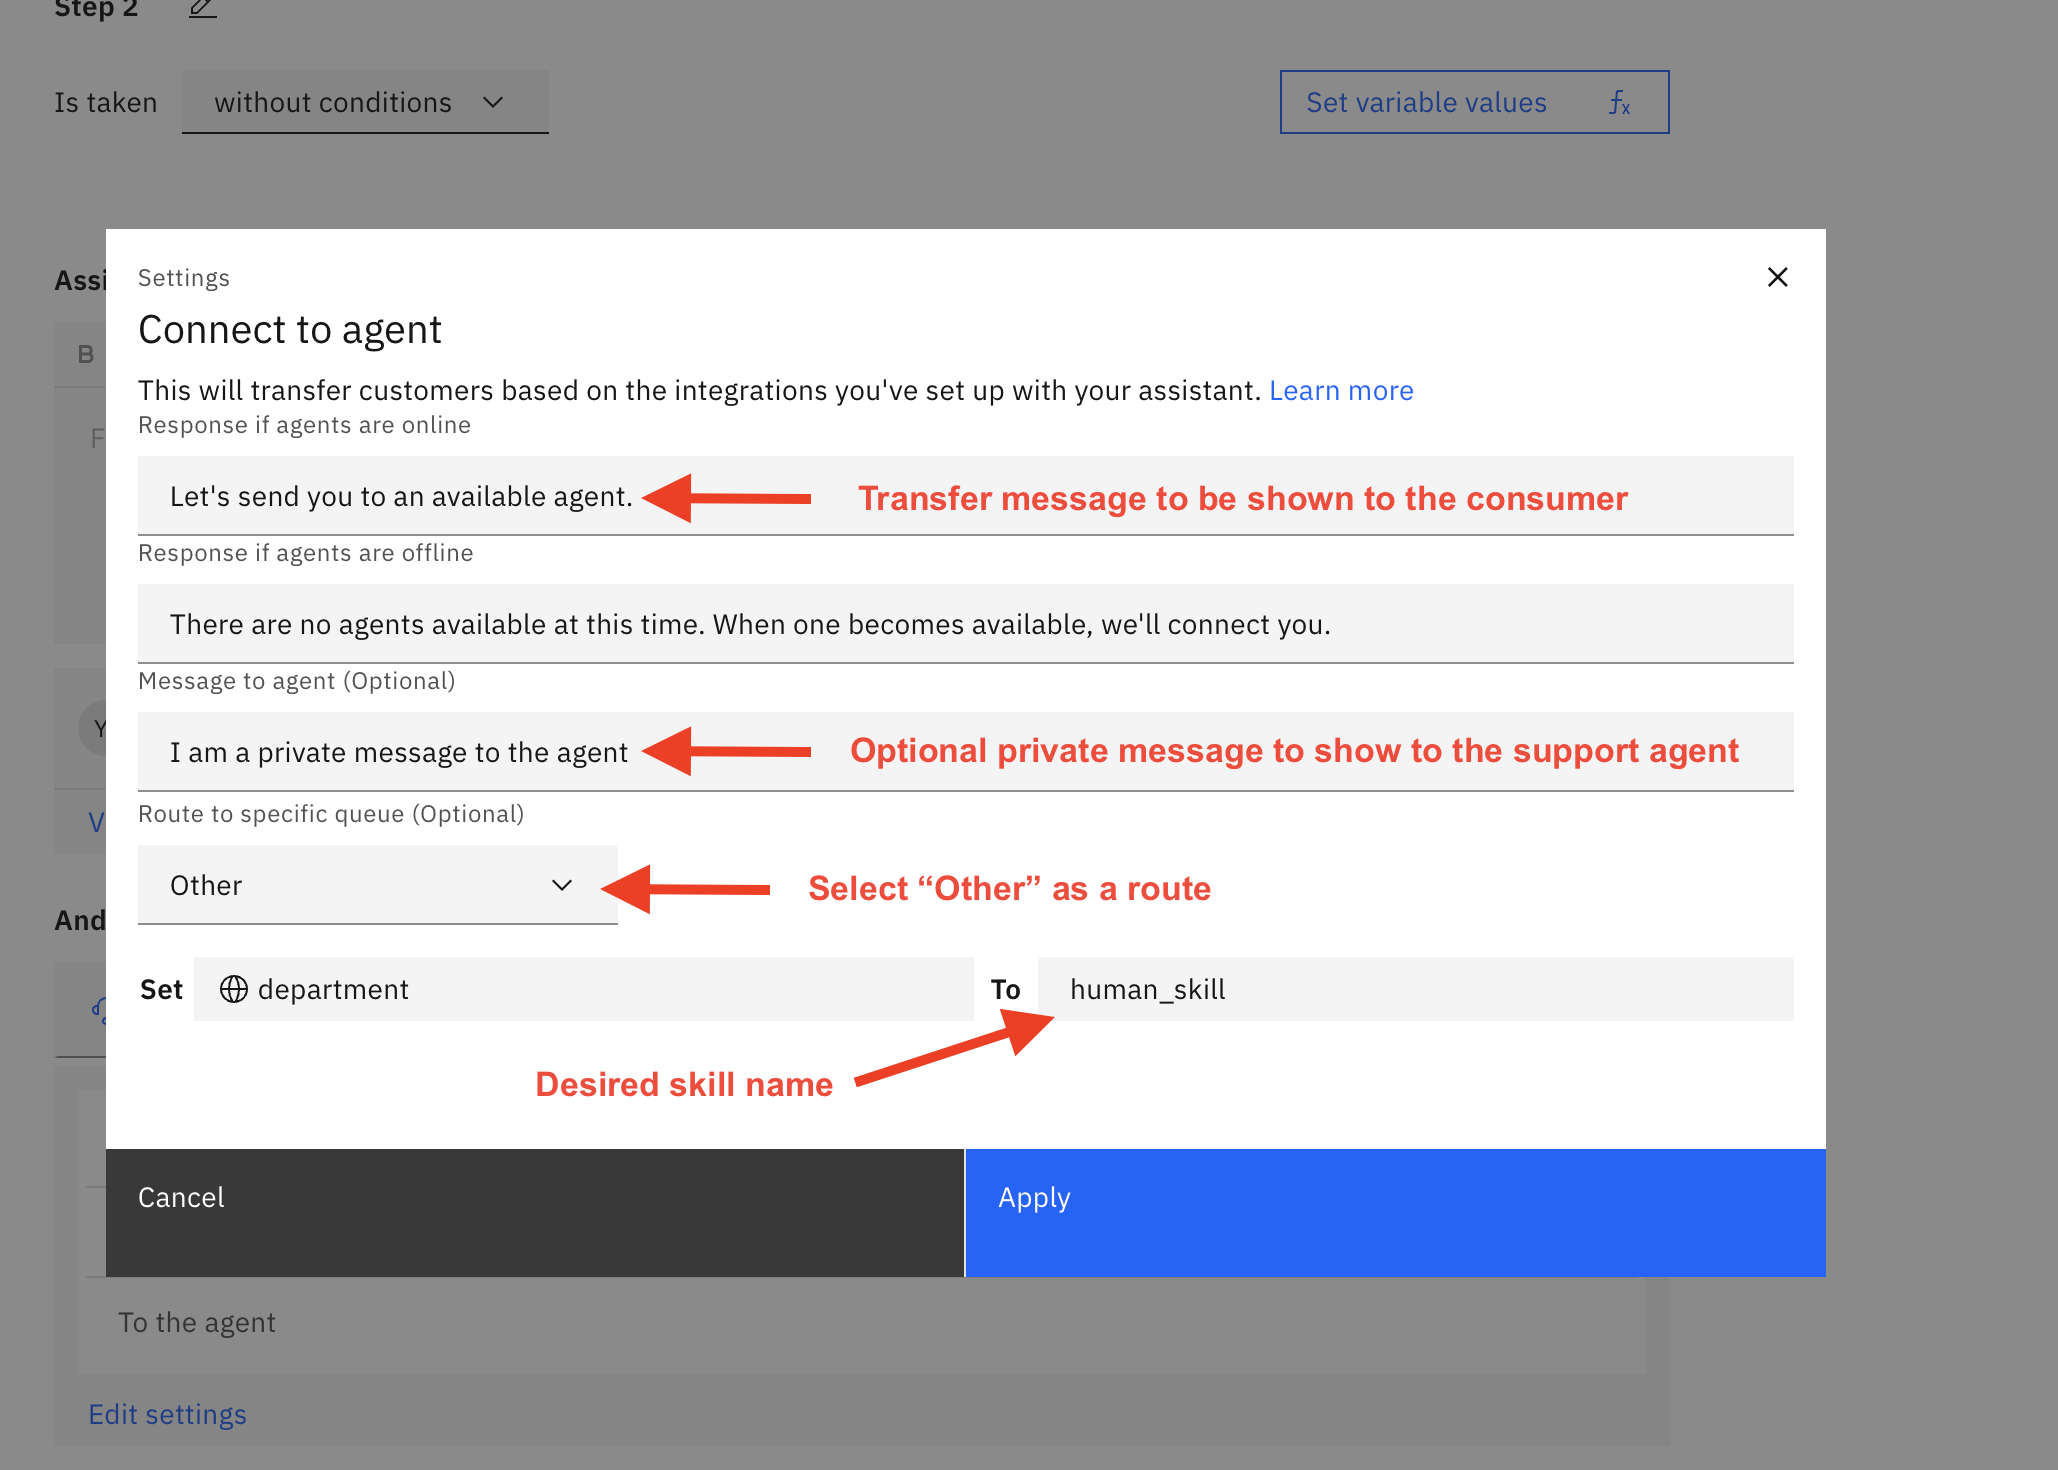
Figure 2.12 Watson Assistant Connect to agent filled form example
Please Note: The default Fallback action defined by Watson assistant needs to be configured to transfer the conversation to the desired skill name, if not configured the Fallback action will cause an error escalation
Sending Rich Content (Structured Content)
If Images are sent in Rich Content, then their URLs must be added to a whitelist via internal LivePerson
configuration (Houston: messaging.rich.content.valid.urls). Please note that you must add all possible
domains to this list manually as wildcards are not supported. Moreover, All domains must be HTTPS secure.
The core Conversational Cloud platform supports the use of rich/structured content. For more information on the format and functionality available, please refer to the documentation found here. As a result, the Bot Connector also supports this.
To send structured content via Watson Assistant you will need to send a custom JSON payload as a user_defined response type. To do this, you will need to select the action step that will hold the structured content.
From there, under the section Assistant says Click on the tags on the left of the editor toolbar to switch to JSON Editor (Figure 2.13)
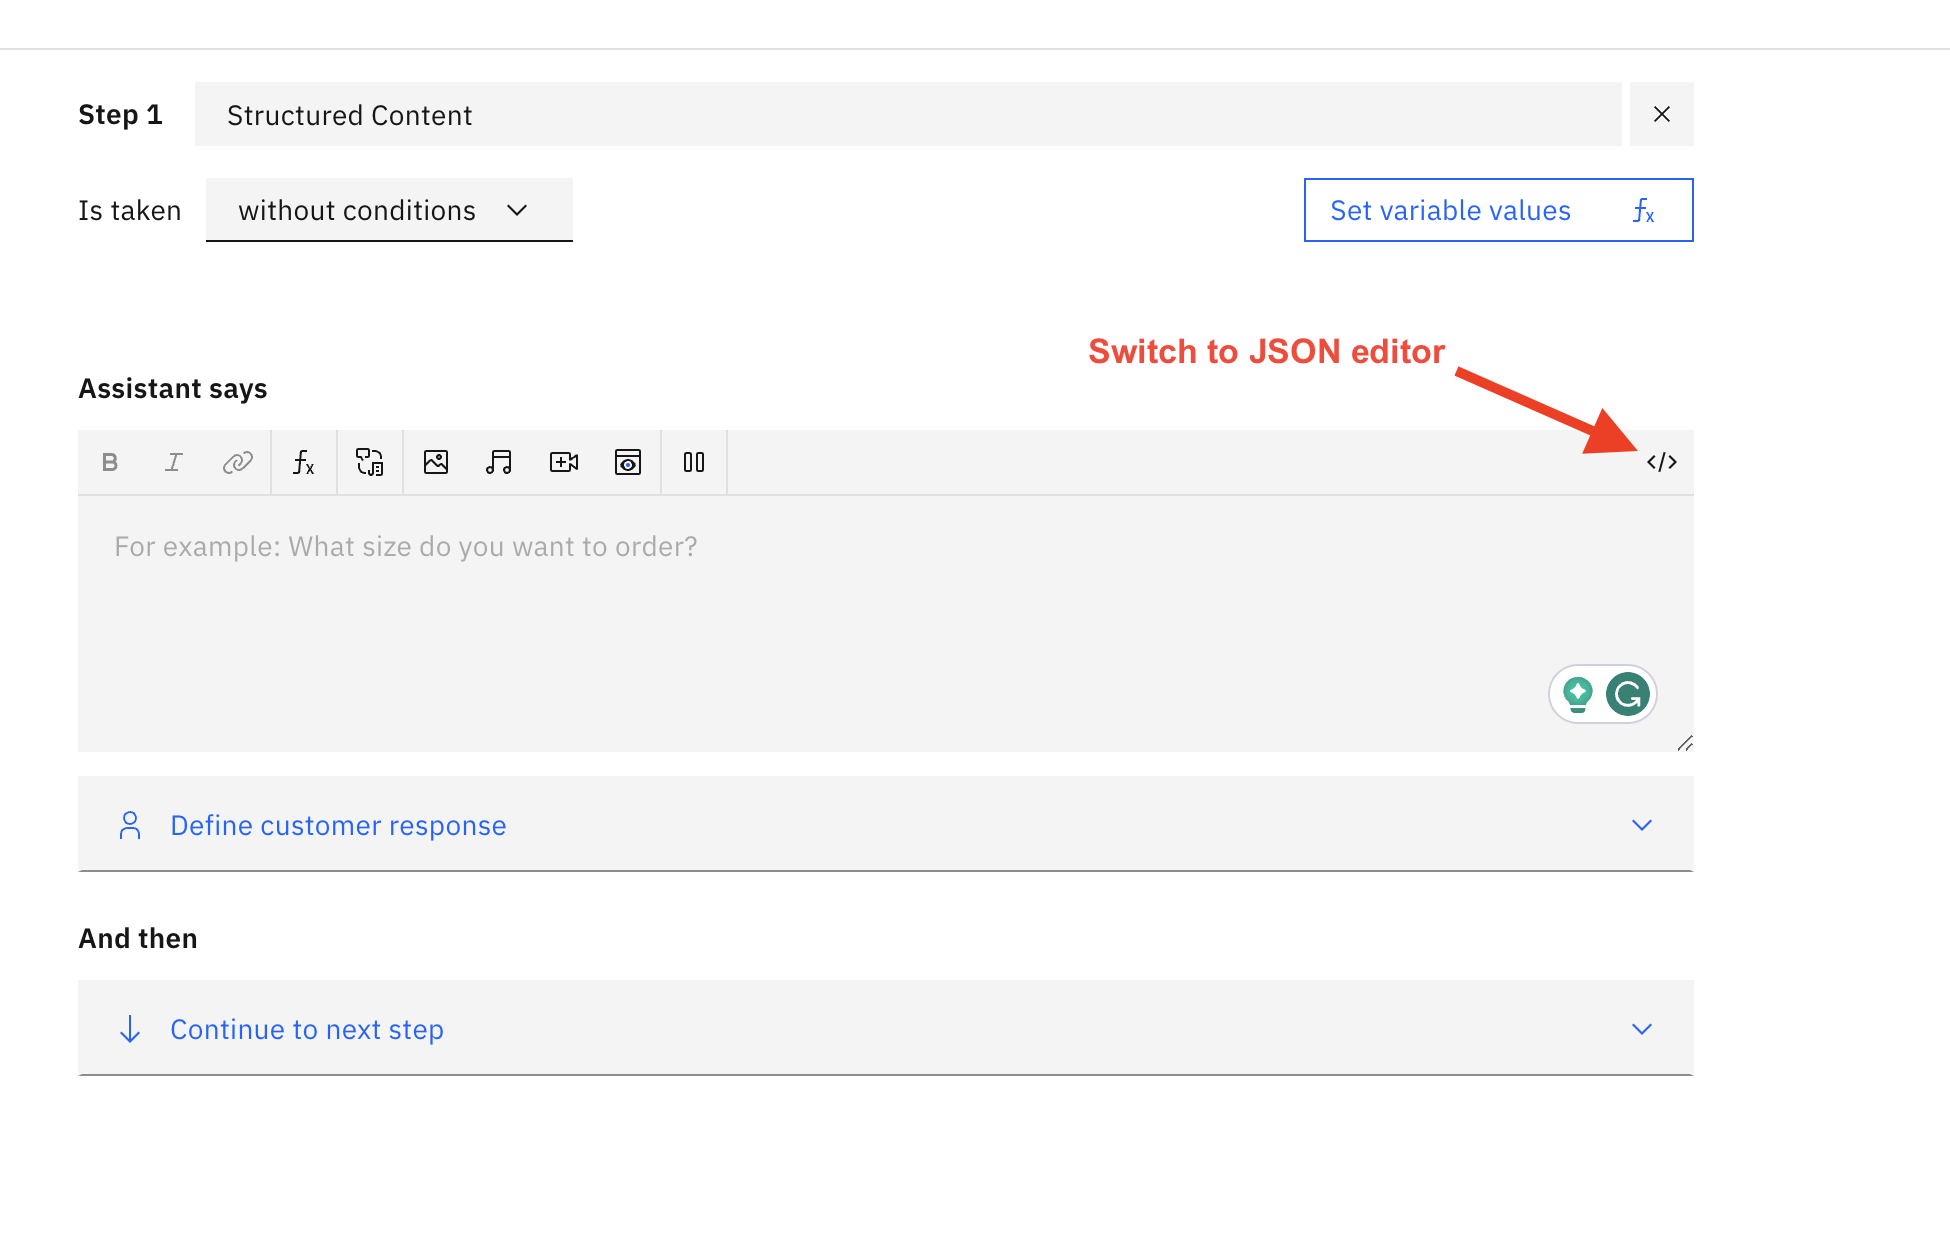
Figure 2.13 Watson Assistant Action JSON Editor
In the JSON Editor, you will need to add your custom JSON response (Figure 2.14).
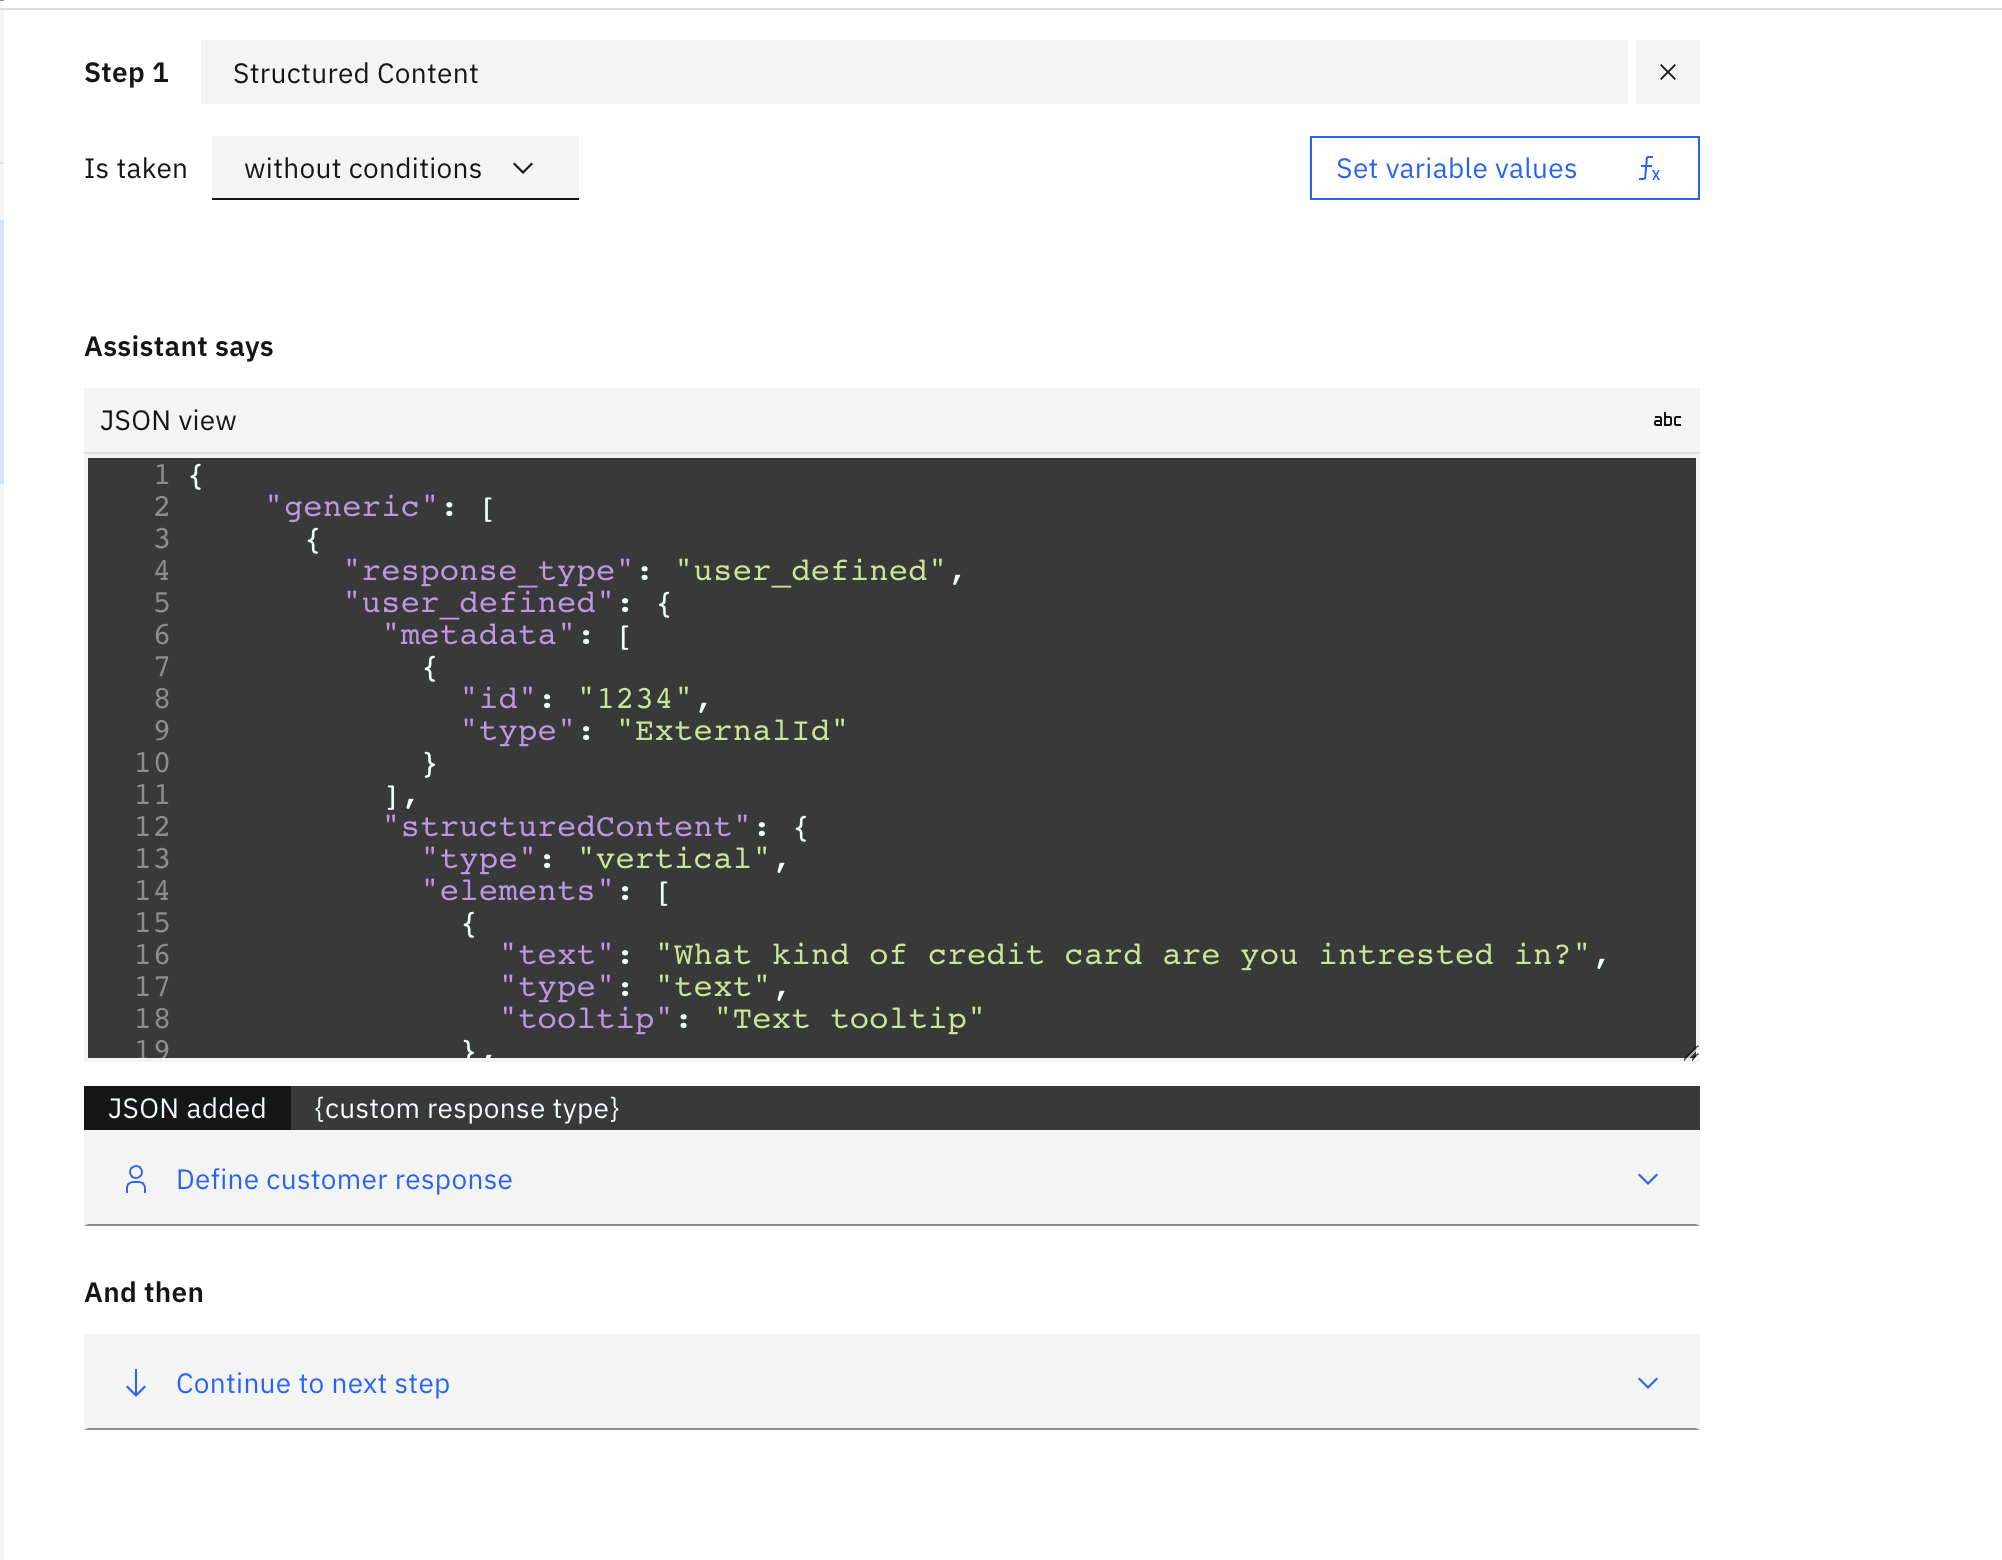
Figure 2.14 Watson Assistant JSON Editor
There is a strict JSON structure for the response that must be used. The JSON structure for a user_defined response can be found below in Figure 2.15. An example with a sample JSON that uses a standard Structured Content card with a button option in can be seen in Figure 2.16.
{
  "generic":[
    {
      "response_type": "user_defined",
      "user_defined": {
        "metadata": [
          {
            "id": "1234",
            "type": "ExternalId"
          }
        ],
        "structuredContent": {}
      }
    }
  ]
}
Figure 2.15 Structured Content Watson user_defined JSON Structure (JSON Editor should contain this object structure for Rich Content)
{
  "generic": [
    {
      "response_type": "user_defined",
      "user_defined": {
        "metadata": [
          {
            "id": "1234",
            "type": "ExternalId"
          }
        ],
          "structuredContent": {
          "type": "vertical",
          "elements": [
            {
              "type": "button",
              "click": {
                "actions": [
                  {
                    "text": "Recommend me a movie, please",
                    "type": "publishText"
                  }
                ]
              },
              "title": "Recommend a movie"
            }
          ]
        }
      }
    }
  ]
}
Figure 2.16 Structured Content Watson user_defined JSON Example (JSON Editor should contain this object structure for Rich Content)
Sending Quick Replies (Structured Content)
Please note Quick Replies are only supported in Messaging Conversations.
Quick Replies are a special kind of Structured Content. The content should be added to the quickReplies property of the structuredContent object and there also a message be included in the structuredContent object. This message will be sent to the customer along with the Quick Replies. For detailed information on Quick Replies check out the documentation for the specific channel (Mobile SDK and Web, Facebook Messenger, Google RCS Business Messaging).
{
  "structuredContent": {
    "quickReplies": {
      "type": "quickReplies",
      "itemsPerRow": 8,
      "replies": [
        {
          "type": "button",
          "tooltip": "yes I do",
          "title": "yes",
          "click": {
            "actions": [
              {
                "type": "publishText",
                "text": "yep"
              }
            ],
            "metadata": [
              {
                "type": "ExternalId",
                "id": "Yes-1234"
              }
            ]
          }
        },
        {
          "type": "button",
          "tooltip": "No!",
          "title": "No!",
          "click": {
            "actions": [
              {
                "type": "publishText",
                "text": "No!"
              }
            ],
            "metadata": [
              {
                "type": "ExternalId",
                "id": "No-4321"
              }
            ]
          }
        }
      ]
    },
    "message": "Message to send before sending QuickReplies content"
  },
  "metadata": [
    {
      "id": "1234",
      "type": "ExternalId"
    }
  ]
}
Figure 2.17 Quick Replies StructuredContent example.
Bot Actions
Please note we only support ONE ACTION per response
Transfer / Escalations
Naming conventions: Before going into actions and skills is the naming convention between each. All non-escalation actions are defined by using underscores. For example, in the case of closing a conversation, the action name returned by Watson needs to be CLOSE_CONVERSATION. Further down the line, if any additional functionality is added that can be called by an action from the AI, it will follow the same naming convention. For escalations, the naming convention for these skills should use a "-" instead of whitespace. Furthermore, if transferring to a skill, specifically assigned to bots, it’s best practice to prefix the skill name with "BOT-" within Conversational Cloud.
Transfer To Skill
This option transfers the conversation to the next available agent using the provided skill.
At the beginning of a chat session or when a messaging bot logs in, all the list of enabled skills on the account are retrieved, keyed by name and stored. When a transfer is requested by the bot, the target skill's name is searched in the stored list and its ID is retrieved and escalated to. In regards to Watson Assistant, this should be configured in the following way:
Parameters: ‘skill’ (case-sensitive) with ‘value’ of skill name (case-sensitive) in Conversational Cloud.
![]()
Figure 2.18 Watson Assistant JSON response for transfer chat/conversation to a skill
{
  "generic": [
    {
      "values": [
        {
          "text_expression": {
            "concat": [
              {
                "scalar": "Escalating to a human"
              }
            ]
          }
        }
      ],
      "response_type": "text",
      "selection_policy": "sequential"
    },
    {
      "response_type": "user_defined",
      "user_defined": {
        "actions": [
          {
            "name": "TRANSFER",
            "type": "client",
            "parameters": {
              "skill": "human_skill"
            },
            "result_variable": "none"
          }
        ]
      }
    }
  ]
}
In the example above, you can see the user_defined response type containing the actions array. Inside the array, we define an escalation skill name in the skill parameter. This will be sent in an object to the chat/messaging connector, which will grab the skillId from a previously stored array based on the name, and escalate.
Transfer to Agent
This feature is depending on permissions
This option transfers the conversation to the particular agent matching the provided agentId and skill. If the agent is not available, the conversation will be transferred to an available agent with the same skill
Parameters: ‘skill’ (case-sensitive) with ‘value’ of skill name (case-sensitive) in Conversational Cloud. ‘agentId (case-sensitive) with ‘value’ of agentId in Conversational Cloud.
![]()
Figure 2.19 Watson Assistant JSON response for transfer chat/conversation to a specific agent
In the Then respond with: JSON editor block, use the following:
{
  "generic": [
    {
      "values": [
        {
          "text_expression": {
            "concat": [
              {
                "scalar": "Escalating to an agent"
              }
            ]
          }
        }
      ],
      "response_type": "text",
      "selection_policy": "sequential"
    },
    {
      "response_type": "user_defined",
      "user_defined": {
        "actions": [
          {
            "name": "TRANSFER",
            "type": "client",
            "parameters": {
              "skill": "human_skill",
              "agentId": "4129463410"
            },
            "result_variable": "none"
          }
        ]
      }
    }
  ]
}
Close Conversation
To close a chat or messaging conversation, we utilize the action object as we did for a transfer (see Figure 2.18). In Figure 2.20 below, the Watson Assistant JSON response should be mirrored as follows:
{
  "generic": [
    {
      "values": [
        {
          "text_expression": {
            "concat": [
              {
                "scalar": "Thanks for chatting with us today!"
              }
            ]
          }
        }
      ],
      "response_type": "text",
      "selection_policy": "sequential"
    },
    {
      "response_type": "user_defined",
      "user_defined": {
        "actions": [
          {
            "name": "CLOSE_CONVERSATION",
            "type": "client",
            "result_variable": "none"
          }
        ]
      }
    }
  ]
}
Figure 2.20 Watson Assistant JSON response for closing chat/conversation
To close a conversation without triggering a post-conversation survey, see the example below in Figure 2.21:
{
  "generic": [
    {
      "values": [
        {
          "text_expression": {
            "concat": [
              {
                "scalar": "Thanks for chatting with us today!"
              }
            ]
          }
        }
      ],
      "response_type": "text",
      "selection_policy": "sequential"
    },
    {
      "response_type": "user_defined",
      "user_defined": {
        "actions": [
          {
            "name": "CLOSE_CONVERSATION",
            "type": "client",
            "parameters": {
              "withoutPcs": true
            },
            "result_variable": "none"
          }
        ]
      }
    }
  ]
}
Figure 2.21 Watson Assistant JSON response for closing conversations without pcs
Change Time To Response of Conversation
Change the TTR of a conversation based on the action response of Watson. There are 3 different types. "URGENT", "NORMAL", "PRIORITIZED". The time values of these are defined in the Agent Workspace.
{
  "generic": [
    {
      "values": [
        {
          "text_expression": {
            "concat": [
              {
                "scalar": "Sure thing! Change the TTR to Urgent."
              }
            ]
          }
        }
      ],
      "response_type": "text",
      "selection_policy": "sequential"
    },
    {
      "response_type": "user_defined",
      "user_defined": {
        "actions": [
          {
            "name": "CHANGE_TTR",
            "type": "client",
            "parameters": {
              "ttrType": "URGENT"
            },
            "result_variable": "none"
          }
        ]
      }
    }
  ]
}
Figure 2.22 Watson JSON response for changing TTR