
Best practices
Review our best practices for writing articles.
Add an article
An article is a focused piece of content (a message) on a single topic that you want to serve to consumers.
Learn about article best practices and limits.
To add an article to an internal knowledge base
- Open the knowledge base.
- Click Articles in the menu in the upper-left corner.
- Click Add article in the upper-right corner.
- Specify the following basic settings:
- Title: Enter a complete sentence or question, e.g., "I can't remember my password." or, "Do we have a company org chart?"
- Intent Qualifiers: This field is only shown if you're using Knowledge Base intents. Intent qualifiers are alternative ways that people ask for the article, i.e., alternative ways to communicate the same intent. An intent qualifier can't be used more than once, i.e., in more than one article.
- Intent: This field is only shown if the knowledge base is using Domain intents. If you're using intent matching to find and serve answers (see Search Methods), select the intent to associate with the article. If needed, you can use the Create intent option in the drop-down list to create the intent in Intent Manager from this location. Similarly, there's an Update training phrases link for updating the training phrases in Intent Manager from here. Note: An intent can't be used more than once, i.e., in more than one article. Also note that you don’t need to link your articles to intents right away, as the Intent field is optional. This is deliberate because it allows you to get started with a knowledge base by adding just the articles first. Then, you can create intents for the content you care about the most, and link those to the relevant articles. This means you can focus on specific content areas in your knowledge base, and manage the content overall with varying levels of effort on your part. The approach gives you flexibility as you maintain the knowledge base over time.
-
Summary: Enter a short response or message to be sent to the user.
You can include web links, although depending on the Messaging channel they might not display correctly. For example, for SMS, you might need to show the URL by itself, not wrapped in HTML, since the HTML will be sent as plain text over this channel. For the Voice channel, keep your URLs as short as possible too. They should take the form of “www.mysite.com,” i.e., without the “http://” that doesn’t convey well in a voice conversation.
Additionally, in this field you can use a subset of HTML, but not SSML for use in the Voice channel.
- Detail: This field can be used to include longer messages to the user, though we recommend that you keep the responses as brief as possible. The considerations regarding Web links, HTML, and SSML described above for the Summary apply here too.
- Category: To assign the article to a category, enter the category name. This lets you subsequently filter and find articles based on category in the KnowledgeAI application. Additionally, during a search, AI Search checks the input query against the category. Use only alphanumeric and underscore characters in the category name; only these are permitted.
- Tags: Tags are keywords, not sentences, that highlight the key noun(s) or word(s) in the title and intent qualifiers/training phrases. Tags can also be entities that you've defined in a domain in Intent Manager. To increase the accuracy of Knowledge Base search results, add tags. For example, for an article about health insurance, the tags should be "health", “insurance”, “benefits”. These should be words, not sentences. During a search, AI Search checks the input query against tags.
- If desired, click Advanced Settings, and specify the following:
- Valid From and Valid To: If desired, specify in UTC the dates and times during which the article is active. To specify a finite time period, use both date settings. To specify an open-ended date range, omit the Valid To date. To activate an article immediately after you add it, omit the Valid From date. These settings work with the Enable Article setting to determine if and when the article is active.
- Content: Use this field to send a hyperlink. Enter the URL here, and then configure the bot with the Knowledge Base integration accordingly. For help, see the next section.
- Audio: Use this field to send an audio file. Enter the URL here, and then configure the bot with the Knowledge Base integration accordingly. For help, see the next section.
- Image: Use this field to send an image. Enter the URL here, and then configure the bot with the Knowledge Base integration accordingly. For help, see the next section.
- Video: Use this field to send a video. Enter the URL here, and then configure the bot with the Knowledge Base integration accordingly. For help, see the next section.
-
Click Save.
By default, the article is disabled, which means it isn't returned in knowledge base searches in KnowledgeAI™ integrations. This is done to give you the opportunity to test the article before enabling it.
Add content links
You can use the content links in the Advanced Settings of an article to send rich content (hyperlink, audio, image, and/or video) along with an article.

Details on how to set this up follow below.
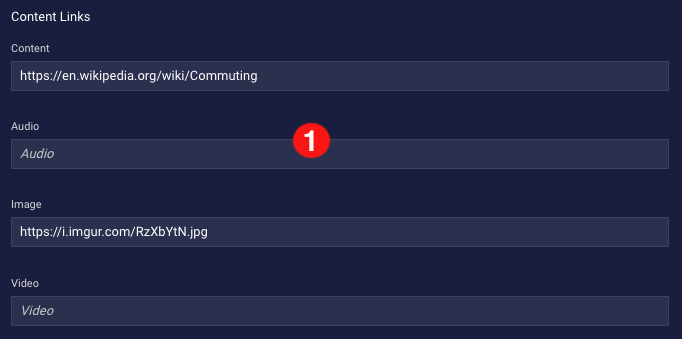
Configure the article
First, in the Advanced Settings of the article, enter the URLs to send (1).
The remainder of this information below is for the benefit of bot developers using a KnowledgeAI integration in a bot. However, there's a more powerful and simpler alternative that doesn't require a KnowledgeAI integration, namely, use of the Knowledge AI interaction in LivePerson Conversation Builder.
Configure the KnowledgeAI integration in the bot
Next, open Conversation Builder and navigate to the KnowledgeAI integration inside the bot that uses the knowledge base.
Verify that the appropriate knowledge base is selected (2), and then add custom data fields for the content links that you're using (3).
The "article" custom data field is added automatically when you add the Knowledge Base integration, but in this step you need to manually add additional custom data fields for the content links. For the values, specify the paths to the URL nodes in the JSON, like we've done in the image below.
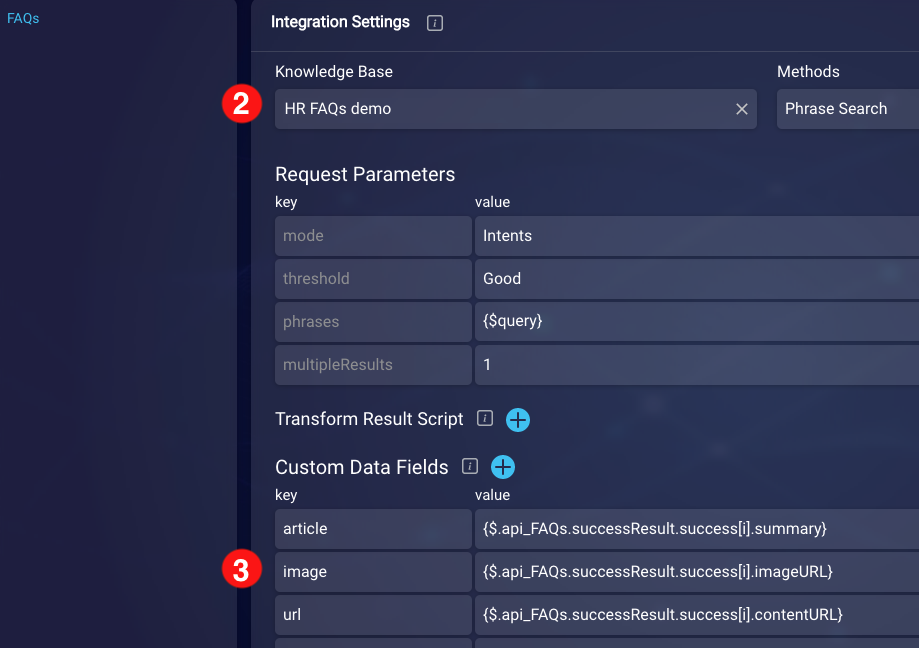
For the names of the JSON nodes for the content links, see the JSON reference farther below in this topic.
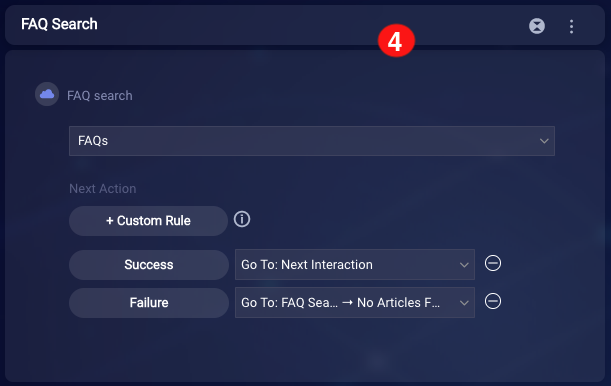
Configure the dialog in the bot
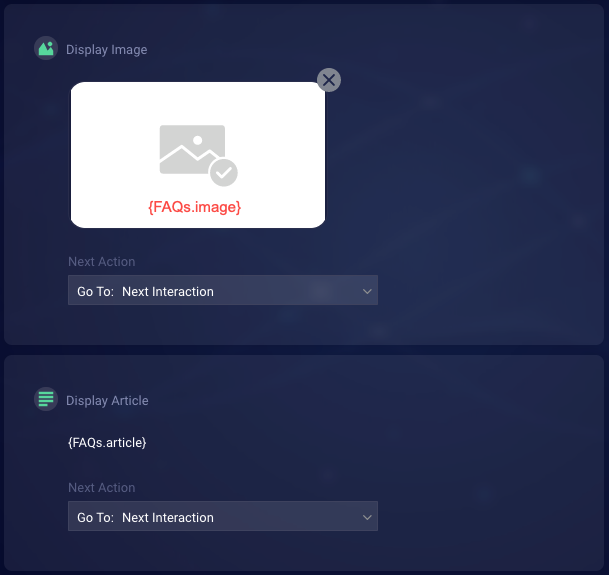
Next, still in Conversation Builder, build out the applicable dialog to make use of the additional content (4), i.e., use the custom data fields as you require. (For help on displaying variables in interactions, see this section.)
Preview the conversation
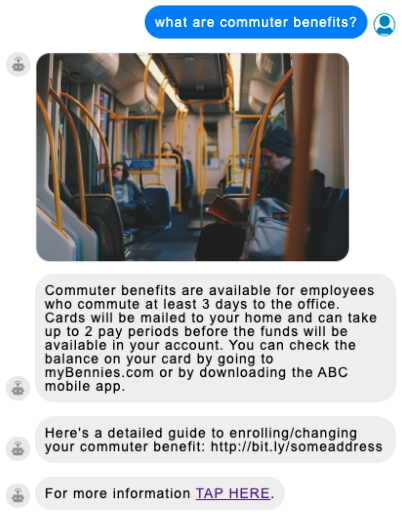
Use Conversation Builder's Preview tool to preview the conversation and verify the content is returned and rendered as you expect.
Useful techniques
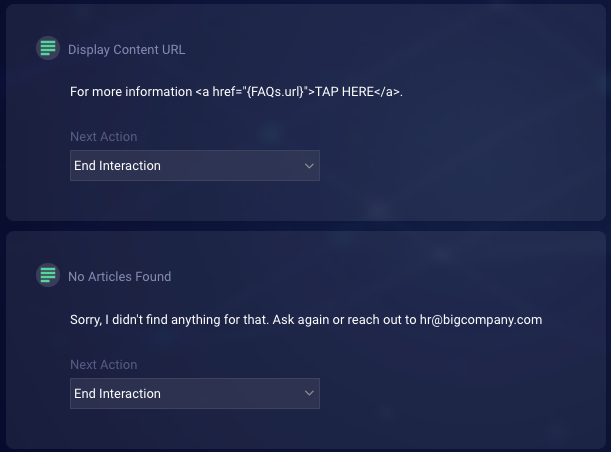
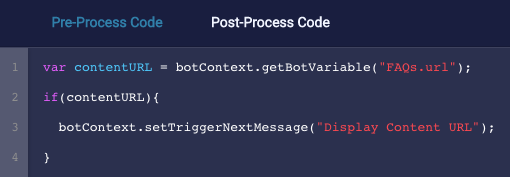
Continuing our example, we've added some JavaScript so that, if there's a content link that is returned by the integration call, it is displayed. And if there isn't one, the conversation ends after the article is sent.
To accomplish this, in the Display Article interaction, we've configured the next action to be "End Interaction." Then, we've added some Post-Process code to that same interaction. The code (shown below) checks whether the content link (URL) exists, and, if it does, it changes the interaction's next action to be the following interaction.
Enable or disable an article
Enabled articles are returned by knowledge base searches in KnowledgeAI integrations, while disabled articles are not. That said, keep in mind that an enabled article is returned only if the article is active, i.e., if the current date and time in UTC falls within the time period specified by the article's Valid From and/or Valid To dates, if specified.
To enable or disable an article
- Open the knowledge base, find the article, and click its title.
- In the Edit Article window, scroll down to Enable Article.
-
Do either of the following:
- Turn on (enable) the setting to enable the article.
- Turn off (disable) the setting to disable the article.
Format text in an article
In the Summary and Detail fields of an article in an internal knowledge base, you can use the following subset of HTML tags:
-
<p>and<br> -
<strong>,<b>and<i> -
<ul>,<ol>and<li> -
<a href="">, with support for HTTP, HTTPS, phone (tel) and email (mailto)
Examples of valid anchor tags:
<a href="https://example.com/test.jpg">click here</a><a href="https://example.com/1$2324%342523">click here</a><a href=”tel:+123456789”>phone</a><a href=”mailto:a.b@example.com”>email</a>
Examples of invalid anchor tags:
<a href="javascript: alert(’test’)">click here</a><a href="https://example.com/test.jpg" onmouseover="alert('test')”>click here</a><a onmouseover="alert('test')" href="https://example.com/test.jpg">click here</a>
If you're using an external knowledge base, where your content developers are authoring content in an external CMS, you can use the same HTML tags listed above.
The HTML tags render in Conversation Builder's Preview tool and in the Web messaging/chat window based on the capability of the respective tool, window, and channel in use. Be sure to test in the target channel to verify support.
Find an article to edit
- Open the knowledge base, and click Articles in the menu in the upper-left corner.
-
In the Search box at the top of the page, enter a word or phrase that’s contained in the article's content (title, summary, detail, tags).
If you enter a string and press Enter, the search is performed against only the title. However, if you enter a string and wait for the list of results to appear, that list of results reflects a search of the string against all article content fields (title, summary, detail, tags).

-
In the list that appears, select the article.
- Select the article title. This opens the article for editing.
Restore an earlier version of an article
In an internal knowledge base or an external knowledge that uses LivePerson AI, whenever someone changes an article’s content — that is, the title, the summary, the detail or a content URL — a back-up of the previous version of the article is automatically created. The system stores the three, most recent back-up versions that have been created, and you can restore one of these if desired.
Note the following:
- You can only restore an earlier version of the article’s content (title, summary, detail and content URLs). To change any other article property, you must modify the article directly.
- When applicable, a back-up version is also created due to a sync of updated content.
To restore an earlier version of an article
-
Open the knowledge base, and use the Search box at the top of the page to find the article.
-
Click the
 icon that's displayed on the right, and select Content Versions from the menu that appears.
The system displays the current version and the previous version of the article’s content. The date shown for each version reflects when it was created. The name shown is the user who created that version of the article.
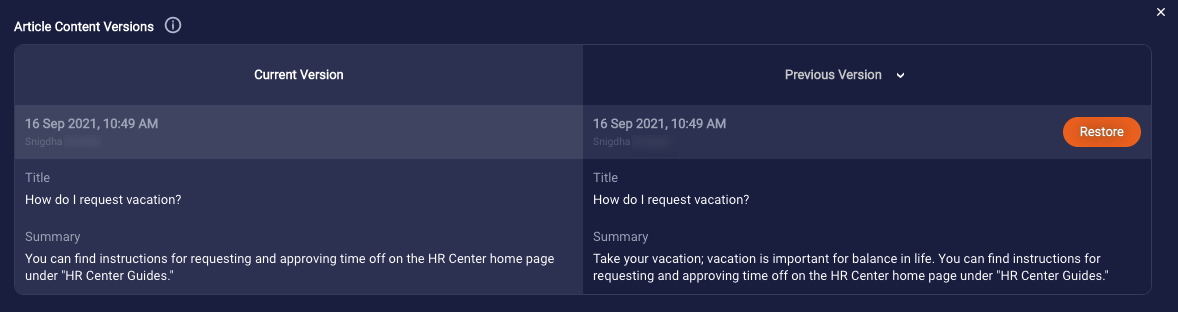
To display a different, earlier version (the last three are available), click the dropdown arrow beside Previous Version, and select the version from the list.
-
Review the earlier version. To restore it, click Restore.
This changes the current version so that it’s now the most recent back-up version, and the back-up version that you selected now becomes the current version of the article.
JSON reference
The following table identifies the JSON node for article information that's often needed when you're integrating the knowledge base with a bot.
| Name of UI field | Name of JSON node |
|---|---|
| Title | title |
| Summary | summary |
| Detail | detail |
| Content Links → Content | contentURL |
| Content Links → Image | imageURL |
| Content Links → Video | videoURL |
| Content Links → Audio | audioURL |