
The following guide is going to present customization for the Watson Assistant on how to implement functions specifically for IBM Watson. It is intended for users who are familiar with IBM Watson cloud dashboard. Continue if you are familiar with and have access to IBM Watson cloud dashboard.
Sending Encoded Metadata
The conversational Cloud Messaging platform provides a new metadata input type (“encodedMetadata”) for passing a base64 encoded metadata on a conversation. The new metadata input type is in addition to the existing conversation metadata input field. Third-party Bot also supports this property and this section will cover the information needed for you to send encoded metadata within your conversations. Before sending encoded metadata you must ensure the following conditions in order to successfully send the data.
- Common.EncodedMetadata AC feature is ON
- Content is base64 encoded
- Metadata size is limited to 5k
Failing to comply with the above validation points will cause the message to be dropped. This feature is only available for messaging conversations not for chat conversations
Encoded Metadata can be sent with simple Text, Rich Content (structured content), and Multiple responses. The encodedMetadata can be defined with a context editor or using the JSON editor (Figure 3.1). In both ways, Third-Party Bot leverages the context variables to send the encoded metadata. The encoded metadata is passed throughout the conversation responses unless it is overwritten by upcoming encodedMetadata. Then the upcoming encodedMetadata will be passed along with the responses.
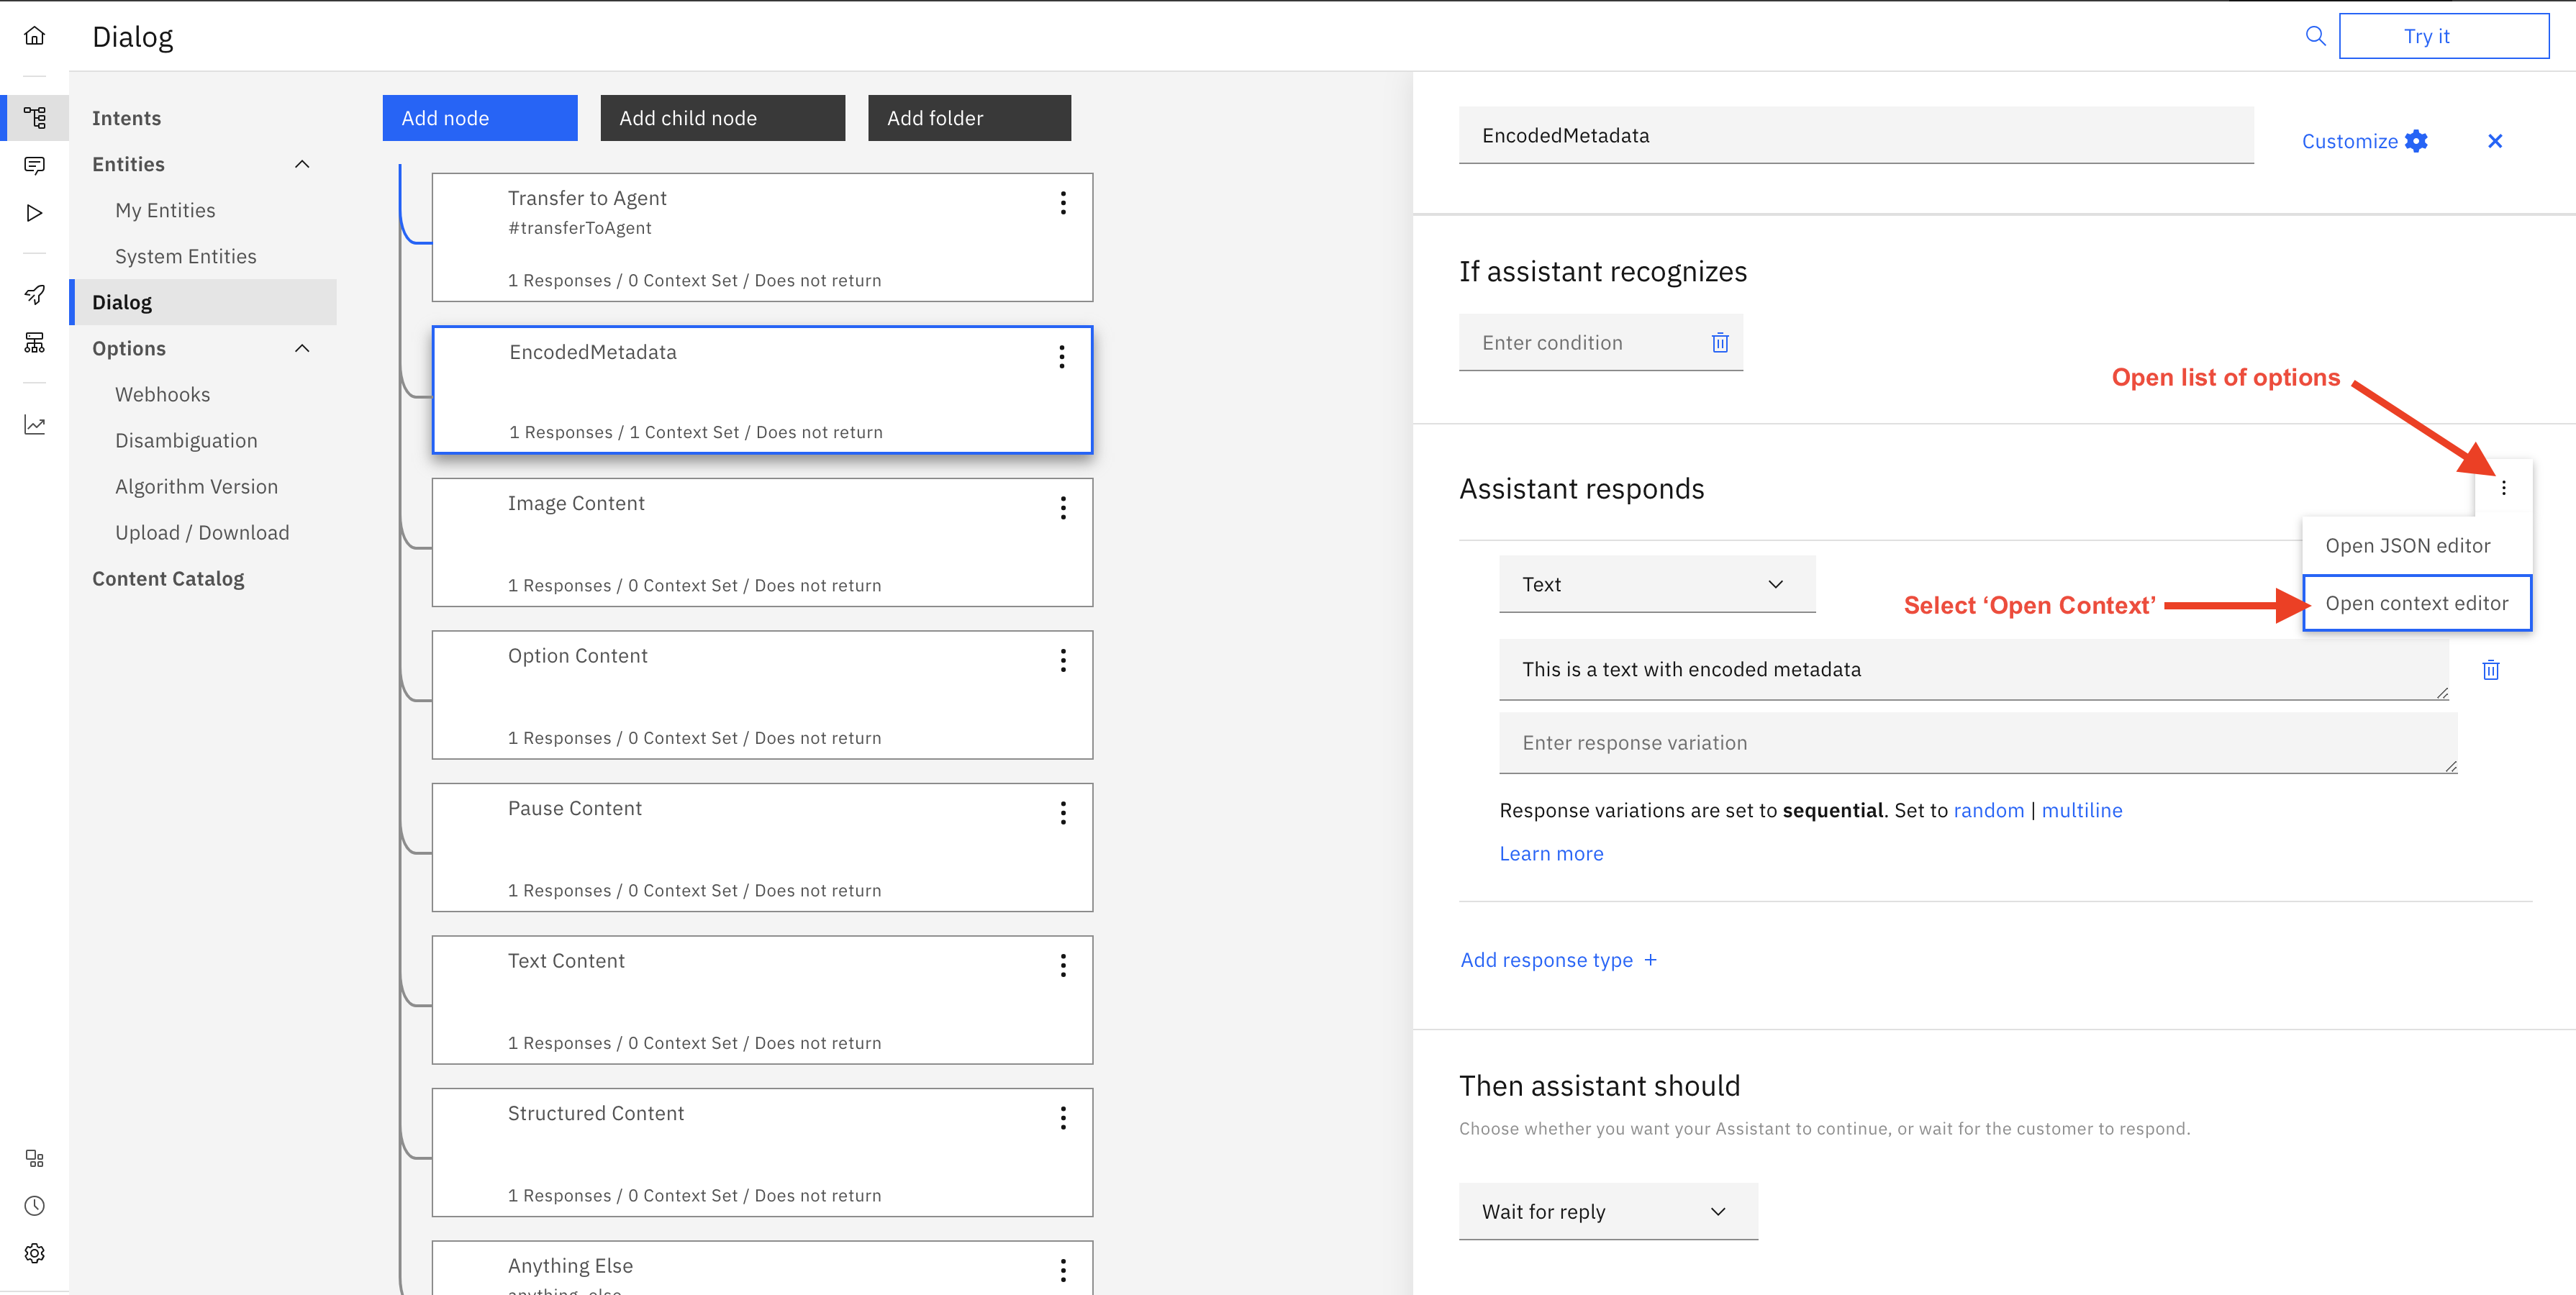 Figure 3.1 Showing options of JSON editor and context editor
Be careful with the camel-case characters encodedMetadata you must provide it exactly the same.
Sending Watson Native Content with Encoded Metadata
Sending encoded metadata with the Native Content (Text, Image, and Options) is possible using Watson's context editor or also through the JSON editor. An example response definition for both ways can be seen below:
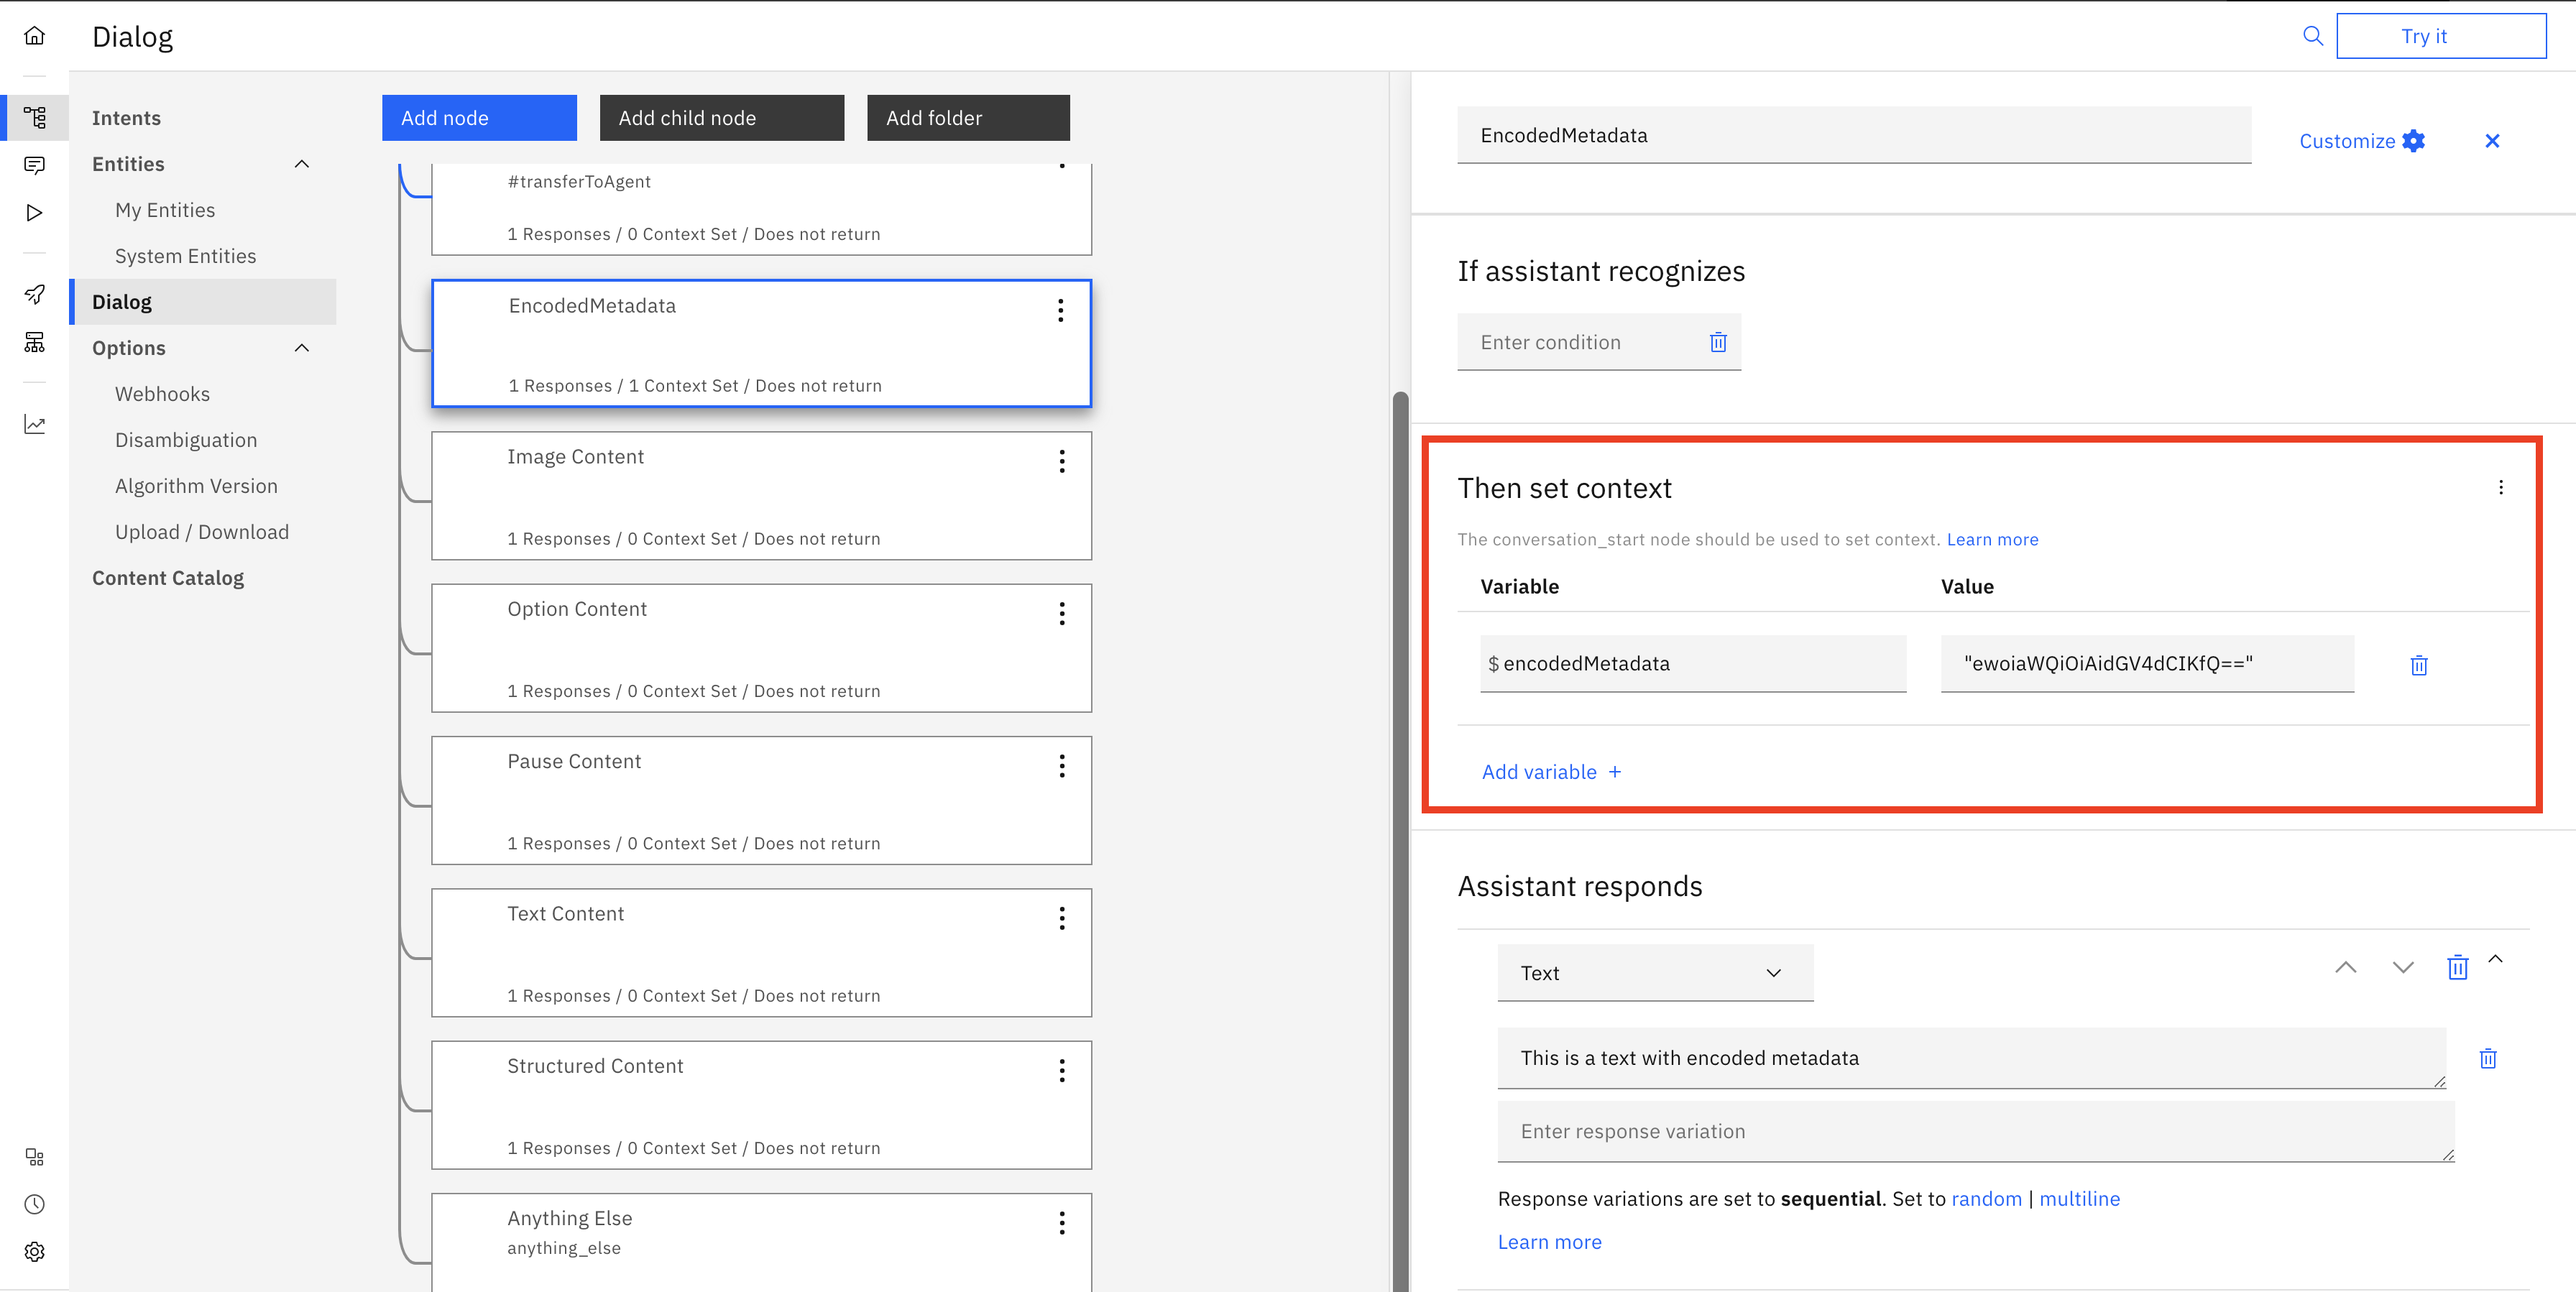 Figure 3.2 Showing context editor with the encoded metadata.
Example response body for JSON editor:
{
  "output": {
    "generic": [
      {
        "values": [
          {
            "text": "This is a text with encoded metadata"
          }
        ],
        "response_type": "text",
        "selection_policy": "sequential"
      }
    ]
  },
  "context": {
    "encodedMetadata": "ewoiaWQiOiAidGV4dCIKfQ=="
  }
}
Sending Rich Content (Structured Content) with Encoded Metadata
Sending encoded metadata with the Native Content is possible using Watson's context editor or also through the JSON editor. An example response definition for both ways can be seen below:
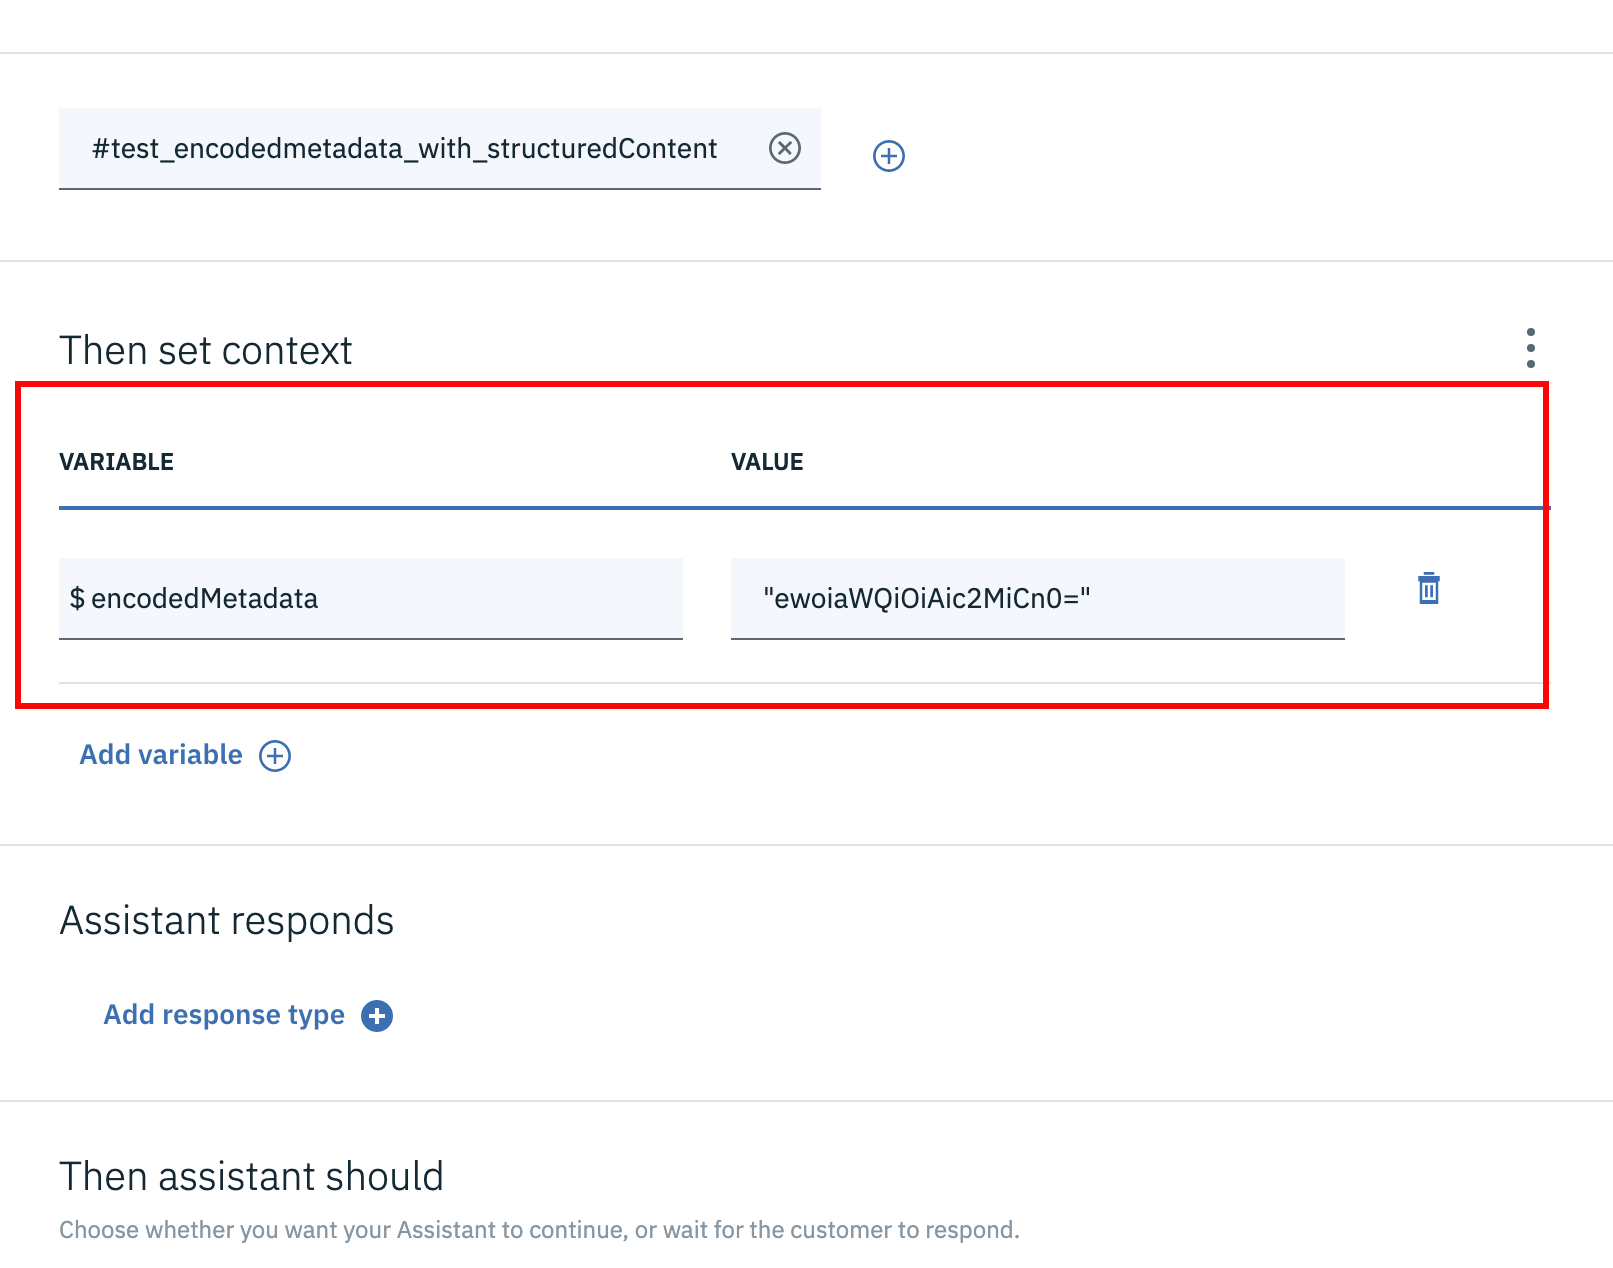 Figure 3.3 Showing context editor with the encoded metadata.
{
  "output": {
    "generic": [
      {
        "response_type": "user_defined",
        "user_defined": {
          "metadata": [
            {
              "id": "1234",
              "type": "ExternalId"
            }
          ],
          "structuredContent": {
            "type": "vertical",
            "elements": [
              {
                "type": "button",
                "click": {
                  "actions": [
                    {
                      "text": "Recommend me a movie, please",
                      "type": "publishText"
                    }
                  ]
                },
                "title": "Recommend a movie"
              }
            ]
          }
        }
      }
    ]
  },
  "context": {
    "encodedMetadata": "ewoiaWQiOiAic2MiCn0="
  }
}
If you have a different context for multiple dialogs in a conversation that are responding with structure content, then you can define the encodedMetadata for each of the dialog separately. In that case, you will not define encodedMetadata via context editor or inside the context property if using JSON editor. The below example shows where encodedMetadata property should be placed in structured content. Please note you will have to use JSON editor for defining such cases:
{
  "output": {
    "generic": [
      {
        "response_type": "user_defined",
        "user_defined": {
          "encodedMetadata": "ewoiaWQiOiAic2MiCn0=",
          "metadata": [
            {
              "id": "1234",
              "type": "ExternalId"
            }
          ],
          "structuredContent": {
            "type": "vertical",
            "elements": [
              {
                "type": "button",
                "click": {
                  "actions": [
                    {
                      "text": "Recommend me a movie, please",
                      "type": "publishText"
                    }
                  ]
                },
                "title": "Recommend a movie"
              }
            ]
          }
        }
      }
    ]
  },
  "context": {}
}
Sending Private Text Message
It is possible to send a private text message from the Live Engage (LE-UI) via agent workspace. This feature can now be used via Third-Party bots as well. This will allow Brands to define private message text within the conversational flow of the bot. These messages are published into the conversation for other Agent/Manager participants. This enables Brands to customize messages giving more insight, summarizing actions taken by the bot, or also advising on the next actions the handover agent should take.
Please note If you have not migrated to the new Agent Workspace you will not be able to see the Private message indicator in the conversation window. Nevertheless, private text messages will not be shown to the consumer and only remain visible to Agents and Managers.
Please note private text messages will never be shown to the consumer and will be visible only inside the conversation window of the agent workspace. The private text message can be added via Watson's JSON editor as a user_defined response. There are two properties, text and messageAudience required for sending a private text message.
| key | value | notes |
|---|---|---|
| text | any string value | mandatory |
| messageAudience | value should be "AGENTS_AND_MANAGERS" | case-sensitive, mandatory |
It is possible to send only a private text message response. The example payload of such response is below (also Figure 3.4 JSON Editor view):
{
  "output": {
    "generic": [
      {
        "user_defined": {
          "text": "This is a private text message",
          "messageAudience": "AGENTS_AND_MANAGERS"
        },
        "response_type": "user_defined"
      }
    ]
  }
}
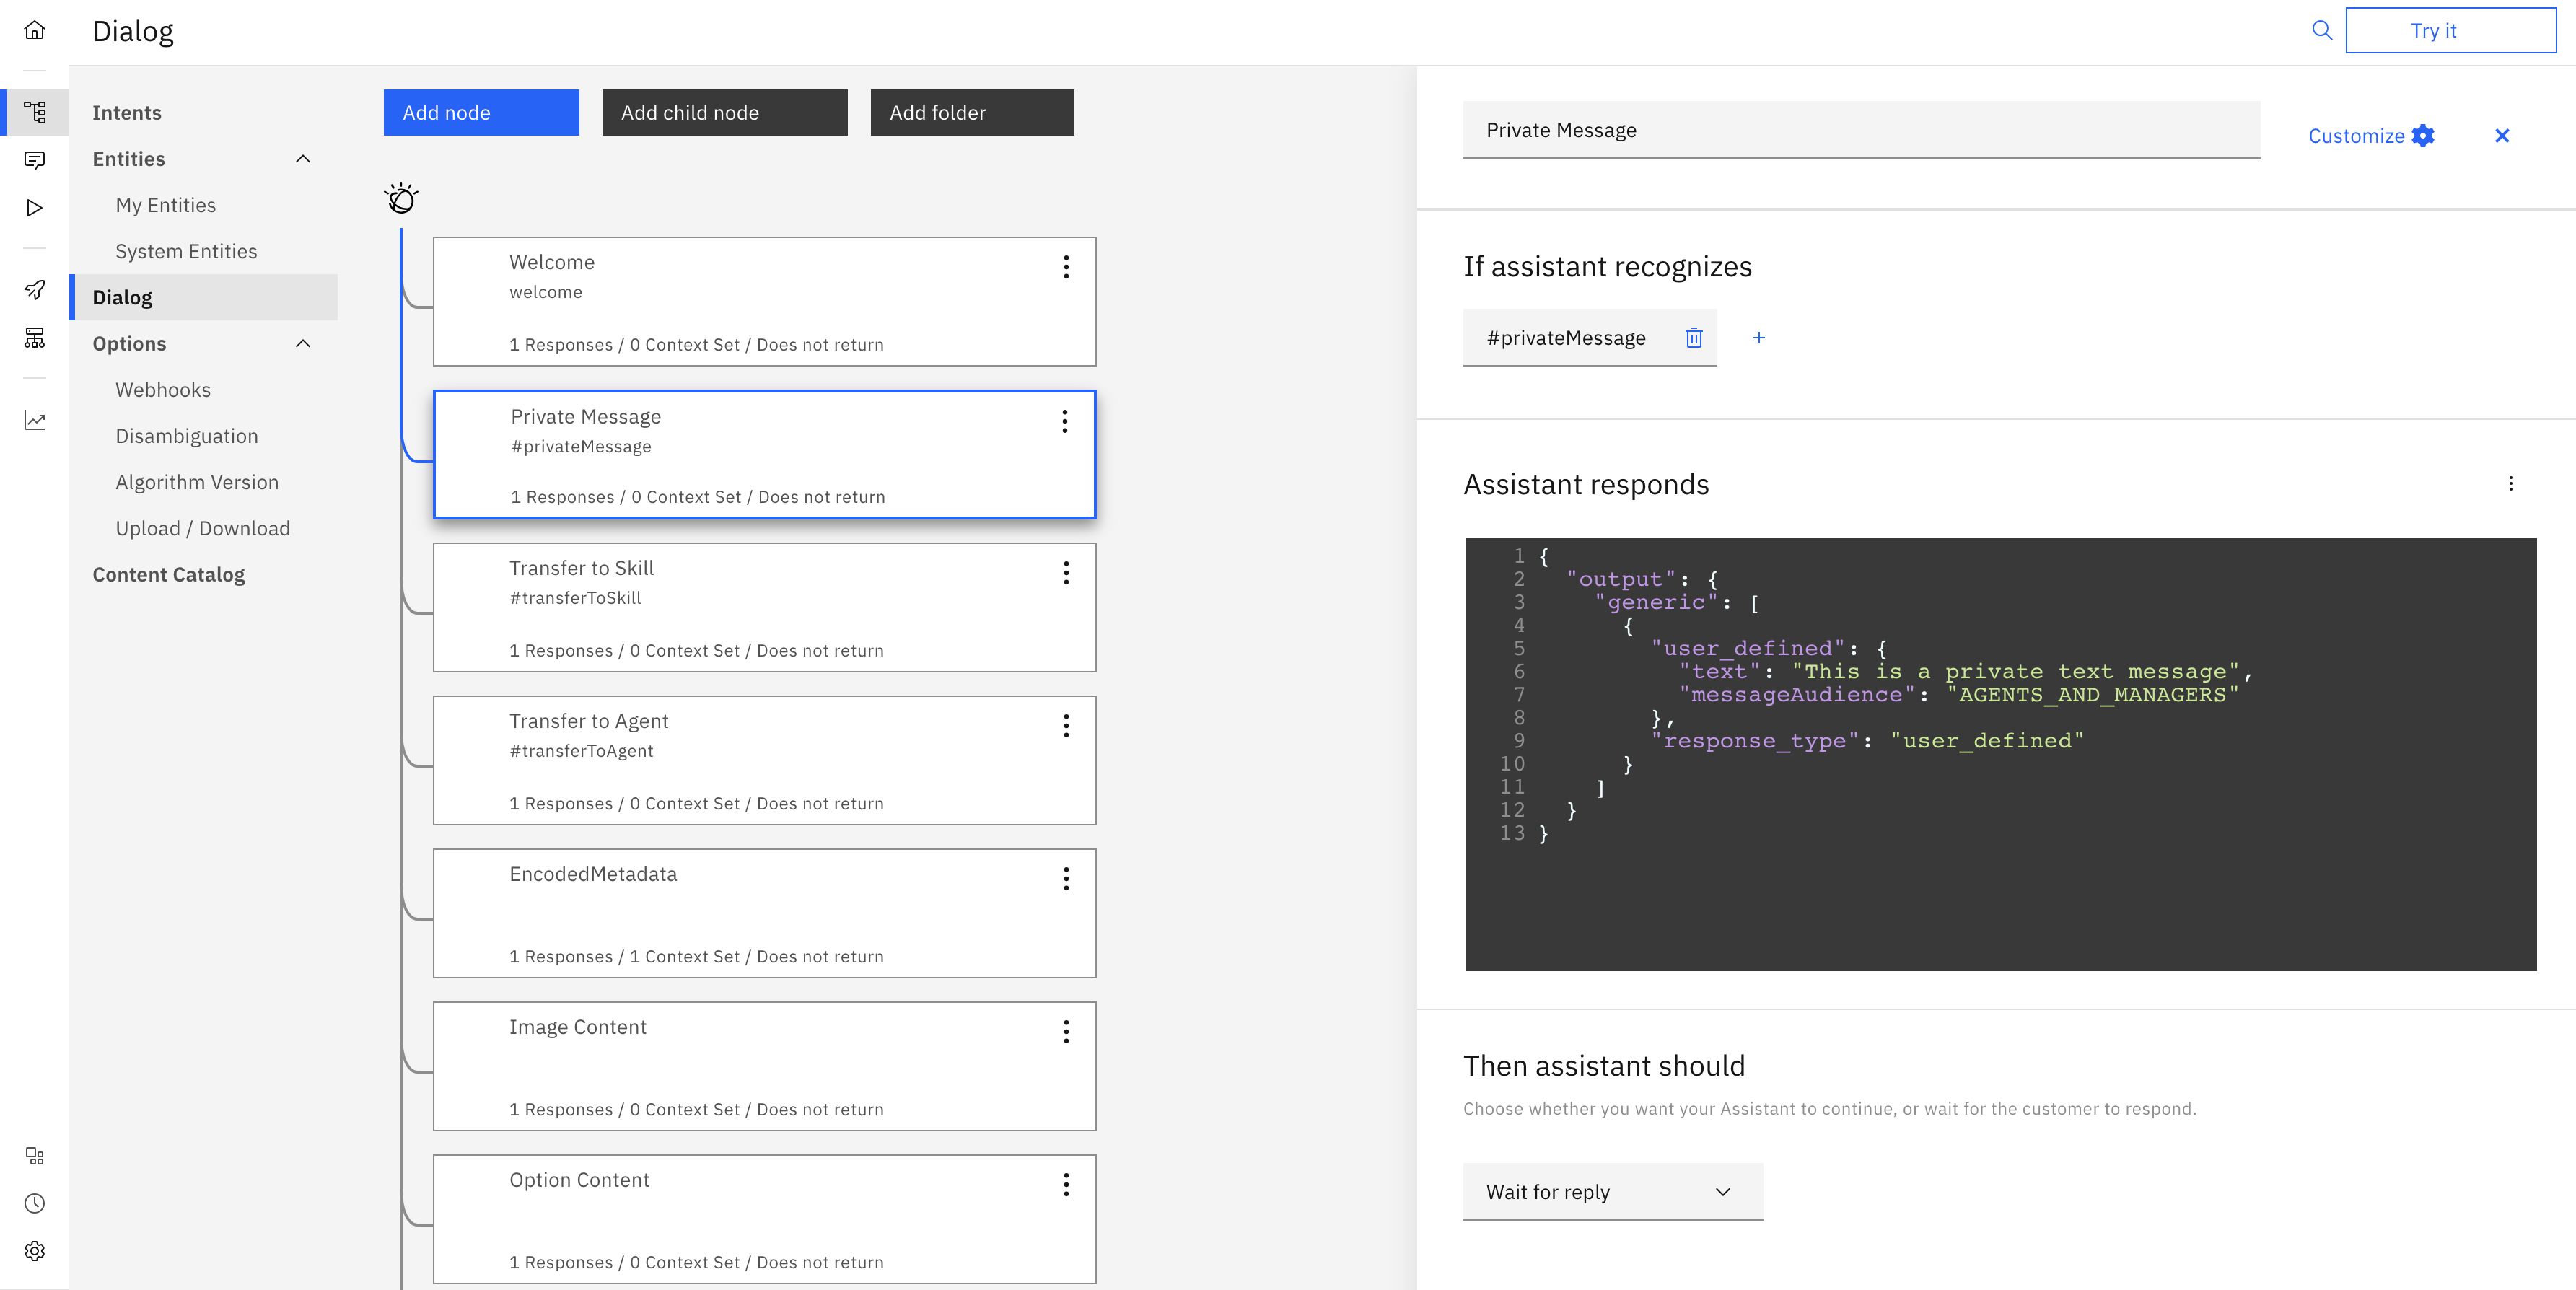 Figure 3.4 Showing single private text message definition inside
 JSON Editor
It is also possible to send a private text message with the action (e.g. Transfer / Escalations). Example payload of such a case (Private Text Message — Action) will be as below:
{
  "output": {
    "generic": [
      {
        "user_defined": {
          "text": "This is a private text message",
          "messageAudience": "AGENTS_AND_MANAGERS"
        },
        "response_type": "user_defined"
      }
    ]
  },
  "actions": [
    {
      "name": "TRANSFER",
      "type": "client",
      "parameters": {
        "skill": "human_skill"
      },
      "result_variable": "none"
    }
  ]
}
![]() Figure 3.5 Showing single private text message definition inside
Figure 3.5 Showing single private text message definition inside JSON Editor
Invoke LivePerson Function
During a conversation, it is possible to trigger a LivePerson Function that is deployed to the LivePerson Functions (Function as a Service) platform. This provides a way to run custom logic with a bot.
To invoke a LivePerson Function, we utilize the action object as we did for a bot action. In Figure 3.6 below, the Watson Assistant JSON response should be mirrored as follows:
{
  "output": {
    "generic": [
      {
        "values": [
          {
            "text": "Trigger LivePerson Function"
          }
        ],
        "response_type": "text",
        "selection_policy": "sequential"
      }
    ]
  },
  "actions": [
    {
      "name": "INVOKE_FUNCTION",
      "type": "client",
      "parameters": {
        "lambdaUuid": "4ec49ffc-080b-4e59-b302-18d6b826191b",
        "payload": {
          "some": "stuff"
        },
        "failOnError": true

      },
      "result_variable": "none"
    }
  ]
}
Figure 3.6 Watson Assistant JSON response for invoking LivePerson Function
To retrieve the lambdaUuid of your LivePerson Function follow this guide
In addition, it is possible to send your own payload to the function. Set your content inside the payload parameter
The bot does not escalate on a failed invocation by default. To enable this, set the additional parameter failOnError to true
Please note that the action name INVOCATION got deprecated please use the Action name INVOKE_FUNCTION as shown in Figure 3.6 above.
Engagement attributes as context
Third-Party bots allows the collection of engagement attributes (more information can be found here) if Engagement Attributes option is checked in the Conversation Type step as shown in Figure 3.7.
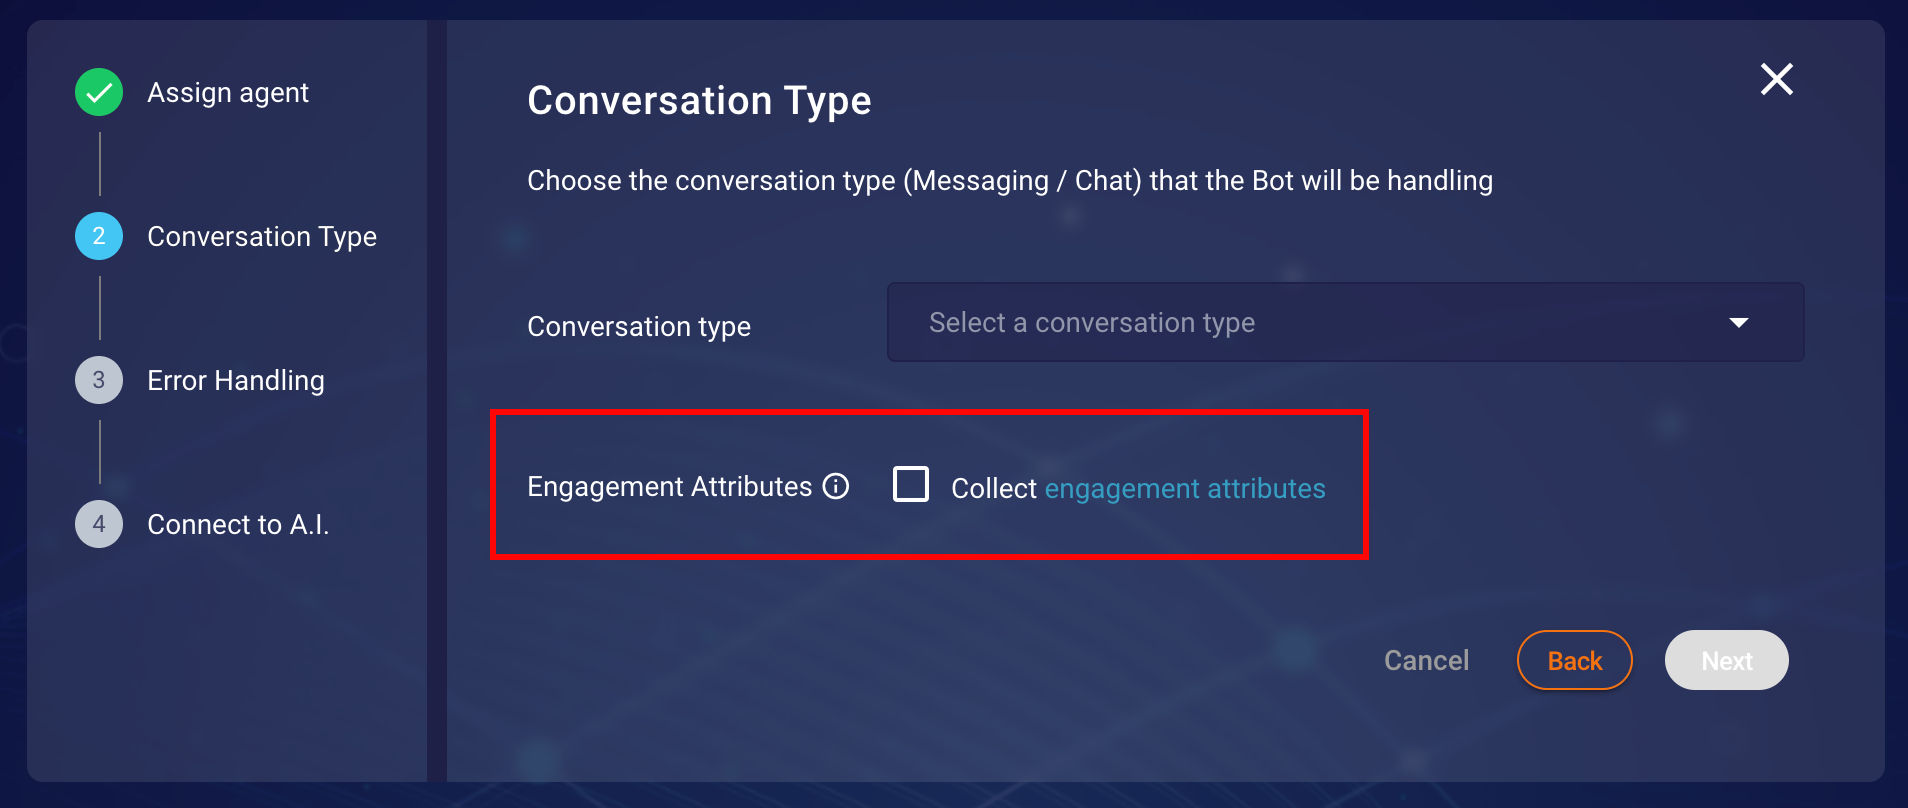 Figure 3.7 Conversation Type step in creation/modification of bot configuration.
These attributes are only collected at the start of a conversation. Third-party bots leverage the LivePerson Visit Information API to collect the engagement attributes, Further information on Visit Information API can be found here. Moreover, Engagement attributes are not updated throughout the life cycle of a conversation and are only passed along with each message request. In Watson Assistant V1 these engagement attributes are added to the property lpSdes. For the preservation of these attributes within a conversation, the context property is used (further information about context can be found here). An example of the request body can be seen below:
{
  "message": "Some Message",
  "context": {
    // … contains some more information about conversation as well
    "lpEvent": {}, // Holds LP Events
    "lpSdes": {} // Holds SDES
  }
}
Receiving Rich Content Response (Messaging Only)
Third-party bots allow LivePerson's Rich Messaging channel capabilities not only to be received as a response from the vendor but also, allow Rich Messages (Structured Content) to be sent back to the vendor based on specific user interactions/responses (For example users sharing their location on WhatsApp). Please note these capabilities are sometimes limited by the channels in which the conversation is happening. For the list of Rich Messaging capabilities for each channel, browse or search the table here.
An example use case of the Rich Content Event (RichContentEvent) response sent by Third-Party
Bots are described below. The example will show how to set up and access the RichContentEvent
response with Watson Assistant after a user shares the location.
Usually a RichContentEvent of type map/location will have following JSON schema:
{
  "content": {
    "type": "vertical",
    "elements": [
      {
        "la": 49.82380908513249,
        "type": "map",
        "alt": "49.82380908513249, 2.021484375",
        "lo": 2.021484375
      }
    ]
  },
  "type": "RichContentEvent"
}
Create Intent for RichContentEvent
We needs to create a intent that should have training phase com.liveperson.bot-connectors.consumer.send-rich-content as shown in the Figure 3.8 below
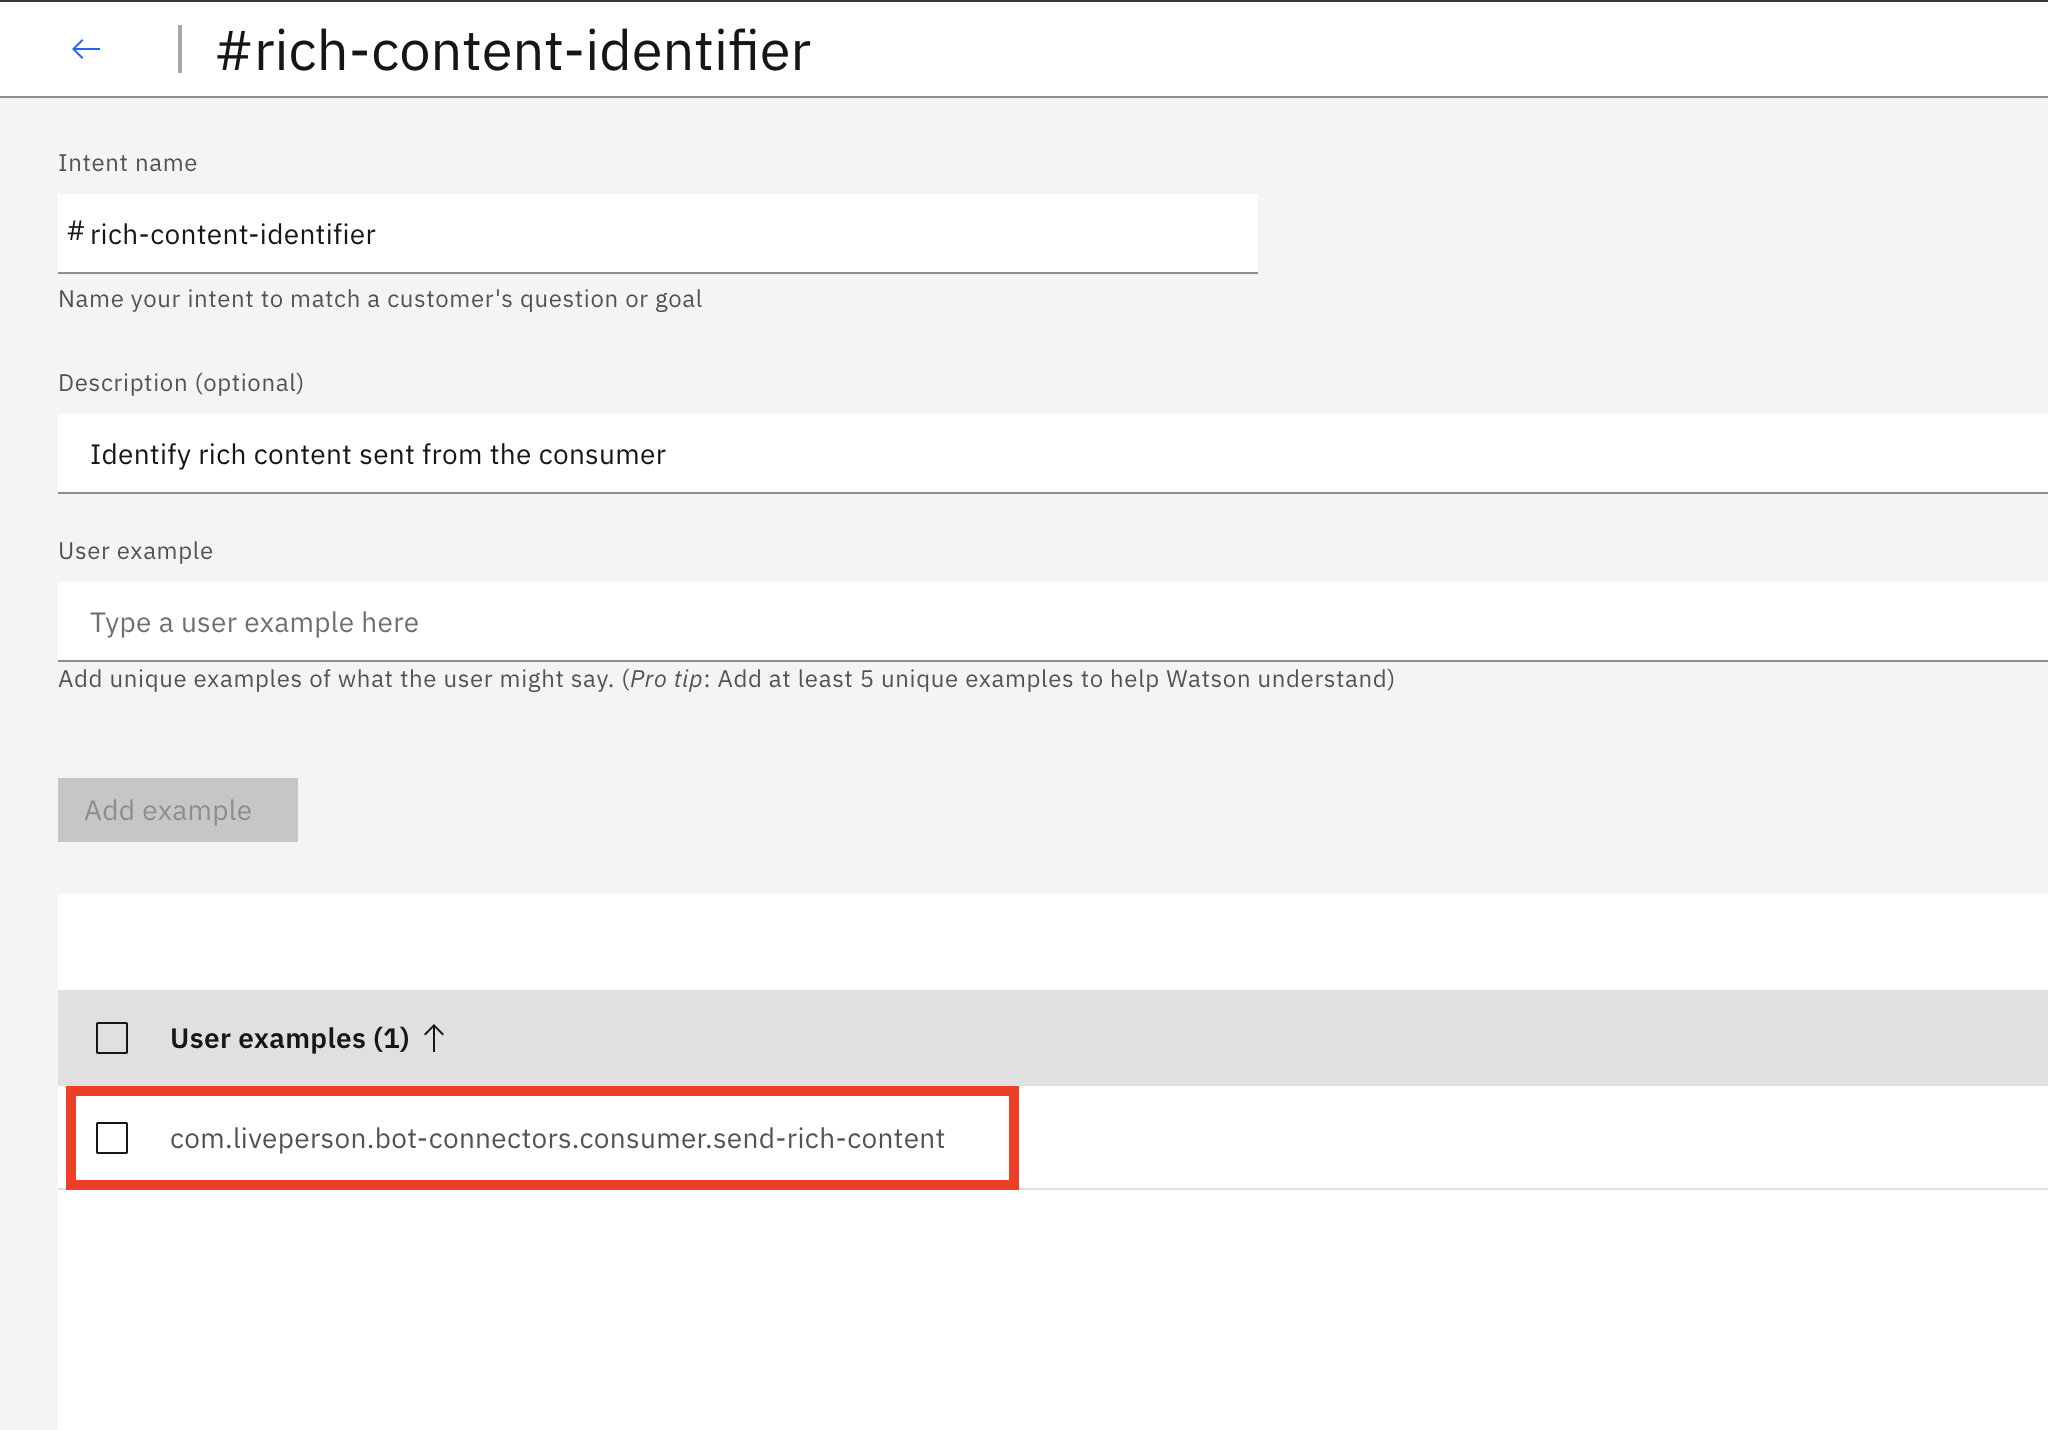 Figure 3.8 Intent creation in Watson Assistant console
Access RichContentEvent in Dialog
There are two ways in which a RichContentEvent can be accessed in IBM Watson Assistant. You can either access the raw data directly in the node configuration or you can leverage the IBM Cloud Functions to handle more complex scenarios for your business cases. We will define our demo example for both use cases below.
Accessing the RichContentEvent via node configuration
The RichContentEvent is sent with the context. Thus, for Watson Assistant, we can leverage
the Context Variables
for accessing the RichContentEvent data. The context information that is sent by Third-Party Bots contains in $lpEvent.
An example of accessing RichContentEvent from that context variable can be seen in Figure 3.9.
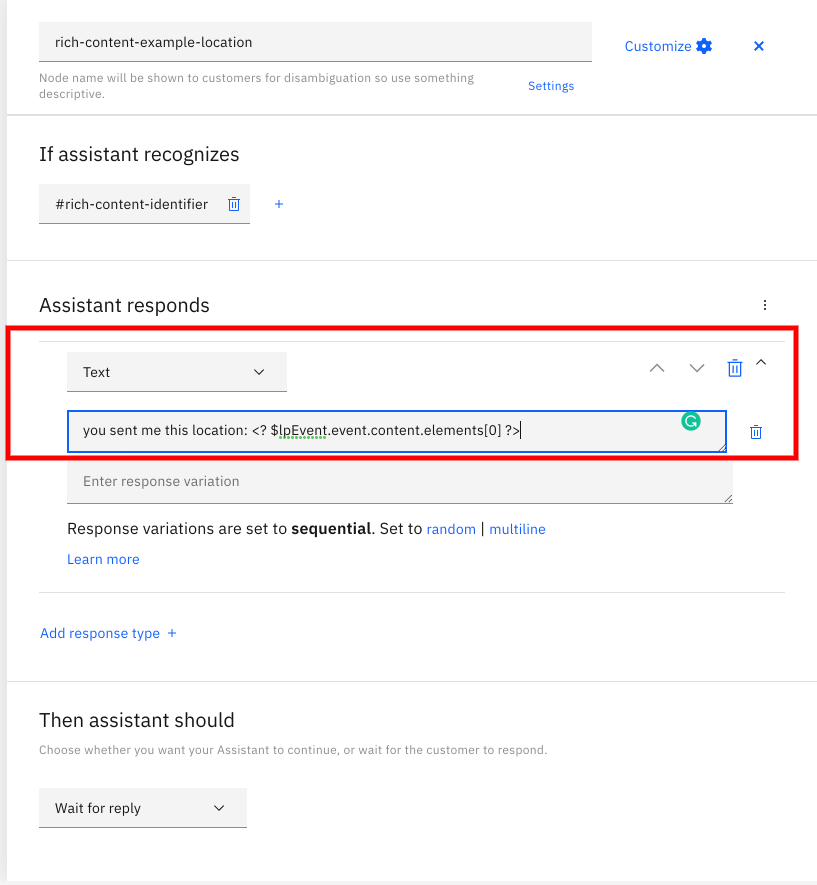 Figure 3.9 Displaying how to access the Rich Content/Structured Content using Context Variables
Accessing the RichContentEvent Data via IBM Cloud Functions
The RichContentEvent is sent with the context. Thus, for Watson Assistant, we can leverage
the IBM Cloud Functions
for responding to the RichContentEvent. The RichContentEvent information is accessed via
Context Variables.
The context variable that is sent by the Third-Party bot is $lpEvent.
We can use an action
cloud function to access the RichContentEvent data and attach this action as a webhook to
the IBM Watson Assistant instance.
A code snippet of an IBM Cloud Function of type action can be seen below. This LivePerson function
will check if the input payload has RichContentEvent in the request and then will respond with
the map/location body.
/**
 *
 * main() will be run when you invoke this action
 *
 * @param contains the lpEvent variables that is passed from the Dialog Node
 *
 * @return The output message for for Rich Content Event
 *
 */
function main(params) {
  const { lpEvent: { event = {} } = {} } = ({} = params);

  let message = "rich content not found";

  if (event && event.type && event.type === "RichContentEvent") {
    // Default response for Rich Content
    message = `Found Rich Content Event Raw data: ${JSON.stringify(event)} `;

    // If we find Rich Content Event of type Map then respond different for E2E Tests
    if (
      event.content &&
      event.content.elements &&
      event.content.elements &&
      Array.isArray(event.content.elements)
    ) {
      message = `you sent me this location: ${event.content.elements[0]}`;
    }
  }

  return { message };
}
Once the function is created and you have the link to the endpoint to call the IBM Cloud Function, this can then be attached to an IBM Watson Assistant instance via the Webhooks option. An example of this can be seen in Figure 3.10 below
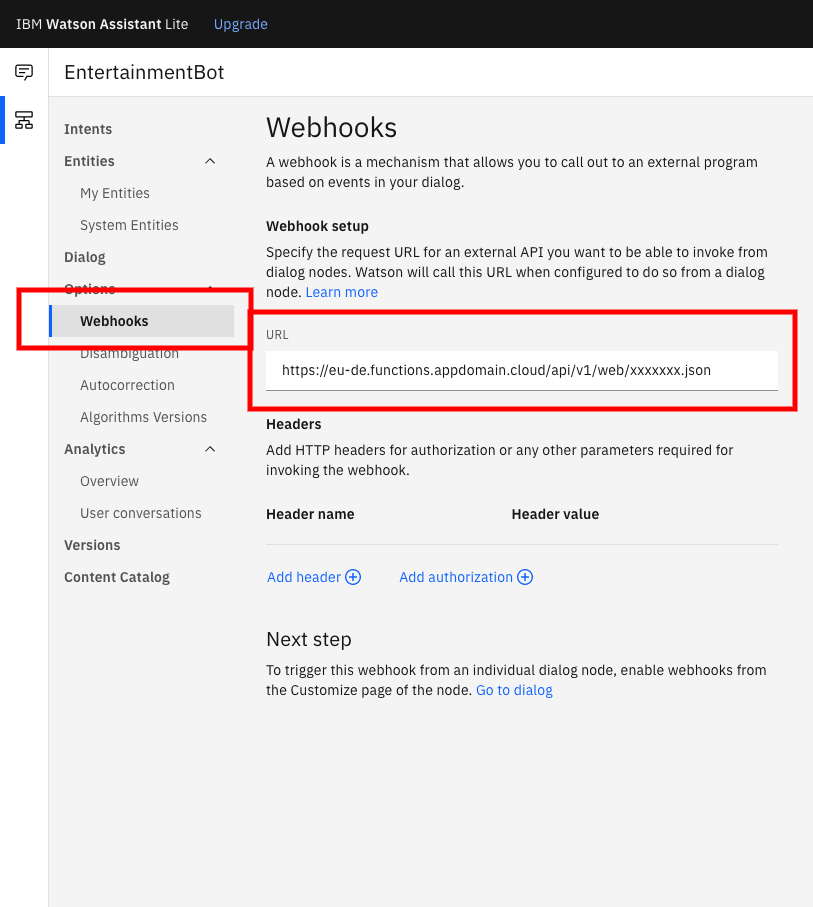 Figure 3.10 IBM Watson Assistant Webhooks configuration to an IBM Cloud Function
Please Note the ending of the endpoint with .json this is needed to be added additionally to
the endpoint of the IBM Cloud Function if you expect the response from the IBM Cloud Function
as JSON Object. Like in our above example code of function it was in the property message.
After setting up the Webhook configuration we need to now configure the Dialog node which is replying
to the intent of RichContentEvent an example of the configuration of the dialog node can be seen in
Figure 3.11 below:
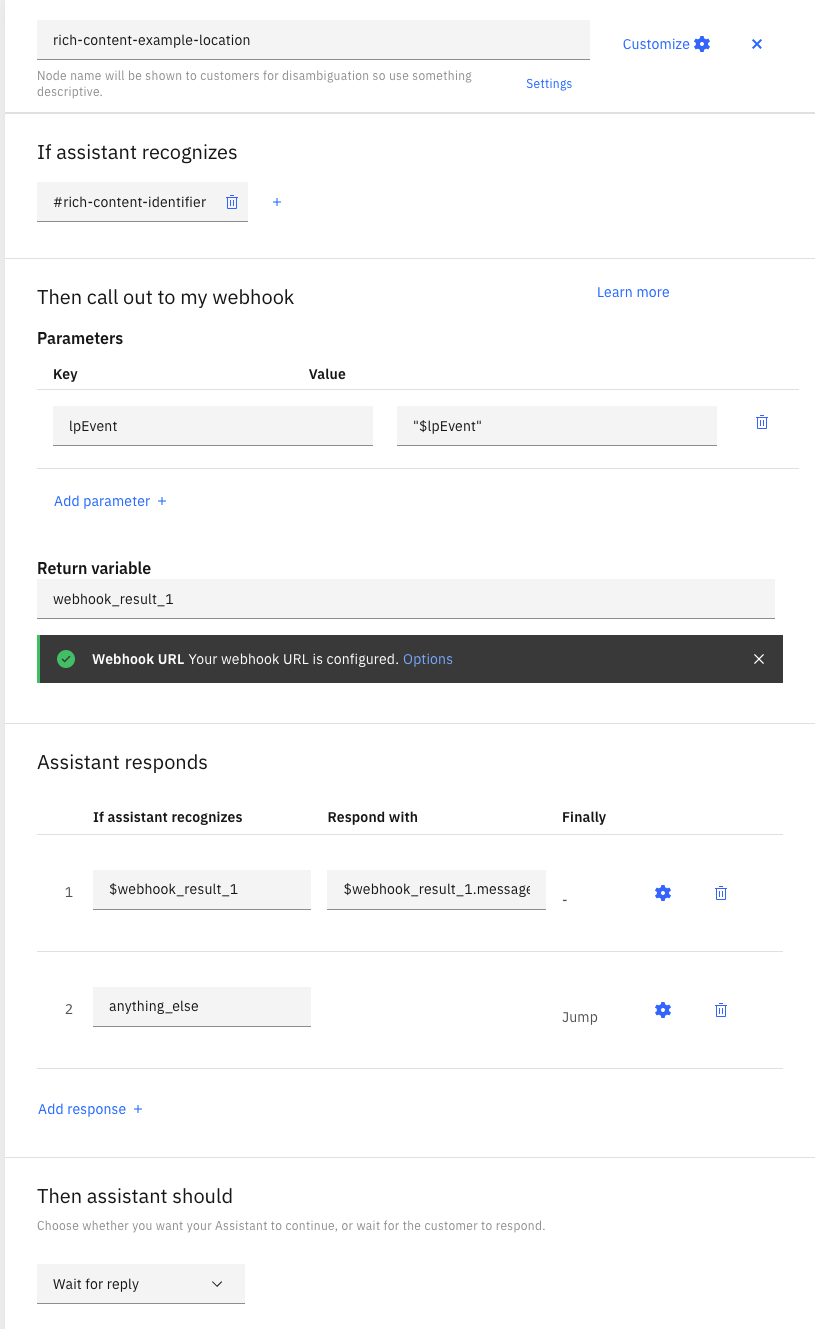 Figure 3.11 A Dialog Node setup for a RichContentEvent
We can see in Figure 3.11 that $lpEvent context variable is passed as parameter lpEvent
which was accessed in the IBM Cloud Function implementation we wrote above. The result is
returned to the variable webhook_result_1 and then the response is accessed via
$webhook_result_1.message.
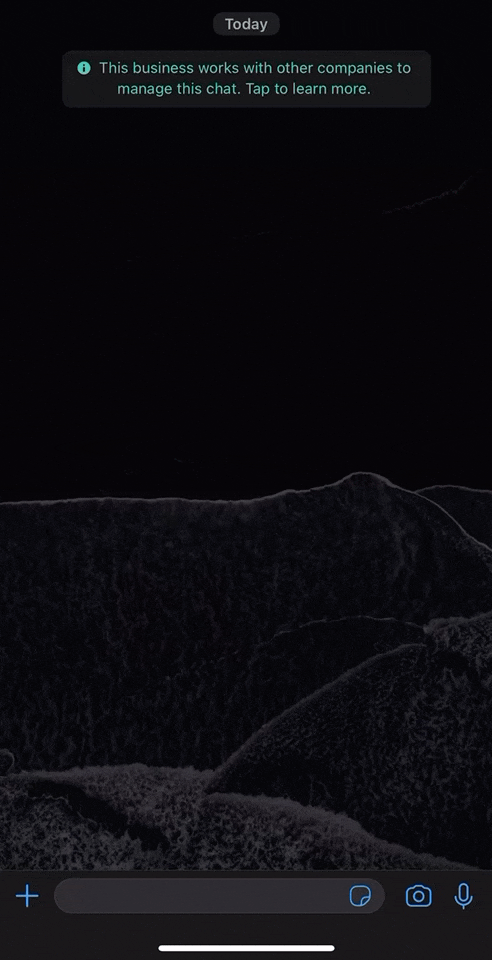
A demo of our WhatsApp map example with both of the above bot configurations (defined above) can be seen below:
Receiving Last consumer message (Messaging Only)
Third-Party bot now provides a way to add the last consumer message as a part of the welcome event. When an ongoing conversation gets transferred to a new Agent or Skill, This enhancement will allow brands to respond to the last consumer message uttered as per their needs.
The last consumer message is passed via the property lastConsumerMessage which is part of another property lpEvent that is sent with context information by Third-Party Bots. Thus, for Watson Assistant, we can leverage the Context Variables
An example of accessing lastConsumerMessage from that context variable can be seen in Figure 3.12.
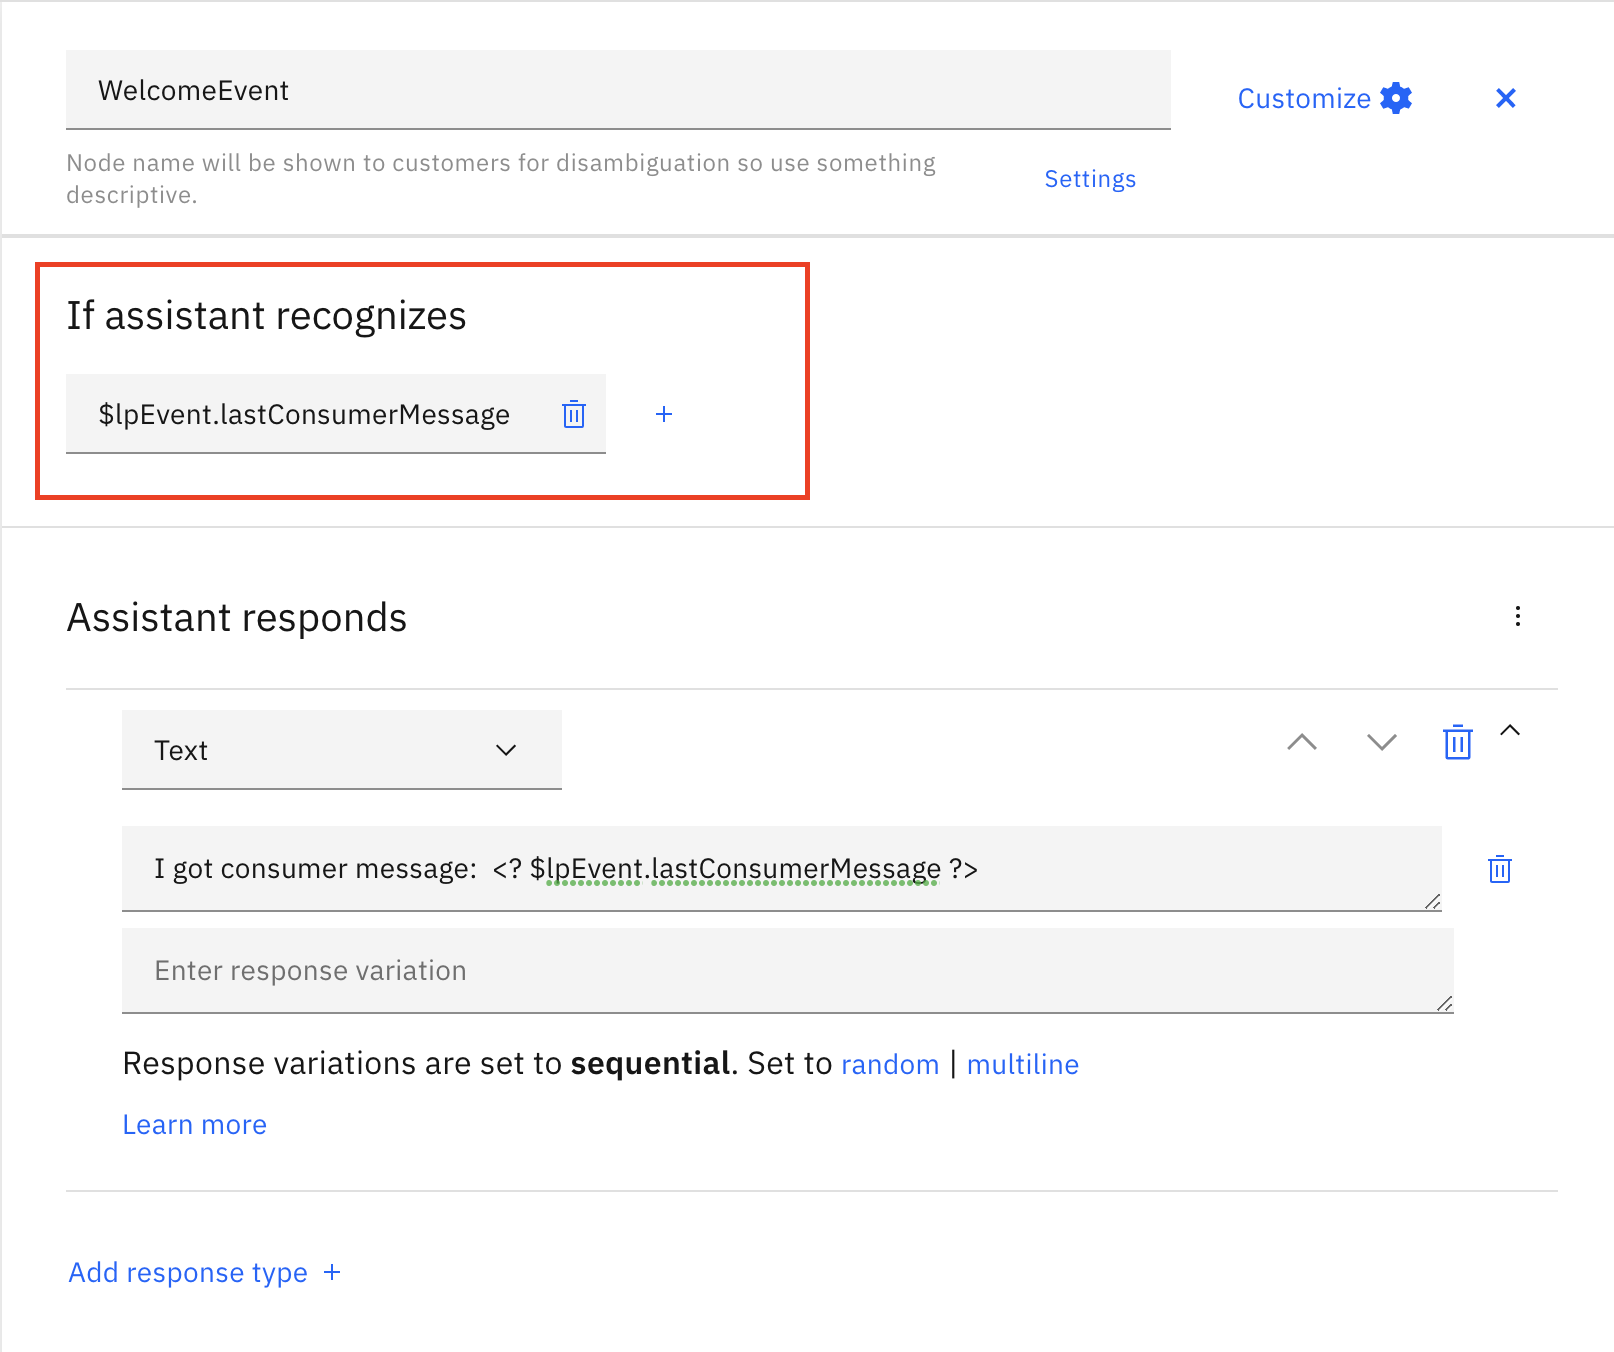 Figure 3.12 Displaying how to access the last consumer message using Context Variables
Watson Discovery
Discovery Search is a tool that uses the knowledge of websites, documents and other data, to generate an answer the Watson Bot is able to send within a conversation. If enabled, the bot searches for matching parts of the provided information on specified intents or in case no matching intent was found.
To use Watson Discovery the Watson Assistant Bot needs to have a search skill linked to a Watson Discovery Instance
Disambiguation Responses
Disambiguation is a feature configurable in the Watson Assistant UI. It triggers if a bot can't confidently identify an intent.
Find details on how it works here.
Disambiguation responses will be renders as Quick Replies.
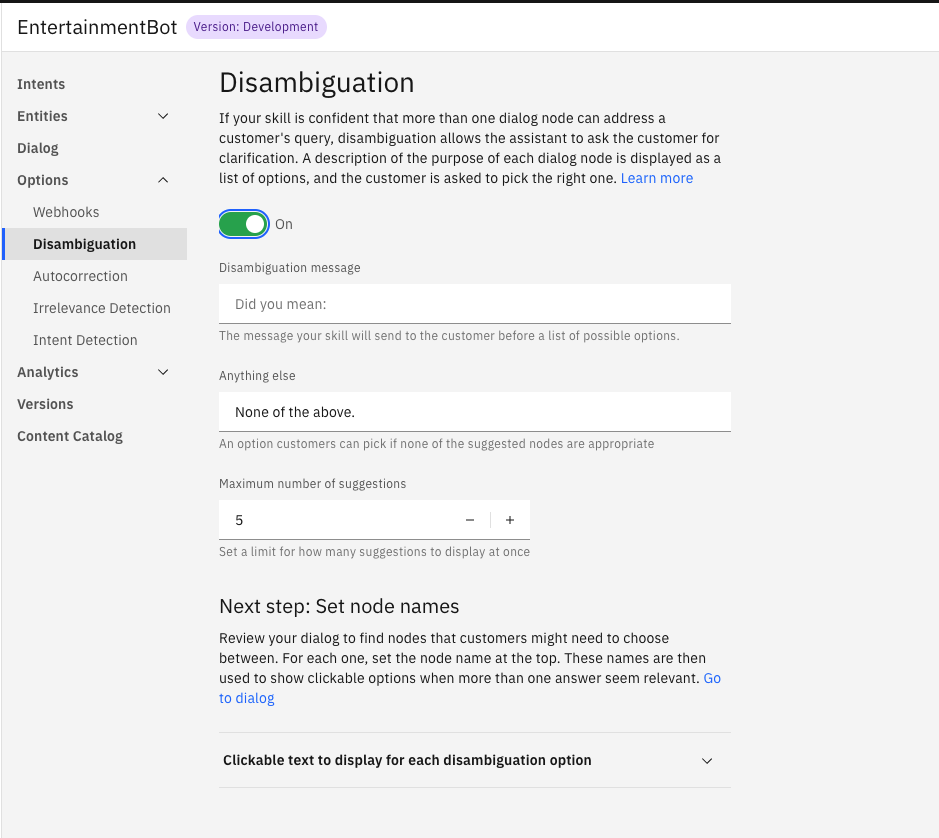 Figure 3.13 Configure Watson Disambiguation
Prevent Transferring loop behavior
As a good practice and to prevent that the bot goes into a conversation loop during off hours, create a separate bot for off-hour times that only listens to the human skill and not to the regular bot skills. If another bot is not created for that period, the bot can get into a transferring loop.
Limitations
- Currently IBM Watson Assistant retains sessions only for 5 minutes for Free and 60 minutes for Plus or premium members. For more information read here
- Currently IBM Watson allows only 5 response types per node.
Send Secure Forms (PCI)
Secure forms are configured by LivePerson. To enable this feature, please contact LivePerson customer support or your account team. Your LivePerson account team will work with you make the necessary adjustments to your account settings and configurations. For additional information regarding secure forms: Community Center
To give agents the permission to read secure forms sent by a bot, please contact LivePerson customer support to enable the site setting: messaging.display.secure.form.sent.by.bots
Bots are able to send a secure form to a conversation and transfer the customer after submission. The transferred conversation is then visible by an eligible agent, that can read and process the submitted form data.
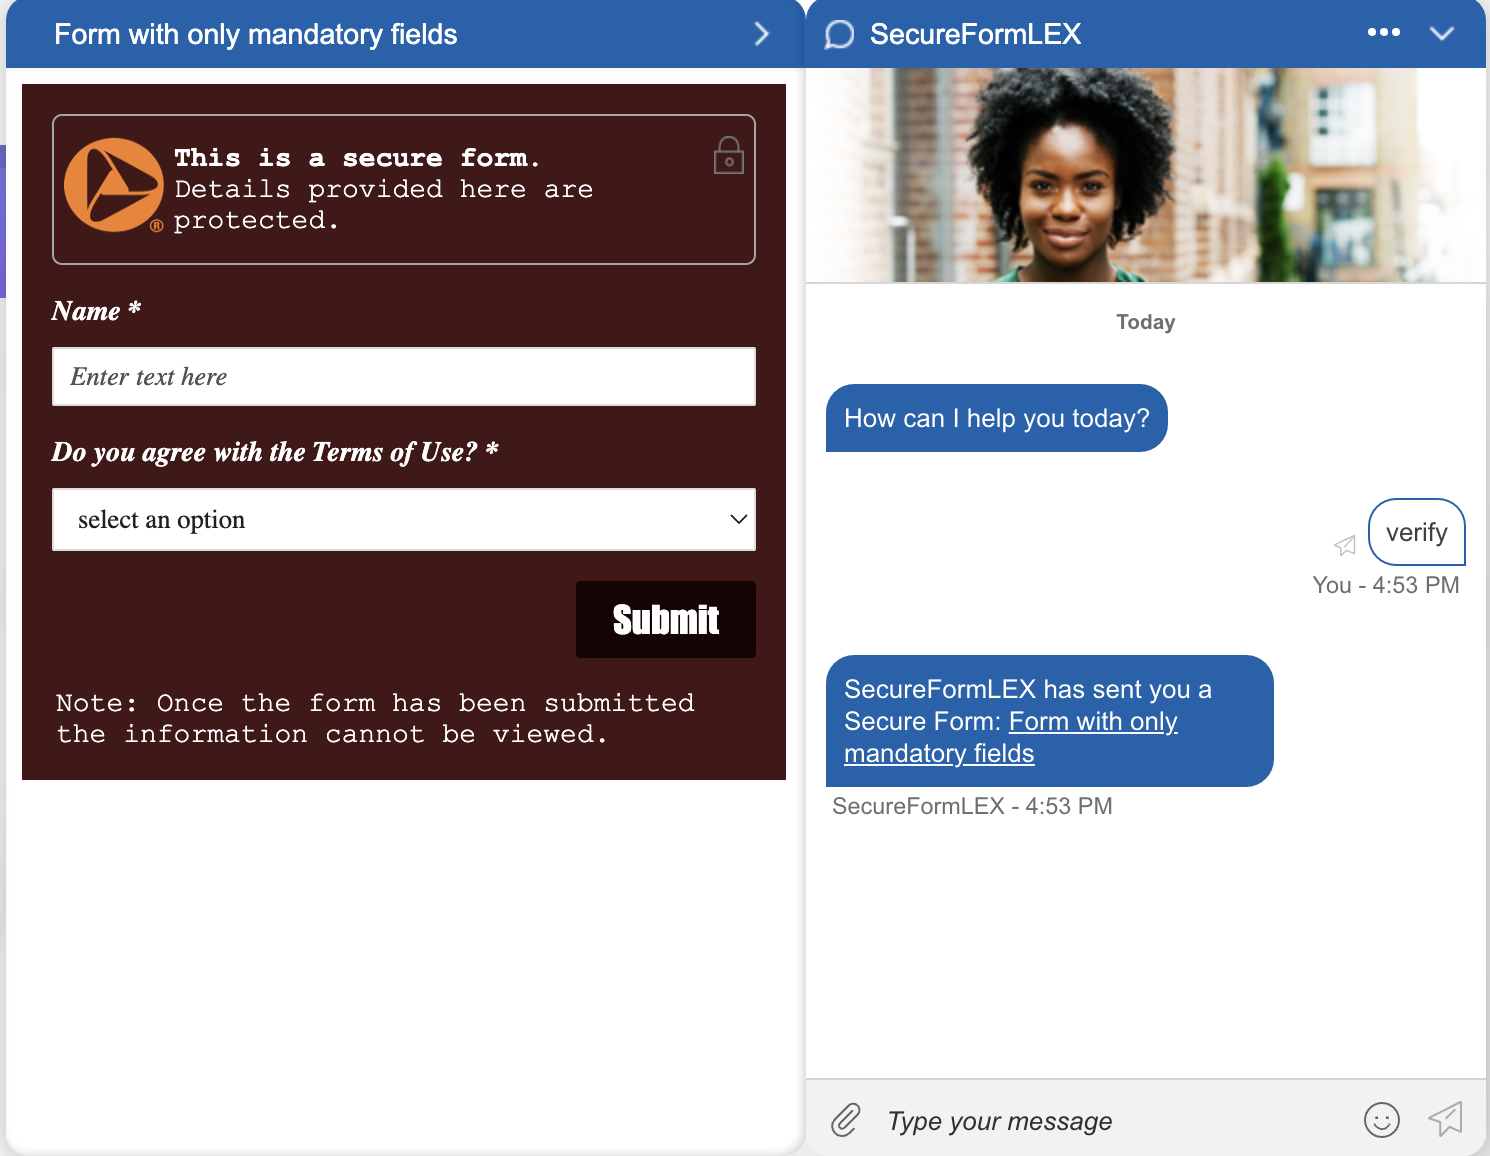
To enable this feature in WatsonAssistant, you need to create a new Intent with a matching utterance and Custom Payload in your fulfillment response to it. The response needs to send a SEND_SECURE_FORM action including the unique formId of the form, that should be provided from LivePerson after the creation of one secure form, and the title of the form.
{
  "output": {},
  "actions": [
    {
      "name": "SEND_SECURE_FORM",
      "type": "client",
      "parameters": {
        "formId": 4510014332,
        "title": "Form with only mandatory fields"
      },
      "result_variable": "none"
    }
  ]
}

To transfer the conversation after submission to an eligible user that can process the secure forms, you need to create a new intent listening on the utterance FORM-SUBMISSION-INTENT that transfers the conversation using a basic transfer event.