
Overview
The following documentation outlines the configuration for the connector and how to implement functions specifically for Amazon Lex V2.
At this time, audio response from Lex is not supported and will get ignored by the connector.
Configuration
See the Getting Started guide before using this document to complete the prerequisite steps.
You will be presented with the following screen to complete the Vendor Settings in order to add a bot connector.
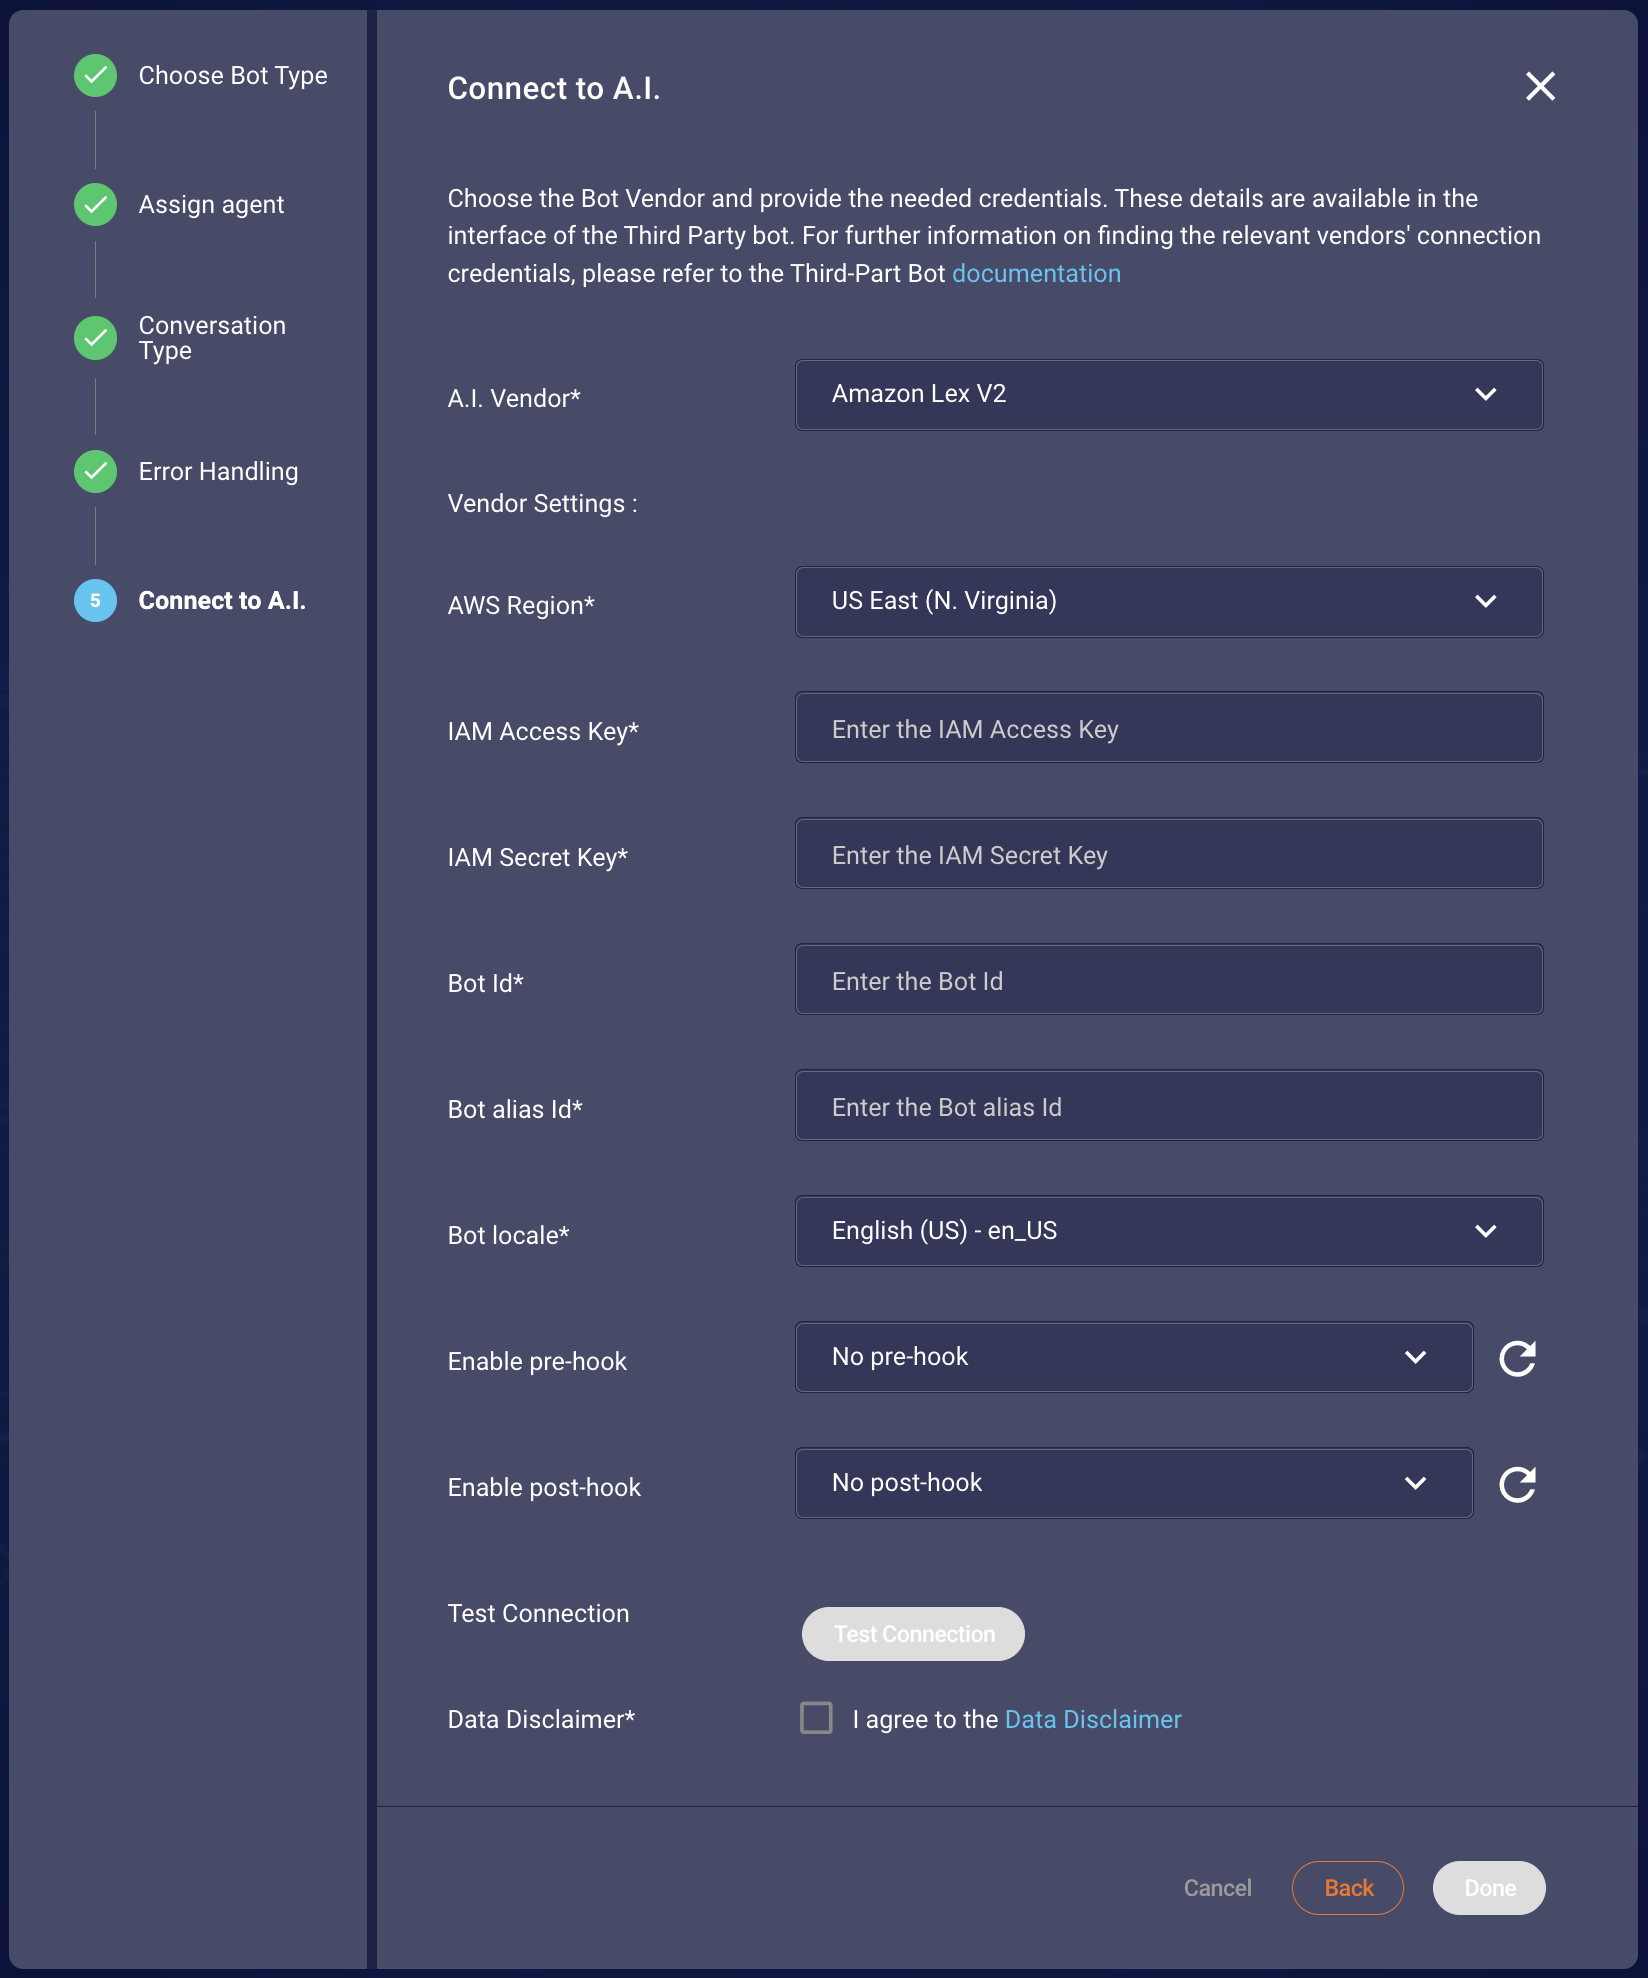
Figure 1.1 Showing the configuration that needed to be filled
The user should provide the following Amazon Lex V2 information to LivePerson:
Common Fields:
| Item | Description | Example |
|---|---|---|
| Authentication Method | Specify the authentication method: IAM Access Key/Secret or OAuth2. | IAM Access Key/Secret |
| AWS Region | AWS region of the Lex bot. | us-east-1 |
| Bot ID | The bot identifier from the Lex V2 bot details. | KFPKMHZDYR |
| Bot Alias ID | The alias identifier from the Lex V2 bot deployment information. | TSTALIASID |
| Bot Locale | The language identifier to be used by the bot. | en_US |
Authentication Specific Fields:
If IAM Access Key/Secret is selected:
Lex APIs adhere to Signature V4 Signing Process. Some degree of familiarity with AWS IAM policies and the AWS IAM console is necessary for setting up a valid Lex client with Read Only API Key access. A service account is a prerequisite for setting up the above config. Documentation is available here.
| Item | Description | Example |
|---|---|---|
| IAM Access Key | Access Key ID of the IAM role. | AKIAXXXXXXXXXXXBWN3 |
| IAM Secret Key | IAM secret key of the IAM role. | lwRQJUxxxxxxxxxxxxRQFpoxxxxxxxdE6JR |
If OAuth2 is selected:
When using OAuth2, LivePerson will utilize AWS AssumeRole to access your Amazon Lex V2 bot. Ensure the provided ARN has the AmazonLexRunBotsOnly permission attached.
To prevent authentication errors, LivePerson refreshes OAuth2 tokens 2 minutes before their expiration. This ensures a new token is always available for seamless communication.
Here's a comprehensive guide to set up the required IAM Role:
-
Create an IAM Role:
- Navigate to the AWS Management Console and go to the IAM service.
- Click on Roles and select Create role.
-
Choose Trusted Entity:
- Under Select trusted entity, choose Web identity.
- For Identity provider, you can use an existing one or create a new one.
- If creating a new one:
- Select OpenID Connect
- Use the domain from your OAuth2 provider as the Provider URL
- Use the client ID from your OAuth2 provider as the Audience
-
Add Permissions:
- Attach a policy that provides permissions to access AWS LexV2.
AmazonLexRunBotsOnly
- Attach a policy that provides permissions to access AWS LexV2.
-
Assign the Role Name:
- Give the role a meaningful name (e.g., Auth0LexRole) and create the role.
-
Copy the Role ARN:
- After creating the role, note down the Amazon Resource Name (ARN). This ARN will be used during the OAuth2-based authentication.
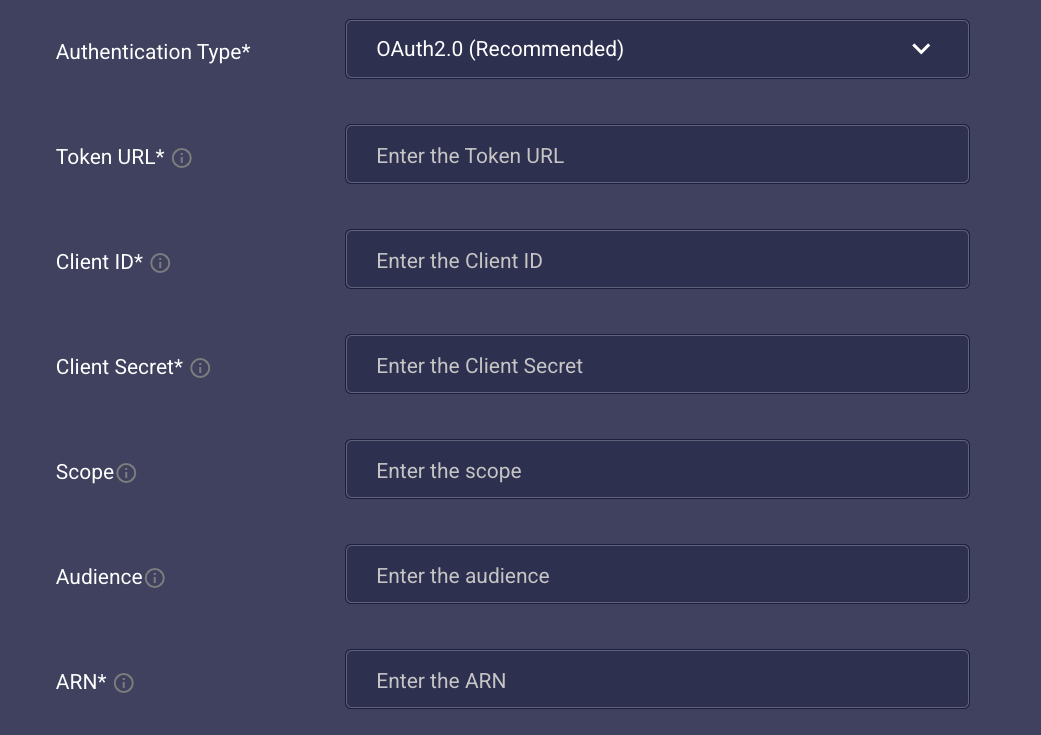
| Item | Description | Example |
|---|---|---|
| Token URL | The URL to obtain an OAuth2 access token. | https://oauth2-provider.com/token |
| Client ID | Client ID for OAuth2 authentication. | xxxxxxx-123e-xxxx-xxxx-xxxxxxx0441c |
| Client Secret | Client Secret for OAuth2 authentication. | 1xxx2xxk7xxxx49r4xxxxx2qs |
| Scope (Optional) | The OAuth2 scopes requested. | read write |
| Audience (Optional) | The intended audience of the OAuth2 token. | https://oauth2-provider.com/api/v2/ |
| ARN | The ARN of the IAM role to assume. This role must have the `AmazonLexRunBotsOnly` permission. | arn:aws:iam::123456789012:role/YourLexRole |
You have to agree to the Data Disclaimer in order to use the services of the bot connector. For that, you can click on the checkbox "I agree to the Data Disclaimer"
Validate the credentials by performing a test connection request. Use the "Test Connection" button to check if the connection is successful, as shown in Figures 1.2 and 1.3, respectively. If the connection fails, the error can be displayed, allowing you to determine the cause of the connection failure from the AI vendor. Please note that your bot should be capable of handling unsupported messages either via fallback intents or as your design pleases. This will ensure the success of the call to the API of Lex for testing the connection.
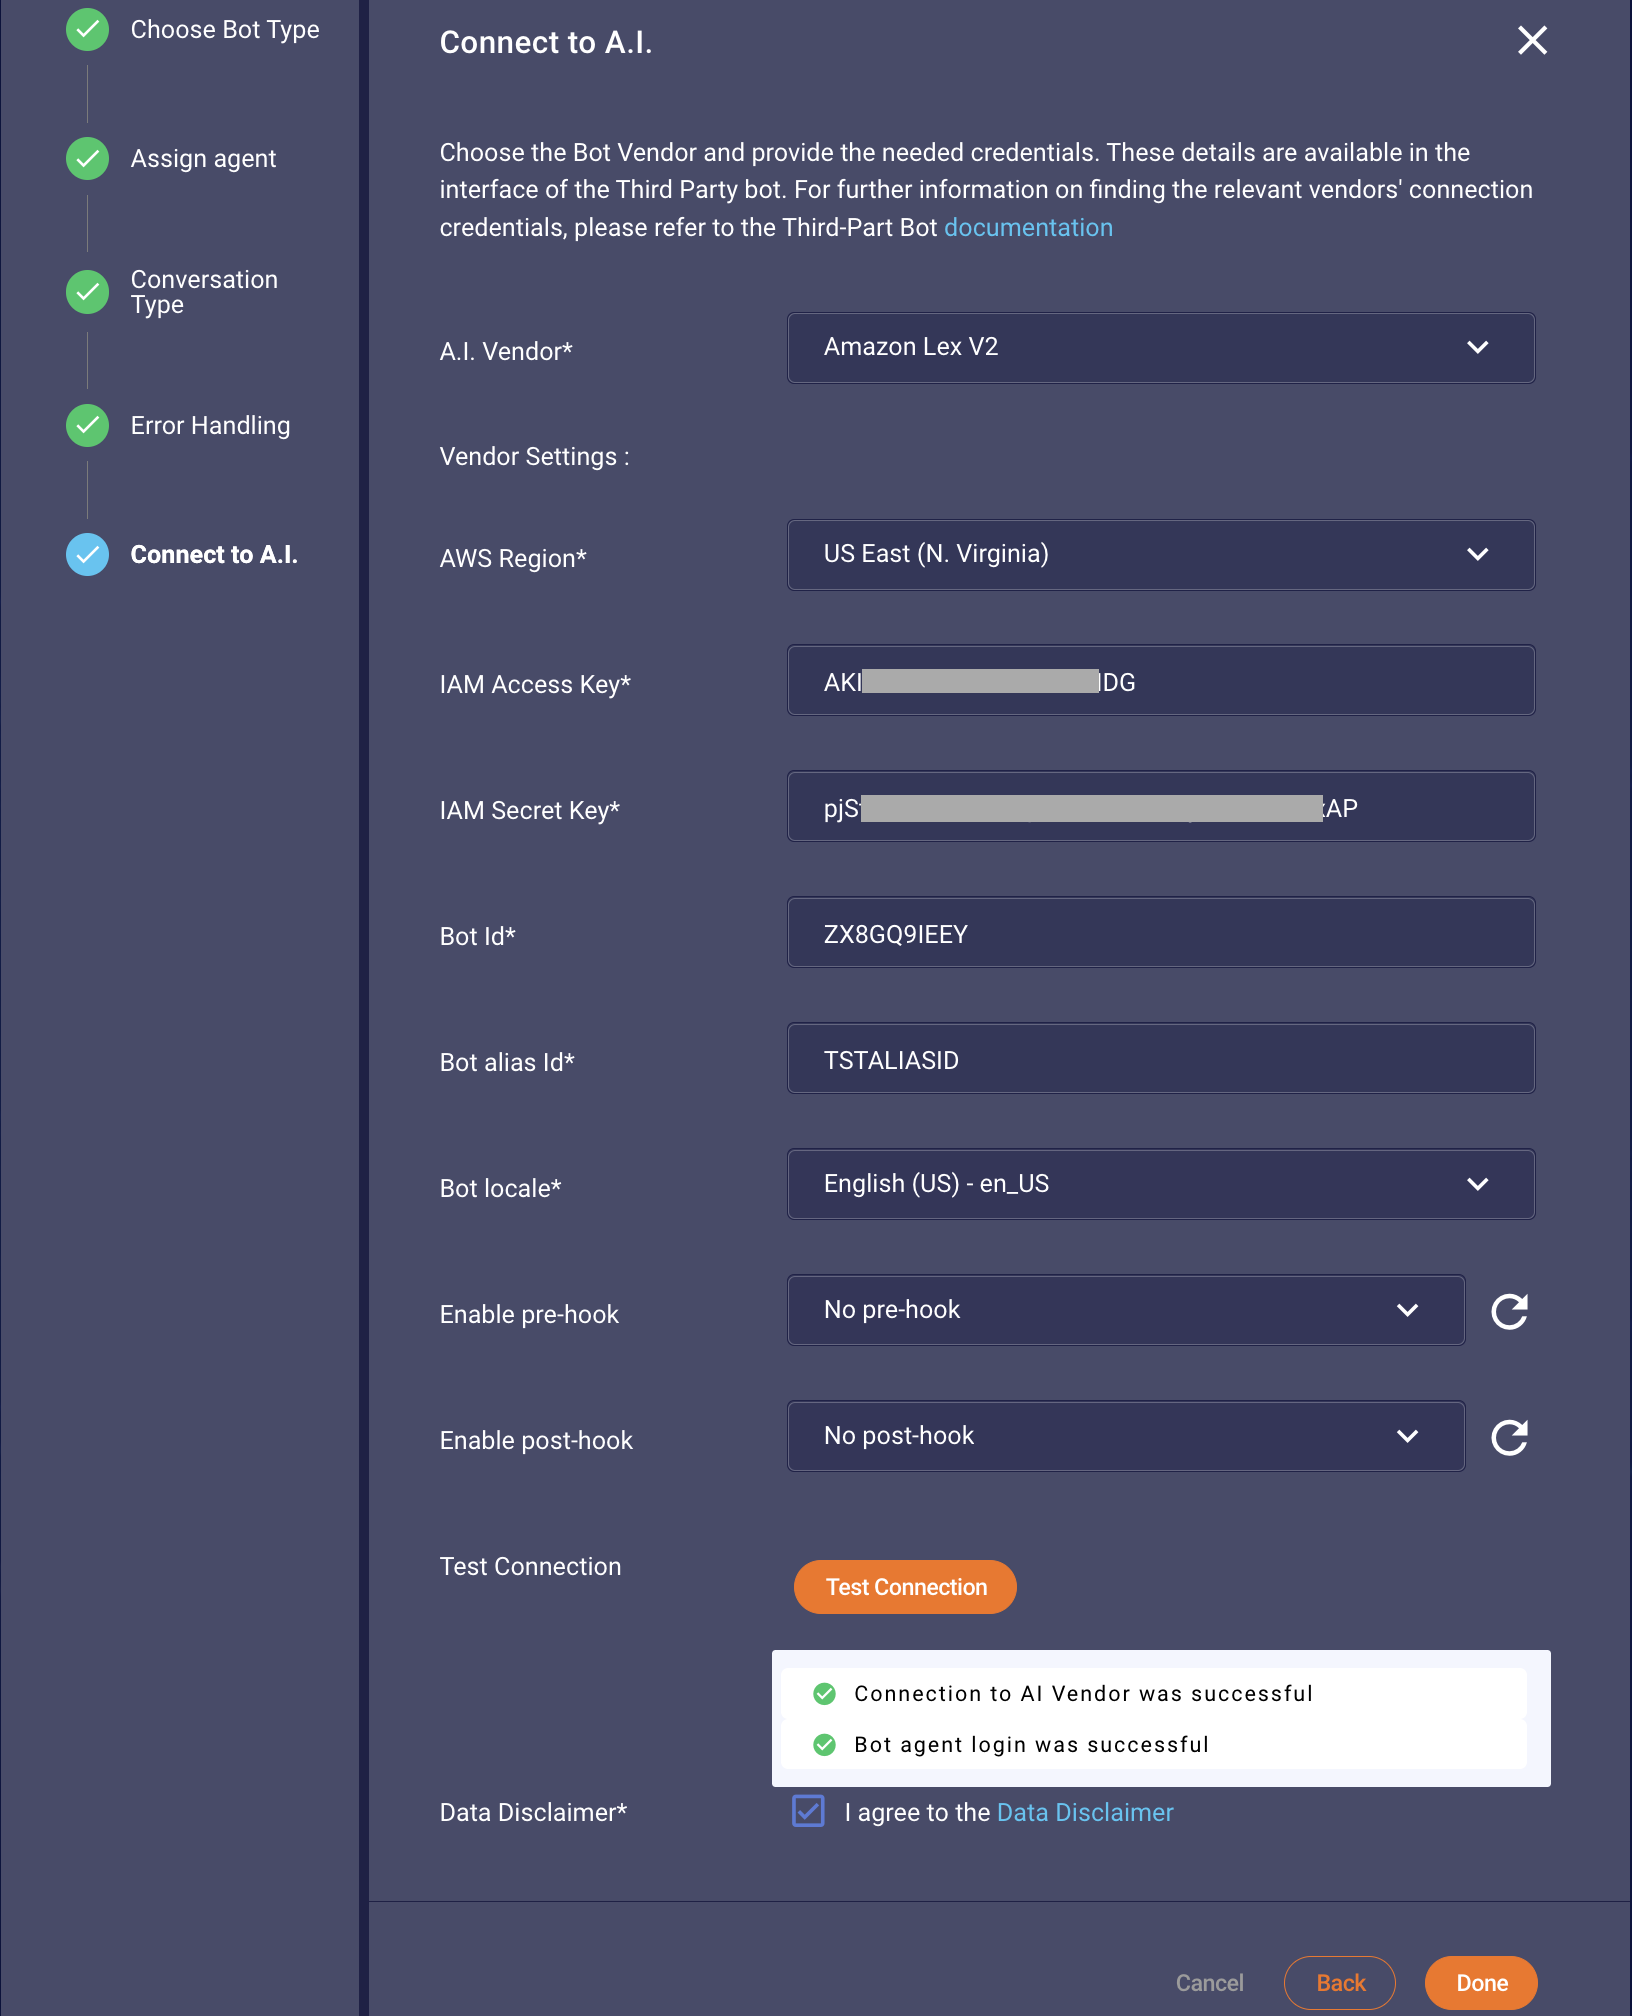
Figure 1.2 Showing the success case of the valid credentials
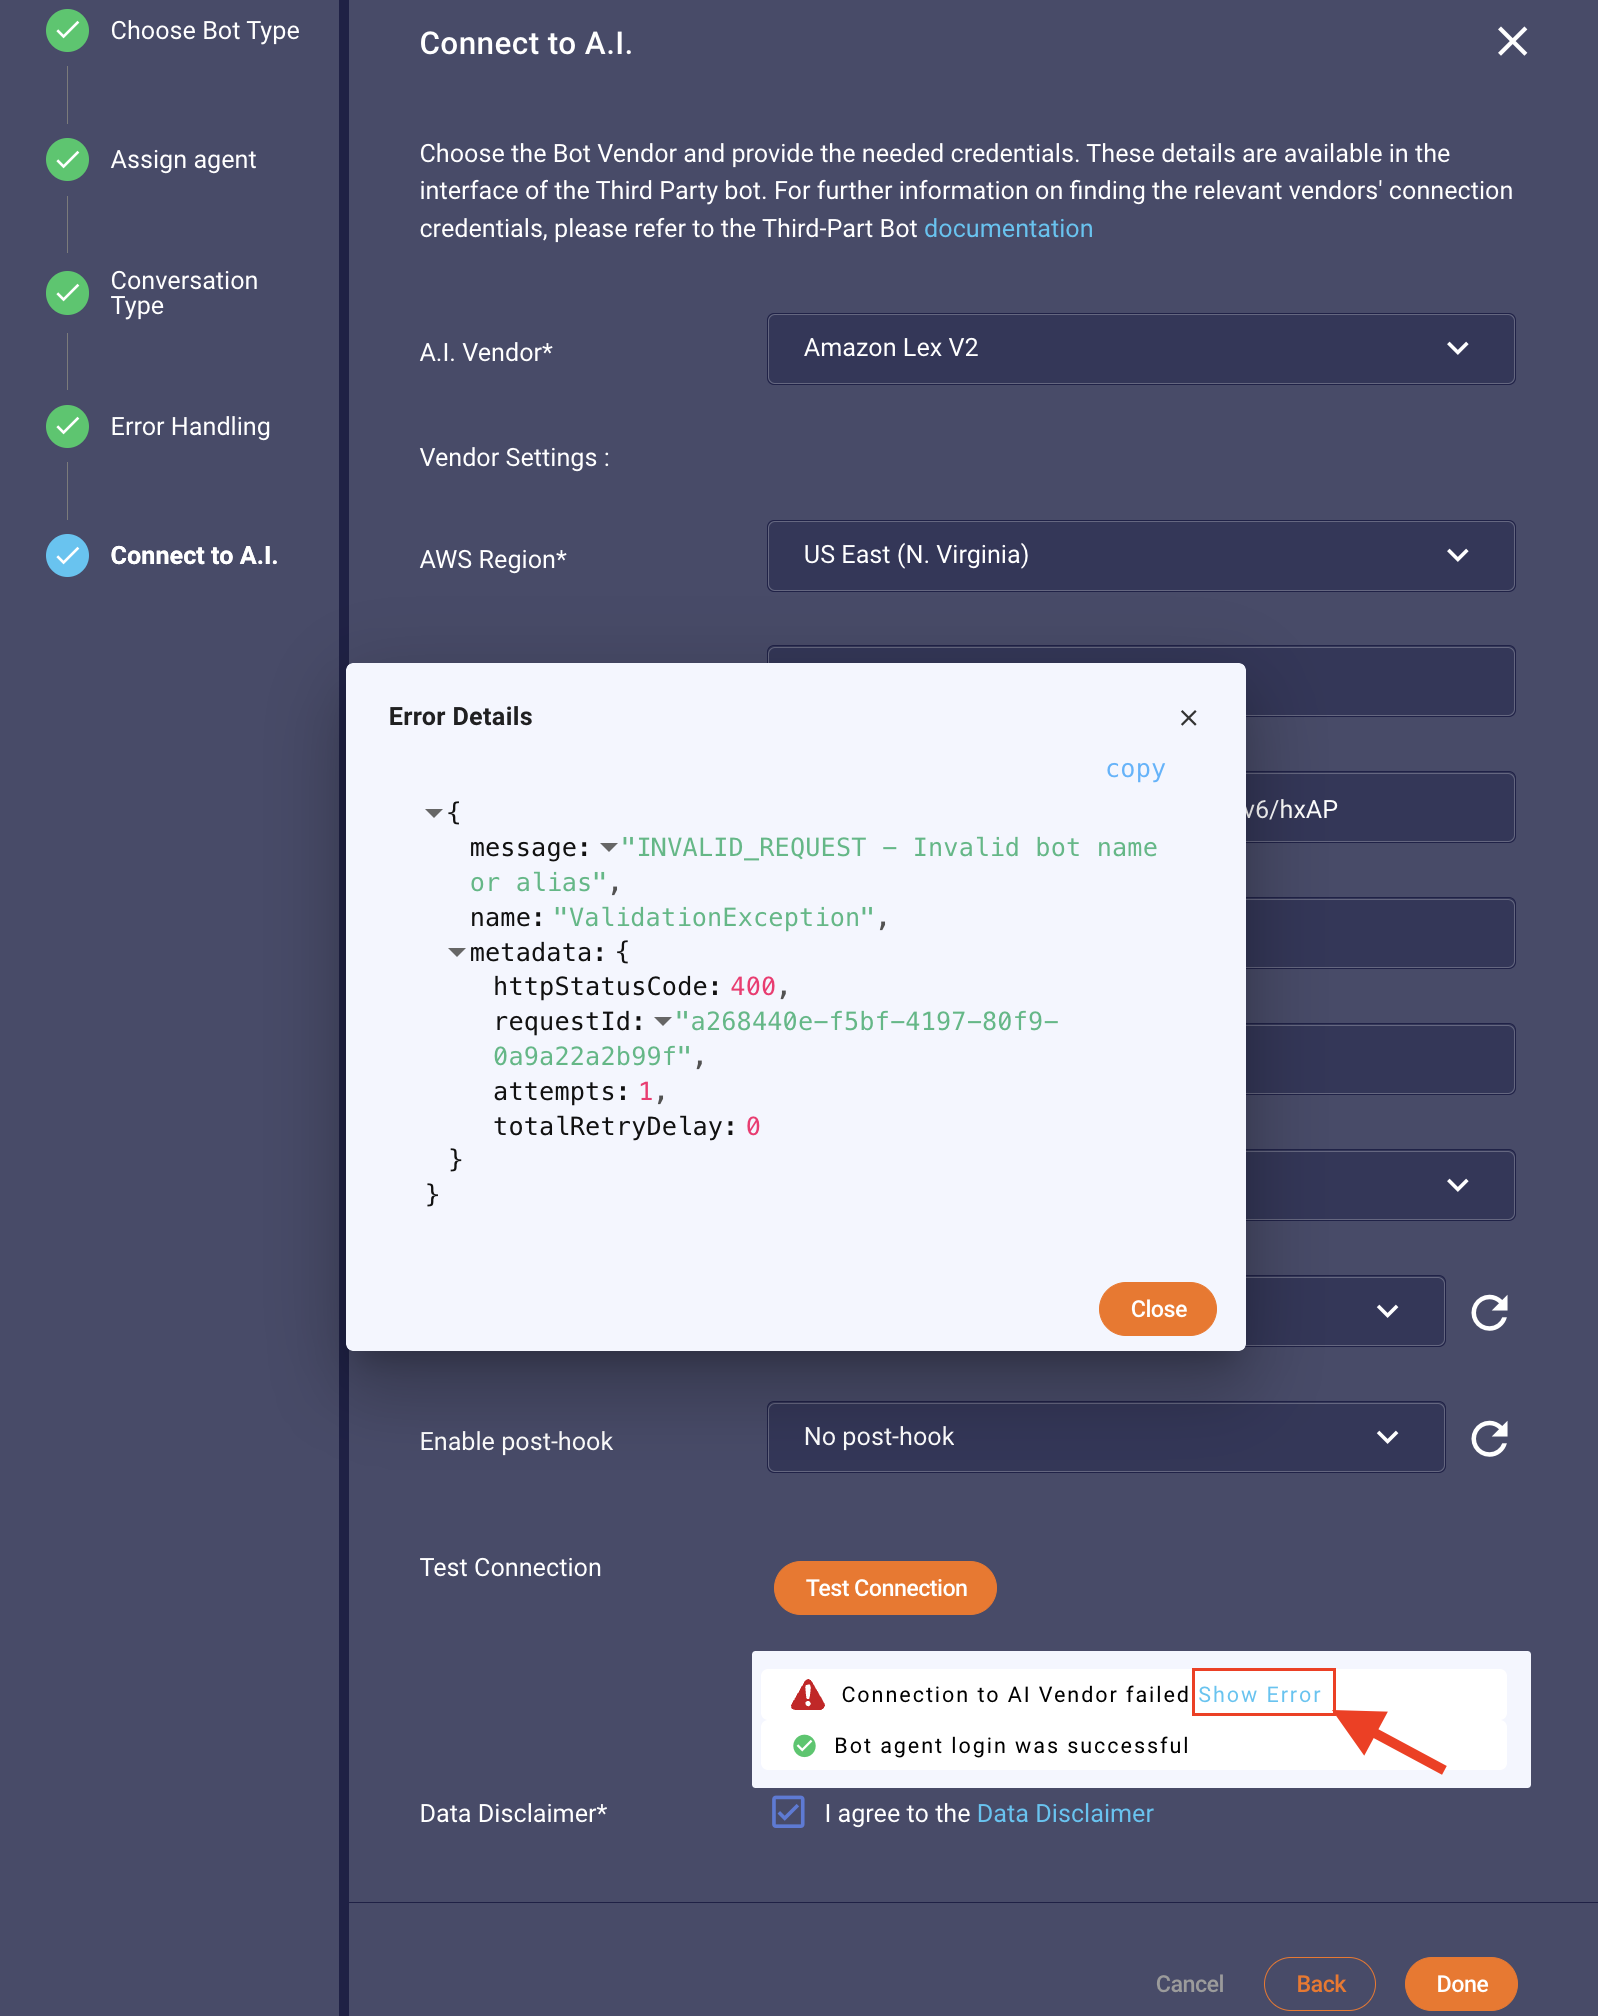
Figure 1.3 Showing the fail case of the invalid bot Id or alias as returned from Amazon Lex
Once you filled out all necessary fields, you can save the configuration by pressing "Done". Congratulations! You have completed the configuration of the Amazon Lex V2 bot connector.
Limitations
Max input text limitation
Lex has a limitation of 1024 characters on the length of the input text it can process. If the input length exceeds the limit, Third-Party Bots will truncate it and attach the original text length as a request attribute with the key BC-INPUTTEXT-LIMIT-EXCEEDED.
To handle this limitation gracefully we recommend adding a lambda function that checks the request attribute BC-INPUTTEXT-LIMIT-EXCEEDED if exists.
session timeout
Lex retains slot data and session attributes until a conversation session ends. The session default duration is 5 minutes. The session timeout value for intents in Lex can be increased from the Lex console if it is expected that it takes longer than 5 minutes to collect information from the customer and fulfill the request.
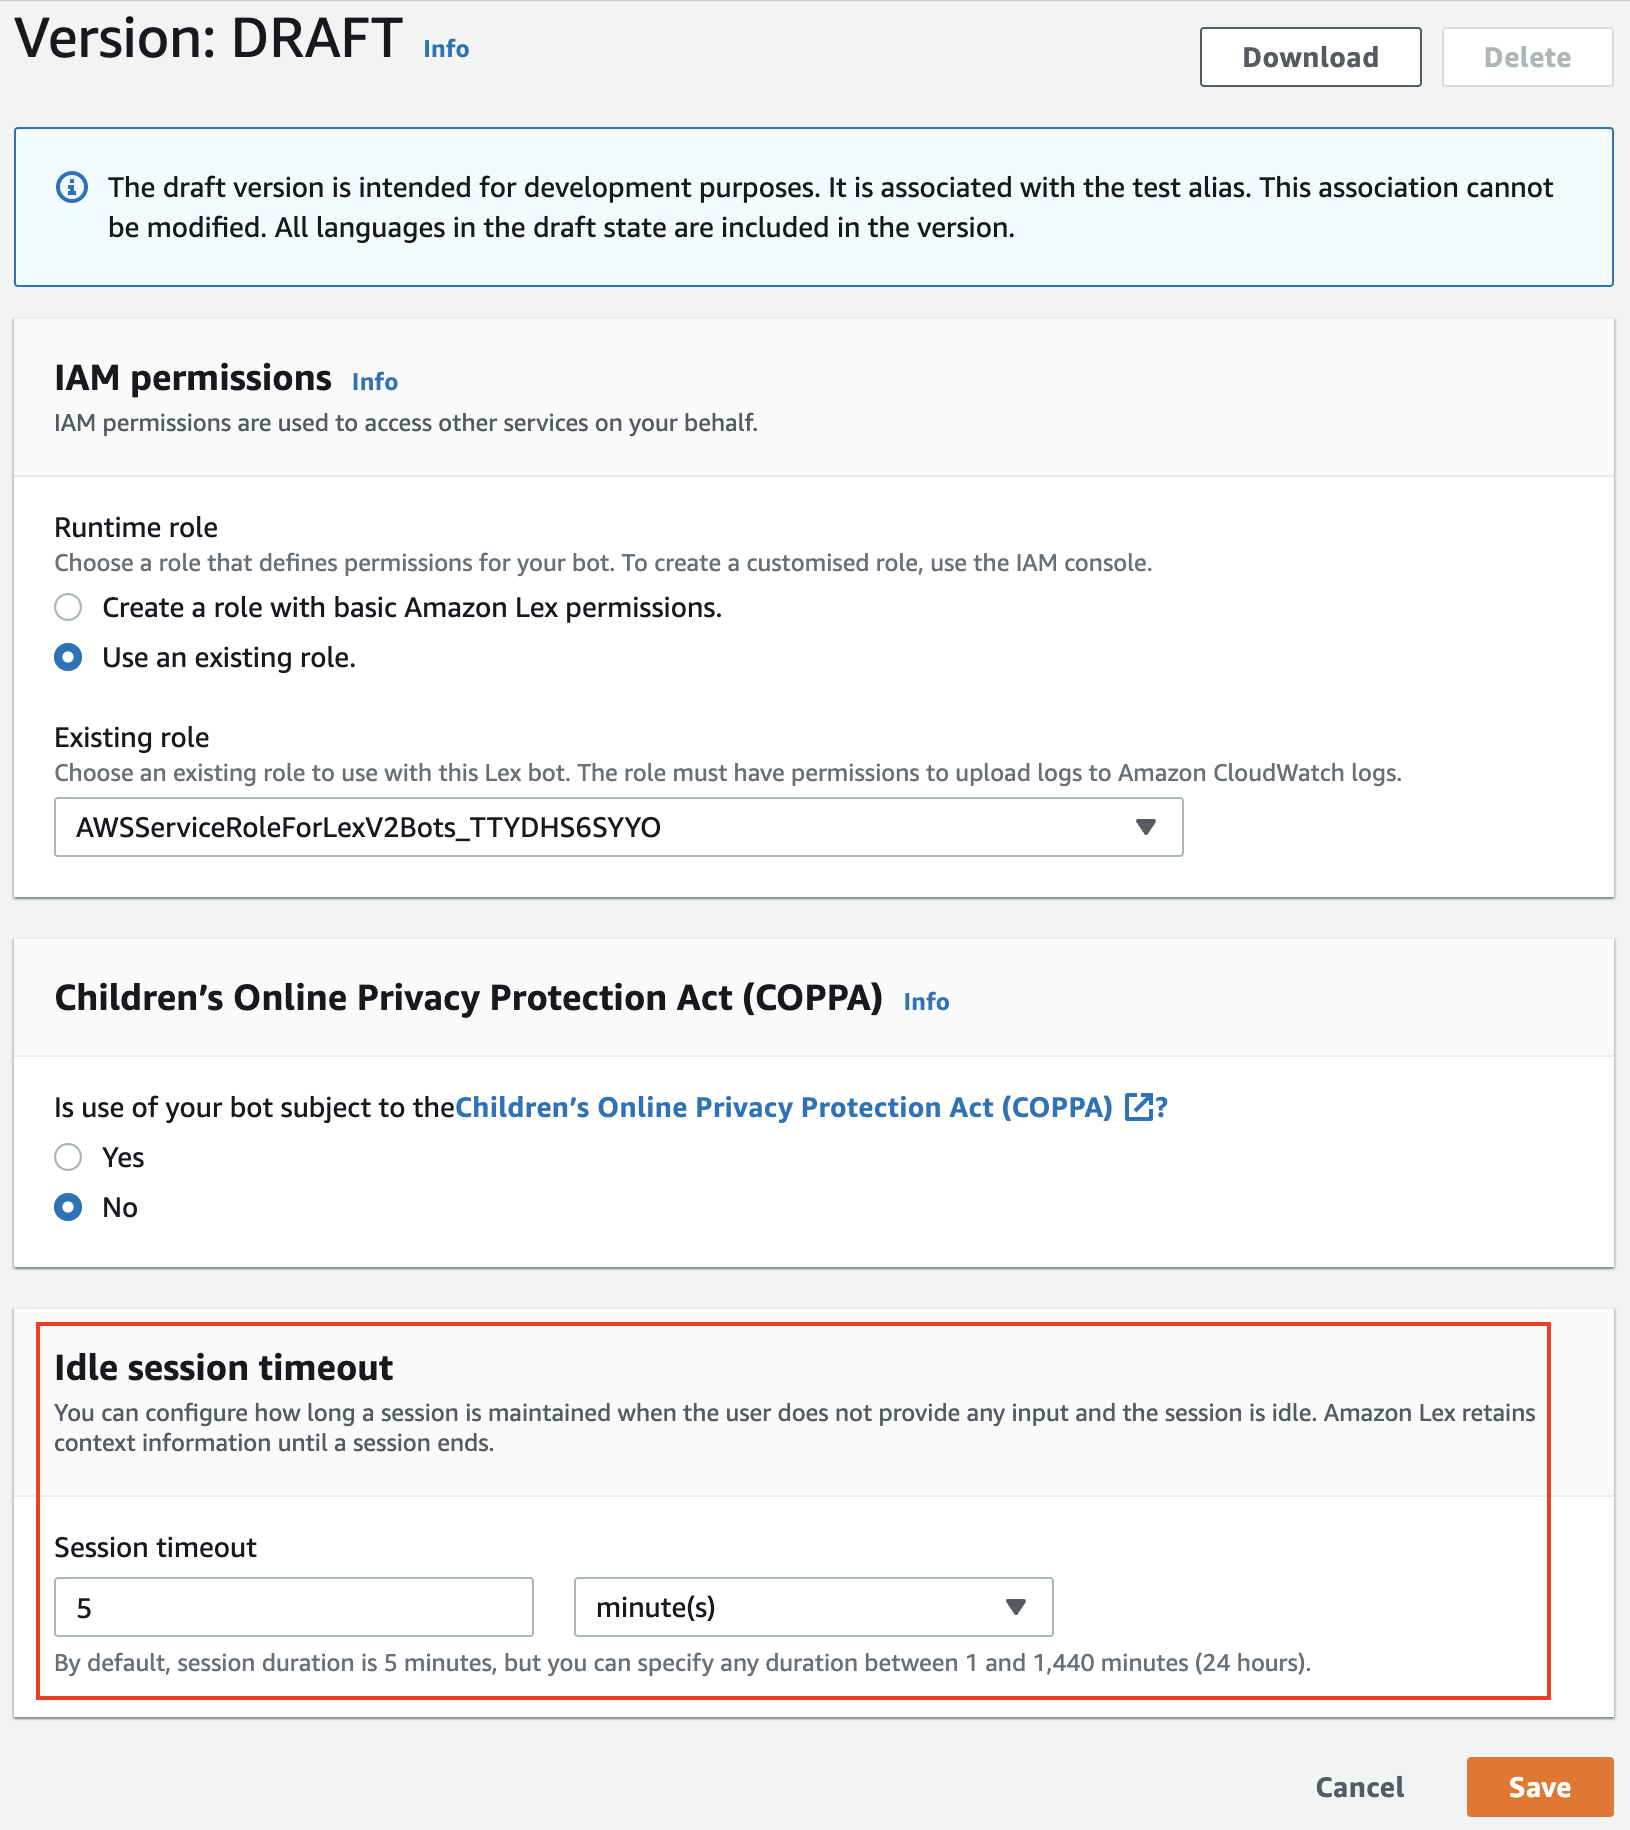
Figure 1.4 — Change session timeout for a specific bot version
SSML response
Lex Speech Synthesis Markup Language (SSML) is not supported by LivePerson. As a result, any response with the SSML type will be dropped by the Third-party bots connector.
Streaming to a bot
The Lex V2 streaming API allows for a bidirectional communication stream between the bot and the connector. This version of the Third-Party Bots connector does not support the streaming API.