Introduction
Resource owners can use the Bot Accounts area within LivePerson Conversation Builder to define credentials for accessing resources.
Once a credential is defined, you can attach it to a bot API integration. When the bot is processing a dialog and needs to call the API integration as a part of the dialog flow, the bot will use the associated credentials to authenticate and perform the necessary actions.
You define credentials per organization.
When working with API integrations, keep in mind that the authentication type that you select for a credential must be supported by the API that you intend to call. For example, don't use Basic Authentication if the API doesn't support it.
API credentials managers
There exists a permission in Conversational Cloud that you can assign to relevant profiles if you want the user to only be able to manage credentials for API and NLU integrations. It's named Conversation Builder: API Credentials Manager.
Whenever you assign this permission, also assign these permissions:
- Conversation Builder: Bot Builder Lite
- Conversation Builder: API Developer
Learn more about:
OAuth 2.0 using the Authorization Code grant type
You can create an OAuth 2.0 credential and use it in API integrations when you require the use of an access token that's obtained via the OAuth 2.0 protocol.
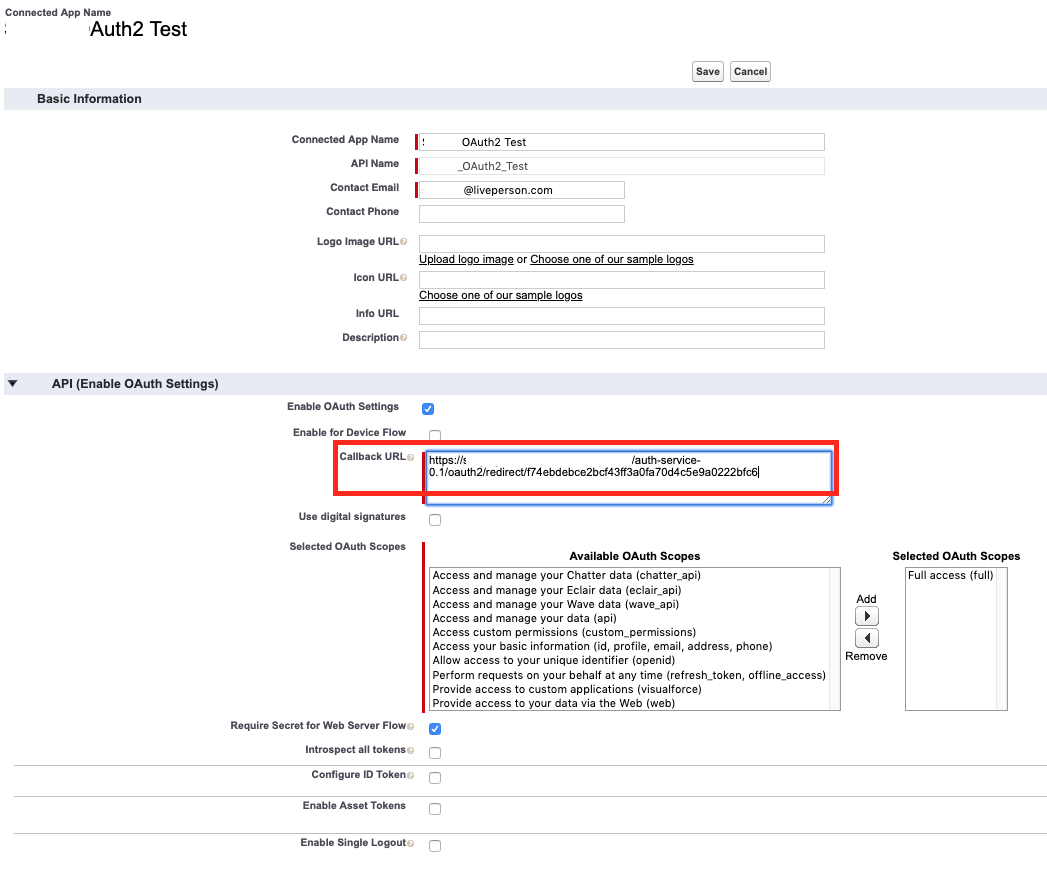
The images in this section illustrate creating an OAuth 2.0 credential to support integration with Salesforce in particular, as an example.
Optionally using Proof Key for Code Exchange (PKCE)
PKCE is an optional extension to the OAuth 2.0 protocol that provides an additional layer of security for authorization code grant flows.
When using the authorization code grant flow in OAuth 2.0, the client requests an authorization code from the authorization server, which is then exchanged for an access token. The authorization code is typically sent over a redirect from the authorization server to the client.
Without PKCE, there is a risk that an attacker could intercept the authorization code during this redirect and use it to obtain an access token for the client. PKCE mitigates this risk by requiring the client to generate a secret value called a "code verifier" and a hashed value called a "code challenge."
The client then sends the code challenge to the authorization server when requesting the authorization code, and the authorization server stores the code challenge with the authorization code. When the client exchanges the authorization code for an access token, it sends the code verifier to the authorization server, which hashes it to compare it to the stored code challenge.
If the code verifier matches the code challenge, the authorization server grants an access token to the client. This process ensures that only the client that originally requested the authorization code can exchange it for an access token, and not an attacker who intercepts the authorization code during the redirect.
Add an OAuth 2.0 credential using the Authorization Code grant type
- Access Bot Accounts, and select the name of the organization for which to create the credential.
- Click Credentials in the upper-left corner.
- Click Add Credential in the upper-right corner.
- In the Add Credentials dialog box, specify the following:
- Name: Enter a descriptive name.
- Authentication Type: Select "OAuth 2.0."
- Proof Key for Code Exchange (PKCE) extension for OAuth 2.0: Check this box if you want to provide this additional layer of security for the authorization code grant flow. PKCE is discussed above.
- Grant Type: Select "Authorization Code."
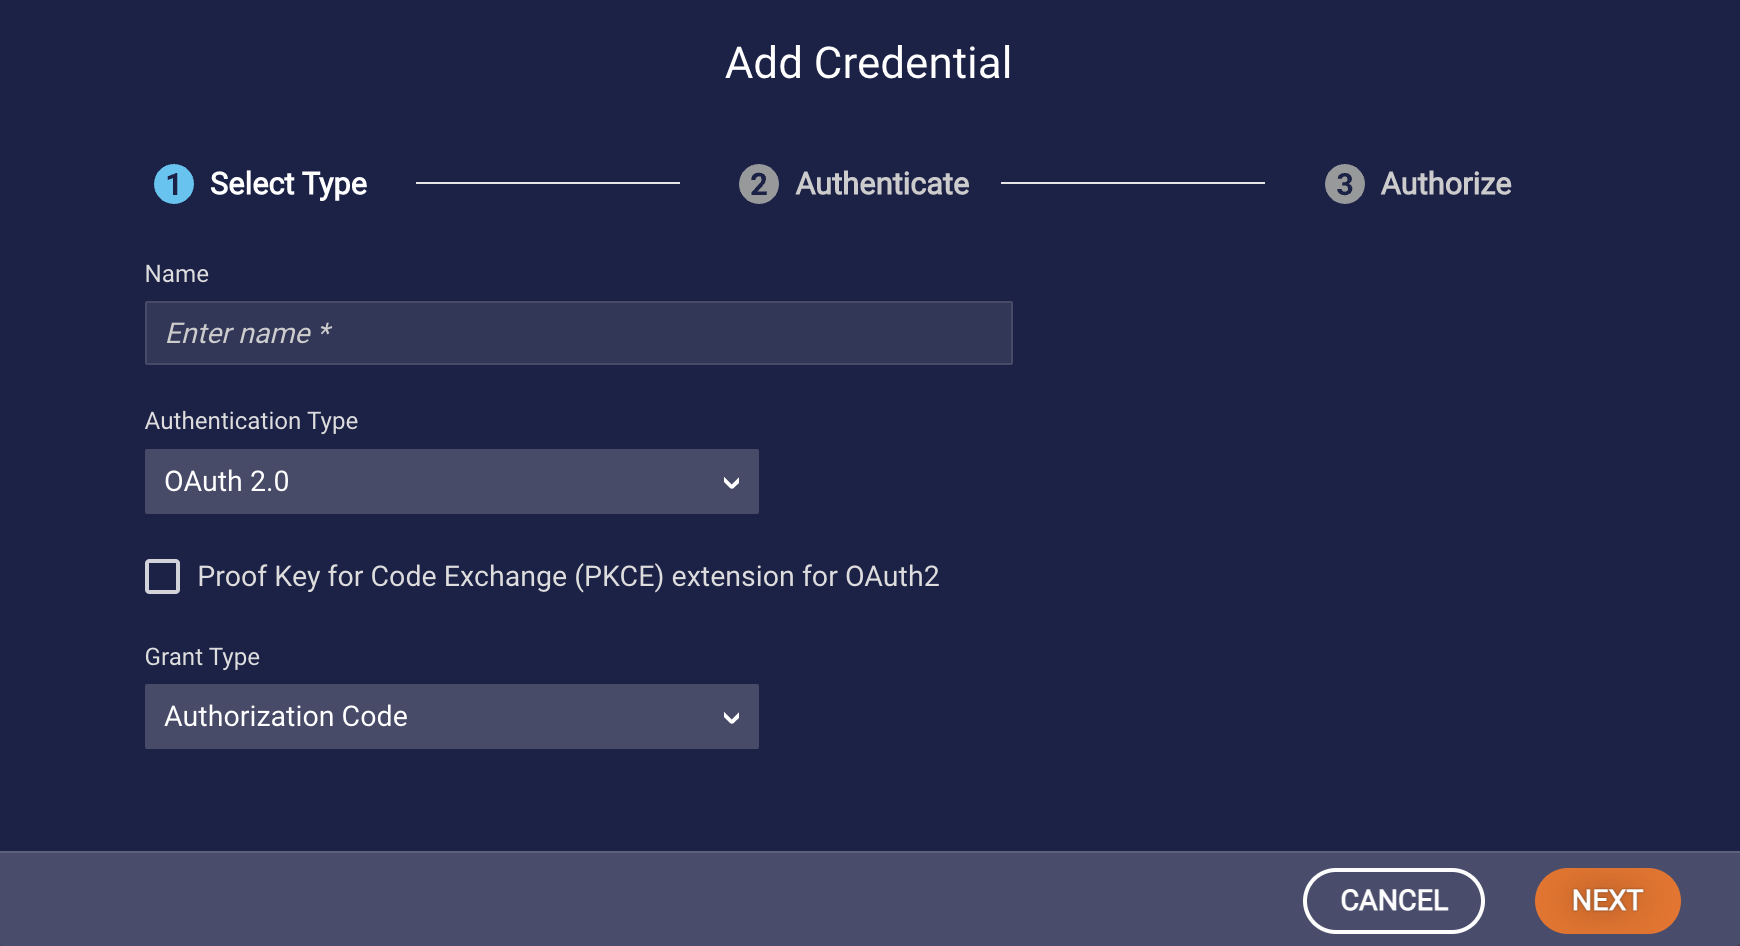
- Click Next.
-
Set the callback/redirect URI in the resource:
a. Click Copy to copy the redirect URI to your clipboard.
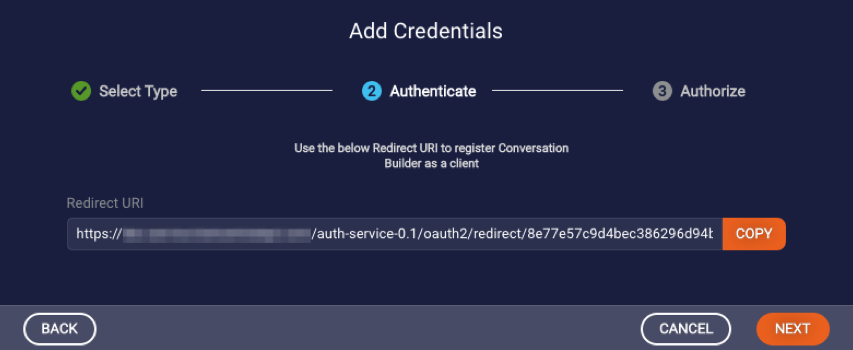 b. Go to the resource (for example, Salesforce), paste in/set the redirect URI there, and save.
- Click Next.
- In the Add Credentials dialog box, specify the following based on the OAuth 2.0 configuration in the resource application (where you earlier pasted the redirect URI):
- Client ID: A public ID that identifies the API client to the respective entity. Also called the consumer key/ID.
- Client Secret: A private secret that only the client should have. Used for verifying the client's identity before providing an access token to the API. Also called the consumer secret.
- Scope: (Optional) Used to define the scope of the access granted by the token. For example, read_only in some resource providers would mean that the token will only grant access to read APIs. This value is passed as is; it should conform to the OAuth 2.0 specification.
- Auth URL: Enter the auth URL (the auth end point). Used to exchange the OAuth2 credentials for a code that is later exchanged for an access token. Used only during the authorization process, which usually happens once.
-
Token URL: Enter the resource URL (the token end point). Used to exchange the OAuth2 credentials plus the code that was received from the Auth URL for an access token that will be used for making the secured API calls. Also used for refreshing the token when it expires.
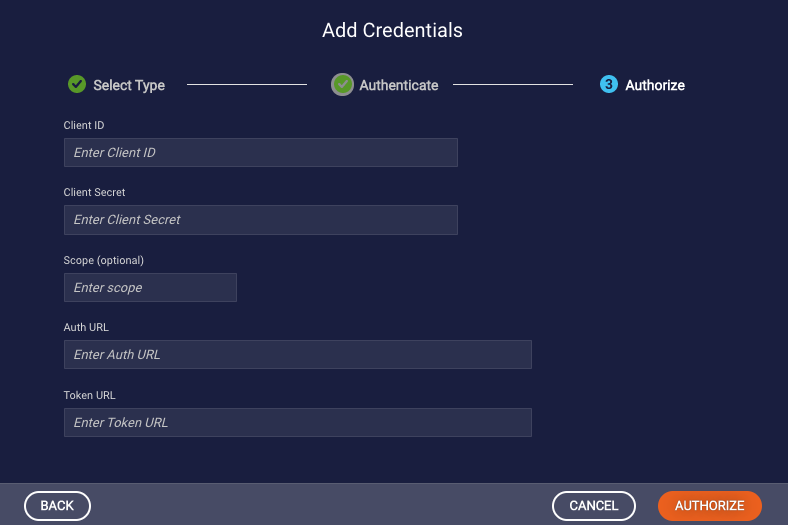
-
Click Authorize.
This adds the credentials and proceeds to authorize them with the resource. You are redirected to the resource for authentication. If a session is already cached, you might be redirected immediately back to Conversation Builder; otherwise, you'll have to allow authorization.
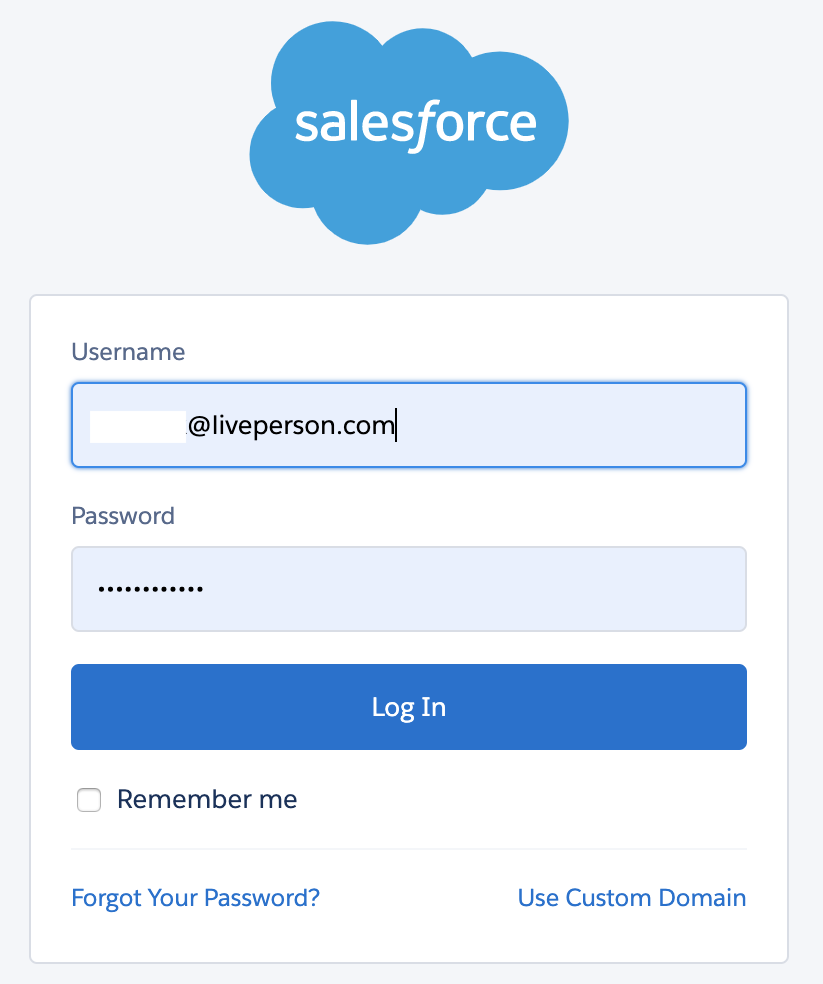
If the credentials are valid, you are then redirected back to Conversation Builder, and you'll see a confirmation message indicating that authorization passed successfully. At this point, the access token is captured via your brand’s endpoint and persisted in Conversation Builder, and it can be used by bots. If a refresh token was defined (recommended), it also is captured and persisted.
OAuth 2.0 using the Client Credentials grant type
You can create an OAuth 2.0 credential and use it in API integrations when you require the use of an access token that's obtained via the OAuth 2.0 protocol.
Add an OAuth 2.0 credential using the Client Credentials grant type
- Access Bot Accounts, and select the name of the organization for which to create the credential.
- Click Credentials in the upper-left corner.
- Click Add Credential in the upper-right corner.
- In the Add Credentials dialog box, specify the following:
- Name: Enter a descriptive name.
- Authentication Type: Select "OAuth 2.0."
- Grant Type: Select "Client Credentials."
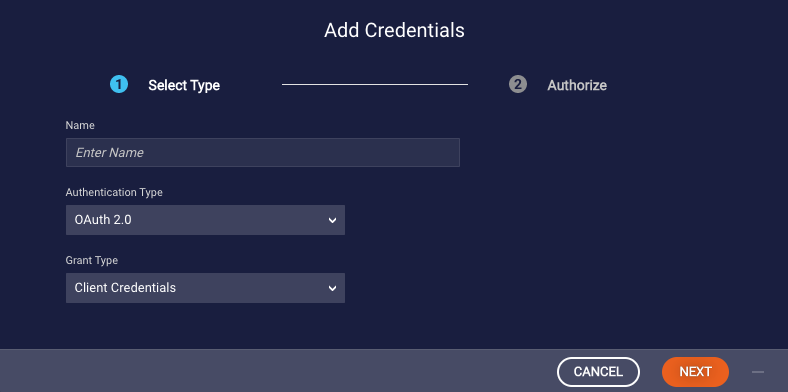
- Click Next.
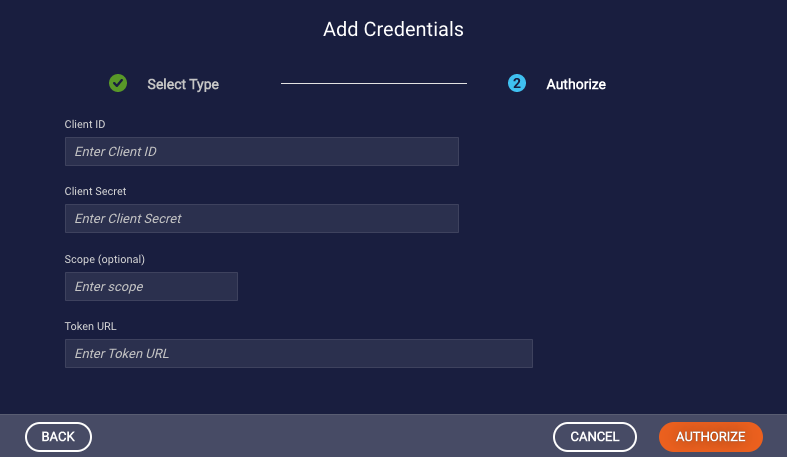
- In the Add Credentials dialog box, specify the following based on the OAuth 2.0 configuration in the resource application:
- Client ID: A public ID that identifies the API client to the respective entity. Also called the consumer key/ID.
- Client Secret: A private secret that only the client should have. Used for verifying the client's identity before providing an access token to the API. Also called the consumer secret.
- Scope: (Optional) Used to define the scope of the access granted by the token. For example, read_only in some resource providers would mean that the token will only grant access to read APIs. This value is passed as is; it should conform to the OAuth 2.0 specification.
-
Token URL: Enter the resource URL (the token end point). Used to exchange the OAuth2 credentials for an access token that will be used for making the secured API calls. Also used for refreshing the token when it expires.
-
Click Authorize.
If the credentials are valid, you'll see a confirmation message indicating that authorization passed successfully. At this point, the access token is captured via your brand’s endpoint and persisted in Conversation Builder, and it can be used by bots. If a refresh token was defined (recommended), it also is captured and persisted.
Automatic refresh of an OAuth 2.0 credential
During the initial setup of the credential, when you grant authorization, Conversation Builder retrieves and securely stores the access token from your brand's designated web endpoint. If you've also set up a refresh token (which we strongly advise), that will be stored as well.
It's important for the refresh token to have a significantly longer lifespan than the access token (for example, 7 days versus 24 hours). This difference ensures that the access token can be successfully renewed when it expires.
Access tokens are automatically renewed, but only when there's activity that requires them (like an API call). There isn't a scheduled background process for this renewal. If you've configured both an expiration time for the access token (which we recommend) and a refresh token, the refresh token will be used to get a new access token. If the refresh token is within 5 minutes of its own expiration, both the access token and the refresh token will be renewed before the intended API call is made.
You’ll need to manually reauthorize the credential in the following cases:
- At your endpoint, you’ve defined the expiry of the access token, but you haven’t defined a refresh token, and the access token has expired. (A configuration like this isn’t recommended so that processes can be automated as much as possible.)
- Both the access token and the refresh token have expired. (Refresh tokens should have a longer lifespan than access tokens, but they should also have an expiration date to limit potential abuse.)
As mentioned above, manual reauthorization captures and persists a new access token and, if applicable, a new refresh token.
Manually reauthorize an OAuth 2.0 credential
Currently, there’s no way to programmatically reauthorize the credential.
-
In the Credentials view, move your mouse over the credential in the list, click the
 icon, and then select Authorize from the menu that appears.
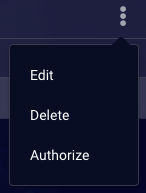
At this point, the access token is captured via your brand’s endpoint and persisted in Conversation Builder, and it can be used by bots. If a refresh token was defined (recommended), it also is captured and persisted.
Consumer Pre-Authentication
Consumer Pre-Authentication is a type of OAuth 2.0 authentication. If you’re authenticating your consumers and then storing and managing their digital identities using an identity provider (IdP) service, you can leverage that functionality in the Conversational Cloud, effectively federating their identities to LivePerson.
The Consumer Pre-Authentication credential lets you securely share those consumer tokens with registered LivePerson services (Conversation Builder, etc.). In turn, our services can use the tokens to:
- Validate consumers.
- Carry on authenticated conversations, without prompting the consumer to re-authenticate when powering multiple LivePerson use cases.
- Make API calls to your brand’s services on the consumer’s behalf (retrieve order details, make a payment, etc.).
Consumer Pre-Authentication (IdP) credentials are supported only in the LivePerson cloud (North America), not in the public cloud.
Using Consumer Pre-Authentication
In this authentication flow, the consumer is authenticated before a conversation with a bot ever begins. To set this up:
-
Configure your IdP service, so you can leverage it in Conversational Cloud. Learn more.
- In Bot Accounts, add a Consumer Pre-Authentication credential.
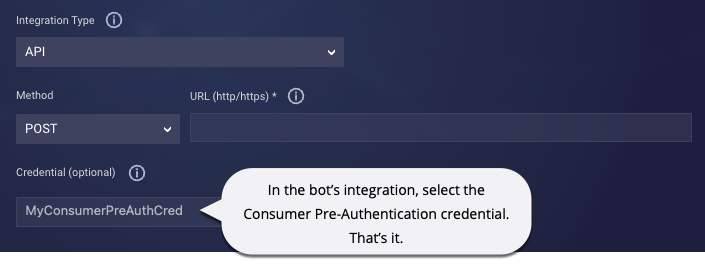
- In Conversation Builder, in an API integration in the bot, select the configured credential. This gets the consumer’s unique token from the IdP service when needed for the API call.
How does Consumer Pre-Authentication differ from Consumer Authentication?
The Consumer Pre-Authentication credential is somewhat similar to the Consumer Authentication credential: Both use an IdP service to provide consumer tokens when requested.
However, the authentication flows are different. With the former, the consumer is “pre-authenticated,” i.e., they’re authenticated before a conversation with the bot begins. With the latter, the consumer must complete an authentication challenge during the conversation in order to be authenticated.
Consumer Pre-Authentication is strongly recommended over Consumer Authentication for several reasons:
- It’s more secure. LivePerson securely stores and manages the consumer tokens in one, central place for use by all registered LivePerson services.
- It’s simpler for you. Lifecycle management is easier because you update the policies in one, central place instead of in multiple LivePerson services. What’s more, within your bot, the integration is implemented differently and more simply: Just select the Consumer Pre-Authentication credential as the one to use. That’s it.
- It’s simpler for your consumers. There’s no work for the consumer to do during the bot conversation.
- Token renewal is done automatically upon expiry.
Add a Consumer Pre-Authentication credential
Only one Consumer Pre-Authentication credential can exist per account.
- Access Bot Accounts, and select the name of the organization for which to create the credential.
- Click Credentials in the upper-left corner.
- Click Add Credentials in the upper-right corner.
- In the Add Credentials dialog box, specify the following:
- Name: Enter a descriptive name.
-
Authentication Type: Select “Consumer Pre-Authentication.”
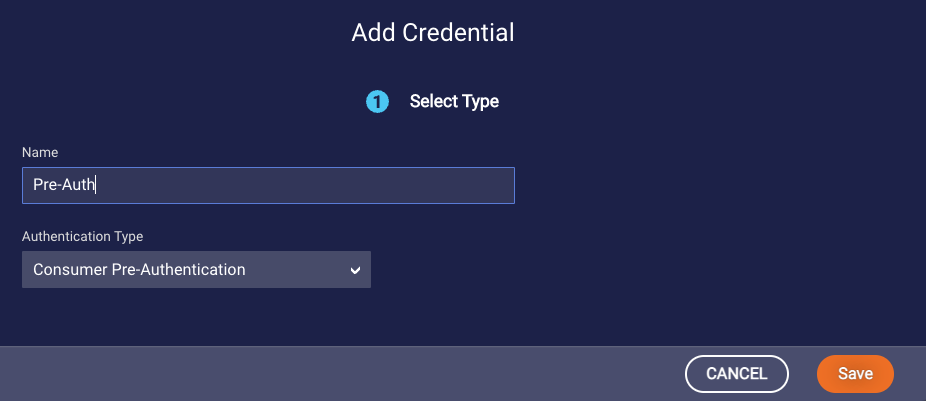
- Click Save.
Consumer Authentication
Unfamiliar with this credential? Learn more.
Consider using Consumer Pre-Authentication instead. It’s strongly recommended over this credential; learn why.
Add a Consumer Authentication credential
- Access Bot Accounts, and select the name of the organization for which to create the credential.
- Click Credentials in the upper-left corner.
- Click Add Credentials in the upper-right corner.
- In the Add Credentials dialog box, specify the following:
- Name: Enter a descriptive name.
- Authentication Type: Select “Consumer Authentication.”
- Click Next.
-
For Authentication URL, enter the authentication endpoint to be sent to the consumer in order to obtain an access token that is sent to the bot. An example is below. The URL is provided by the resource provider; see their documentation for this info.
The authentication URL must include the following query params:
- client_id={PROVIDE THE CLIENT ID}
- response_type=code
- redirectedCode={PROVIDE THE REDIRECT URI}
- scope={PROVIDE THE SCOPE}
- Click Save.
Authentication URL Example
https://accounts.brand.com/authorize?client_id=34e83335186541078261d83c6d050a32&response_type=code&redirect_uri=https://va.idp.liveperson.net/callback/12345566/redirectedCode&scope=user-read-private
Mutual Authentication
You can create a Mutual Authentication credential (Mutual TLS or mTLS) and use it in API integrations when you require an industry-standard, two-way authentication protocol where both the client and the server authenticate each other. A Mutual Authentication credential makes use of a key certificate and a trust certificate.
Key certificates
A key certificate is a key store file that contains private and public key pairs. A key certificate identifies the LivePerson platform as a valid entity that is allowed to interact with external systems. The recommended format is .p12 (PKCS12). You can generate a self-signed certificate pair using openssl or keytool, for example:
keytool -genkeypair -alias nt-ms -keyalg RSA -keysize 2048 -storetype PKCS12 -keystore cb-mtls-server.p12 -validity 3650 -ext SAN=dns:localhost,ip:127.0.0.1
You can verify the file using:
keytool -keystore somefilename.p12 -list
Trust certificates
A trust certificate is exported from the external system (e.g., Salesforce) to which the LivePerson platform makes the external call. The recommended file format is .pem.
When you add a Mutual Authentication credential, you can upload a trust certificate via the UI, or you can import it into the keystore as follows. If your keystore already has the trust certificate, then one provided via the UI is not required.
The PEM format is the most common format used for trust certificates. Extensions used for PEM certificates are .cer, .crt, and .pem. They are Base64-encoded ASCII files. The DER format is the binary form of the certificate. DER-formatted certificates do not contain the "BEGIN CERTIFICATE/END CERTIFICATE" statements. DER-formatted certificates most often use the .der extension.
You can convert a trust certificate to the required format using openssl. For example, the following commands convert a PEM-format file to DER and then import it into the keystore:
openssl x509 -outform der -in certificate.pem -out certificate.der
keytool -import -alias company-alias -keystore ./cb-mtls-server.p12 -file ./certificate.der
Standard TLS versus mTLS
With standard TLS, the trust certificate is validated by an external party known as a Certificate Authority (CA) to ensure that the client is communicating with a server that legitimately owns the domain. However, with mTLS, a provider can act as a CA itself and optionally provide a self-signed TLS trust certificate that they can validate.
Add a Mutual Authentication credential
- Access Bot Accounts, and select the name of the organization for which to create the credential.
- Click Credentials in the upper-left corner.
- Click Add Credential in the upper-right corner.
- In the Add Credentials dialog box, specify the following:
- Name: Enter a descriptive name.
- Authentication Type: Select "Mutual Authentication."
- Click Next.
- In the Add Credentials dialog box, specify the following:
- Key Certificate: This is required. Click Upload, and upload the file that contains the private and public keys. The file format must be .pfx, .p12 (recommended), or .jks. Note that the UI doesn’t verify that the uploaded certificate and keys are working; you must verify externally that they’re current and valid.
- Trust Certificate: This is optional. Click Upload, and upload the file that contains the trusted resources. The file format must be .crt, .cer, or .pem. As mentioned above, if your keystore already has the trust certificate, then one provided via the UI is not required. Note that the UI doesn’t verify that the uploaded certificate and keys are working; you must verify externally that they’re current and valid.
- Key Certificate Password: This is an optional field, but if the keys certificate requires a password (a standard practice), you must enter it here.
- Trust Certificate Password: This is an optional field, but if the trust certificate requires a password (a standard practice), you must enter it here.
- Cryptographic Protocols: Select the encryption/decryption protocols that are supported by the trusted resources. If you leave this blank, the default value of TLS 1.2 and TLS1.1 is used.
- Click Save.
Basic Authentication
You can create a Basic Authentication credential and use it in API integrations when the API has a permanent token that you always want to use. The token is created by the system using the user name and password that you specify, and it's valid as long as the password isn't changed.
Like the Access Token credential (discussed below), this type of credential isn't very secure, so it isn't used very often.
Add a Basic Authentication credential
- Access Bot Accounts, and select the name of the organization for which to create the credential.
- Click Credentials in the upper-left corner.
- Click Add Credential in the upper-right corner.
- In the Add Credentials dialog box, specify the following:
- Name: Enter a descriptive name.
- Authentication Type: Select "Basic Authentication."
- Click Next.
- In the Add Credentials dialog box, specify the following:
- User Name: Enter the user name for the system to use to create the token.
- User Password: Enter the password for the system to use to create the token.
- Click Save.
Access Token
You can create an Access Token credential and use it in API integrations when the API has a permanent token that you always want to use. You specify the token to use.
Like the Basic Authentication credential (discussed above), this type of credential isn't very secure, so it isn't used very often.
Add an Access Token credential
- Access Bot Accounts, and select the name of the organization for which to create the credential.
- Click Credentials in the upper-left corner.
- Click Add Credential in the upper-right corner.
- In the Add Credentials dialog box, specify the following:
- Name: Enter a descriptive name.
- Authentication Type: Select "Access Token."
- Click Next.
- In the Add Credentials dialog box, specify the following:
- Access Token: Enter the token.
- Token Type: Enter the type of token; typically, this value is "Bearer" or "Basic," but this field allows for free text to let you specify another third-party type that isn't supported by any protocol.
- Click Save.
Transfer to Messaging
A Voicebot that includes a Transfer to Messaging interaction to transfer the phone conversation to a messaging channel must use a "Transfer to Messaging" credential to perform the transfer.
The credential provides a client ID and client secret to establish a secure and authorized communication channel between the Conversation Builder Voicebot and LivePerson's Connect-to-Messaging (C2M) system.
Get the client ID and client secret from your LivePerson account representative.
The Voicebot must perform several API calls to accomplish the transfer to messaging. In the first API call, if the client ID is recognized and the client secret is valid, the C2M system provides an access token to use when making the rest of the API calls. This avoids revealing the client secret every time.
Add a Transfer to Messaging credential
- Access Bot Accounts, and select the name of the organization for which to create the credential.
- Click Credentials in the upper-left corner.
- Click Add Credential in the upper-right corner.
- In the Add Credential dialog box, specify the following:
- Name: Enter a descriptive name.
- Authentication Type: Select "Transfer to Messaging."
- Click Next.
- In the Add Credential dialog box, specify the following:
- Client ID: Enter the unique identifier that the LivePerson C2M system uses to identify Conversation Builder as a recognized client application. Get this client ID from your LivePerson account representative.
- Client Secret: Enter the secret key that's used to verify that Conversation Builder is authorized to access the LivePerson C2M system. Get this client secret from your LivePerson account representative.
- Click Save.
Third-party NLU
This procedure applies if you're using a Google Dialogflow or IBM Watson NLU engine for NLU intelligence.
While the credential types discussed above support API integrations, a third-party NLU credential is different in that it's used during domain training in Intent Manager. Use it to authenticate with the third-party NLU engine.
Add a third-party NLU credential
- Access Bot Accounts, and select the name of the organization for which to create the credential.
- Click Credentials in the upper-left corner.
- Click Add Credential in the upper-right corner.
- In the Add Credentials dialog box, specify the following:
- Name: Enter a descriptive name.
- Authentication Type: Select "Third-party NLU."
- Click Next.
- In the Add Credentials dialog box, specify the following:
- NLU Provider: Select the NLU provider.
- Credentials: Paste here the credentials that you received from the NLU provider when you set up the service. The credentials must be in JSON format.
- Click Save.
Delete a credential
Before deleting a credential, manually verify that it isn't in use by a bot or, in the case of third-party NLU credentials, by a domain. If the credential is in use, you'll need to reconfigure the bots or domains as appropriate.
To delete a credential
- Access Bot Accounts, and select the name of the organization for which to delete the credential.
- Click Credentials in the upper-left corner to display the list of credentials.
- Select the credential, and then click the
 icon that appears.
 - Select Delete.
- Click Continue in the confirmation dialog.
