
This is a tutorial series that's cumulative in nature. To start from the beginning, start here.
During an automated voice conversation, there are times in the flow when you might want to transfer the call to one of your supported messaging channels. In this tutorial, you do just this, using the SMS channel.
Step 27: Create a skill and assign it to yourself
Your consumers interact with your agents who are skilled in different areas. In LivePerson’s Conversational Cloud, these capabilities are represented by what we call “skills,” which you assign to agents. In this step, you create a skill and assign it to yourself. You’ll make use of this new skill later on.
- On the menu on the left side of the page, click Manage > Users & Skills.
- Select your name in the list of users.
-
Scroll down to the bottom and, for Skills, enter “human.” When prompted, select the link to create the skill.
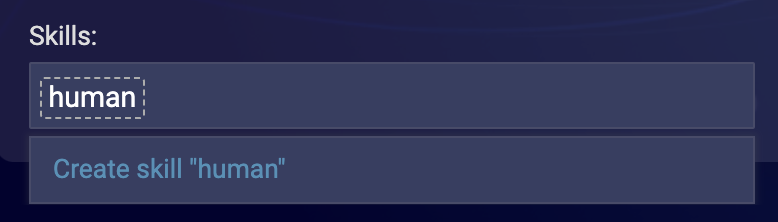
Typically, skills are named more specifically, e.g., “Sales” or “Support.” But for the purpose of this tutorial, “human” will work fine.
-
Click Save.
This creates the “human” skill and assigns it to your user.
Step 28: Get a Telnyx number
You need a Telnyx phone number that Conversational Cloud can use to send SMS messages to the consumer, which will be you in this tutorial.
Telnyx is a Communication Platform as a Service (CPaaS) provider. It’s a gateway and infrastructure provider that lets applications connect to the global phone network and send/receive SMS messages.
Take one of the following approaches to proceed:
- Use a Telnyx number that you own and manage: You can port your own number.
- Use a Telnyx number that LivePerson owns and manages: In this case, the cost to purchase the number and any SMS messages sent using it are passed on to you.
In either case, contact your LivePerson account representative to have this step (port or purchase) completed by LivePerson. If needed, we’ll get the number and ensure it’s activated. And we’ll associate the number with your account.
Step 29: Configure and activate SMS in Conversational Cloud
In this step, you set up the SMS integration in Conversational Cloud. This integration provides the gateway for sending SMS messages.
- In Conversational Cloud, on the menu on the left side of the page, click Manage > Channel Setup.
-
In the SMS card, click Get Started. (If you have SMS integrations already set up for one or more phone numbers, click Configure instead.)

-
On the SMS Integrations Dashboard, click Create New SMS Integration.
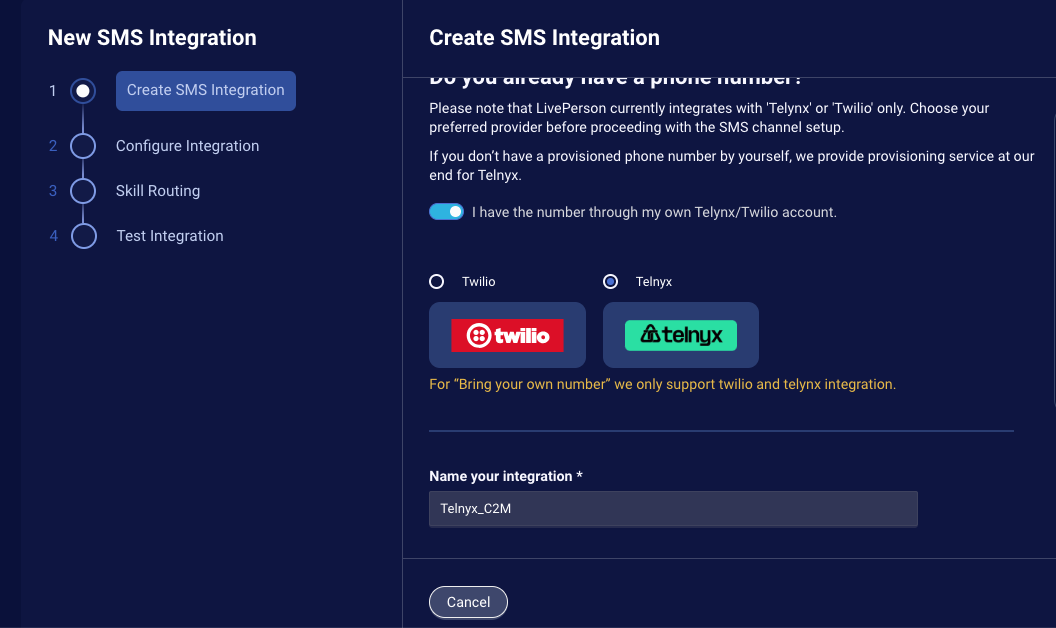
This begins the SMS Channel Setup Wizard, which takes you through the process of creating an SMS integration.
-
Turn on the toggle named, “I have the number through my own Telnyx/Twilio account,” select the Telnyx radio button, and enter a name for the integration, e.g., “Telnyx_C2M.” (This suggested name communicates two points: 1) it’s a Telnyx number, and 2) it’s used for C2M deflection.) Click Next.
-
Enter the configuration details for the Telnyx integration:
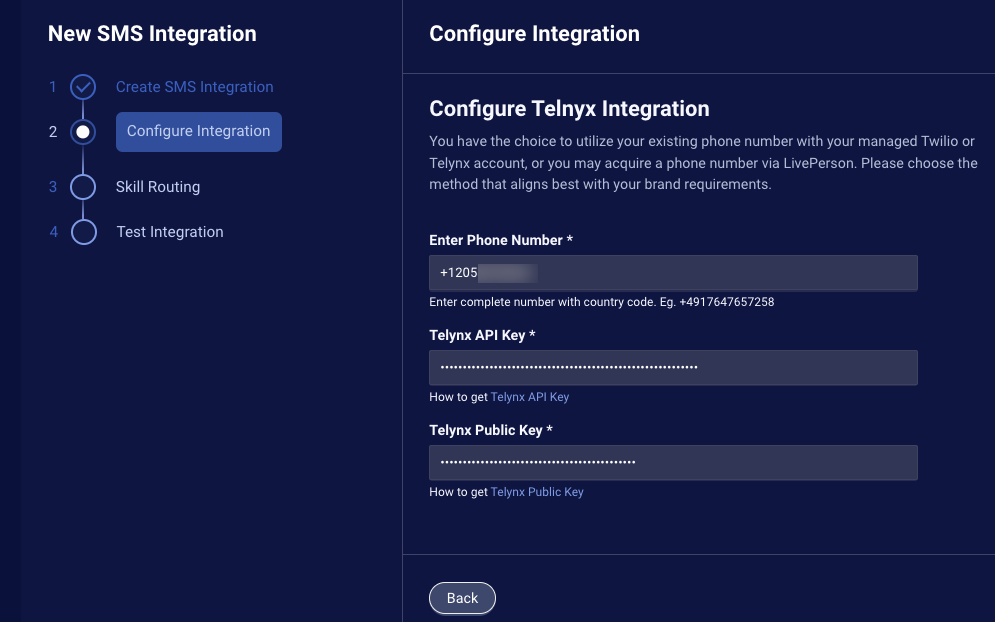
- Telnyx Phone Number: This is either the number that you ported or the one procured via LivePerson. As shown in the example in the UI, remove any hyphens from the number when entering it.
- Telnyx API Key: If you ported a number, get this from the Telnyx site. If you procured a number via LivePerson, get this from your LivePerson representative.
- Telnyx Public Key: If you ported a number, get this from the Telnyx site. If you procured a number via LivePerson, get this from your LivePerson representative.
-
Click Next, and when prompted, click Proceed to create integration to confirm the action.
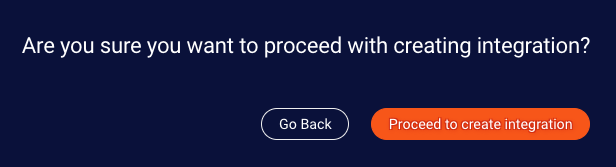
After this step, the system creates the integration.
If there are any errors, you are notified. In the case of errors, recheck the data that you entered into the form.
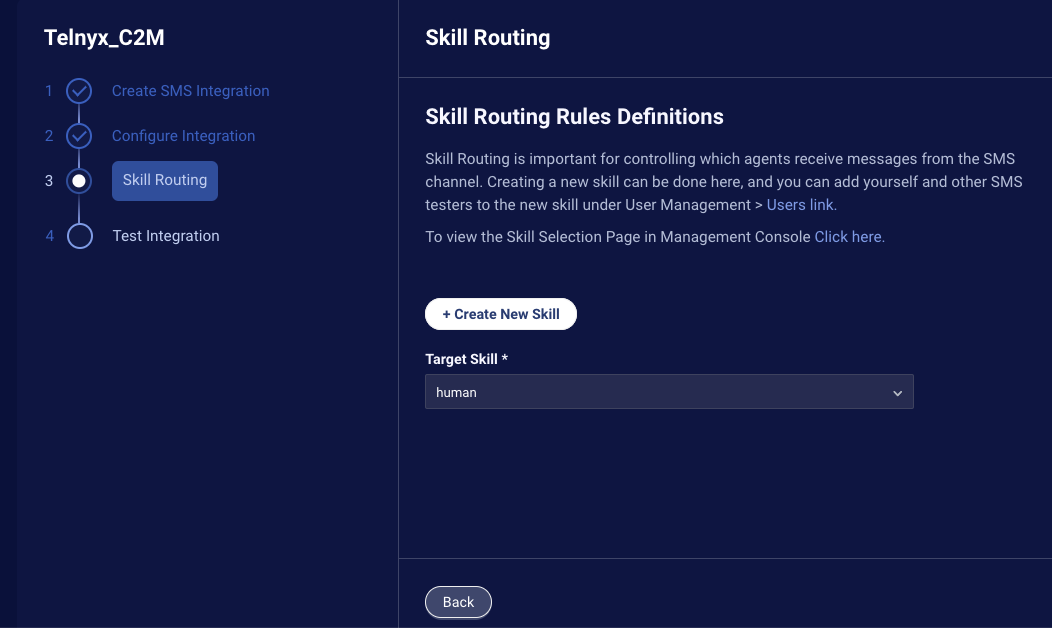
Next, you specify the “human” skill that you created earlier as the Target Skill in the SMS integration. In this way, you control which agents receive SMS messages from the Telnyx number. In this case, the agent is you.
-
For Target Skill, select “human,” and click Next.
-
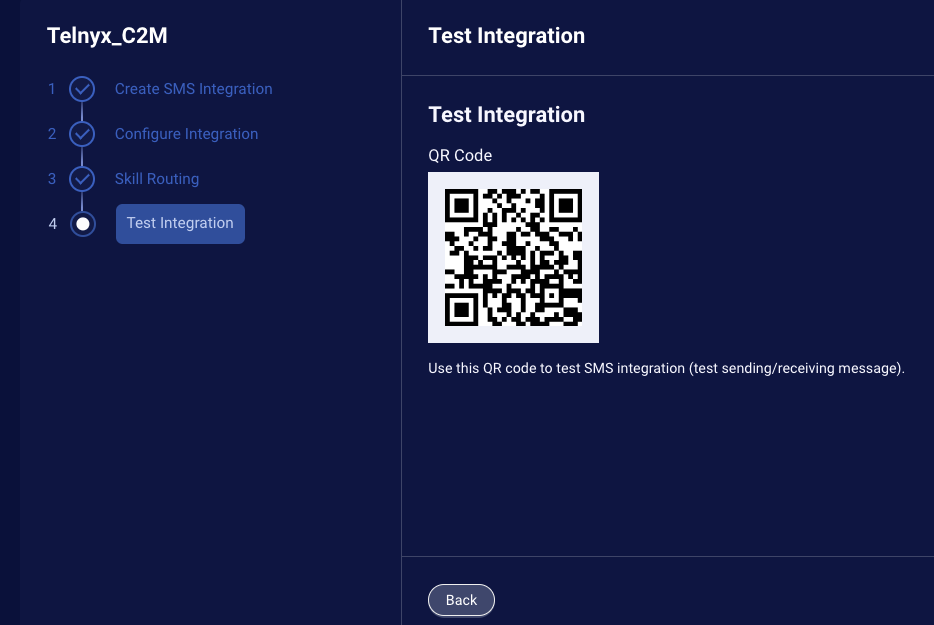
Use your phone to test the integration: With your phone, scan the QR code, and use the option that appears to send an SMS message to the Telnyx number. If the process works correctly, this should start a new messaging conversation in the Agent Workspace, which you can accept and use to test sending and receiving messages using the Telnyx phone number. Once done, click Next.

Step 30: Create the Transfer to Messaging credential
- On the menu on the left side of the page, and select Automate > Conversation Builder.
- On the dashboard page that lists all of your bots, select Bot Accounts from the menu in the upper-left corner.
- Select your organization name (number).
- Select Credentials from the menu in the upper-left corner.
- Click Add Credential in the upper-right corner.
-
Specify the following:
- Name: Enter “myC2MCredential.”
- Authentication type: Select “Transfer to Messaging.”
- Click Next.
-
Specify the following:
- Click Save.
Step 31: Configure the C2M system
In this step, you configure the LivePerson Connect To Messaging (C2M) system.
- On the left navigation menu, click Engage > Connect to Messaging.
- If this is your first time accessing the system, click Get Started in the lower-left corner.
-
Click Settings in the upper-right corner. (If you don’t see this option, try refreshing the browser window.)
Next you enable the messaging channel that you intend to use, in this case, SMS.
- Select Channels on the left.
-
Verify the SMS channel is turned on (enabled). If it isn’t, turn it on, and save the change.

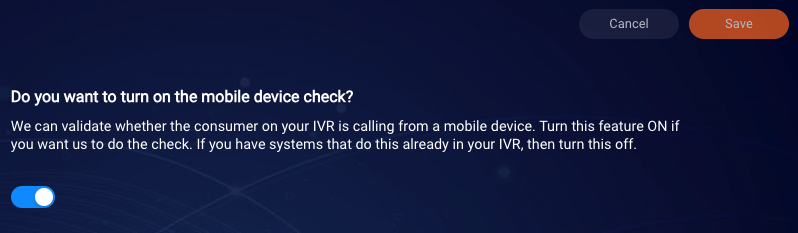
Next you turn on the C2M system check that determines whether the consumer’s number is a landline or a mobile number.
-
Select Device Check on the left, and turn on the toggle. Click Save.
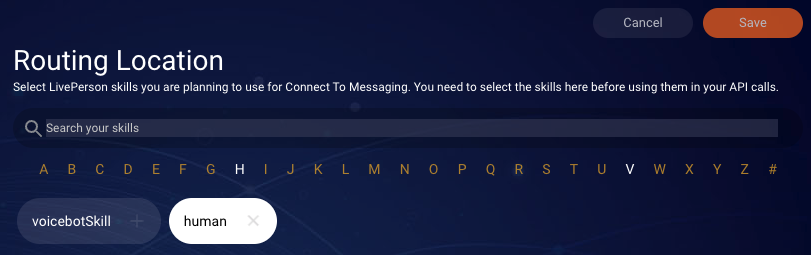
Next you enable the skill to which you’ll be transferring the conversation.
-
Select Routing on the left, select the “human” skill, and click Save.
Next you create an API handoff. This is the group of configuration settings to use when the Voicebot calls the API that checks the device’s eligibility to receive messages. You leave the Settings area to do this.
- Select API Handoffs from the menu in the upper-left corner.
-
Click New Handoff.

-
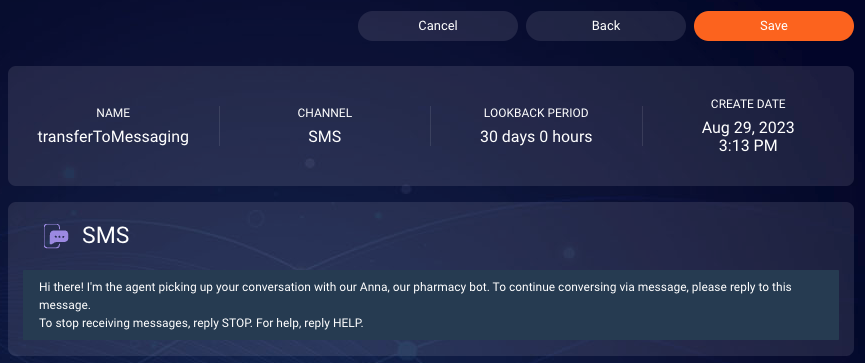
Specify the following:
- Title: Enter “transferToMessaging.”
- LookBack Period: Leave as is.
- Select and Set Channel Priority: Ensure SMS is first in the list and is turned on.
- Click Next.
-
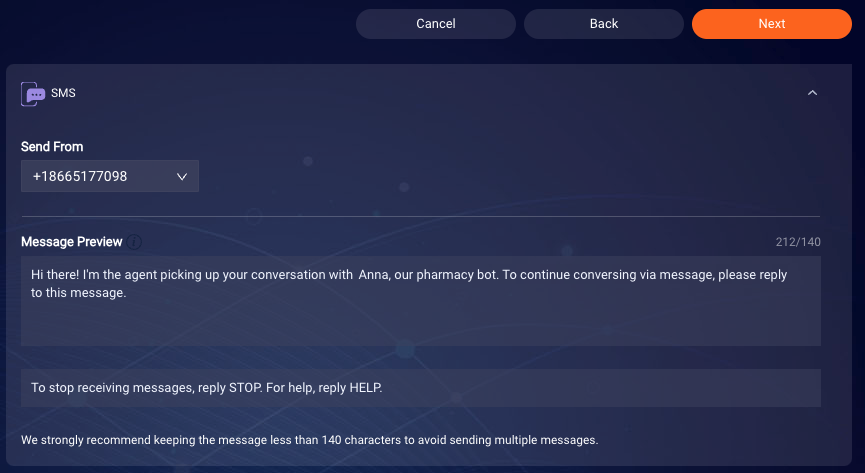
Do the following:
- Send From: Ensure your Twilio phone number is selected.
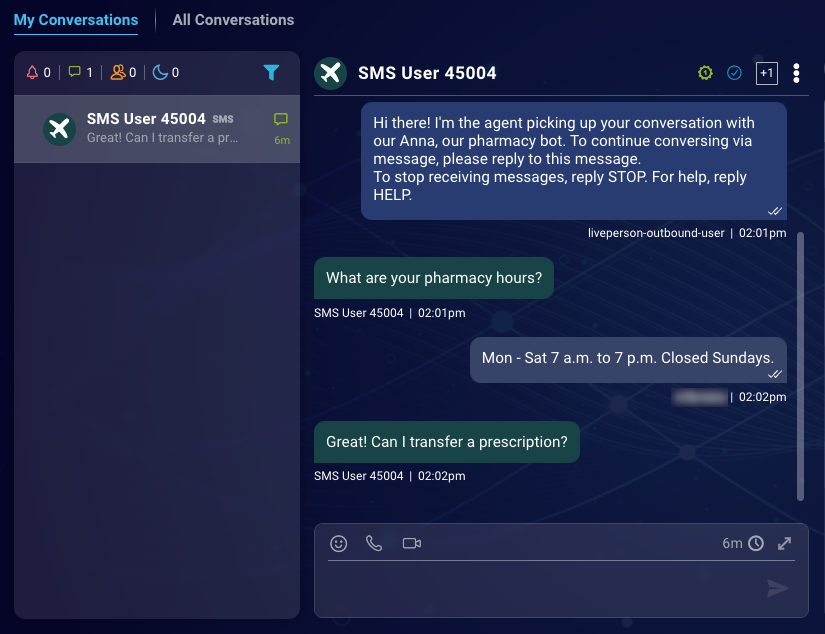
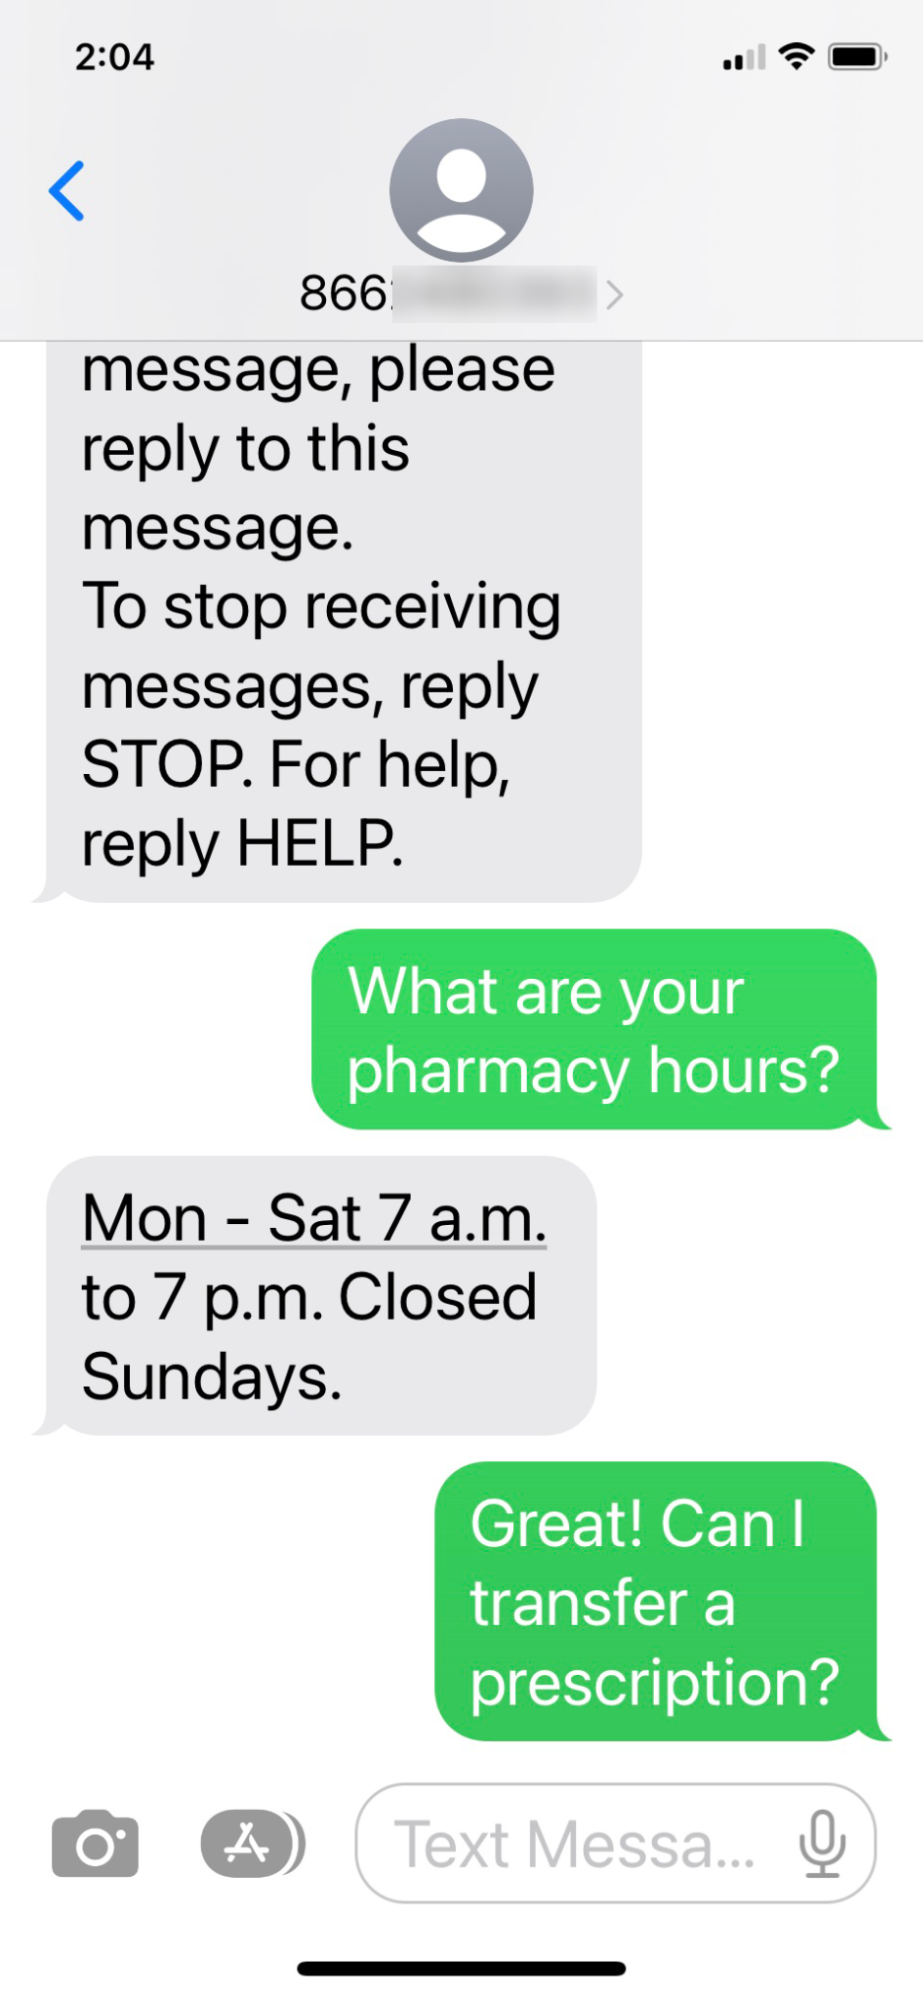
- Message Preview: Enter the first message to send to the consumer on behalf of the agent. Enter, “Hi there! I’m the agent picking up your conversation with Anna, our pharmacy bot. To continue conversing via message, please reply to this message.”
-
Click Next, and then click Save.
-
Record the handoff ID, as you’ll need this later.

Step 32: Configure the bot
- Return the Pharmacy Bot in Conversation Builder.
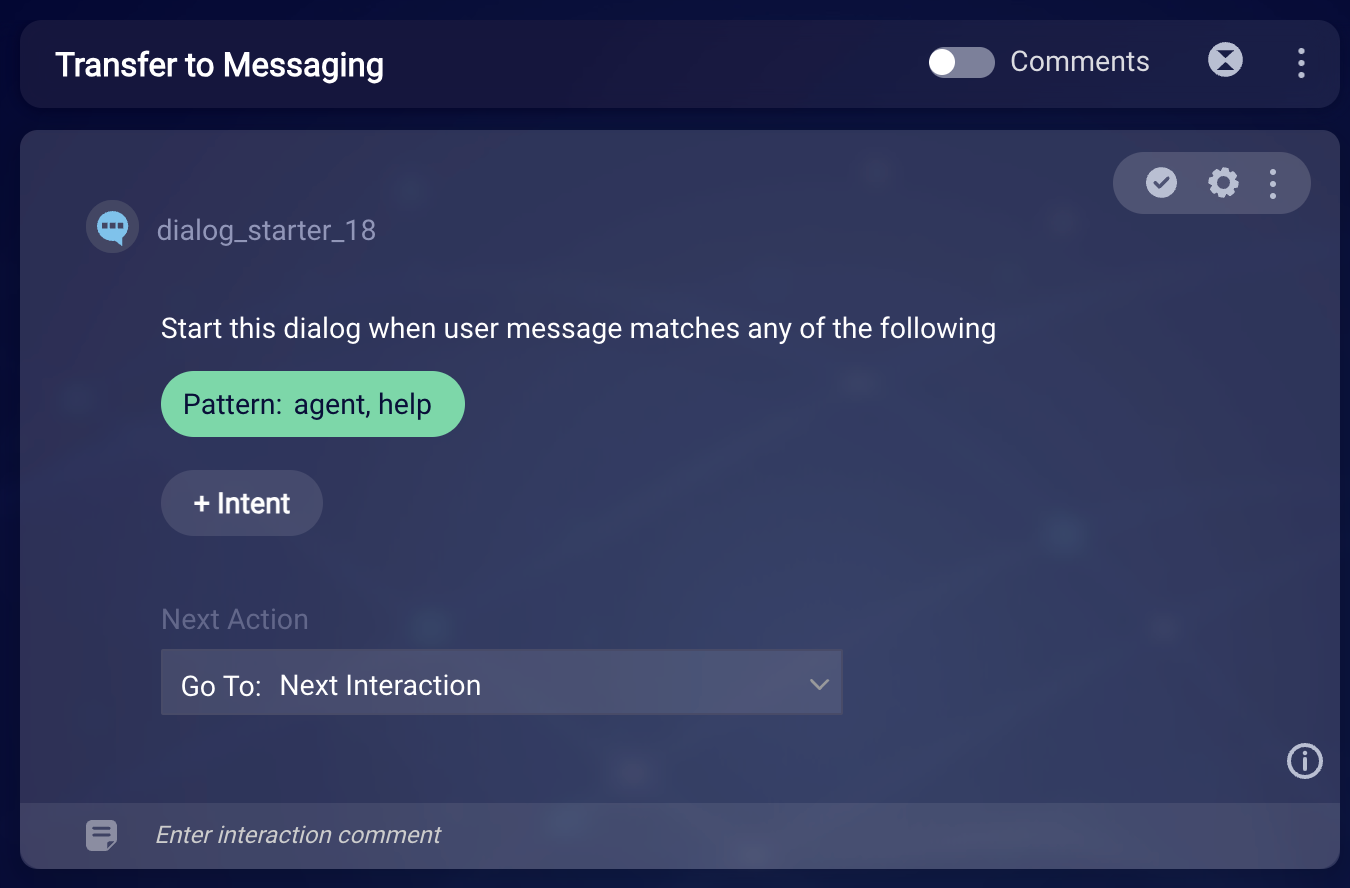
- Create a new dialog named “Transfer to Messaging.”
-
In the dialog starter, click + Pattern, and enter the following patterns:
agenthelp

-
Click Save.
-
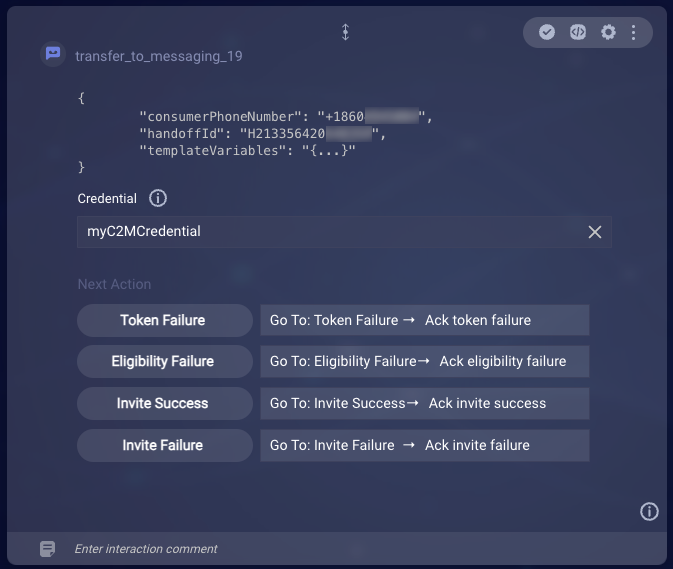
Beneath the dialog starter, add a Transfer to Messaging integration interaction.
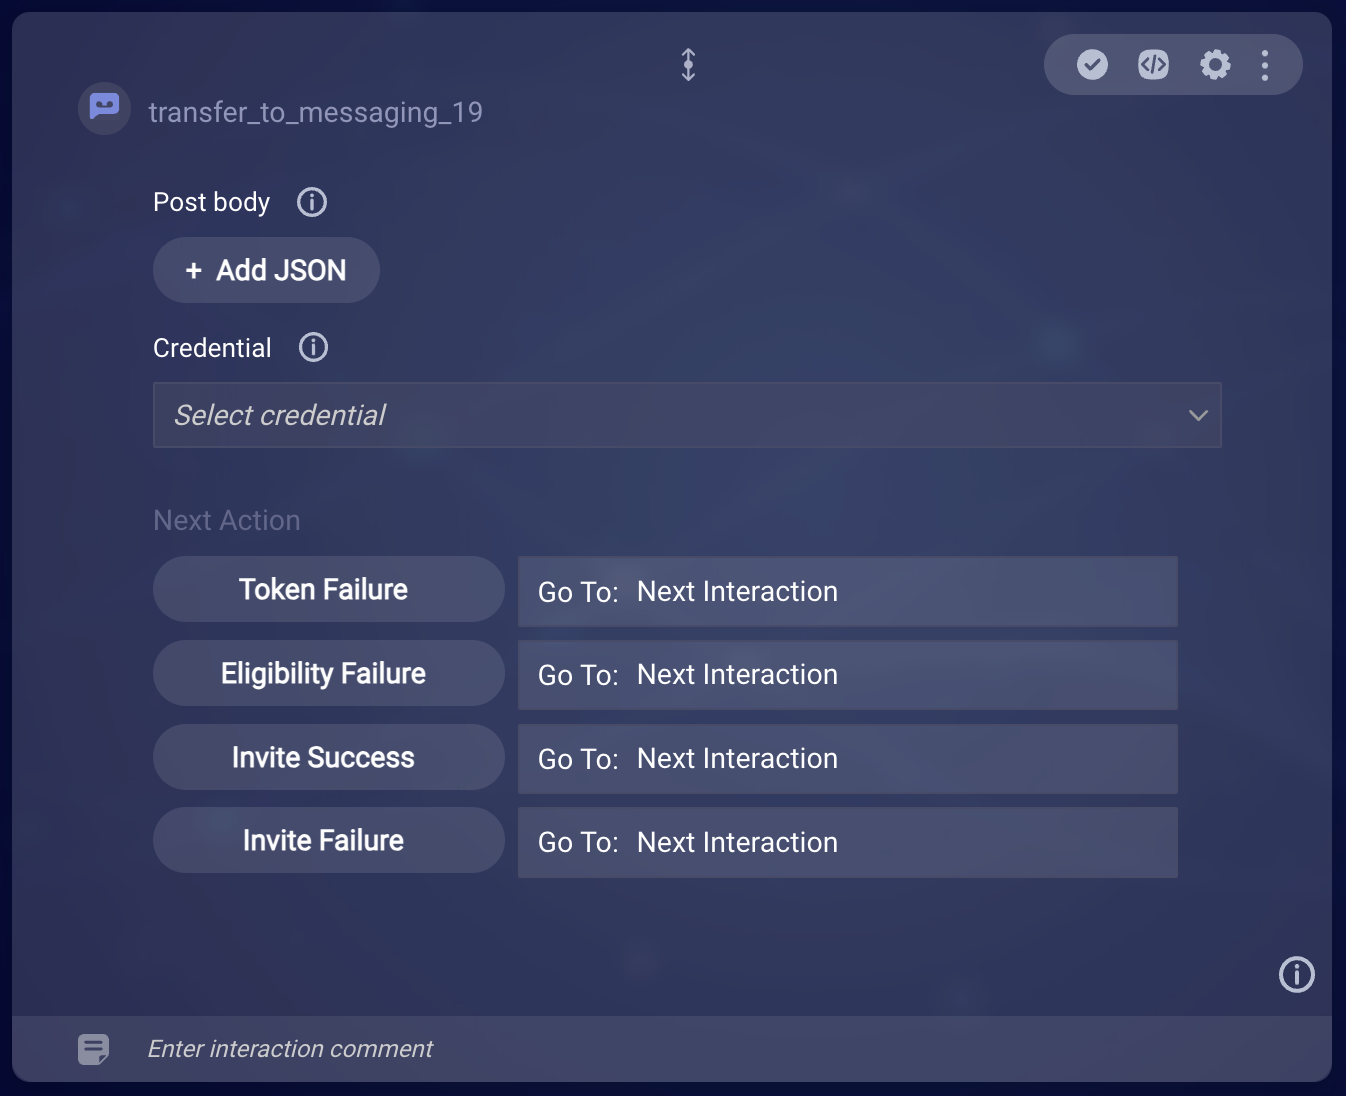
- For Credential, select the “myC2MCredential.” And save the interaction.
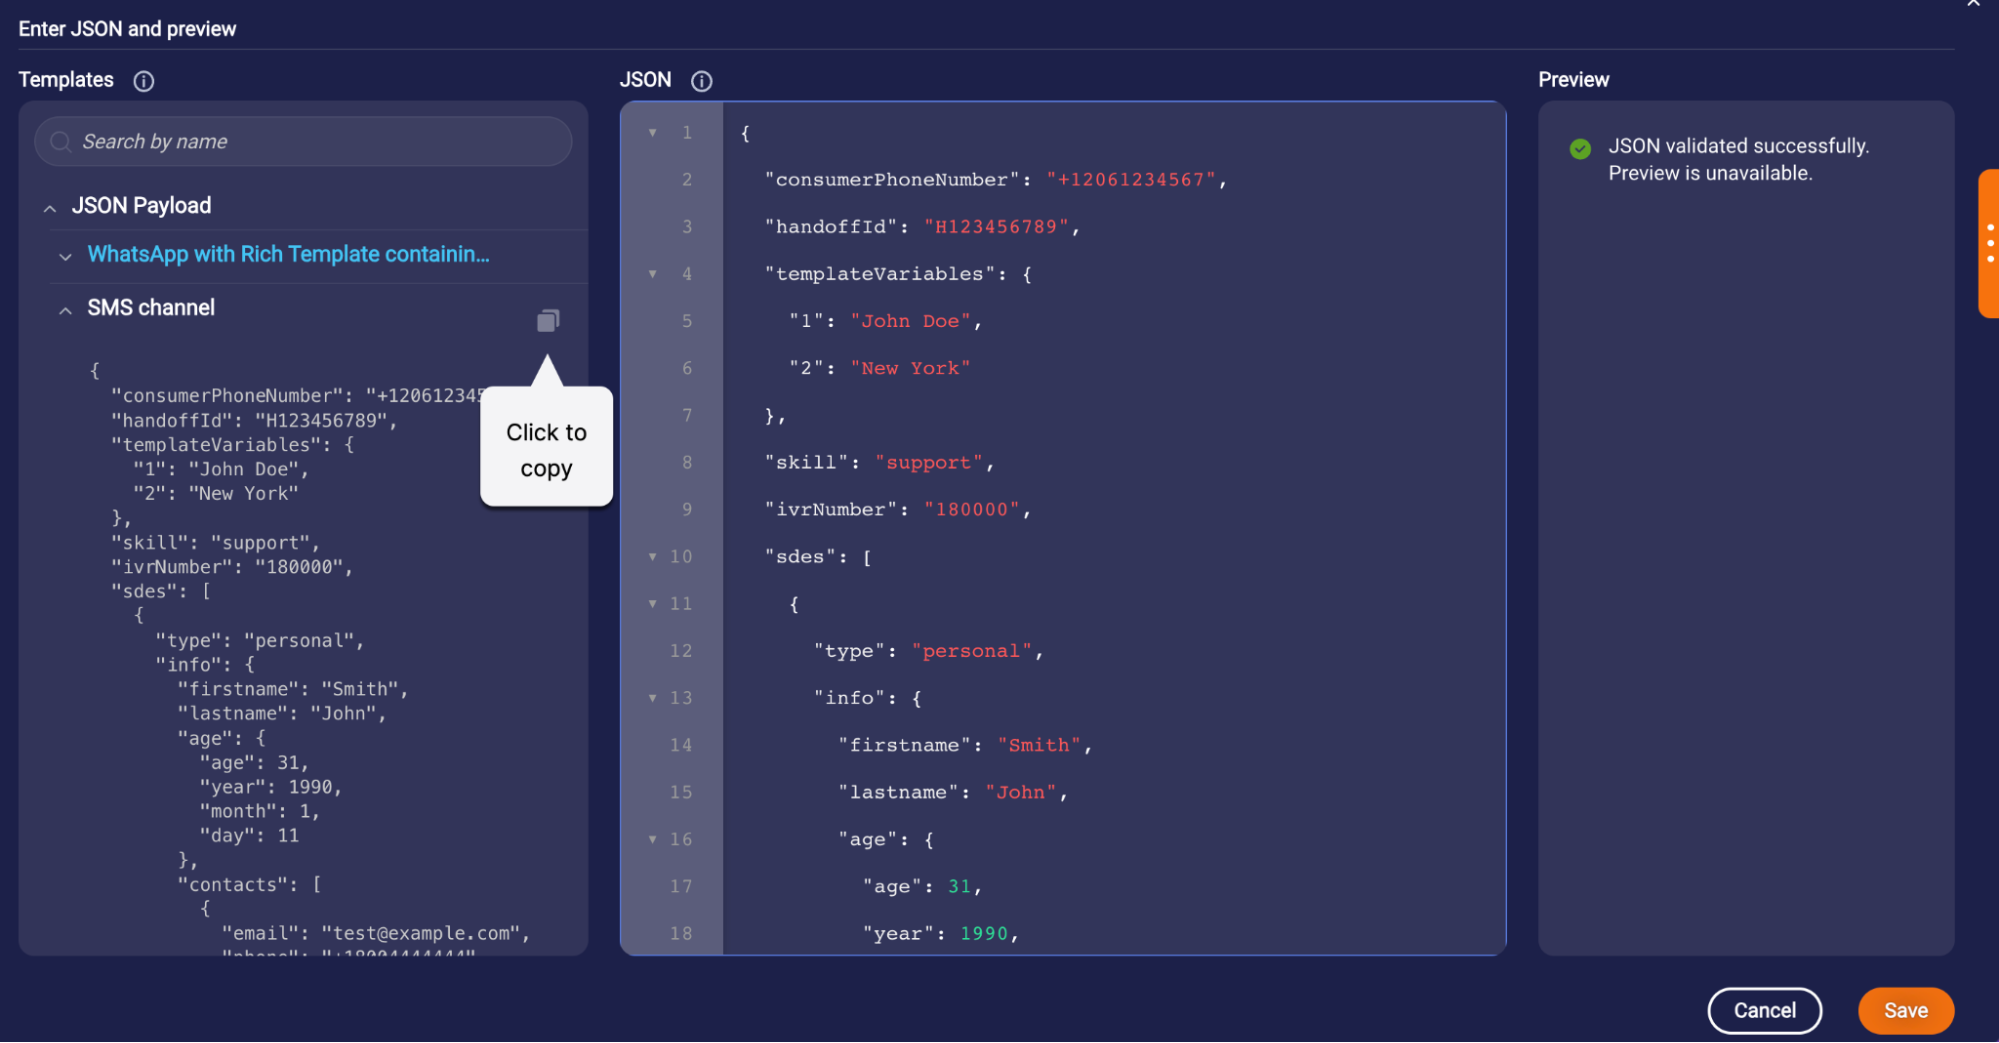
- Under Post body, click + Add JSON. Use the template that’s available to make things quicker here.
-
In the left panel, copy the JSON for the SMS channel, and paste it into the middle panel.
-
Update the JSON as follows:
- Replace the value for “consumerPhoneNumber” with your own mobile phone number. (Ordinarily, you’d use a variable here, but for this tutorial, you want the SMS messages to be sent to your own mobile phone.)
- Replace the value for “handoffId” with the ID of the API handoff that you created in the C2M system.
- Replace the skill with the name of the skill you created, in this case, “human”.
- Replace the value for “ivrNumber” with the phone number that you assigned to the Voice bot, prepended with “ + “. (The IVR number is the number from which the call was transferred.)
- Delete the rest of the JSON, keeping just the closing brace.
The JSON should look like this:
 {
   "consumerPhoneNumber": "+18601234567",
   "handoffId": "H123456789",
   "skill": "human",
   "ivrNumber": "+18601234567"
 }
For example:
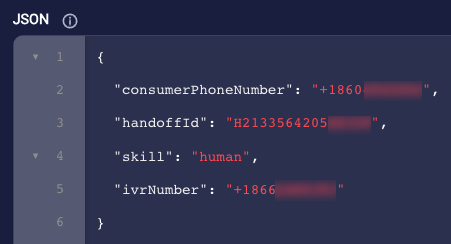
ivrNumberisn't required. OnlyconsumerPhoneNumber,handoffId, andskillare required. But specifying theivrNumbermeans that Voice bot's phone number is shown as the number from which the call was transferred. This is nice to show, so specify that too.Now let’s create the dialogs that will handle the success and failure flows.
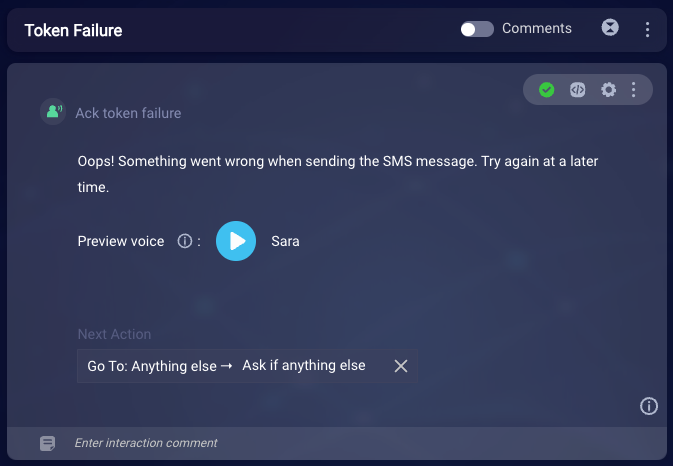
- Create a new dialog named “Token Failure.”
-
In the Token Failure dialog, delete the dialog starter. Add a Speech statement that says, “Oops! Something went wrong when sending the SMS message. Try again at a later time.” Name the interaction “Ack token failure” (Acknowledge token failure). And set the statement’s next action to redirect the flow to the “Anything else” dialog.
- Create a new dialog named “Eligibility Failure.”
-
In the Eligibility Failure dialog, delete the dialog starter. Add a Speech statement that says, “I’m sorry. The device tied to your phone number isn’t capable of receiving a message.” Name the interaction “Ack eligibility failure.” And set the statement’s next action to redirect the flow to the “Anything else” dialog.
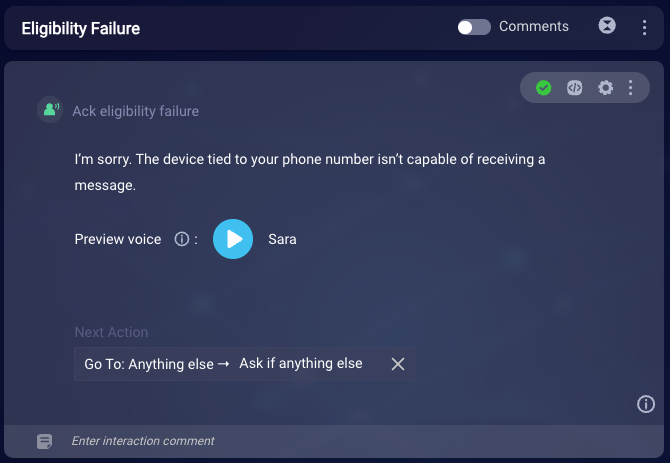
A better dialog flow would be to ask the consumer if they have an alternate number that can be used. The Eligibility Failure dialog could then perform the transfer using the alternate number. But for the purposes of this tutorial, this simple flow works fine.
- Create a new dialog named “Invite Success.”
-
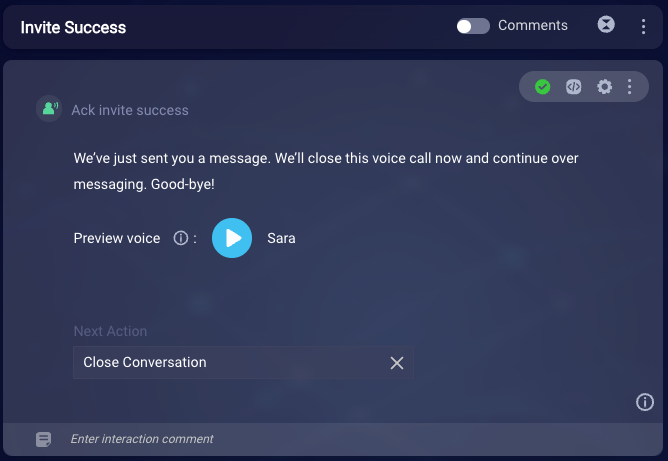
In the Invite Success dialog, delete the dialog starter. Add a Speech statement that says, “We’ve just sent you a message. We’ll close this voice call now and continue over messaging. Good-bye!” Name the interaction “Ack invite success.” And set the statement’s next action to “Close Conversation.”
- Create a new dialog named “Invite Failure.”
-
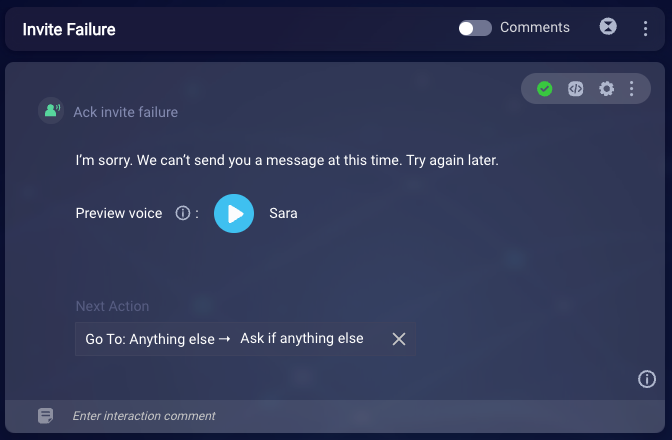
In the Invite Failure dialog, delete the dialog starter. Add a Speech statement that says, “I’m sorry. We can’t send you a message at this time. Try again later.” Name the interaction “Ack invite failure.” And set the statement’s next action to redirect the flow to the “Anything else” dialog.
-
Return to the Transfer to Messaging dialog. In the Transfer to Messaging interaction, update the four rules so that each redirects the flow appropriately to one of the four dialogs that you just created. Save the interaction.
Step 33: Test the experience
- Start a conversation with the voice bot.
- Trigger the dialog flow that transfers the conversation to messaging.
- Once you receive the initial SMS message on your phone, reply to the message as the consumer.
- In Conversational Cloud, accept the conversation, and respond as the agent.

What's next?
Continue on to the next tutorial in the series.