
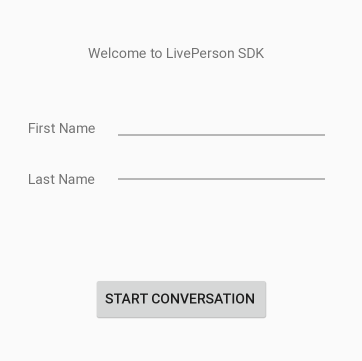
Step 1 — Creating initial views
- In order to get some basic data from the user, let’s create some initial views on our main activity / an activity of your choosing (more data can be used in order to initialize the SDK, during this guide, we’ll use some basic name features only).
Step 2 — Downloading and adding the SDK to our project
-
Download the latest Messaging SDK from the following link: SDK Repository
-
Extract the ZIP file to a folder on your computer.
-
The downloaded package should contain the following item:
LP_Messaging_SDK/lp_messaging_sdk — this is a Module that should be added to your project. This module contains the following:
-
LivePerson.java — Main entry point for the Messaging SDK
-
Resources (.aars files)
Drag the lp_messaging_sdk folder into your project folder OR add it as a module to your project from a different folder.
- File → New → Import Module

And then select the LivePerson SDK module

Step 3 — Gradle modifications
-
compileSdkVersion and buildToolsVersion (should be at least Version 23)
-
minSDKVersion should be at least 19
-
Add the following code under the Android section:
repositories {
            flatDir {
                dirs project(":lp_messaging_sdk").file("aars")
              }
  }
- Under the Dependencies section, add the following line:
compile project(":lp_messaging_sdk")
Build.gradle file example:
apply plugin: "com.android.application"

    android {
    repositories {
        flatDir {
            dirs project(":lp_messaging_sdk").file("aars")
        }
    }
    compileSdkVersion 28
    defaultConfig {
        applicationId "com.liveperson.sampleapp"
        minSdkVersion 21
        targetSdkVersion 28
        versionCode 1
        versionName "1.0"
        testInstrumentationRunner "android.support.test.runner.AndroidJUnitRunner"
        multiDexEnabled true

    }
    buildTypes {
        release {
            minifyEnabled false
            proguardFiles getDefaultProguardFile("proguard-android.txt"), "proguard-rules.pro"
        }
    }
}

dependencies {
    compile fileTree(dir: "libs", include: ["*.jar"])
    androidTestCompile("com.android.support.test.espresso:espresso-core:2.2.2", {
        exclude group: "com.android.support", module: "support-annotations"
    })
    compile "com.android.support.constraint:constraint-layout:1.0.2"
    compile "com.google.firebase:firebase-messaging:18.0.0"

    testCompile "junit:junit:4.12"
    // LivePerson SDK
    compile project(path: ":lp_messaging_sdk")
}
apply plugin: "com.google.gms.google-services"
- Make sure you have the following line written in your settings.gradle file:
include ":lp_messaging_sdk"
Step 4 — Manifest modifications
- Add the following permission to your app’s AndroidManifest.xml file:
<uses-permission android:name="android.permission.INTERNET" />
<uses-permission android:name="android.permission.ACCESS_NETWORK_STATE" />
Vibrate on new incoming msg (required if enabled):
<uses-permission android:name="android.permission.VIBRATE"/>
For Photo Sharing (For SDKs previous to 5.20.1, required if enabled):
<uses-permission android:name="android.permission.READ_EXTERNAL_STORAGE"/>
<uses-permission android:name="android.permission.WRITE_EXTERNAL_STORAGE"/>
Step 5 — LivePerson Events
- Intents Handler — In order to listen to LivePerson basic messaging events (via BroadcastReceiver) and respond via callback accordingly, we will have to add a class that will handle those events.
- Create a class and name it “IntentsHandler” (or any other name of your choosing)
public class IntentsHandler {

   private Context mContext;
   private BroadcastReceiver mLivePersonReceiver;

   public IntentsHandler(Context ctx){
       this.mContext = ctx;
       registerToLivePersonEvents();
   }
 }
-
Create a function named
registerToLivePersonEventsandinitthe broadcast receiver we declared earlier:
public void registerToLivePersonEvents(){
   createLivePersonReceiver();
   LocalBroadcastManager.getInstance(mContext.getApplicationContext())
           .registerReceiver(mLivePersonReceiver, LivePersonIntents.getIntentFilterForAllEvents());
}
-
In this example we will listen to all events via the intentfilter shown above, but you can create your own specific intent filter as well.
-
Create a function named
createLivePersonReceiverand handle the events accordingly. This is a general example of handling most of the events. You can read more about LivePerson events here.
Here is an example of a function which handles some LivePerson events:
private void createLivePersonReceiver() {
   if (mLivePersonReceiver != null){
       return;
   }
   mLivePersonReceiver = new BroadcastReceiver(){

       @Override
       public void onReceive(Context context, Intent intent) {

           Log.d(TAG, "Got LP intent event with action " + intent.getAction());
           switch (intent.getAction()){
               case LivePersonIntents.ILivePersonIntentAction.LP_ON_AGENT_AVATAR_TAPPED_INTENT_ACTION:
                   onAgentAvatarTapped(LivePersonIntents.getAgentData(intent));
                   break;

               case LivePersonIntents.ILivePersonIntentAction.LP_ON_AGENT_DETAILS_CHANGED_INTENT_ACTION:
                   AgentData agentData = LivePersonIntents.getAgentData(intent);
                   onAgentDetailsChanged(agentData);
                   break;
           }

       }
   };
}
Following the function above, you will have to add a function that will act according to the specific use-case, for example:
private void onAgentAvatarTapped(AgentData agentData) {
   showToast("on Agent Avatar Tapped - " + agentData.mFirstName + " " + agentData.mLastName);
}
Step 6- Messaging activity
-
Create a messaging activity that will launch the activity session. In this tutorial, we will demonstrate a basic initialization of the LivePerson SDK in Activity mode, though you can also initialize it in Fragment mode and use different features while doing so.
-
Basic members:
public class MainActivity extends AppCompatActivity {
 // Consumer name inputs
   private EditText fnameInput;
   private EditText lnameInput;
   private Button startConvBtn;
 // Brand login details
   private final String brandID = "82055668";
 // Project’s package
   private final String appID = "com.shaym.sdk28";
 // Intent Handler
   private IntentsHandler mIntentsHandler;
 }
- onCreate:
@Override
protected void onCreate(Bundle savedInstanceState) {
   super.onCreate(savedInstanceState);
   setContentView(R.layout.activity_main);
// IntentsHandler is the object we introduced in the previous section of this tutorial
   mIntentsHandler = new IntentsHandler(this);
// init basic UI views
   initViews();
// Init the button listener
   initOpenConversationButton();
}
- init Button function:
private void initOpenConversationButton() {
   startConvBtn = (Button) findViewById(R.id.startcnvbtn);
   startConvBtn.setOnClickListener(new View.OnClickListener() {
       @Override
       public void onClick(View v) {
          // This will check if we already in a conversation
           if (LivePerson.isValidState()) {
               openActivity();
           }
           else {
               removeNotification();
               initActivityConversation(); // The conversation activity
           }
       }
   });
}
- init Activity conversation:
A few notes on this step:
-
In this step we will initialize the SDK, but only if we"re not already in a
validstate (we checked for that in the previous section). -
We are using the brandID and appID which we declared in the top of this class.
-
If the initialization is a success, we will call the
openActivitymethod.
private void  initActivityConversation() {

     LivePerson.initialize(MainActivity.this, new InitLivePersonProperties(brandID, appID, new InitLivePersonCallBack() {
         @Override
         public void onInitSucceed() {
             // You can’t register pusher before initialization
             handlePusherRegistration(MainActivity.this);
             runOnUiThread(new Runnable() {
                 @Override
                 public void run() {
                     openActivity();
                 }
             });
         }
         @Override
         public void onInitFailed(Exception e) {
             runOnUiThread(new Runnable() {
                 @Override
                 public void run() {
                     Toast.makeText(MainActivity.this, "Init Failed", Toast.LENGTH_SHORT).show();
                 }
             });
         }
     }));
 }
- The openActivity function
Here is where we use LivePerson SDK’s showConversation method. In this example, we aren’t using an authentication parameter, though you can definitely use one if needed (using the setPhoneNumber field).
private void openActivity() {
   LivePerson.showConversation(MainActivity.this, new LPAuthenticationParams().setAuthKey(""), new ConversationViewParams(false));
   ConsumerProfile consumerProfile = new ConsumerProfile.Builder()
           .setFirstName(fnameInput.getText().toString())
           .setLastName(lnameInput.getText().toString())
           .setPhoneNumber("")
           .build();
   LivePerson.setUserProfile(consumerProfile);
}
Step 7- Configuring Push Notifications
Firebase Configuration

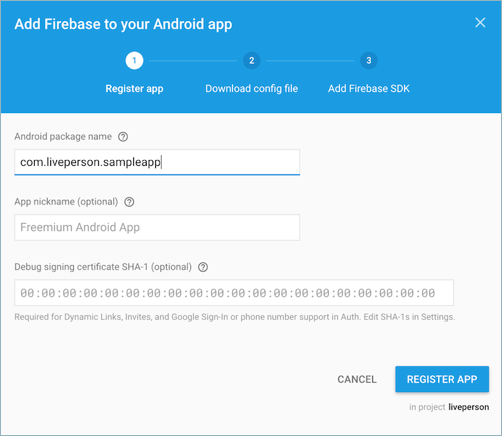
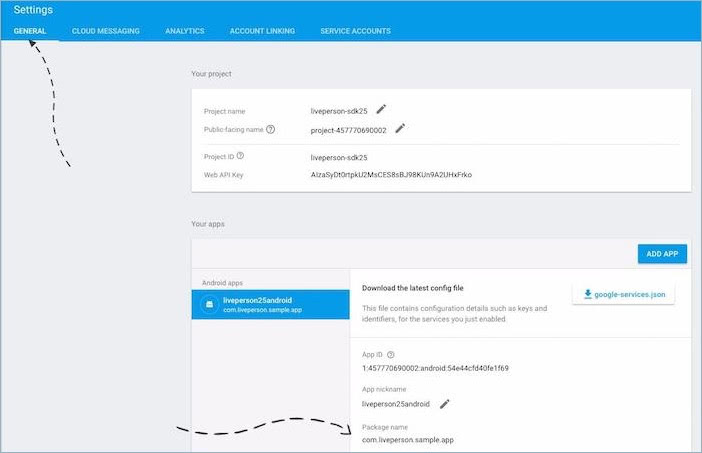
-
Enter Google Firebase console
-
Enter your app’s package name and click on ‘Register App’
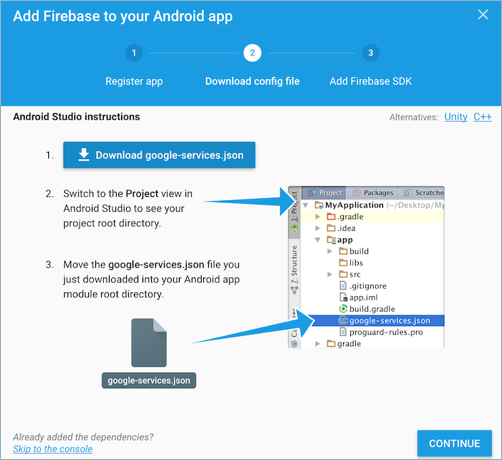
-
Download the JSON config file and drag it into your project level in Android studio.
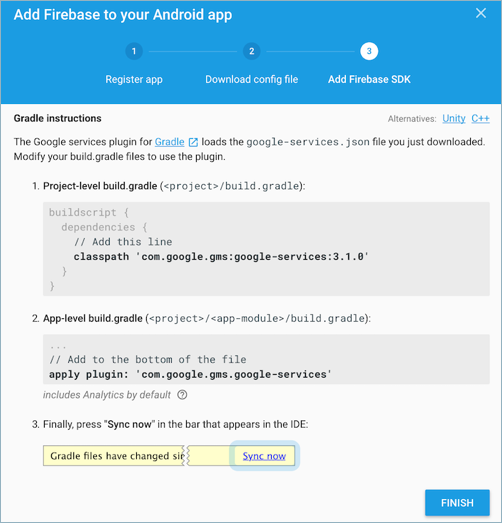
-
Follow the gradle instructions below (make sure there are no duplicates), and click ‘Finish’.
Add the following lines in your app.gradle dependencies section:
compile "com.google.firebase:firebase-messaging:18.0.0"
Change the "multiDexEnabled" under the android tag to true
multiDexEnabled true
Conversational Cloud Configuration
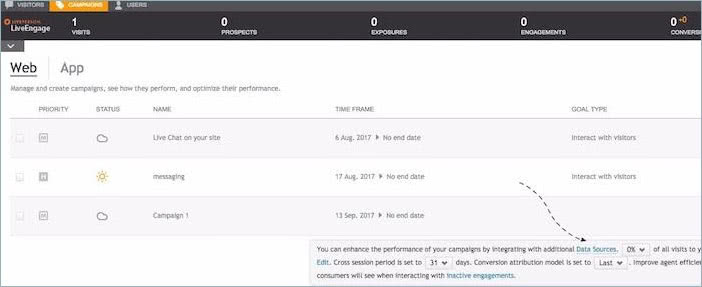
- Connect to your account via Conversational Cloud, click on the Campaign Builder tab. Then choose "Data Sources"
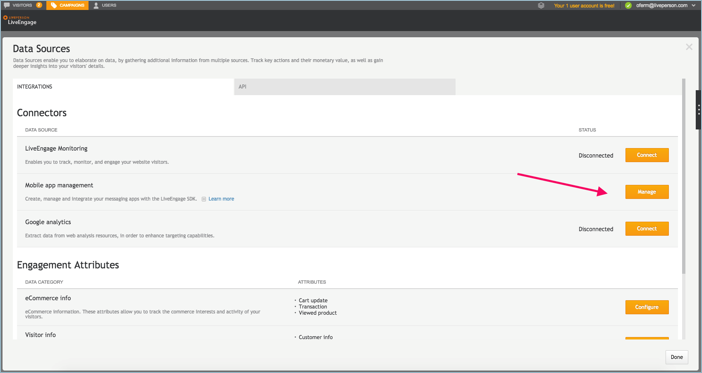
- Click Manage, on the right of "Mobile app management" tab
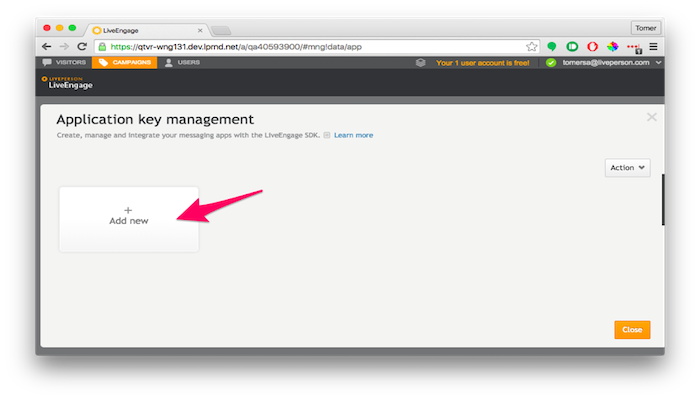
- Click Add new, in order to add your app to the mobile campaign
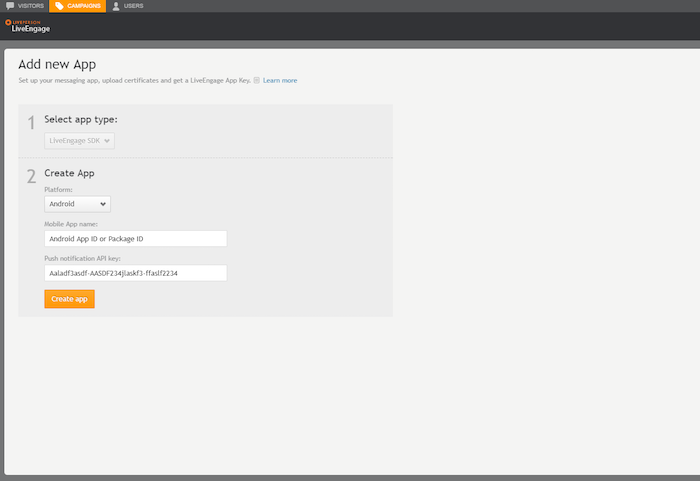
- Fill in your mobile package name under mobile app name, Google Firebase Legacy API key under push notification API key.
Then click "Create app"
- Package Name (From the firebase console):
- Legacy Key:

Project Configuration
- Add the following services + receiver under the application tag:
       <service
          android:name=".push.fcm.MyFirebaseMessagingService">
           <intent-filter>
               <action android:name="com.google.firebase.MESSAGING_EVENT"/>
           </intent-filter>
       </service>

       <service
           android:name=".push.fcm.FirebaseRegistrationIntentService"
           android:exported="false">
       </service>

       <receiver android:name=".push.NotificationUI$BadgeBroadcastReceiver">
           <intent-filter>
               <action android:name="ACTION_LP_UPDATE_NUM_UNREAD_MESSAGES_ACTION"/>
           </intent-filter>
       </receiver>
Note: After you"ve added the services you will have to create the classes to fit those services. Create new classes called: MyFirebaseMessagingService, Firebase registrationintentservice, NotificationUI (or choose your own names for these classes).
Change the path of the services according to the classes you just created.
- Add the following permission to your app’s AndroidManifest.xml file:
<uses-permission android:name="com.google.android.c2dm.permission.RECEIVE" />
<uses-permission android:name="android.permission.WAKE_LOCK" />
- Following the
handlePusherRegistration(MainActivity.this);call we added at theinitstage, add the following function to your messaging activity call in order to register to the pusher:
private void handlePusherRegistration(Context ctx) {
   Intent intent = new Intent(ctx, FirebaseRegistrationIntentService.class);
   ctx.startService(intent);
}
- Following the
removeNotification();call we added at theShowconversationstage, add the following function in order to hide the push message when entering the conversation view:
private void removeNotification() {
   NotificationUI.hideNotification(this);
}
- NotificationUI is the class that will enable us to present and handle the push to the UI.
Here is a simple example:
public class NotificationUI {

   private static final String TAG = NotificationUI.class.getSimpleName();
   public static final int NOTIFICATION_ID = 143434567;
   public static final String PUSH_NOTIFICATION = "push_notification";

   public static void showNotification(Context ctx, PushMessage pushMessage) {
       NotificationCompat.Builder builder = new NotificationCompat.Builder(ctx).
               setContentIntent(getPendingIntent(ctx)).
               setContentTitle(pushMessage.getMessage()).
               setAutoCancel(true).
               setDefaults(Notification.DEFAULT_SOUND | Notification.DEFAULT_LIGHTS).
               setSmallIcon(R.mipmap.ic_launcher).
               setStyle(new NotificationCompat.InboxStyle()

                       .addLine(pushMessage.getFrom())
                       .addLine(pushMessage.getBrandId())
                       .addLine(pushMessage.getConversationId())
                       .addLine(pushMessage.getBackendService())
                       .addLine(pushMessage.getCollapseKey())
                       .addLine("Unread messages : " + LivePerson.getNumUnreadMessages(pushMessage.getBrandId()))

               );

       if (Build.VERSION.SDK_INT >= 21) {
           builder = builder.
                   setCategory(Notification.CATEGORY_MESSAGE).
                   setPriority(Notification.PRIORITY_HIGH);
       }
       getNotificationManager(ctx).notify(NOTIFICATION_ID, builder.build());
   }

   public static void hideNotification(Context ctx){
       getNotificationManager(ctx).cancel(NOTIFICATION_ID);

   }
   private static NotificationManager getNotificationManager(Context ctx) {
       return (NotificationManager) ctx.getSystemService(Context.NOTIFICATION_SERVICE);
   }

   private static PendingIntent getPendingIntent(Context ctx) {
       Intent showIntent = new Intent(ctx, MainActivity.class);
       showIntent.putExtra(PUSH_NOTIFICATION, true);

       return PendingIntent.getActivity(ctx, 0, showIntent, PendingIntent.FLAG_UPDATE_CURRENT);
   }

   /************************ Example of Icon Badge - For Samsung *******************************/
   public static void setBadge(Context context, int count) {

        SharedPreferences.Editor editor = context.getSharedPreferences("liveperson", MODE_PRIVATE).edit();
        SharedPreferences prefs = context.getSharedPreferences("liveperson", MODE_PRIVATE);

       int current = prefs.getInt("count", 0);
       if (current == 0 || count == 1)
           current += count;
       else
           current = count;
       editor.putInt("count", current);
       editor.apply();

       String launcherClassName = getLauncherClassName(context);
       if (launcherClassName == null) {
           return;
       }
       Intent intent = new Intent("android.intent.action.BADGE_COUNT_UPDATE");
       intent.putExtra("badge_count", current);
       intent.putExtra("badge_count_package_name", context.getPackageName());
       intent.putExtra("badge_count_class_name", launcherClassName);
       context.sendBroadcast(intent);
   }

   public static String getLauncherClassName(Context context) {

       PackageManager pm = context.getPackageManager();

       Intent intent = new Intent(Intent.ACTION_MAIN);
       intent.addCategory(Intent.CATEGORY_LAUNCHER);

       List<ResolveInfo> resolveInfos = pm.queryIntentActivities(intent, 0);
       for (ResolveInfo resolveInfo : resolveInfos) {
           String pkgName = resolveInfo.activityInfo.applicationInfo.packageName;
           if (pkgName.equalsIgnoreCase(context.getPackageName())) {
               return resolveInfo.activityInfo.name;
           }
       }
       return null;
   }
    /* Listen to changes in unread messages counter and updating icon badge*/
   public static class BadgeBroadcastReceiver extends BroadcastReceiver{

       public BadgeBroadcastReceiver(){}

       @Override
       public void onReceive(Context context, Intent intent) {
           int unreadCounter = intent.getIntExtra(LivePerson.ACTION_LP_UPDATE_NUM_UNREAD_MESSAGES_EXTRA, 0);
           NotificationUI.setBadge(context, unreadCounter);
       }
   }
}
Services Classes
The following services are an extension of Google’s Firebase cloud messaging services, you can read more about them here.
FirebaseRegistrationIntentService
We call this service from our messaging activity when we init the SDK and want to register for the pusher for the first time (or every time we init), here is a simple example:
public class FirebaseRegistrationIntentService extends IntentService {

   public static final String TAG = FirebaseRegistrationIntentService.class.getSimpleName();

   public FirebaseRegistrationIntentService() {
       super(TAG);
   }

  @Override
   protected void onHandleIntent(Intent intent) {
       String token = FirebaseInstanceId.getInstance().getToken();
       // Register to LivePerson Pusher
       String account = "12345678"; // Replace with your account id.
       String appID = "com.liveperson.sampleapp"; // Replace with your applicationId.
       LivePerson.registerLPPusher(String brandId, String appId, String deviceToken, PushType pushType, LPAuthenticationParams authenticationParams, ICallback<Void, Exception> registrationCompletedCallback);
   }
}
Enter your account number as account, and your package name as appID in order to register to the pusher, as seen in the example above. Notice the token we are getting from the FirebaseInstanceId. This is sent to the LivePerson pusher and integrated into your LivePerson account.
MyFirebaseMessagingService
This service is always running in the background and handles incoming messages, here"s a simple example:
public class MyFirebaseMessagingService extends FirebaseMessagingService {
private static final String TAG = "MyFirebaseMsgService";
   @Override
   public void onMessageReceived(RemoteMessage remoteMessage) {
       // TODO(developer): Handle FCM messages here.
       Log.d(TAG, "From: " + remoteMessage.getFrom());
       // Check if message contains a data payload.
       if (remoteMessage.getData().size() > 0) {
           Log.d(TAG, "Message data payload: " + remoteMessage.getData());

           // Send the data into the SDK
           String account = "12345678"; // Replace with your account id.
           PushMessage message = LivePerson.handlePushMessage(this, remoteMessage.getData(), account, false);

           // Code snippet to add push UI notification
           if (message != null){
               NotificationUI.showNotification(this, message);
           }

       }
       // Check if message contains a notification payload.
       if (remoteMessage.getNotification() != null) {
           Log.d(TAG, "Message Notification Body: " + remoteMessage.getNotification().getBody());
       }

   }

}
Handle Push
In order to handle a scenario when a push message is clicked on, we will have to implement a push handler on our messaging activity’s onCreate function.
Add the following call into the bottom of your onCreate function to achieve this:
handlePush(getIntent());
Then, add the following function into the messaging activity. This will check if the intent which opened the app came from a push notification. If it did, the function will automatically direct the user to the conversation screen.
private void handlePush(Intent intent) {
   boolean isFromPush = intent.getBooleanExtra(NotificationUI.PUSH_NOTIFICATION, false);
   // Check if we came from Push Notification
   if (isFromPush) {
       clearPushNotifications();
               if (LivePerson.isValidState()){
                   openActivity();
               }
               else
                    initActivityConversation();
   }
}
You should also add to your messaging activity in order to clear all pushes once the conversation screen has been clicked:
private void clearPushNotifications() {
   ((NotificationManager) getSystemService(Context.NOTIFICATION_SERVICE)).cancel(NotificationUI.NOTIFICATION_ID);
}